
Categorie popolari
State cercando un filato?


Commenti / Domande (7)
![]() Anne ha scritto:
Anne ha scritto:
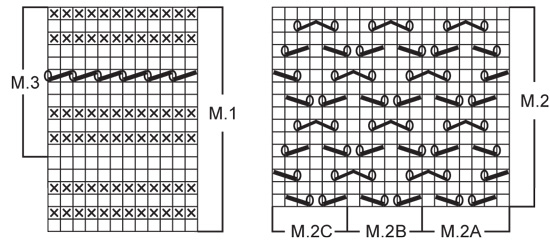
I'm having trouble understanding the chart instructions: Stockinette st/knit (as seen from the right side) - do I knit on the right side and purl on the wrong side? Reverse stockinette/purl (as seen from the right side) - when do I purl? Right side or wrong side? Thanks
23.03.2025 - 14:41DROPS Design ha risposto:
Dear Anne, the charts are shown as seen from the right side, so the white square always looks like a knit stitch and the crossed square always looks like a purl stitch. The white square is worked in stocking stitch, which means that you knit on the right side and purl on the wrong side. The crossed square is reverse stocking stitch, which means that you purl from the right side and knit from the purl side. Happy knitting!
23.03.2025 - 20:01
![]() Martine Berlan ha scritto:
Martine Berlan ha scritto:
Bonjour j' aimerais faire ce modèle mais avec un devant et dos qui fait 50 cm de hauteur combien de grammes en plus je dois prévoir ? Merci Martine
25.02.2024 - 19:30DROPS Design ha risposto:
Bonjour Mme Berlan, vous pouvez vous inspirer d'un modèle de même tension et de forme similaire pour évaluer la quantité supplémentaire désirée pour la taille concernée, votre magasin saura également vous conseiller, même par mail ou téléphone. Bon tricot!
26.02.2024 - 09:36
![]() Jamie ha scritto:
Jamie ha scritto:
Hello, I want to make this pattern but I seem to be confused. I understand the casting on but I am having a hard time after you cast on. I don't know if I am just not understanding the diagrams but I have looked on the website page to understanding diagrams and still seems to be confused. After you cast on it says to work pattern 1 what is pattern 1 and what is pattern 2? Any help would be greatly appreciated!
10.04.2023 - 03:59DROPS Design ha risposto:
Dear Jamie, Pattern 1 is M1 (chart at the left), Pattern 2 is M2 (chart at the right). The charts are after the pattern instructions. On the first row where you need to work the patterns, work the first row of each of the charts (the lowest row, read from right to left). Take into account that Pattern 2 is divided into sections; for example when it says Pattern 2C, then it means to work only the leftmost section of M2 (as indicated in the chart M.2C). In the same way, M.3 is only the upper rows of M.1, so if it says M.3 you just need to work these upper rows. Happy knitting!
10.04.2023 - 13:29
![]() Gabriela ha scritto:
Gabriela ha scritto:
Ich meinte das Diagramm M2!
18.02.2021 - 21:53DROPS Design ha risposto:
Liebe Gabriela, wenn Sie M.2 stricken sollen Sie mit den 7 Maschen A.2A anfangen, dann die 6 Maschen in M.2B wiederholen (= 15-16-17-18-19 Mal insgesamt), dann enden Sie mit den 6 M in A.2C, dh: 1 Randmasche + 7 M (A.2A) + 15-16-17-18-19x6 M (A.2B = 90-96-102-108-114 M) + 6 M (A.2C) + 1 Randmasche = 105-111-117-123-129 Maschen. Kann das Ihnen helfen? Viel Spaß beim stricken!
19.02.2021 - 12:09
![]() Gabriela ha scritto:
Gabriela ha scritto:
Bei der 12-ten Reihe sind die Maschen falsch berechnet und dementsprechend für das weitere Stricken im Muster falsch aufgeteilt. Am Ende bleiben zwei Maschen übrig, die nicht in das Schema für Lochmuster passen.
09.02.2021 - 14:26DROPS Design ha risposto:
Liebe Gabriela, bei welchem Diagram meinen Sie? Könnten Sie bitte uns mehr darüber sagen? Herzlichen Dank im voraus!
09.02.2021 - 16:36
![]() Manon ha scritto:
Manon ha scritto:
Bonjour , Je tente de trouver une laine de substitution pour la Muskat, le convertisseur ne m`en suggère aucune. Merci de me conseiller. Ravissant modèle !
03.02.2021 - 17:12DROPS Design ha risposto:
Bonjour Manon, vous pouvez utiliser tous les fils du groupe B, comme Muskat - rappelez-vous juste que le résultat sera différent si vous utilisez un fil de composition différente - le convertisseur vous propose les qualités ainsi que les quantités correspondantes - découvrez ici comment l'utiliser. Bon tricot!
04.02.2021 - 09:02
![]() Irene ha scritto:
Irene ha scritto:
I don't understand the pattern after row 12. the stiches don't add up either. Thanks
06.01.2015 - 02:59DROPS Design ha risposto:
Dear Irene, 12th row in M.1 (= 7th row in M.3) is worked (K2 tog, YO) accross - in M.2, you start with M.2A on the first 7 sts, then repeat M.2B until 6 sts remain, and work them in M.2C. In the lace patterns, you should always get the same number of sts, all dec are compensated by a YO. Happy knitting!
06.01.2015 - 09:25
|
|||||||||||||||||||
Endlessly Enamored |
|||||||||||||||||||
|
|
|||||||||||||||||||
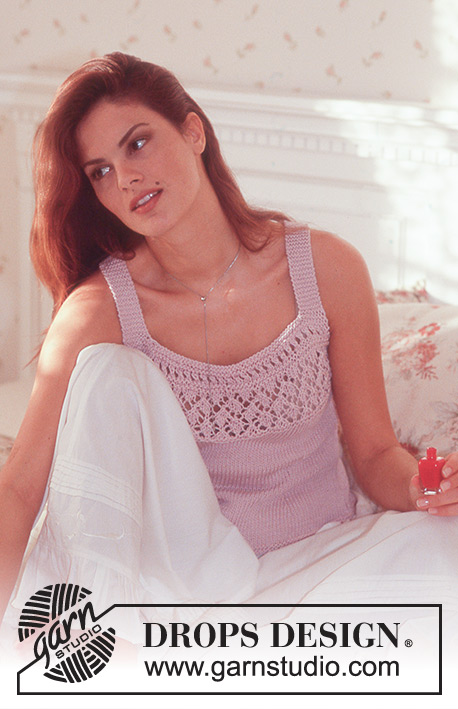
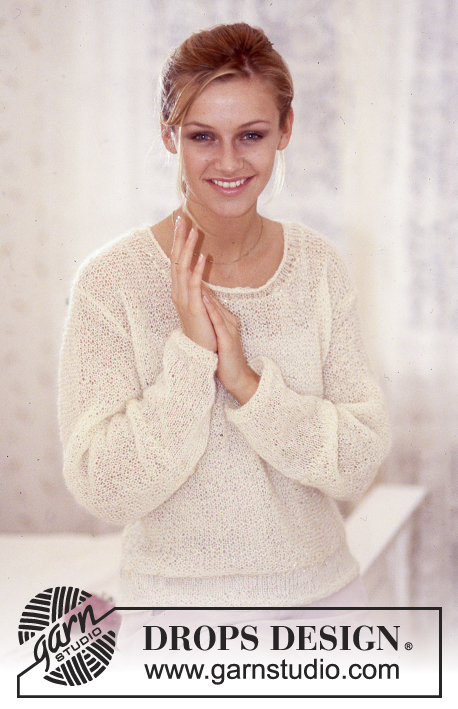
Maglione largo DROPS con bordo traforato in "Muskat"
DROPS 74-24 |
|||||||||||||||||||
|
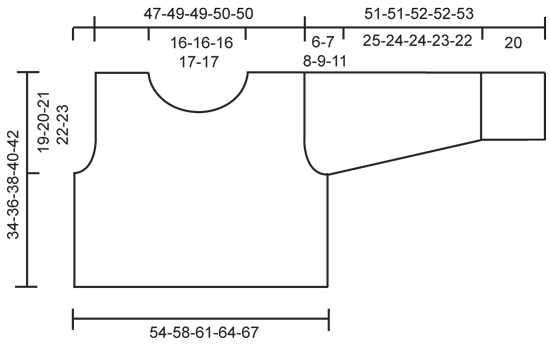
Campione: 19 m x 25 ferri = 10 x 10 cm in maglia rasata con i ferri 5. 2 ripetizioni di M.1B - vedere diag = 10 cm in larghezza. M.2 deve essere lavorato con i ferri 4,5 per ottenere lo stesso campione in larghezza MOTIVO: Vedere i diag M.1 a M.3. Il motivo mostra il punto fantasia sul diritto del lavoro. PUNTO LEGACCIO (avanti e indietro sul f): Lavorare tutti i ferri sul diritto. 1 “cresta” legaccio = 2 ferri a dir. PUNTO LEGACCIO (in tondo sui ferri a doppia punta): 1 giro dir e 1 giro rov *, ripetere dal * - *. DAVANTI: Avviare 106-112-118-124-130 m (incl 1 m vivagno ad ogni lato) con i ferri 5 e Muskat e lavorare M.1 NOTA! Il 13° ferro del M.1 comincia con 1 m vivagno a punto legaccio, 2 m insieme a dir, e termina con 2 m insieme a dir, 1 m vivagno a legaccio = 105-111-117-123-129 m. Ricordarsi della tensione della maglia! Dopo M.1, continuare con i ferri 4,5, lavorare M.2 così: 1 m vivagno, M.2A (=7 m), M.2B sulle 90-96-102-108-114 m seguenti, M.2C (=6 m), 1 m vivagno. Dopo M.2 riprendere i ferri 5, lavorare 2 creste legaccio (vedere le spiegazioni sopra), poi continuare a maglia rasata. Allo stesso tempo, quando il lavoro misura 15-16-17-18-19 cm, intrecciare per gli scalfi ad ogni lato ogni 2 ferri: 3 m 1-1-2-2-2 volte, 2 m 1-2-2-2-3 volte e 1 m 3-2-2-4-5 volte = 89-93-93-95-95 m. Leggere tutto il paragrafo prima di continuare! Quando il lavoro misura 25-27-28-30-32 cm, intrecciare le 15-15-15-17-17 m centrali per lo scollo, poi diminuire ad ogni lato dello scollo ogni 2 ferri: 2 m 3 volte e 1 m 2 volte = rimangono 29-31-31-31-31 m per ogni spalla. Allo stesso tempo, quando il lavoro misura ca 32-34-36-38-40 cm, lavorare M.3 con 1 m a maglia rasata al lato dello scollo e 2 m a maglia rasata al lato spalla. Intrecciare, il lavoro misura ca 36-38-40-42-44 cm. DIETRO: Avviare e lavorare come il davanti. Intrecciare per gli scalfi come per il davanti e continuare fino a quando il lavoro misura 32-34-36-38-40 cm. Intrecciare tutte le maglie, non intrecciare per lo scollo sul dietro. MANICHE: Avviare 52-52-52-58-58 m (incl 1 m vivagno ad ogni lato) con i ferri 5 e Muskat e lavorare M.1 con 1 m vivagno ad ogni lato. NOTA! Il 13° ferro del M.1 comincia con 1 m vivagno a punto legaccio, 2 m insieme a dir, e termina con 2 m insieme a dir, 1 m vivagno a legaccio = 51-51-51-57-57 m. Dopo M.1 continuare con i ferri 4,5, lavorare M.2 così: 1 m vivagno a legaccio, M.2A (=7 m), M.2B sulle 36-36-36-42-42 m successive, M.2C (= 6 m), 1 m vivagno a legaccio. Lavorare M.2 2 volte in altezza, poi riprendere i ferri 5, lavorare 2 creste di legaccio e continuare con maglia rasata fino alla fine. Allo stesso tempo, dopo M.2 (il lavoro misura ca 20 cm) aumentare 1 m ad ogni lato in totale 9-11-13-12-14 volte per: Taglia S: Ogni 7 ferri Taglia M: alternativamente ogni 5 e 6 ferri Taglia L + XL: alternativamente ogni 4 e 5 ferri Taglia XXL: Ogni 4 ferri = 69-73-77-81-85 m. Quando la manica misura 45-44-44-43-42 cm, intrecciare per l’arrotondamento della manica ad ogni lato ogni 2 ferri: 4 m 1 volta, 3 m 2-2-1-2-2 volte, 2 m 2-2-2-2-3 volte e 1 m 1-3-7-4-7 volte, poi intrecciare 2 m finché il lavoro non misuri 51-51-52-52-52 cm poi 3 m 1 gang. Intrecciare, il lavoro misura ca 51-51-52-52-53 cm. Intrecciare le m rimanenti. CONFEZIONE: Cucire le spalle. COLLO: Riprendere ca 82 a 92 m con un ferro circolare piccolo 4,5 e Muskat e lavorare 2 creste di legaccio. Intrecciare senza stringere. Attaccare le maniche. Cucire le maniche e i lati nella m vivagno. |
|||||||||||||||||||
Spiegazioni del diagramma |
|||||||||||||||||||
|
|||||||||||||||||||
 |
|||||||||||||||||||
 |
|||||||||||||||||||
Avete terminato questo modello?Allora taggate le vostre foto con #dropspattern o inviatele alla #dropsfan gallery. Avete bisogno di aiuto con questo modello?Troverete 21 video tutorial, una sezione per i commenti/domande e molto altro guardando il modello su www.garnstudio.com © 1982-2026 DROPS Design A/S. Ci riserviamo tutti i diritti. Questo documento, compreso tutte le sue sotto-sezioni, è protetto dalle leggi sul copyright. Potete leggere quello che potete fare con i nostri modelli alla fine di ogni modello sul nostro sito. |
|||||||||||||||||||


Con oltre 40 anni di esperienza nel design di modelli di maglia e uncinetto, DROPS Design offre la più estesa collezione di modelli gratuiti su internet - tradotti in 17 lingue. Ad oggi vi possiamo fornire 324 cataloghi e 12290 modelli - 9561 dei quali sono tradotti in Italiano.
Ci stiamo impegnando molto per darvi il meglio che vi possiamo offrire in termini di maglia e uncinetto, ispirazioni e consigli così come filati di grande qualità ad un prezzo incredibile! Volete utilizzare i nostri modelli per qualcosa d'altro oltre al vostro uso personale? Potete leggere tutto ciò che è consentito nel testo sul Copyright in basso su tutte le pagine dei nostri modelli. Buon lavoro!
Lasciare un commento sul modello DROPS 74-24
Noi saremmo felici di ricevere i tuoi commenti e opinioni su questo modello!
Se vuoi fare una domanda, fai per favore attenzione a selezionare la categoria corretta nella casella qui sotto per velocizzare il processo di risposta. I campi richiesti sono indicati da *.