
Categorie popolari
State cercando un filato?


Commenti / Domande (24)
![]() Rena ha scritto:
Rena ha scritto:
Hello. "Work in stockinette stitch without increases until piece measures 8-8-9 cm = 3 1/8"-3 1/8"-3 1/2" from marker for measurement.'" Does it mean 8 cm from the first marker for measure BEFORE increasing stitches or just right after I finish increase and start stockinette stitches on 168-176-184 stitches? Thank you!
10.02.2022 - 10:36DROPS Design ha risposto:
Dear Rena, you should measure these -8-9 cm = 3 1/8"-3 1/8"-3 1/2" from marker added after the folded edge to measure from, ie from where you start to work with needle size 3 MM/US2.5. Happy knitting!
10.02.2022 - 13:19
![]() Lucyfly ha scritto:
Lucyfly ha scritto:
Bonjour, J’ai par erreur fait la bordure en 3, est que je peux faire la suite en 2,5? Puis 3 comme indiqué, qu’en pensez-vous ? Merci
17.01.2022 - 08:16DROPS Design ha risposto:
Bonjour Lucyfly, votre bordure risque d'être trop large si vous l'avez tricotée en 3, on ne fait que monter les mailles en 3 (pour éviter que le montage ne soit trop serré), puis on tricote la bordure en 2,5 pour qu'elle soit suffisamment serrée, et on reprend ensuite la 3 pour continuer le béret. Bon tricot!
17.01.2022 - 09:37
![]() Karen ha scritto:
Karen ha scritto:
Hi I'm at the stage now where I have 8cm from marker and ready to start decreasing my only problem is that I'm running out of wool I have a second ball I can use but is it possible to connect that second ball or what do you suggest when running low. I made a mistake at my first attempt so I had to throw away a small amount of wool.
11.12.2021 - 14:07DROPS Design ha risposto:
Dear Karen, you can watch this video to see how to join new yarn: https://www.garnstudio.com/video.php?id=490&lang=en Happy knitting!
11.12.2021 - 20:54
![]() Filiz Çelik ha scritto:
Filiz Çelik ha scritto:
Hello thank you
25.10.2021 - 11:27
![]() Filiz Çelik ha scritto:
Filiz Çelik ha scritto:
Hello thank you
25.10.2021 - 11:26
![]() Karen ha scritto:
Karen ha scritto:
I have a question on this section On next round knit yarn over twisted to avoid holes is this for every stitch or just one after the marker. Increase like this every other round 7 times in total vertically = 168 where do we get this 168 stitch count from? Work in stocking stitch without increases until piece measures 8-8-9 cm from marker for measurement which marker is the pattern talking about because I have just 7 in the pattern now
21.10.2021 - 00:41DROPS Design ha risposto:
Dear Karen, you cast on 112 sts and insert after the folded hem 8 markers; you then increase 1 stitch at each marker (= 8 sts increased) on every other round a total of 7 times (= 56 sts will be increased in total), so that you get: 112+56= 168 sts. After folding edge, you continue with circular needle size 3 mm and insert a marker on this round, this is the round you should measure from afterwards. Happy knitting!
21.10.2021 - 07:16
![]() Karen ha scritto:
Karen ha scritto:
Hi I have a question about the stitch markers. So I have placed first stitch marker after one stitch at the beginning of the round and 7 more markers 14 stitches apart I'm now left with 17 stitches at the end of after the last stitch marker is this correct or have I gone wrong somewhere.
17.10.2021 - 23:15DROPS Design ha risposto:
Dear Karen, you should have 14 stitches after the last marker at the end of the round again (112 : 8 = 14) - so it looks like you have three more sts. When knitting with double stranded yarn, it sometimes happens that we accidentally split the strands and create a new stitch by mistake - please check you sts in round, maybe that's where the snag is. Happy knitting!
18.10.2021 - 05:20
![]() Karen Pryal ha scritto:
Karen Pryal ha scritto:
I have a question about this section stocking stitch in the round for 2cm purl 1 round. Does this mean I do stocking stitch until its 2cm I length when I measure and then purl 1 round or is this Knit 1 purl 1 for 2cm.
06.10.2021 - 00:08DROPS Design ha risposto:
Dear Mrs Pryal, you work the hem as follows: 2 cm stocking stitch, purl 1 round (folding edge), 2 cm stocking stitch. Happy knitting!
06.10.2021 - 07:54
![]() Karen ha scritto:
Karen ha scritto:
Hi there currently knitting this hat is there any tutorial on changing the needle size as it asks at the beginning after casting to switch to a smaller needle size just wondering why you wouldn't start off on the smaller needle size
04.10.2021 - 22:32DROPS Design ha risposto:
Dear Karen, you cast on the stitches with a larger needle so that the cast on edge won't be too tight, then just work with the smaller needle, just take the smaller needle and work the stitches on the other needle, then join and continue in the round. Happy knitting!
05.10.2021 - 07:18
![]() Hanne ha scritto:
Hanne ha scritto:
Moet de hele muts met twéé draden gebreid worden? Is die van 25 gram dan genoeg?
03.10.2021 - 20:02DROPS Design ha risposto:
Dag Hanne,
Ja, dat klopt helemaal, je breit de muts met 1 draad alpaca en 1 draad Kid-Silk. Voor Kid-Silk heb je dan genoeg aan 1 bol van 25 gram.
07.10.2021 - 11:22
|
|
Streets of Paris#streetsofparishat |
|
 |
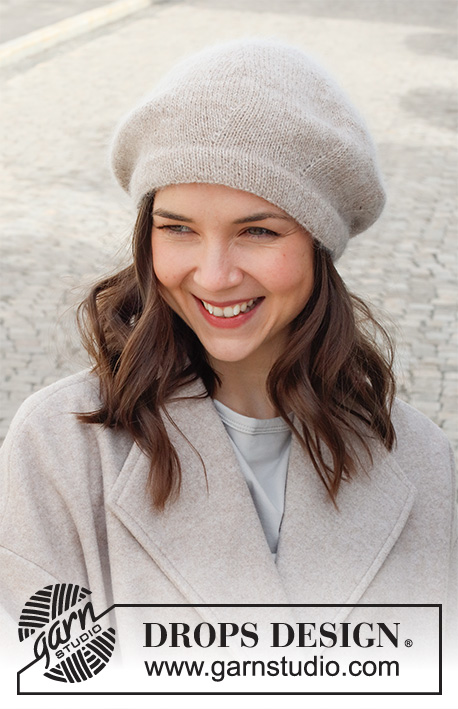 |
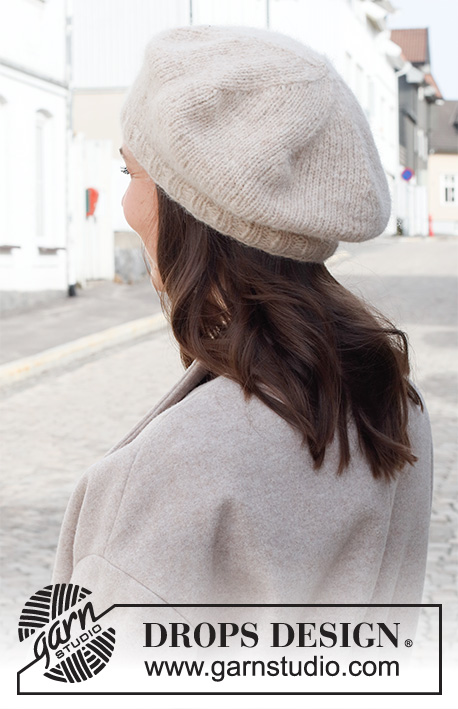
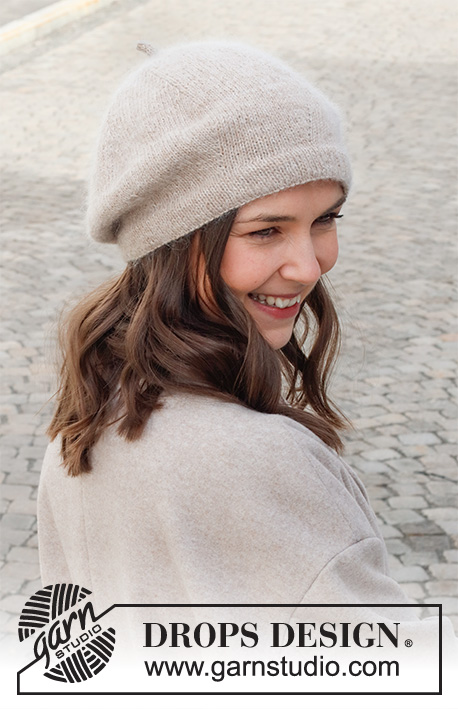
Berretto/cappello lavorato ai ferri n DROPS Alpaca e DROPS Kid-Silk.
DROPS 225-41 |
|
|
---------------------------------------------------------- TECNICHE IMPIEGATE: ---------------------------------------------------------- SUGGERIMENTO PER GLI AUMENTI: Aumentare 1 maglia facendo 1 gettato. Sul giro successivo lavorare il gettato a diritto ritorto per evitare buchi. SUGGERIMENTO PER LE DIMINUZIONI: Diminuire 1 maglia lavorando 2 maglie insieme a diritto dopo il segnapunti ---------------------------------------------------------- INIZIO DEL LAVORO: ---------------------------------------------------------- CAPPELLO – BREVE RIASSUNTO DEL LAVORO: Lavorato in tondo con i ferri circolari corti, dal basso verso l’alto. Passare ai ferri a doppia punta durante le diminuzioni. CAPPELLO: Avviare 112-120-128 maglie con i ferri circolari n° 3 mm con 1 capo di DROPS Alpaca nocciola chiaro e 1 capo di DROPS Kid-Silk panna (= 2 capi). Passare ai ferri circolari corti n° 2,5 mm e lavorare a maglia rasata in tondo per 2 cm, lavorare 1 giro rovescio (= bordo da piegare), e poi lavorare a maglia rasata in tondo per 2 cm. Passare ai ferri circolari corti n° 3 mm. Inserire 1 segnapunti sul giro – ora misurare il lavoro da questo segnapunti! Lavorare 1 giro a maglia rasata. Sul giro successivo inserire 8 nuovi segnapunti nel lavoro come spiegato sotto. Usare questi segnapunti durante gli aumenti e le diminuzioni. I segnapunti devono essere di colore diverso rispetto al segnapunti per le misure. Inserire il 1° segnapunti all’inizio del giro, poi inserire i 7 segnapunti successivi a 14-15-16 maglie di distanza. Lavorare a maglia rasata in tondo, e aumentare allo stesso tempo 1 maglia dopo ogni segnapunti – leggere il SUGGERIMENTO PER GLI AUMENTI-1 (= 8 aumenti). Aumentare in questo modo a giri alterni 7 volte in totale in verticale = 168-176-184 maglie. Lavorare a maglia rasata senza aumenti fino a quando il lavoro misura 8-8-9 cm dal segnapunti per le misure. Sul giro successivo iniziare le diminuzioni – diminuire 1 maglia dopo tutti i segnapunti – leggere il SUGGERIMENTO PER LE DIMINUZIONI (= 8 diminuzioni). Diminuire in questo modo a giri alterni 20-21-22 volte in totale = 8 maglie rimaste. Sul giro successivo diminuire 3 maglie in modo uniforme = 5 maglie rimaste. Il cappello misura circa 22-23-25 cm dalla cima fino al segnapunti. Lavorare la cima del cappello come segue: Usare 2 ferri a doppia punta n° 3 mm. Trasferire le 5 maglie su un ferro a doppia punta e lavorare con l’altro. * Lavorare 5 maglie diritto, spostare le maglie ancora sul davanti del ferro, tirare il filo *, lavorare *-* fino a quando la cima del cappello misura circa 2 cm. Tagliare il filo e farlo passare attraverso le 5 maglie, tirare bene e affrancare. CONFEZIONE: Piegare il bordo sulla parte inferiore del cappello a metà verso il rovescio del lavoro e affrancare, ma lasciare una piccola apertura per far passare un elastico – assicurarsi di evitare una cucitura tirata. Far passare l’elastico e aggiustare la lunghezza. Cucire l’apertura sul bordo da piegare. |
|
Avete terminato questo modello?Allora taggate le vostre foto con #dropspattern #streetsofparishat o inviatele alla #dropsfan gallery. Avete bisogno di aiuto con questo modello?Troverete 16 video tutorial, una sezione per i commenti/domande e molto altro guardando il modello su www.garnstudio.com © 1982-2026 DROPS Design A/S. Ci riserviamo tutti i diritti. Questo documento, compreso tutte le sue sotto-sezioni, è protetto dalle leggi sul copyright. Potete leggere quello che potete fare con i nostri modelli alla fine di ogni modello sul nostro sito. |
|


Con oltre 40 anni di esperienza nel design di modelli di maglia e uncinetto, DROPS Design offre la più estesa collezione di modelli gratuiti su internet - tradotti in 17 lingue. Ad oggi vi possiamo fornire 324 cataloghi e 12290 modelli - 9561 dei quali sono tradotti in Italiano.
Ci stiamo impegnando molto per darvi il meglio che vi possiamo offrire in termini di maglia e uncinetto, ispirazioni e consigli così come filati di grande qualità ad un prezzo incredibile! Volete utilizzare i nostri modelli per qualcosa d'altro oltre al vostro uso personale? Potete leggere tutto ciò che è consentito nel testo sul Copyright in basso su tutte le pagine dei nostri modelli. Buon lavoro!
Lasciare un commento sul modello DROPS 225-41
Noi saremmo felici di ricevere i tuoi commenti e opinioni su questo modello!
Se vuoi fare una domanda, fai per favore attenzione a selezionare la categoria corretta nella casella qui sotto per velocizzare il processo di risposta. I campi richiesti sono indicati da *.