
Hledáte přízi?
































Komentáře / Otázky (51)
 Jessica napsala:
Hi! I’m a little confused about what to do once I’ve done the first 8 rows in A.1. I’m finishing on the WS so starting A.2 on the RS with a P1 K1 and 3 garter stitches at each end, then on the WS purling all stitches, but from previous comments that doesn’t seem to be the correct pattern, and after I got to switching to A.3, doing the row indicated by the arrow on the WS indicates that the previous RS row should be all knitted, not P1 K1 as I have done. Any help would be appreciated.
07.05.2021 - 11:22Odpověď DROPS Design :
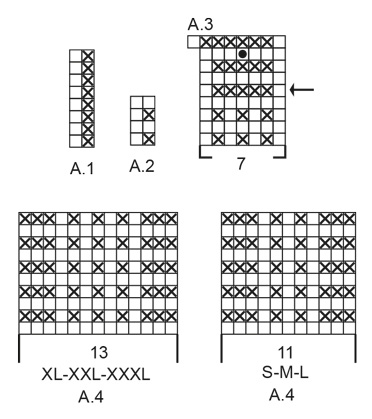
Dear Jessica, the garter stitches in A.2 (= P from RS, P from WS) should be worked over the P stitches in A.1, so that you will work A.2 from RS: 3 sts in garter st, K1, (P1, K1) repeat from (to) and finish with 3 sts in garter stitch and from WS: K3, P to the last 3 sts, P3. Happy knitting!
07.05.2021 - 13:00
 Katzilicious napsala:
I'm confuse about worked A.1 until it had been vertically worked and work A.2 over A.1 can you please explain? Thank you
06.05.2021 - 07:39Odpověď DROPS Design :
Dear Katzilicious, work first the 8 rows in A.1 as explained: (from RS = 3 sts in garter stitch, knit 1, repeat A.1 (read from the right towards the left= P1, K1), 3 sts in garter st / from WS: 3 sts in garter st, A.1 (read from the left towards the right = P1, K1), P1, 3 sts in garter st). Then work: 3 sts in garter st, knit 1, repeat A.2 (= 1 st in garter st, 1 st in stocking st), and finish with 3 sts in garter st, from WS: 3 sts in garter st, repeat A.1 (=1 st in stocking st = P, 1 st in garter st = K), P1, 3 sts in garter st. Hope this help. Happy knitting!
06.05.2021 - 07:45
 Diana napsala:
I prefer written instructions as opposed to charts. Is there anyone who has written out the instructions? Also, there are no instructions on how many inches or rows we need to knit for each diagram. I am a long time knitter but find almost all of the patterns here quite confusing with no written instructions or actual row/inches for each size. I understand the patterns are translated from Norwegian and it is not an easy task to ensure everything is explained in detail.
29.03.2021 - 22:35Odpověď DROPS Design :
Dear Diana, we use charts insted of written out instructions not only because they are available in many languages, but also because we believe that with charts one can see not only the very next step, but one can see teh larger picture, as how stitches and rows relate to each other en large. We also have a lesson about how to read diagrams here, and one can always ask for help in the store where they bought their DROPS yarn from (over the phone or in person). We have many knitters who actually prefer diagrams to written instructions. Happy Knitting!
30.03.2021 - 11:50
 Müller napsala:
Guten Tag, ich vertehe nicht beim Rückenteil, dass man A.2 über A.1 stricken soll, wie wird das gemeint? Dann steht da außerdem, dass man A2 stricken soll bis 1 Masche übrig ist. Soll man also die reihe so oft wiederholen bis 1 Masche übrig ist und dass dann mit allen einzelnen reihen von A2? Danke im voraus!
17.01.2021 - 23:25Odpověď DROPS Design :
Liebe Frau Müller, Sie sollen die 2 Maschen von A.2 über die 2 Maschen von A.1 stricken/in der Breite wiederholen, so haben Sie 1 Masche kraus rechts (= die 1. Masche in A.2) über die linke Masche von A.1 und die rechte Masche in A.2 stricken Sie über die rechte Masche in A.1. Beim A.1 hatten Sie 1 linke Masche beidseitig innerhalb die rechte Masche vor/nach den 3 M krausrechts - hier wird das gleiche, Dann stricken Sie mit A.2 und 1 M krausrechts beidseitig + 1 Masche glatt rechts nach der 1. Randmasche. Viel Spaß beim stricken!
18.01.2021 - 11:16
Melanie napsala:
Hallo, ich verstehe den Anfang des Rückenteils nicht. Wieso steht da zweimal 1. Reihe. Erst steht da 1. Rück Reihe und dann 1. Vor Reihe. Warum steht das 2 mal da und müsste es nicht it vor Reihe beginnen? Ich würde noch gerne wissen, wie man stricken muss, falls man das Top länger als angegeben haben möchte. Danke im Voraus!
15.01.2021 - 08:30Odpověď DROPS Design :
Liebe Melanie, nach Anschlag stricken Sie alle Maschen links = diese Reihe wird von der Rückseite gearbeitet. Dann stricken Sie die nächste Reihe von der Vorderseite = Hinreihe mit A.1 (= 1. Reihe = Hinreihe) und 3 M kraus rechts beidseitig. Leider können wir nicht jede Anleitung nach jedem Wunsch umrechnen. Gerne kann Ihnen Ihr DROPS Händler damit helfen. Viel Spaß beim stricken!
15.01.2021 - 15:16
 Alysha Magtuto napsala:
Hello! When we get to the row of A.2 where we cast on 1 stitch at the end of the row, do we start the following row by knitting the stitch that was just casted on?
01.08.2020 - 11:27Odpověď DROPS Design :
Dear Mrs Magtuto, after you have cast on 1 st at the end of first of 2 rows, knit the new st (= edge stitch in garter stitch) then after you have cast on 1 st at the end of 2nd row, work: 1 edge st in garter st, K1, A.2 until 1 st remain, 1 edge st in garter st. Happy knitting!
03.08.2020 - 07:42
Winki napsala:
Zeigt das Muster die Maschen wie sie auf der Vorderseite erscheinen? Bei A3 ist die Reihe mit dem Pfeil aber eine Hinreihe!
27.07.2020 - 17:06Odpověď DROPS Design :
Liebe Winki, ja, es sind alle Reihen eingezeichnet und A.1 und A.2 beginnen mit einer Hin-Reihe. Bei A.3 soll allerdings tatsächlich mit einer Rück-Reihe begonnen werden (Reihe mit Pfeil), damit sich der V-Ausschnitt, den Sie mit A.3 einleiten, optisch absetzt. Gutes Gelingen!
28.07.2020 - 11:21
 Liesel Thompson napsala:
Please clarify for me? For A2 pattern is the 2nd row Which will be worked from the wrong side be a row of purl stitch or knit stitch please?
17.07.2020 - 16:12Odpověď DROPS Design :
Hi Liesel, Row 2 in A.2 is purled, as it is from the wrong side. Happy knitting!
20.07.2020 - 07:32
Liesel Thompson napsala:
Please explain how there are 48 stitches on the left and right back when the total stitches are 95? After 20cm working on 95 stitches are we meant to increase 1 somewhere?
15.07.2020 - 22:26Odpověď DROPS Design :
Dear Mrs Thompson, you increase one stitch in A.3 (next to last row = 3rd symbol from diagram text) so that there are 96 sts on needle. Happy knitting!
16.07.2020 - 09:59
 Johanne Villars Jørgensen napsala:
Hej. Det er sådan et flot mønster. Jeg ønsker at strikke toppen så den bliver lidt længere, er der da et stykke af opskriften jeg kan gentage til den får den ønskede længde? De bedste hilsner fra Johanne.
07.07.2020 - 23:09Odpověď DROPS Design :
Hei Johanne. Du kan strikke / fortsette med dette mønstret mellom første og siste økning: Strikk mønster slik: 1 kantmaske rille, 1 rett, A.2 til det gjenstår 1 maske, 1 kantmaske i rille, til du har strikket de ekstra cm du ønsker. Husk å nok garn. God Fornøyelse!
13.07.2020 - 08:50
|
|||||||||||||
Mazo#mazotop |
|||||||||||||
 |
 |
||||||||||||
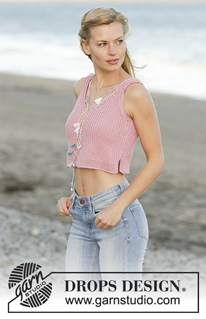
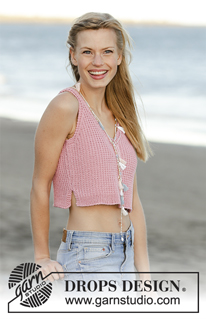
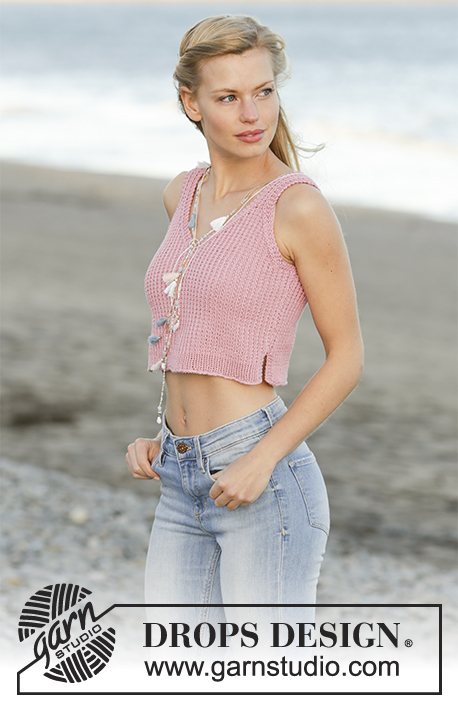
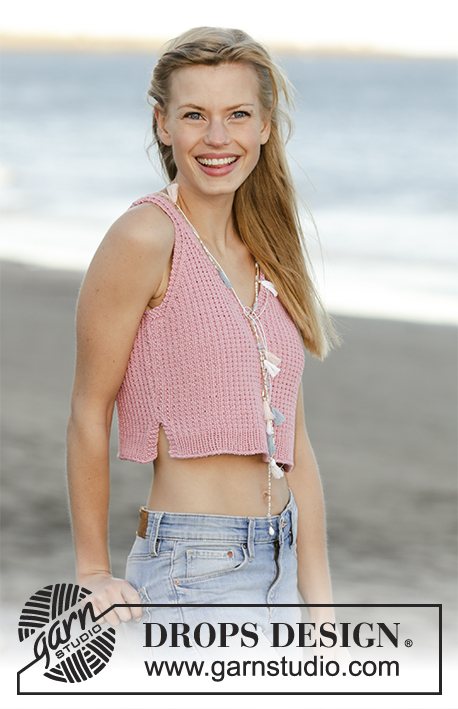
Krátké tílko - top s V-výstřihem pletené strukturovým vzorem z příze DROPS Muskat. Velikost: S - XXXL.
DROPS 178-66 |
|||||||||||||
|
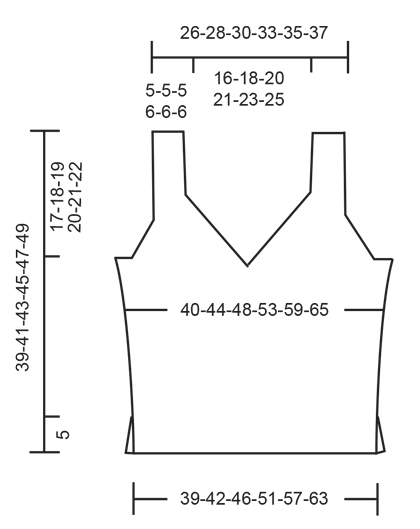
VROUBKOVÝ VZOR: Pleteme stále hladce, lícové i rubové řady. 1 vroubek = 2 řady hladce. VZOR: Viz schémata A.1 až A.4. Zobrazeny jsou všechny řady vzoru nahlížené z lícové strany. Zvolte si schéma pro požadovanou velikost. TIP - PŘIDÁVÁNÍ: Přidáváme nahozením. V následující řadě pleteme nahození za zadní nit, aby se v pletenině netvořily dírky. POZN.: nová oka postupně zapracujeme do vzoru A.2. TIP - UJÍMÁNÍ: Ujímáme 1 oko vedle 3 krajních vroubkových ok na každé straně dílu. Ujímáme vždy v lícových řadách. ZA 3 krajními oky vroubkovým vzorem ujímáme přetažením, tj. 1 oko sejmeme hladce, 1 oko upleteme hladce a sejmuté přes ně přetáhneme. PŘED 3 krajními oky vroubkovým vzorem splétáme 2 oka hladce. ---------------------------------------------------------- TOP: Upleteme v řadách 2 díly, které nakonec sešijeme. ZADNÍ DÍL: Na kruhovou jehlici č.4 nahodíme přízí Muskat 81-89-97-107-119-133 ok a upleteme 1 rubovou řadu obrace. Pokračujeme pružným vzorem, takto (1. řada = lícová): 3 oka VROUBKOVÝM VZOREM – viz výše, 1 oko hladce, vzor A.1 (= 2 oka) – sekvenci vzoru opakujeme až po poslední 3 oka, končíme 3 oky vroubkovým vzorem. Pleteme v řadách v tomto rozvržení vzorů. Po dokončení celé sekvence vzoru A.1 (na výšku) pleteme namísto něj vzor A.2 (= 2 oka). Ve výši 5 cm nahodíme na konci každé z následujících 2 řad 1 nové oko (= konec postranního rozparku) = 83-91-99-109-121-135 ok. Pokračujeme takto: 1 krajové oko vroubkovým vzorem, 1 oko hladce, vzor A.2 - sekvenci vzoru opakujeme až po poslední 1 oko, 1 krajové oko vroubkovým vzorem. Ve výši 7 cm přidáme na každé straně vedle 1 krajového oka vroubkovým vzorem 1 oko - viz TIP - PŘIDÁVÁNÍ! Toto přidávání zopakujeme ještě ve výši 10 cm = 87-95-103-113-125-139 ok. Ve výši 19-20-21-22-23-24 cm pleteme nad prostředními 7 oky vzor A.3 od místa označeného šipkou – řada označená šipkou musí být rubová. V 1. lícové řadě po dokončení vzoru A.3 upleteme prvních 44-48-52-57-63-70 ok v řadě a dalších 44-48-52-57-63-70 ok odložíme na pomocnou jehlici. PRAVÝ ZADNÍ DÍL: = 44-48-52-57-63-70 ok. NEŽ BUDETE PLÉST DÁL, PŘEČTĚTE SI POZORNĚ CELÝ NÁSLEDUJÍCÍ POPIS! Ujímáme SOUČASNĚ průkrčník i průramek, takto: Pleteme vzor A.2 jako dosud se 3 krajními oky vroubkovým vzorem po stranách průkrčníku a 1 krajovým okem vroubkovým vzorem na boku. PRŮKRČNÍK: V 1.lícové řadě začneme tvarovat průkrčník – ujmeme 1 oko vedle 3 krajních vroubkových ok - viz TIP - UJÍMÁNÍ. Takto ujímáme v každé 2. řadě (tj. v každé lícové) celkem 16-18-20-22-24-26x. PRŮRAMEK: Ve výši 21-22-23-24-25-26 cm upleteme nad krajními 10-10-12-11-11-14 oky na boku (včetně 1 krajového oka vroubkovým vzorem) 4 řady vroubkovým vzorem (= 2 vroubky). Potom uzavřeme prvních 7-7-9-8-8-11 ok v řadě (= průramek). Následující 3 oka pleteme vroubkovým vzorem (= lem průramku). Pro vytvarování průramku pak vedle těchto 3 vroubkových ok ujmeme 1 oko a takto ujímáme v každé 2. řadě (tj. v každé lícové) celkem 10-12-12-14-18-20x. Po dokončení veškerého ujímání průkrčníku i průramku zbývá v řadě 11-11-11-13-13-13 ok (= ramínko). Dál pleteme vzor jako dosud se 3 vroubkovými oky na každé straně. Ramínko je znázorněno ve schématu A.4 – zvolte si schéma pro požadovanou velikost. Ve výši 39-41-43-45-47-49 cm všechna oka uzavřeme. LEVÝ ZADNÍ DÍL: Odložených 44-48-52-57-63-70 ok druhé půlky zadního dílu vrátíme z pomocné jehlice zpět na kruhovou jehlici č.4 a pleteme stejně jako pravý zadní díl, jen zrcadlově převrácený – POZN.: při tvarování průramku uzavřeme oka na začátku rubové řady (nikoli na začátku lícové). Další ujímání průramku i průkrčníku už pleteme z lícové strany. PŘEDNÍ DÍL: Nahodíme a pleteme stejně jako zadní díl. DOKONČENÍ: Obě ramínka sešijeme – nejlépe pletacím stehem, aby byl šev co nejjemnější. Sešijeme postranní švy od průramku k okraji rozparku. |
|||||||||||||
Vysvětlivky ke schématu |
|||||||||||||
|
|||||||||||||
 |
|||||||||||||
 |
|||||||||||||
Dokončili jste tento model?Pak označte své fotky tagem #dropspattern #mazotop nebo je pošlete do galerie #dropsfan. Potřebujete s tímto návodem poradit?Otevřete-li si návod na stránce garnstudio.com, najdete tam 10 výukových video-ukázek, Komentáře/Dotazy a další užitečné informace. © 1982-2026 DROPS Design A/S. Vyhrazujeme si veškerá práva. Tento dokument, včetně všech jeho dílčích částí, podléhá autorským právům. Podrobnější komentář k možnostem užití našich návodů najdete dole pod každým návodem na našich stránkách. |
|||||||||||||






V oblasti pletené a háčkované módy působí DROPS Design více než 40 let. Díky tomu vám můžeme nabídnout jednu z nejrozsáhlejších kolekcí modelů s bezplatnými návody dostupnými na internetu - navíc v 17 jazycích. K dnešnímu dni máme na 333 katalogů a 12525 návodů celkem - z nich je už 7971 dostupných v [češtině].
We work hard to bring you the best knitting and crochet have to offer, inspiration and advice as well as great quality yarns at incredible prices! Would you like to use our patterns for other than personal use? You can read what you are allowed to do in the Copyright text at the bottom of all our patterns. Happy crafting!
Přidejte komentář k návodu DROPS 178-66
Rádi bychom věděli, co si o tomto modelu myslíte!
Pokud se chcete na něco zeptat, dbejte prosím na to, abyste ve formuláři níže vybrali správnou kategorii - díky tomu se dříve dozvíte, co potřebujete vědět. Povinná pole jsou označena *.