
Populaarsed kategooriad
Otsid lõnga?


Kommentaarid / Küsimused (27)
![]() Della kirjutas:
Della kirjutas:
Hi. I’m wondering how I am going to fit 154 stitches at the end of A1 on a 15mm x 80cm circular needle. I’ve just started this garment and I’m doing the neck on the 12mm x 80cm and 44 stitches just fit 😳
22.08.2021 - 16:21DROPS Design vastas:
Dear Della, our knitters didn't really had problems fitting the stitches on the needles, but you can always use a longer circular, or even two circs, if you feel they are too crowded. Happy Stitching!
22.08.2021 - 17:33
![]() Emmanuelle kirjutas:
Emmanuelle kirjutas:
Merci pour votre réponse ultra rapide. C\'est parti, je me lance ! Bonne journée, Emmanuelle
02.08.2021 - 08:01
![]() Emmanuelle kirjutas:
Emmanuelle kirjutas:
Bonjour, très joli modèle. Une question toutefois avant de me lancer : je n'ai pas d'aiguille double pointe en 12. Peut-on commencer à tricoter dès le début (col) en rond avec les aiguilles circulaires 12 ? Merci par avance de votre réponse.
01.08.2021 - 10:45DROPS Design vastas:
Bonjour Emmanuelle et merci. Effectivement, vous pouvez tricoter le col sur une aiguille circulaire de 80 cm en utilisant la technique dite du magic loop jusqu'à ce que vous ayez augmenté suffisamment de mailles pour continuer sur une 60 ou sur la 80 mais en rond "normalement". Bon tricot!
02.08.2021 - 07:23
![]() Alica kirjutas:
Alica kirjutas:
Dear Drops, I have a problem with the yarn. Wanted to buy it, but I do not know which color is that colour 05, tan. When I choose colour 05 it is more brown. What does it mean tan? I would like to have the same colour as on the picture here. Pls help:)
04.05.2021 - 07:09DROPS Design vastas:
Hei Alica, The name of Polaris no 5 is Taupe (not tan) and is the colour you see in the picture - a dark mauve/grey. Happy knitting!
04.05.2021 - 07:42
![]() Madou kirjutas:
Madou kirjutas:
Merci pour les explications et les précisions ! Mon pull est à présent terminé et mon chat me le pique déjà... Le pull tient vraiment chaud et est très confortable à porter ! Conseil : ne pas hésiter à bien serrer l'encolure ! J'ai réalisé le modèle en taille Medium et je tiens juste à préciser qu'il me reste encore à peu près 150 g de laine, donc 1000 g vont bien pour cette taille, alors même que j'ai rallongé un peu les manches. Très beau pull, merci !
10.04.2021 - 16:09
![]() Madou kirjutas:
Madou kirjutas:
Bonjour, J'adore ce modèle et je viens de finir l'empiècement devant et dos, il ne me reste donc plus que les manches à tricoter. J'ai repris mes 24 mailles pour tricoter la première manche, et dois monter 2 mailles sous la manche. Dois-je les monter sur l'aiguille gauche ou droite ? Aussi, pourquoi suis-je censée avoir 28 mailles après avoir monter 24 + 2 mailles sous la manche ? Je vous remercie d'avance. Madou
08.04.2021 - 16:12DROPS Design vastas:
Bonjour Madou, montez 2 m de chaque côté des mailles en attente, par ex: montez 2 m, tricotez les 24 m de la manche et montez 2 m. La correction a été faite, merci. Bon tricot!
09.04.2021 - 07:11
![]() Laura Z Rhodes kirjutas:
Laura Z Rhodes kirjutas:
Hello, wonderfully patient DROPS design team. I have another sleeve question, regarding decreases. Are the decreases over 24 rows (one stitch decrease right side, one row no decreases, one row decrease left side, one row no decreases, for a total of 2 stitches decreased over 4 rows), or are the decreases over 12 rows (one stitch decrease start of knit row, one stitch decrease start of purl row, for a total of 2 stitches decreased over 2 rows)? Thank you.
17.02.2021 - 19:14DROPS Design vastas:
Dear Mrs Rhodes, the decreases will be worked over 24 rows, (1 row decreasing 1 st on the right side, 1 row without decreasing, 1 row decreasing on the left side, 1 row without decreasing), repeat from (to) a total of 6 times = 6 sts have been decreased on each side and 24 rows have been worked, 16 sts remain - decrease either at the beginning or at the end of a row from RS. Happy knitting!
18.02.2021 - 09:12
![]() Laura Rhodes kirjutas:
Laura Rhodes kirjutas:
Thank you so much for clearing up my question about the end of row marker. I am now ready to do the sleeves, but I don’t understand what you mean by casting on stitches mid under sleeve? I am to cast on 2 stitches (I am making the M), but twice, for a total of 28 stitches? Where is mid under sleeve? Thanks so much. The knitting is going super and I am excited to finish. :-)
15.02.2021 - 03:26DROPS Design vastas:
Hi Laura, The sleeve is worked over the stitches from the one thread as well as 2 stitches cast on, on each side = 4 new stitches (these stitches are used when the sleeve is sewn to the body when it is finished). You work back and forth until the sleeve is finished, then the sleeve seam and the opening under the sleeve are sewn together. Mid under the sleeve will be the underside of the sleeve, where the seam is. Hope this helps and happy knitting!
15.02.2021 - 07:54
![]() Laura Z Rhodes kirjutas:
Laura Z Rhodes kirjutas:
Thanks for your reply, but I am still confused about where the pattern starts in each row. At the start of A.1, I placed the marker before the first P. I understand increasing, but rnd7 seems to begin with a K placed BEFORE the marker. Is this the last K on rnd6? Then marker, then P1, K1, P1, K1 pattern? Rnd11 pattern is P1, P1 incr, P1, K1? Rnd12 is P1, K2, P1, K1? Rnd14 is P1, K2, P1, P incr? Or do you want the first incr on the last K of rnd13? Rnd15-18 is P1, K2? All start at EOR marker.
11.02.2021 - 17:30DROPS Design vastas:
Dear Mrs Rhodes, you increase on row 6 and the stitch before the P stitch on row 7 is the new stitch that will be worked K, this means the marker on beg of round stays here and over P1, K1 (= increase on row 6), K1, you will now work: K1, P1, K1, P1. On row 11 work K1, P1, inc, P1 and row 12: K1, P1, K2, P1 etc... ie just work the stitches as they are shown in diagram. Hope this helps. Happy knitting!
12.02.2021 - 06:49
![]() Laura Z Rhodes kirjutas:
Laura Z Rhodes kirjutas:
Hello! I am following along the pattern chart, working from lower right to upper left, and I am at the row (row 7) where it looks like the pattern begins one stitch *before* the end-of-round marker. Is this correct? And then, in row 15, it again looks like I am adding stitches before the end-of-round marker. This would keep the purl stitches in line, which I assume you want? Thanks so much.
11.02.2021 - 02:44DROPS Design vastas:
Dear Mrs Rhodes, yes that's correct, you increased one stitch in each repeat on previous round, and now you work K1, P1, K1, P1 over the (P1, K1 worked with the increase, P1). On row 15, you will start with K2 since you increased on previous row 1 stitch in the first stitch of the repeat. Hope this helps. Happy knitting!
11.02.2021 - 06:52
|
||||||||||
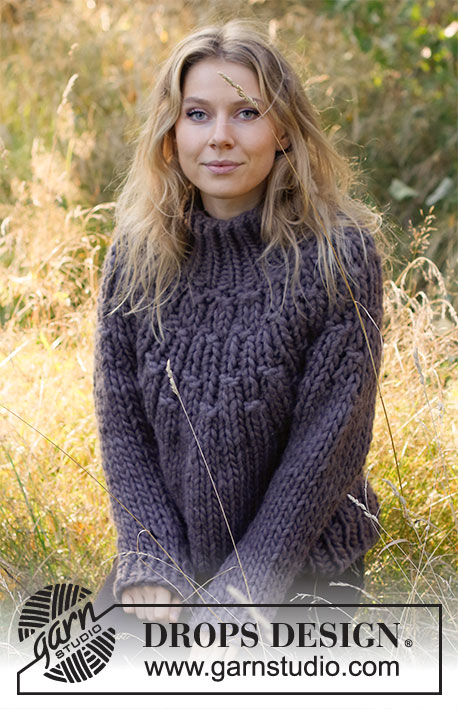
November Woodland#novemberwoodlandsweater |
||||||||||
 |
 |
|||||||||
DROPS Polaris lõngast ülevalt alla kootud ümara passega ja kõrge kraega džemper suurustele S kuni XXXL
DROPS 216-24 |
||||||||||
|
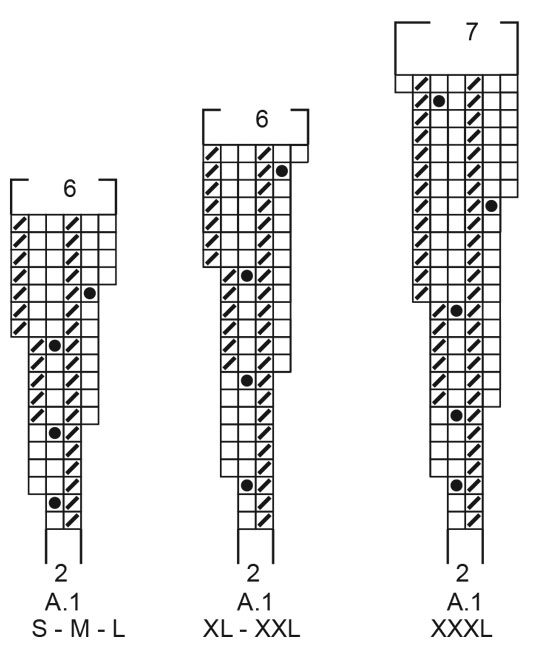
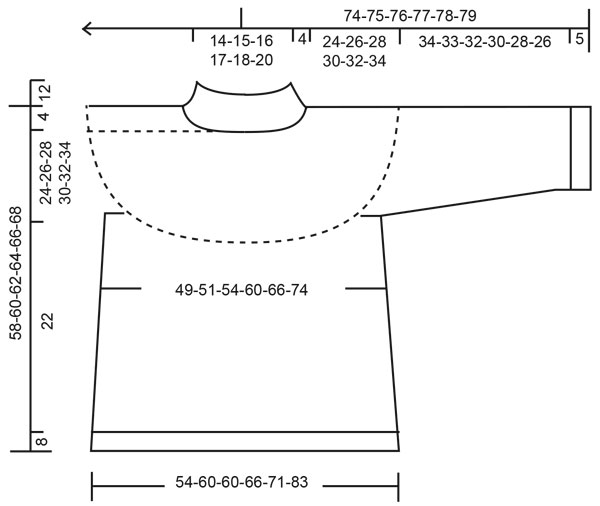
NÕUANDED: ------------------------------------------------------- MUSTER: Vaata skeemi A.1. Vali suurusele sobiv skeem. RINGVARRASTE MAAGILINE RING (MAGIC LOOP) Kui ringvardad on liiga pikad, koo maagilise ringi meetodil nii: tõmba silmused umbes varda (kaabli) keskele jaga silmused kaheks ja tõmba kaablit välja nende silmuste vahelt. Siis liiguta eesmised silmused varda otsa ja koo kuni kaabli aasani. Liiguta jälle silmused varda otsa ja tee teise serva aas. Jätka nii, kuni on piisavalt silmuseid, et ei pea enam kaablit aasaks välja tõmba. KASVATAMISE NIPP (kehaosa): Kasvata 1 silmus, tehes õhksilmuse. Järgmisel ringil koo õhksilmused keerdsilmustena, et ei jääks auke. KAHANDAMISE NIPP (varrukatel): NB! Tee kahandusi kordamööda paremal ja vasakul küljel, st. kahanda kordamööda rea alguses ja lõpus. Kahanda töö paremal pool: koo 2 parempidi kokku. Kahanda töö pahemal pool: 2 pahempidi kokku. ------------------------------------------------------- ALUSTA SIIT: ------------------------------------------------------- DŽEMPER – KOKKUVÕTE: Kootakse ringselt ülevalt alla suka- ja ringvarrastega. Varrukad kootakse edasi-tagasi ringvarrastega ja ühendatakse lõpus külge. KAELUS: Loo 34-36-38-40-42-44 silmust 12 mm sukavarrastele Polaris lõngaga. Koo ringselt soonikut 1 parempidi/1 pahempidi 12 cm. PASSE: Loe ülevalt maagilise ringi kohta. Paigalda reamärkija – EDASI MÕÕDA SIIT! Võta 15 mm ringvardad ja koo ringselt skeemi A.1 – vali suurusele vastav skeem. JÄLGI KOETIHEDUST! Kui skeem A.1 on tehtud vertikaalselt, on vardal 102-108-114-120-126-154 silmust. Järgmisel ringil kasvata 0-4-2-8-10-2 silmust ühtlaste vahedega – loe KASVATAMISE NIPPI üleval = 102-112-116-128-136-156 silmust. Koo parempidises koes, kuni töö pikkus on 24-26-28-30-32-34 cm. Järgmine ring: koo esimesed 15-16-17-19-20-23 silmust (= pool seljaosa), tõsta järgmised 21-24-24-26-28-32 silmust abilõngale varruka jaoks, loo 4-4-4-4-6-6 silmust (= külg), koo järgmised 30-32-34-38-40-46 silmust (= esiosa), tõsta järgmised 21-24-24-26-28-32 silmust abilõngale (= varrukas), loo 4-4-4-4-6-6 silmust (= külg), koo viimased 15-16-17-19-20-23 silmust (= pool seljaosa). Jätka kehaosa ja varrukaid eraldi. EDASPIDI MÕÕDA SIIT! KEHAOSA: = 68-72-76-84-92-104 silmust on ringil. Koo ringselt parempidises koes, kuni töö pikkus on 22 cm jagamise kohast kõikidel suurustel. Võta 12 mm ringvardad ja koo ringselt soonikut 1 parempidi/1 pahempidi 8 cm. Koo silmused lõdvalt maha, pahempidi silmused pahempidi ja parempidi silmused parempidi. Kampsuni pikkus on umbes 58-60-62-64-66-68 cm, mõõtes õlast alla. VARRUKAD: Varrukad kootakse edasi-tagasi ringvarrastega ja ühendatakse lõpus külge. Tõsta 21-24-24-26-28-32 silmust abilõngalt 15 mm ringvarrastele ning korja lisaks 1 silmus igast 2-2-2-2-3-3 uuest silmusest varruka all = 25-28-28-30-34-38 silmust. Koo parempidises koes edasi-tagasi, samal ajal kahanda järgmisel töö parempoolsel real 1-0-0-0-0-0 silmus (ainult SUURUSEL S), kududes 2 äärmist silmust kokku vasakul küljel = 24-28-28-30-34-38 silmust. Kui töö pikkus on 4-2-2-4-4-2 cm, kahanda 1 silmus paremal küljel – loe KAHANDAMISE NIPPI. Kahanda kordamööda vasakul ja paremal pool igal 2.-2.-2.-1.-1.-1. real kokku 8-12-12-14-14-18 korda (= 4-6-6-7-7-9 korda mõlemal küljel) = 16-16-16-16-20-20 silmust. Siis koo kuni töö pikkus on 34-33-32-30-28-26 cm jagamise kohast, NB! Lühemad mõõdud suurematel suurustel, kuna õlad on laiemad. Võta 12 mm ringvardad. Koo soonikut 1 parempidi/1 pahempidi 5 cm. Koo silmused lõdvalt maha, pahempidi silmused pahempidi ja parempidi silmused parempidi. Tee teine varrukas samamoodi. VIIMISTLUS: Õmble kokku varrukaõmblus läbi ääresilmuste. Õmble kokku avad kaenlaaugus. |
||||||||||
Skeemi seletused |
||||||||||
|
||||||||||
 |
||||||||||
 |
||||||||||
Kas oled teinud seda mustrit?Lisa oma piltidele viide #dropspattern #novemberwoodlandsweater või saada link projektile meie #dropsfan galeriisse. Vajad abi selle mustriga?Garnstudio.com kodulehel on 24 õppevideot, küsimuste/vastuste osa ja muudki. © 1982-2026 DROPS Design A/S. Kõik õigused kaitstud. See dokument, ning selle alajaotused on kaitsud autoriõigustega. Loe rohkem, mida meie mustritega võib teha, iga mustrilehe alt meie kodulehel. |
||||||||||


Tegeledes üle 40 aasta kudumise ja heegeldamise disainidega, pakub DROPS Design ühte suurimat tasuta mustrite kollektsiooni internetis - tõlgituna 17 keelde. Tänaseks on meil 324 kataloogi ja 12290 mustrit - millest 9431 on tõlgitud Eesti keelde.
Me anname endast parima, et tuua teieni kõike mida kudumine ja heegeldamine võib pakkuda - inspiratsiooni, nõuandeid ning ka kvaliteetseid lõngu parima hinnaga! Soovid kasutada mustreid muukski, kui ainult oma tarbeks? Loe infot meie Copyright osas iga lehekülje all. Rõõmsat loomist!
Jäta kommentaar mustrile DROPS 216-24
Ootame kommentaare selle mustri kohta!
Kui soovid midagi küsida, siis kiiremaks vastuse saamiseks veendu, et valid õige kategooria alloleval formil. Vajaliku väljad *.