
Populaarsed kategooriad
Otsid lõnga?


Kommentaarid / Küsimused (75)
![]() Ana kirjutas:
Ana kirjutas:
I've just finished knitting the 10cm on the mid back, but I fear I may have done it wrong, as now there's a 10 cm height difference between one side of the work and the other, which doesn't make sense as we're not casting off just yet. Should I have been knitting all the stitches and not just the 28+62?
22.10.2022 - 15:28DROPS Design vastas:
Boa tarde, Now divide the piece mid back to work back and forth from mid back (this is done so that the seam is mid back). Work in garter stitch back and forth until piece measures 10 cm from the 28 stitches cast on mid front. Deve dividir as 152 malhas em 2 partes que tricota separadamente. até ter 10 cm medidos a partir da carreira em que montou a28 malhas, Bons tricôs!
23.10.2022 - 17:21
![]() Ana kirjutas:
Ana kirjutas:
I've just finished knitting the first 24cm and I'm already confused, what do you mean "cast on 1 stitch 2 times and 2 stitches 5 times"? I need a better explanation, please!
09.10.2022 - 16:36DROPS Design vastas:
Dear Ana, cast on 1 stitch at the end of each row from each side. Cast on 1 stitch at the end of the first row from the RS and WS. Repeat this once more on the next row from the RS and WS. Then, cast on 2 stitches at the end of each row from each side, but repeat this 5 times (so you increase 2 stitches at the end of the next 5 rows from the RS and 5 rows from the WS). Happy knitting!
09.10.2022 - 19:48
![]() Anna kirjutas:
Anna kirjutas:
Dzień dobry, czy jest dostępny szkic/schemat do tego projektu?
09.10.2022 - 11:54DROPS Design vastas:
Witaj Aniu, niestety nie. Napisz jeśli masz jakiś problem. Pozdrawiamy!
10.10.2022 - 10:09
![]() Jutta kirjutas:
Jutta kirjutas:
Hallo, wir haben mit der Anleitung angefangen, befinden uns aber grade in einer Sackgasse und kommen auch mit vereinten Denkkräften nicht weiter...Nach dem einseitige Anschlagen der 28 Maschen und dem Teilen an der hinteren Mitte können wir uns so langsam nicht mehr vorstellen wie es weiter geht und wie daraus die Kapuze entstehen soll. Hat jemand vielleicht eine Zeichnung? Was genau ist die hintere / vordere Mitte? Wie wird alles zusammengenäht? Ich hoffe jemand kann helfen
06.08.2022 - 15:54DROPS Design vastas:
Liebe Jutta, die Arbeit wird zuerst in Reihen von der vorderen Mitte gestrickt, dann wenn die neuen Maschen für die Öffnung für Gesicht angeschlagen wurden, soll die Arbeit von der hinteren Mitte gestrickt werden (so gibt es keine Naht an der vorderen Mitte). Am Ende nähen Sie die Kapuze oben zusammen und die unteren Reihen in der hinteren Mitte (ab den neuen Maschen bis zur Abketterand). Viel Spaß beim stricken!
08.08.2022 - 08:07
![]() Tiko kirjutas:
Tiko kirjutas:
First time I got confused with your pattern 😊1. the whole piece is in gaeter stitch except for the 158 stitches around face? 2. Is the piece worked inthe round at any stage? 3. Is it possible to send or add to the pattern a drawing fo what the finished piece looks like prior to been assambled? Thanks for the answerrs 💚
13.03.2022 - 19:12DROPS Design vastas:
Dear Tiko, 1. correct, only the ribbing edge around face is worked in rib, the whole work is then worked in garter stitch. 2. Piece is only worked in rows, but first from mid front (until opening for face is done), then from mid back (after you have increased/cast on the stitches for under face). 3. we have no chart for this sorry. Happy knitting!
14.03.2022 - 12:06
![]() Ana kirjutas:
Ana kirjutas:
Could I do the whole pattern in rib instead of garter stitch? How could I adapt from one to the other? Thank you so much!
24.02.2022 - 19:10DROPS Design vastas:
Dear Ana, your tension would be then different and your would have to re-calculate the whole pattern. You might find another pattern among these ones. Happy knitting!
25.02.2022 - 08:59
![]() Ayra kirjutas:
Ayra kirjutas:
Plz explain when you pick up 158 stitches around face opening do you have to pick up all of the stitches or you have to pick up 3 and skip one. Thanks
13.02.2022 - 20:44DROPS Design vastas:
Hi Ayra, you have to distribute new stitches evenly to have 158 stitches around face opening in total. Happy knitting!
14.02.2022 - 08:18
![]() Ayra kirjutas:
Ayra kirjutas:
Plz explain for mid back seam after working on 28 new cast on stitches and 62 stitches when you turn your work do you have to do the purl stitch from that side and also you have to work on 28 stitches.again so the mid back seam is done. Now you have to do garter stitch for all of the stitches. Thanks
04.02.2022 - 01:51DROPS Design vastas:
Dear Ayra, when you cut the yarn after the hood part, you start again piece from mid back (= approx. middle of previous rows), and will then cast on new stitches for face opening, ending rows on mid back. The seam on mid back will start here and will be sewn to the bottom edge; the 28 sts are cast on on mid front, there won't be any seam here. Hope it will help. Happy knitting!
04.02.2022 - 09:16
![]() Ayra kirjutas:
Ayra kirjutas:
Plz explain how you sew the hood in the end? Thanks
03.02.2022 - 02:10DROPS Design vastas:
Dear Ayra, fold the cast on edge double and sew cast on sts together; and then sew on mid back from the beginning of row worked from mid back (after face opening) towards the cast off edge. Happy knitting!
03.02.2022 - 08:47
![]() Marta kirjutas:
Marta kirjutas:
One follow up if I may. If there is a seam mid-back, where is the face opening. I'm really confused as you can tell.
02.02.2022 - 14:18DROPS Design vastas:
Dear Marta, you first work the hood, back and forth from mid front, then cut the yarn and start on mid back to work now from the mid back, increasing stitches on mid front and working the 2nd half of sts to mid back. The seam will be on mid back from this part. Hope it will help. Happy knitting!
02.02.2022 - 14:29
|
|
Lawless#lawlesshood |
|
 |
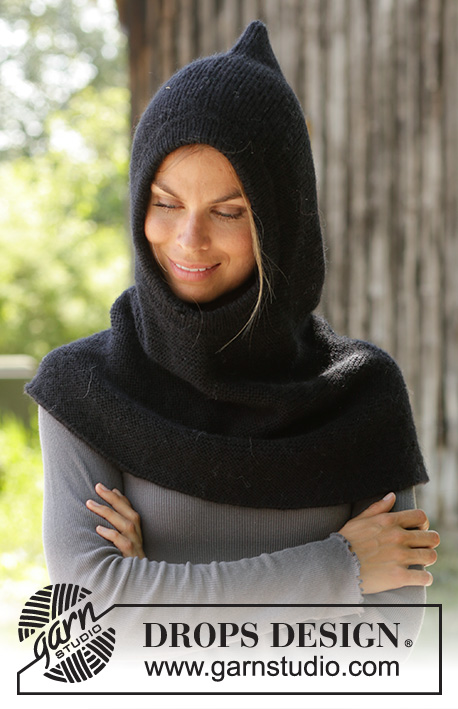 |
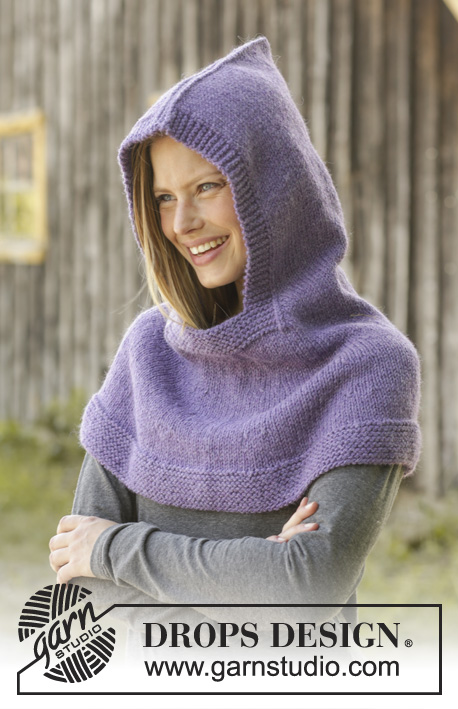
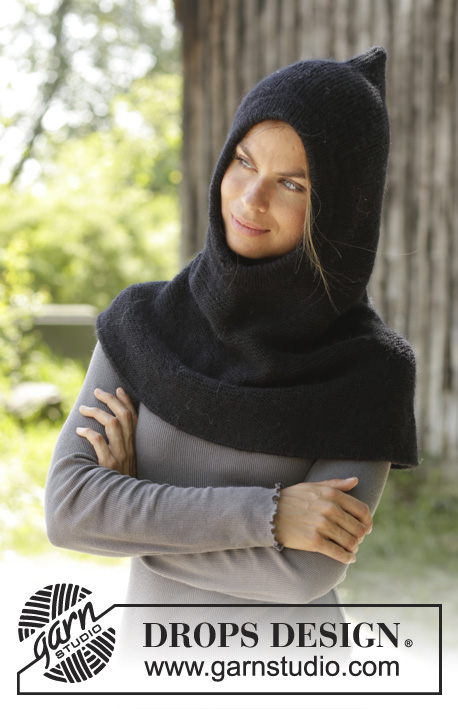
DROPS Merino Extra Fine või DROPS Karisma lõngast ülevalt alla kootud ripskoes kapuutsiga kaelussall suurustele S kuni XXXL
DROPS 192-2 |
|
|
---------------------------------------------------------- JUHEND ---------------------------------------------------------- RIPSKUDE (edasi-tagasi kududes): 1 ripsivall = koo 2 rida parempidi silmuseid. KASVATAMISE NIPP Koo, kuni jääb 1 silmust enne silmusemärkijat, tee 1 õhksilmus, koo 2 parempidi (silmusemärkija on nende silmuste keskel), 1 õhksilmus. Järgmisel ringil koo õhksilmused keerdsilmustena, et ei jääks auke. ---------------------------------------------------------- ALUSTA SIIT ---------------------------------------------------------- KAPUUTS - KOKKUVÕTE Kootakse edasi-tagasi, ülevalt alla, lõpuks õmmeldakse kokku tagant ja pealt. KAPUUTS Loo 100 silmust 3 mm ringvarrastele Merino Extra Fine või Karisma lõngaga. Koo edasi-tagasi RIPSKOES – vaata ülevalt. JÄLGI KOETIHEDUST! Kui töö pikkus on 24 cm, loo uued silmused mõlemal küljel iga rea lõpus (näo poole) järgmiselt: 1 silmus 2 korda, siis 2 silmust 5 korda (= 12 silmust kasvatatud mõlemal küljel) = 124 silmust. Järgmise rea lõpus loo 28 uut silmust (esiosa keskel, näoava alla) = 152 silmust. Nüüd koo kuni rea keskele, st. koo 62 silmust pärast uue 28 silmuse loomist ees keskel. Nüüd jaga töö pooleks nii, et jätkata kudumist tagant keskelt edasi-tagasi (et õmblus taha jääks). Koo ripskoes edasi-tagasi, kuni töö pikkus on 10 cm uute silmuste loomisest ees keskel. Paigalda 8 silmusemärkijat töösse järgmiselt: alusta tagant keskelt ja paigalda silmusemärkija pärast 10 silmust, paigalda järgmised 7 silmusemärkijat pärast iga 19 silmust, pärast viimast silmusemärkijat jääb 9 silmust. Jätka ripskoes. Järgmisel töö parempoolsel real kasvata 1 silmus mõlemal pool iga silmusemärkijat – loe KASVATAMISE NIPPI! Kasvata nii iga 3 cm järel kokku 6-7-8 korda = 248-264-280 silmust ringil. Jätka kudumist, kuni töö pikkus on 58-60-62 cm. Koo silmused maha kahekordse lõngaga. ÜHENDAMINE: Õmble kapuuts kokku taga keskel läbi ääresilmuste ja loomise rea kapuutsi tipus. ÄÄRIS ÜMBER NÄOAVA: Korja ümber näoava töö paremal pool 158 silmust 2,5 mm ringvarrastele. Koo 1 ring pahempidi silmuseid, 1 ring parempidi, 1 ring pahempidi, 1 ring parempidi. Siis koo soonikut 1 parempidi/1 pahempidi 6 cm. Koo silmused lõdvalt maha, pahempidi silmus pahempidi ja parempidi silmus parempidi. Keera pool serva tagasi töö pahemale poole ja kinnita väikeste pistetega. |
|
Kas oled teinud seda mustrit?Lisa oma piltidele viide #dropspattern #lawlesshood või saada link projektile meie #dropsfan galeriisse. Vajad abi selle mustriga?Garnstudio.com kodulehel on 17 õppevideot, küsimuste/vastuste osa ja muudki. © 1982-2026 DROPS Design A/S. Kõik õigused kaitstud. See dokument, ning selle alajaotused on kaitsud autoriõigustega. Loe rohkem, mida meie mustritega võib teha, iga mustrilehe alt meie kodulehel. |
|


Tegeledes üle 40 aasta kudumise ja heegeldamise disainidega, pakub DROPS Design ühte suurimat tasuta mustrite kollektsiooni internetis - tõlgituna 17 keelde. Tänaseks on meil 324 kataloogi ja 12290 mustrit - millest 9431 on tõlgitud Eesti keelde.
Me anname endast parima, et tuua teieni kõike mida kudumine ja heegeldamine võib pakkuda - inspiratsiooni, nõuandeid ning ka kvaliteetseid lõngu parima hinnaga! Soovid kasutada mustreid muukski, kui ainult oma tarbeks? Loe infot meie Copyright osas iga lehekülje all. Rõõmsat loomist!
Jäta kommentaar mustrile DROPS 192-2
Ootame kommentaare selle mustri kohta!
Kui soovid midagi küsida, siis kiiremaks vastuse saamiseks veendu, et valid õige kategooria alloleval formil. Vajaliku väljad *.