
Populaarsed kategooriad
Otsid lõnga?


Kommentaarid / Küsimused (56)
![]() Patrizia kirjutas:
Patrizia kirjutas:
Buonasera, non riesco a capire perché da 160 maglie si passa a lavorare su 80m + 2 cat. Dopo aver finito lo schema A2 mi potete spiegare meglio cosa devo fare per realizzare gli scaldi? Grazie mille. Patrizia
29.06.2023 - 00:47
![]() Aziza kirjutas:
Aziza kirjutas:
Hi, I finished A1 than went to A2 which completed the big round design on the last picture..how many times do I do A2..it says 7 repitions?.do i keep doing all the rows of A2 than go back to A1 starting at row 5?..this pattern not clear.. thank you
04.06.2023 - 10:30DROPS Design vastas:
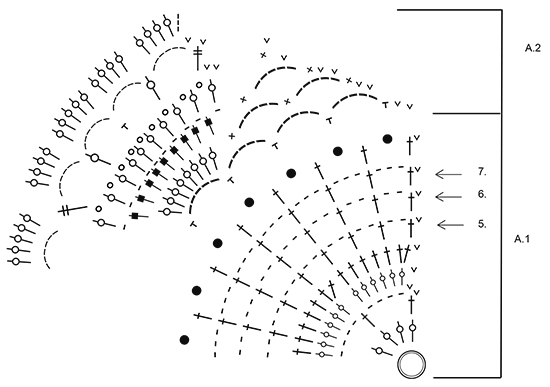
Dear Aziza, you have 7 repeats of A.2 on the round. That is, to work over all of the stitches of A.1 in the previous round, you need to repeat the first round of A.2 7 times in the same round. Continue working the chart. When you finish working A.2 once, work A.1 again, now starting on the 5th round of the chart (marked with an arrow). Happy crocheting!
04.06.2023 - 17:39
![]() Susan Richardson kirjutas:
Susan Richardson kirjutas:
Hello! Me again! Thanks for earlier reply, now clear regarding slip stitches at beginning of rounds. I am now nearly at :Work 7th Round 1-3-5 times, AT THE SAME TIME inc 2 tr evenly on every row, i.e. two times on every row. Is there a best place to put these increases? I assume NOT in the arm hole areas, as this would alter the stitches for the arms? Or it may not! This pattern is challenging me, but with your help I will finish it ! Thank you.
26.02.2023 - 14:35DROPS Design vastas:
Dear Susan, as long as they are not adjacent/next to each other you can work the increases anywhere in the row, even in the armhole areas. Happy crocheting!
26.02.2023 - 23:55
![]() Susan Richardson kirjutas:
Susan Richardson kirjutas:
Thanks for answering my 1st question. I have now started this pattern & it is the first time I have used a diagram pattern. I can work out the stitches needed from the key, but am struggling with working out which stitches in the diagram are in which row at the beginning of the rows, mainly slip stitches in A2. Did row 3 of A2 OK, but when I started row 5 found I had got row 4 wrong 1 extra picot put in. Can you give me written instructions for rows 4 and 5, is start row 4 sl st, dc,sl st,tr?
22.02.2023 - 19:32DROPS Design vastas:
Dear Mrs Richardson, the slip stitches at the beginning of A.2 helps at the beg of round to start on correct place - at the beg of row 4 start with 1 slip st in first ch-space, *1 dc around ch-space, then (1 tr, 1 picot) x 9, 1 tr = 9 picots (10 tr with 1 picot between each), then repeat from * all the round - you should have 7 repeats of A.2 in total. Finish 4th round with 1 slip st in the first dc, then sl st to the first picot (= 3 sl sts), and start with 1 tr (= 4ch) + 6 chains, etc... Happy crocheting!
23.02.2023 - 13:30
![]() Susan Richardson kirjutas:
Susan Richardson kirjutas:
I am using Bomull lin for this pattern. Checked & believe it is an equivalent weight yarn. I am crocheting tension squares to check tension. 1st square made with 5.5 mm hook gives measurement of 9cm wide x 13 cm high, 13tr x 8 rows. 2nd square with 5 mm hook gives measurement of 8cm wide x 12cm high , 13tr x 8 rows. So neither correct. I am unsure what to do. I f I use smaller hook, I will end up with an even narrower width, & maybe reach 11 cm height. My tension is not giving a Square!
18.02.2023 - 17:44DROPS Design vastas:
Dear Susan, in these cases, it's more important the width (with the right amount of stitches) than the height (the amount of rows), since you could always work a few less rows, but it's more difficult to adjust the number of stitches. Therefore, you can work with a 5.5mm hook or even try if the width will match with a 6mm hook. Then, you will need to adjust the amount of rows to work (making rules of 3 of the length indicated for your size in a specific point in the pattern and the rows you have worked and have yet to work). Happy crocheting!
19.02.2023 - 19:27
![]() Denise kirjutas:
Denise kirjutas:
Looking at the picture, it looks like the last 2 rounds of A2 were not completed. According to the picture, the last round completed was the picot between dc around chain space. Am I correct?
23.09.2021 - 06:12DROPS Design vastas:
Hi Denise, All the rounds in A.2 are completed. Happy crocheting!
28.09.2021 - 14:48
![]() Patricia P kirjutas:
Patricia P kirjutas:
Hello, What size is this pattern making? How do you adjust to make S or XXXL? Does the hook size determine the size of the finished jacket? Thank you!
10.04.2019 - 20:15DROPS Design vastas:
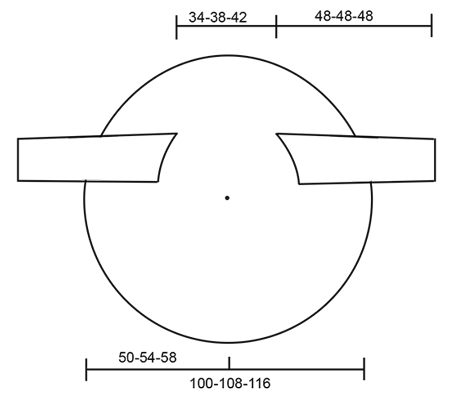
Dear Patricia, for the finished size, please refer to the scematics at the bottom of the pattern. And yes, the sice of the hook does change the size of the finished item (the crocheted fabric will be thighter and the piece will be smaller with a smaller hook, and it will be looser and bigger with a bigger hook). Happy Crafting!
11.04.2019 - 08:57
![]() Julia Kaufmann kirjutas:
Julia Kaufmann kirjutas:
Hallo! Ich würde diese Kreisjacke gerne mit einem Farbwechsel-Bobbel häkeln. Sind da 750 m Lauflänge (3-fädig, 150 g) ausreichend? Danke.
17.07.2018 - 07:59DROPS Design vastas:
Liebe Frau Kaufmann, wir bitten um Verständnis, dass wir nicht Produkte unserer Konkurrenz empfehlen können und dass der Kauf des Materials uns hilft, weiterhin kostenlose Anleitungen zur Verfügung stellen zu können.
17.07.2018 - 09:28
![]() Gilda kirjutas:
Gilda kirjutas:
Salve, vorrei un chiarimento sul punto, dopo gli scalfi, non ho capito bene cosa si intende in verticale; mi viene da pensare che devo lavorare fin sopra gli scalfi, ma non lavorare il collo; qualcuno può aiutarmi per favore?
26.04.2018 - 13:59DROPS Design vastas:
Buongiorno Gilda. Abbiamo corretto il testo. Deve ripetere il giro 7 il numero di volte indicato per la sua taglia. Buon lavoro!
26.04.2018 - 14:10
![]() Chou-coulate kirjutas:
Chou-coulate kirjutas:
Bonjour, Je viens de terminer le dernier rang de A2 et je ne comprends pas lorsqu'il est écrit " au dernier tour de A.2 diminuer 1 B = 160 B". Je dois effectuer des diminutions avant d'entamer la partie disant de reprendre A1 au 5eme rang ?
19.01.2018 - 16:17DROPS Design vastas:
Bonjour Chou-coulate, au dernier rang de A.2, vous avez 23 brides dans chaque A.2 x 7 A.2 = 161 brides, diminuez 1 m (crochetez par ex 4 brides au lieu de 5 autour d'un arceau) pour que vous ayez bien 160 brides à la fin de A.2. Bon crochet!
22.01.2018 - 08:44
|
||||||||||||||||||||||||||||||||||
Evening Tide#eveningtidejacket |
||||||||||||||||||||||||||||||||||
 |
 |
|||||||||||||||||||||||||||||||||
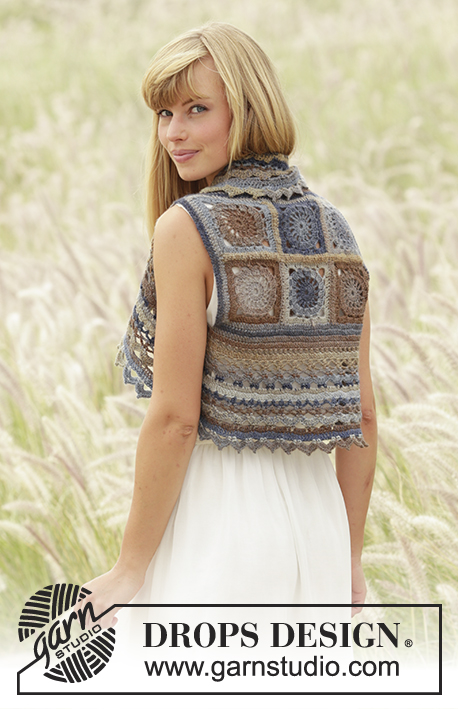
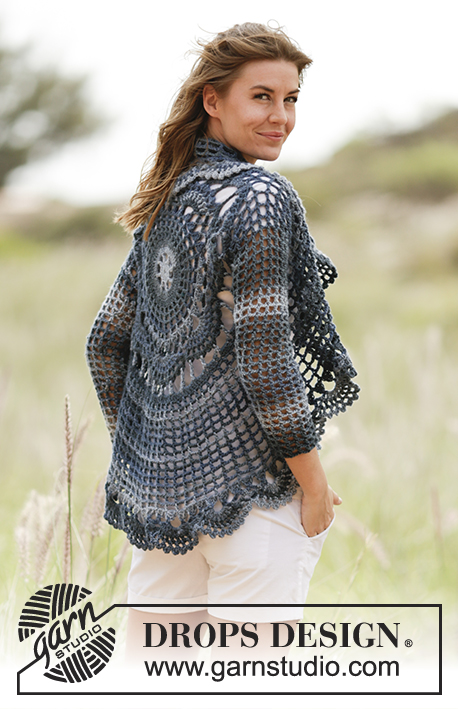
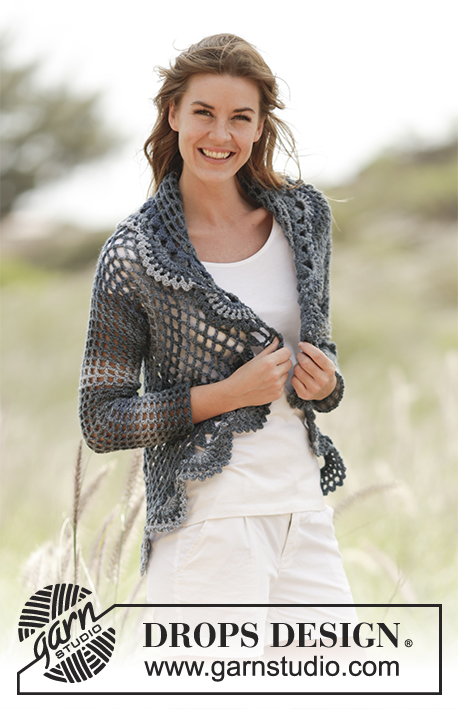
DROPS Big Delight lõngast ringselt heegeldatud rataskampsun / jakk suurustele S kuni XXXL
DROPS 168-27 |
||||||||||||||||||||||||||||||||||
|
LÕNGAST AASAGA ALUSTAMINE Kasuta seda tehnikat ringselt tööd alustades, et ei jääks keskele auku: hoia lõngaotsa vasakus käes ja keera lõng ümber vasaku käe sõrme (vasakult paremale). Hoia aasa vasaku käe pöidla ja nimetissõrmega. Pista heegelnõel läbi aasa ja tõmba silmus, võta lõngakeerd ja tõmba läbi silmuse = 1 kinnissilmus, tee 3 ahelsilmust, siis heegelda 15 ühekordset sammast ümber aasa, lõpus tee 1 aassilmus kolmandasse ahelsilmusesse = 16 ühekordset sammast. Jätka heegeldamist nagu kirjeldatud juhendis, SAMAL AJAL tõmba lõngaotsast aas kinni ja auk kaob. MUSTER Vaata skeeme A.1 ja A.2. HEEGELDAMISE INFO Asenda ringi esimene ühekordne sammas (sm) 3 ahelsilmusega. Lõpeta ring, tehes 1 aassilmuse kolmandasse ahelsilmusesse ringi algul. Asenda ringi esimene kahekordne sammas 4 ahelsilmusega. Lõpeta ring, tehes aassilmuse neljandasse ahelsilmusesse ringi algul. ---------------------------------------------------------- RATASJAKK Tee LÕNGAST AAS - vaata ülevalt, 5,5 mm heegelnõelaga ja Big Delight lõngaga. Siis heegelda skeemi A.1 järgi - NB! Esimene ring skeemil A.1 on selgitatud üleval - vaata LÕNGAST AAS, tee 4 mustrikordust skeemi A.1 laiuses. Aassilmused skeemi A.1 algul tehakse ainult ringi alguses. LOE HEEGELDAMISE INFOT! JÄLGI HEEGELDAMISE TUGEVUST! Kui skeem A.1 on tehtud, jätka skeemi A.2, tee 7 kordust skeemi A.2 laiuses, skeemi A.2 viimasel ringil kahanda 1 ühekordne sammas = 160 ühekordset sammast. Siis jätka skeemiga A.1, alusta 5. reaga skeemil - vaata noolt skeemil. Heegelda 1-2-3 ringi skeemi 5. ringi mustrit (= 80 ühekordset sammast + 2 ahelsilmust), siis tee käeaugud järgmiselt: heegelda * 1 ühekordne sammas + 2 ahelsilmust esimesse sambasse *, korda * kuni * esimese 20 samba kohal; heegelda 22-24-26 ahelsilmust, jäta vahele 10-11-12 sammast (= 1. käeauk), tee * 1 ühekordne sammas + 2 ahelsilmust järgmisesse sambasse *, korda * kuni * järgmise 40-38-36 samba kohale, tee 22-24-26 ahelsilmust, jäta vahele 10-11-12 sammast (= 2. käeauk), lõpus tee 1 aassilmus ringi algusesse. Siis heegelda nagu 6. ring skeemil järgmiselt: tee 1 ühekordne sammas + 2 ahelsilmust igasse sambasse kuni esimese käeauguni, * tee 1 ühekordne sammas + 2 ahelsilmust ümber ahelsilmustest kaare *, korda * kuni * veel 10-11-12 korda, jätka tehes 1 ühekordne sammas + 2 ahelsilmust kuni teise käeauguni, * tee 1 ühekordne sammas + 2 ahelsilmust ümber ahelsilmustest kaare *, korda * kuni * veel 10-11-12 korda = 82 ühekordset sammast ja 2 ahelsilmust iga vahel. Siis korda skeemi 7. ringi 8-7-6 korda vertikaalselt. Heegelda skeemi 7. ringi veel 1-3-5 korda, SAMAL AJAL kasvata 2 ühekordset sammast ühtlaste vahedega igal real, st. 2 korda igal ringil järgmiselt: heegelda ühte sambasse 1 ühekordne sammas + 3 ahelsilmust + 1 ühekordne sammas + 3 ahelsilmust = 84-88-92 ühekordset sammast ja 3 ahelsilmust iga samba vahel. Jaki läbimõõt on umbes 80-88-96 cm (= 40-44-48 cm algusest). Heegelda viimane ring skeemil A.1, siis tee skeemi A.2 (= 21-22-23 mustrikordust ringil). Katkesta ja kinnita lõng. VARRUKAD Heegelda ringselt käeaugust väljapoole. Tee 1 ühekordne sammas + 2 ahelsilmust igasse vahelejäetud sambasse, ja 1 ühekordne sammas + 2 ahelsilmust igasse sambasse käeaugu allääres = 21-23-25 ühekordset sammast ja 2 ahelsilmust iga samba vahel. Paigalda silmusemärkija käeauku - varrukaalune keskkoht. Jätka, tehes 1 ühekordne sammas + 2 ahelsilmust igasse sambasse. Kui töö pikkus on 4 cm, kahanda 1 sammas + 2 ahelsilmust varruka siseküljel järgmiselt: tee viimane sammas enne silmusemärkijat, aga ära tee viimast lõnga läbitõmmet, tee järgmine ühekordne sammas (ära tee 2 ahels nende vahele), aga nüüd tee viimane lõnga läbitõmme läbi kõigi 3 silmuse heegelnõelal (= 1 sm + 2 ahels kahandatud). Kahanda nii iga 5 cm järel veel 7 korda, kahanda kordamööda enne või pärast silmusemärkijat = 13-15-17 ühekordset sammast ja 2 ahelsilmust iga samba vahel. Jätka heegeldamist, kuni töö pikkus on 48 cm kõikidel suurustel, katkesta ja kinnita lõng. Tee teine varrukas samamoodi. |
||||||||||||||||||||||||||||||||||
Skeemi seletused |
||||||||||||||||||||||||||||||||||
|
||||||||||||||||||||||||||||||||||
 |
||||||||||||||||||||||||||||||||||
 |
||||||||||||||||||||||||||||||||||
Kas oled teinud seda mustrit?Lisa oma piltidele viide #dropspattern #eveningtidejacket või saada link projektile meie #dropsfan galeriisse. Vajad abi selle mustriga?Garnstudio.com kodulehel on 8 õppevideot, küsimuste/vastuste osa ja muudki. © 1982-2026 DROPS Design A/S. Kõik õigused kaitstud. See dokument, ning selle alajaotused on kaitsud autoriõigustega. Loe rohkem, mida meie mustritega võib teha, iga mustrilehe alt meie kodulehel. |
||||||||||||||||||||||||||||||||||


Tegeledes üle 40 aasta kudumise ja heegeldamise disainidega, pakub DROPS Design ühte suurimat tasuta mustrite kollektsiooni internetis - tõlgituna 17 keelde. Tänaseks on meil 325 kataloogi ja 12298 mustrit - millest 9442 on tõlgitud Eesti keelde.
Me anname endast parima, et tuua teieni kõike mida kudumine ja heegeldamine võib pakkuda - inspiratsiooni, nõuandeid ning ka kvaliteetseid lõngu parima hinnaga! Soovid kasutada mustreid muukski, kui ainult oma tarbeks? Loe infot meie Copyright osas iga lehekülje all. Rõõmsat loomist!
Jäta kommentaar mustrile DROPS 168-27
Ootame kommentaare selle mustri kohta!
Kui soovid midagi küsida, siis kiiremaks vastuse saamiseks veendu, et valid õige kategooria alloleval formil. Vajaliku väljad *.