
Populaarsed kategooriad
Otsid lõnga?


Kommentaarid / Küsimused (11)
![]() Pascale kirjutas:
Pascale kirjutas:
Je n’ai pas compris ce que voulait dire « 1er rang = sur l’envers », au début de l’ouvrage. Après réflexion, j’ai commencé par un rang envers. Et c’est au moment de tricoter en rond que j’ai compris. Donc j’ai dû défaire 2 rangs pour me retrouver dans le bon sens. Je regrette que les explications n’aient pas été plus détaillées, comme dans certains modèles. C’est la 1ère fois qu’elle je me retrouve bloquée avant même de commencer 😁
17.11.2022 - 07:57
![]() Rafael kirjutas:
Rafael kirjutas:
Hello again! Thanks for the immediate replies so far. Please could you elaborate on your last message as I am a beginner? My question is that I did put both pieces on the same needle and hence I have two tails. I will be using one of these tails to knit in the round but what am I supposed to do with the other tail?
24.06.2020 - 16:16DROPS Design vastas:
Dear Rafael, after you have worked first piece (back piece) and put aside, you can cut the yarn (you then just have to weave it in). Then you work front piece and you work both pieces together in the round with the same ball (= the one from front piece). Happy knititng!
24.06.2020 - 17:08
![]() Rafael kirjutas:
Rafael kirjutas:
Hello! According to pattern, I've done the front and back pieces of the poncho and now I am supposed to slip stc them together in the same needle. How do I do it? I've seen a couple of videos of what slip stc is but how do I to put them together? I'm a bit confused with that part. Should I slip stc the sides of each piece together? Should I to do something with the stics that were kept "alive"? Could someone guide me through? Thank you very much.
22.06.2020 - 18:25DROPS Design vastas:
Dear Rafael, work one row from Right side over stitches on front piece, then at the end of this row, work the stitches of back piece from right sided and, when the last of the stitches on back piece has been worked, insert a marker on the needle (= to mark beg of round) and work stitches on front piece = you have joined pieces in the round, continue now knitting all stitches (as before). Happy knitting!
23.06.2020 - 08:58
![]() Rafael kirjutas:
Rafael kirjutas:
Hello! In the pattern it says "leave it aside" about the front piece and the same goes for the back piece as well. Does that mean that I have to cast off the last row of each piece? Because later on pattern says that they need to be joined together with slip stitch. So I'm a bit confused. Thanks.
23.12.2019 - 12:49DROPS Design vastas:
Dear Rafael, the phrase +leave it (or put it) aside means that you should either leave the stitches on the needle and make the other pieces with another one, or put the stitches on a stitch holder or a piece of leftover yarn, while making the other bits. It is important that you dont bind off the stitches, but keep them "alive" so you can continue knitting them later. Happy Knitting!
24.12.2019 - 17:02
![]() Belén Ramón kirjutas:
Belén Ramón kirjutas:
Podría mandarme a que talla corresponde cada L o XL . Si la L corresponde a talla 46 o 48.... desgraciadamente varía depende de los fabricantes. Creo que sería muy útil. Gracias!!!!
04.12.2019 - 17:34DROPS Design vastas:
Hola Belen. Bajo cada modelo tienes un diagrama de la prenda con las medidas en cm, que es mejor orientación que las tallas. Ante de la duda entre dos tallas, siempre recomendamos elegir la talla más grande . No se puede concretar la correspondencia a las tallas porque esta varia dependiendo del país.
09.12.2019 - 23:54
![]() Rafael kirjutas:
Rafael kirjutas:
Hello! pattern suggets: "Work 3 rows in GARTER ST . K 1 row. " Could you please explain to me that? I know that garter st is a pattern rather than a technique and K stands for knit stitch which is the standard knitting stitch (i saw the videos that you also include here). My question is: Do I knit all stitches for the next 3 rows after casting on and then i knit 1 more row? or do i create 3 ridges through garter stitch, which essentially means to knit 6 rows and then knit 1 more row?
21.11.2019 - 19:49DROPS Design vastas:
Dear Rafael, you should in fact work 3 ridges (= knit 6 rows), then work one more row knitting all stitches, and on next row (8th row from the cast on), work in stocking stitch with 5 sts in garter stitch on each side. Pattern will be edited. Thank you, Happy knitting!
22.11.2019 - 08:07Ylva Forss kirjutas:
Jag beställde rundstickor nr 5, 40 cm ( trä, kantiga). De har inte kommit. Skulle komma v. 11. Jag har redan betalat dem.
21.03.2017 - 13:25DROPS Design vastas:
Hej Ylva. Du kan bedre kontakte butikken hvor du har bestilt for at höre hvor lang tid der gaar endnu.
21.03.2017 - 14:47YlvavForss kirjutas:
Håller på att sticka denna poncho och jag stickar slätstickning nerifrån, enl. instruktionerna skall jag börja sticka mönsterstickning då arbetet mäter 34 cm i mitt fall, men nu måste väl arbetet i sin helhet vara 15 + 34?
17.03.2017 - 18:23
![]() Claudia Carolina kirjutas:
Claudia Carolina kirjutas:
Mi affascina questo modello e il filato non l'ho ancora usato, sono molto curiosa e spero prossimamente sperimentare l'emozione "Neuquén". Grazie Drops per tanto spunti meravigliosi. Claudia
22.03.2016 - 11:46
![]() Claudia Carolina kirjutas:
Claudia Carolina kirjutas:
Mi affascina questo modello e il filato non l'ho ancora usato, sono molto curiosa e spero prossimamente sperimentare l'emozione "Neuquén". Grazie Drops per tanto spunti meravigliosi. Claudia
22.03.2016 - 11:46
|
|||||||||||||||||||
Neuqu |
|||||||||||||||||||
|
|
|||||||||||||||||||
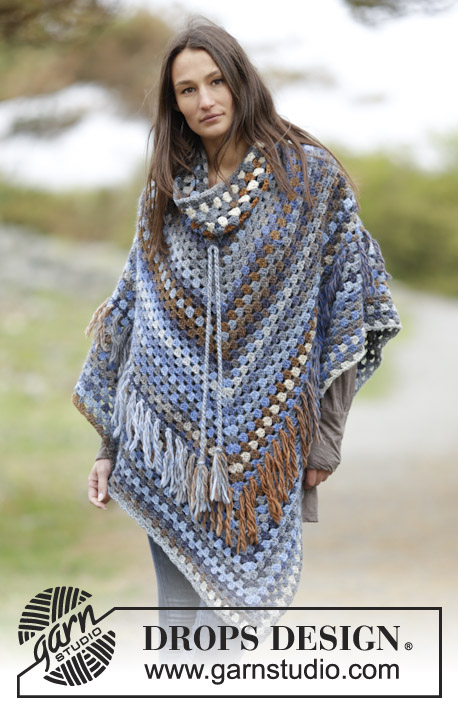
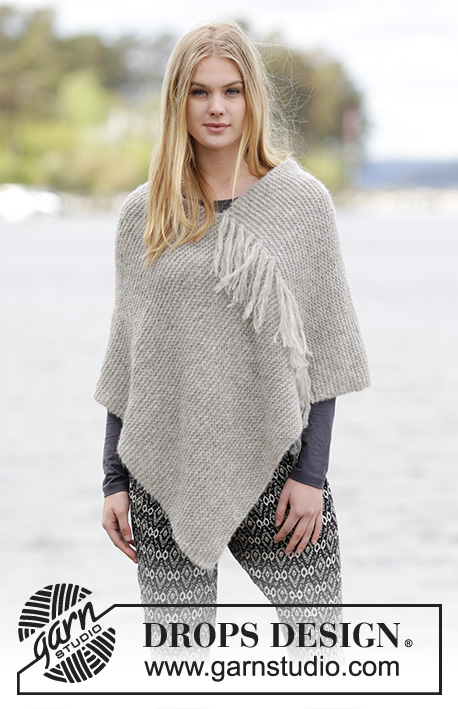
DROPS Nepal lõngast kootud Norra mustriga pontšo suurustele S kuni XXXL
DROPS Extra 0-1164 |
|||||||||||||||||||
|
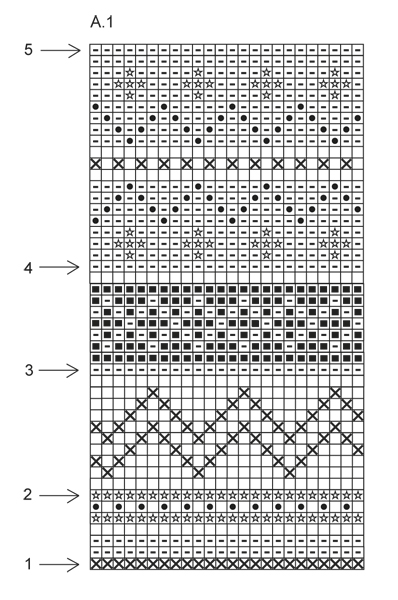
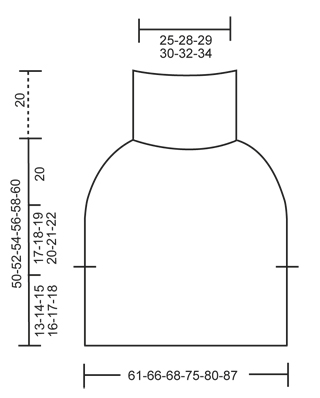
RIPSKUDE (edasi-tagasi kududes): koo kõik silmused parempidi igal real. 1 ripsivall = 2 rida ripskoes. MUSTER Vaata skeemi A.1. Muster kootakse parempidises koes. KUDUMISE NIPP Et muster ei jääks kiskuma, ära pinguta lõngu töö taga liiga tugevasti. Võta suuremad vardad, kui muster jääb liiga pingule. KAHANDAMISE NIPP Arvutamaks, kui tihti peab kahandama, võta silmuste arv ringil (näiteks. 264 s) ja jaga kahandada vajaoleva silmuste arvuga (näiteks. 32) = 8,25. St. selles näites tuleb kududa iga 7. ja 8. silmus kokku. KASVATAMISE NIPP Kasvata 1 s, tehes õhksilmuse, järgmisel ringil koo see keerdsilmusena (st. koo läbi silmuse tagumise aasa, et ei tekiks auku. ----------------------------- PONTŠO Kootakse edasi-tagasi, kuni lõhiku lõpuni, siis jätkatakse ringselt. SELJAOSA (kuni lõhikuni) Kootakse edasi-tagasi ringvarrastega. Loo 106-114-118-130-138-150 s 5 mm ringvardale helehalli lõngaga. Koo 3 ripsivalli (6 rida ripskoes) - vaata ülevalt (1.rida = töö PH pool). Koo 1 rida parempidi. Jätka parempidises koes, tehes 5 s ripskoes mõlemal serval. JÄLGI KOETIHEDUST! Kui töö pikkus on 13-14-15-16-17-18 cm, kahanda 1 ääresilmus mõlemal serval (järgmine rida on töö PP pool) = 104-112-116-128-136-148 s. Pane töö kõrvale ja koo esiosa, kuni lõhiku lõpuni. ESIOSA (kuni lõhikuni) Loo ja koo nagu seljaosa. KEHAOSA Kootakse ringselt. Tõsta esi- ja seljaosa silmused samale ringvardale = 208-224-232-256-272-296 s. Koo parempidises koes helehalli lõngaga, kuni töö pikkus on 30-32-34-36-38-40 cm. Siis koo ringselt mustrit skeemil A.1, SAMAL AJAL kahanda skeemil noolega 1 märgitud real 6-8-8-10-10-12 s ühtlaste vahedega - loe KAHANDAMISE NIPPI ja KUDUMISE NIPPI = 202-216-224-246-262-284 s. Jätka mustriga. Skeemil noolega 2 märgitud real kahanda ühtlaste vahedega 18-24-24-30-30-36 s = 184-192-200-216-232-248 s. Jätka mustriga. Skeemil noolega 3 märgitud real kahanda ühtlaste vahedega 32-32-32-36-44-48 s = 152-160-168-180-188-200 s. Jätka mustriga. Skeemil noolega 4 märgitud real kahanda ühtlaste vahedega 32-34-36-42-44-50 s = 120-126-132-138-144-150 s. Jätka mustriga. Skeemil noolega 5 märgitud real (= viimane ring) kahanda ühtlaste vahedega 34-30-34-36-36-34 s = 86-96-98-102-108-116 s. Koo 1 ring helehalli lõngaga, SAMAL AJAL kasvata 4-6-4-6-6-4 s ühtlaste vahedega - loe KASVATAMISE NIPPI = 90-102-102-108-114-120 s. Siis koo ringselt soonikut 2 pr/4 ph lühikeste ringvarrastega. Kui soonik on u. 20 cm pikkune, koo silmused lõdvalt maha, kududes pr silmuse pr ja ph silmuse ph. |
|||||||||||||||||||
Skeemi seletused |
|||||||||||||||||||
|
|||||||||||||||||||
 |
|||||||||||||||||||
 |
|||||||||||||||||||
Kas oled teinud seda mustrit?Lisa oma piltidele viide #dropspattern või saada link projektile meie #dropsfan galeriisse. Vajad abi selle mustriga?Garnstudio.com kodulehel on 20 õppevideot, küsimuste/vastuste osa ja muudki. © 1982-2026 DROPS Design A/S. Kõik õigused kaitstud. See dokument, ning selle alajaotused on kaitsud autoriõigustega. Loe rohkem, mida meie mustritega võib teha, iga mustrilehe alt meie kodulehel. |
|||||||||||||||||||


Tegeledes üle 40 aasta kudumise ja heegeldamise disainidega, pakub DROPS Design ühte suurimat tasuta mustrite kollektsiooni internetis - tõlgituna 17 keelde. Tänaseks on meil 324 kataloogi ja 12290 mustrit - millest 9430 on tõlgitud Eesti keelde.
Me anname endast parima, et tuua teieni kõike mida kudumine ja heegeldamine võib pakkuda - inspiratsiooni, nõuandeid ning ka kvaliteetseid lõngu parima hinnaga! Soovid kasutada mustreid muukski, kui ainult oma tarbeks? Loe infot meie Copyright osas iga lehekülje all. Rõõmsat loomist!
Jäta kommentaar mustrile DROPS Extra 0-1164
Ootame kommentaare selle mustri kohta!
Kui soovid midagi küsida, siis kiiremaks vastuse saamiseks veendu, et valid õige kategooria alloleval formil. Vajaliku väljad *.