
Populaarsed kategooriad
Otsid lõnga?
















Kommentaarid / Küsimused (164)
 Christina kirjutas:
As soon as I posted my last comment/ question the answer appeared below my original question. It definitely wasnt there before cos I looked carefully. Anyway thank you.
28.09.2026 - 22:06
Christina kirjutas:
Please could someone answer my question from the 23/9 as it doesnt say which size hook to use for the loops. Is it a 3mm or a 5mm. Really this pattern is not at all clear.
28.09.2026 - 22:03DROPS Design vastas:
Hi Christina, We have answered your question and you should have been notified via e mail. If you look at the comments and answers at the bottom of the page, you will see our answer - you work the loops with a 5 mm hook. Regards, Drops Team.
29.09.2026 - 06:12
Christina kirjutas:
I'm about to crochet the loops but it doesnt say what size hook to use. Is it the 3mm or 5mm hook. I take it that I use a 5mm for the ties in chain stitch as I did for the ties at the neck/shoulder.
23.09.2026 - 22:45DROPS Design vastas:
Hi Christina, Yes, the loops are worked using crochet hook size 5 mm. Regards, Drops Team.
24.09.2026 - 07:29
Christina kirjutas:
Ok, thanks. I just did slip stitches at the beginning of M2 to get to M3 and also slip stitches at each beginning row of M3 to decrease and for each new shorter row.Your previous reply on 10/9 said to turn when I have done M3. But then when should I do M4? I went straight from M3 to crochet halfway across M4 to the central point and then turned and went crocheted back across M4 and M3. I couldnt see any other way to do it.
23.09.2026 - 22:41
Christina kirjutas:
Ok, I'll work dble crochet AGAIN along the top of M2 to get to the start of M3 but this will be row 6 of M2. Why doesnt it show this on the graph? But then you say to turn after M3. Dont I have to work M4 after M3 to get to the halfway point. None of this makes any sense to me!
13.09.2026 - 01:17DROPS Design vastas:
Dear Christina, we don't show it in the chart because you can simply cut the thread and rejoin it in M.3. Otherwise, you could also work slip stitches, to avoid cutting the thread but still stitches small enough that it won't look as if M.2 has a 6th row. The M.3 after this first M.2 is worked as before; however, there is an M.3 which is worked before M.2, at the end of the row, previously. For this M.3, instead of working slip stitches, you simply turn the piece and leave unworked the stitches in the final M.2 (as opposed to the initial M.2, which was explained above). Happy crochetting!
14.09.2026 - 00:06
Christina kirjutas:
Thanks for your reply but I still dont understand. Im at ghe end of row5 so if I work a double crochet in each M2 stitch now, then I will have two rows of double crochet instead of one as shown on the pattern. It clearly says in the instructions that M2 has only 5 rows. How do I get to the start of M3 without doing another M2 row? There's nothing to say in the instructions.
09.09.2026 - 22:18DROPS Design vastas:
Dear Christina, at the beginning of the row you work M.2 = 1 dc in each st to the beg of M.3, then when you have done M.3, just turn leaving the last stitches M.2 unworked at the end of the row and continue with M.3 as shown in the diagram. Happy crocheting!
10.09.2026 - 09:45
Christina kirjutas:
I dont want to break and rejoin the yarn as that's a bit messy but the pattern doesn't show to do any slip stitches to make my way from the end of M2 to the beginning of row 6 of M3.
08.09.2026 - 01:18
Christina kirjutas:
I dont want to break and rejoin the yarn as that's a bit messy but the pattern doesn't show to do any slip stitches to make my way from the end of M2 to the beginning of row 6 of M3.
07.09.2026 - 22:52
Christina kirjutas:
Sorry didnt mean to send it twice. I thought it hadnt been sent
07.09.2026 - 22:49
Christina kirjutas:
I'm at the end of row 5 of M2. How to I get to the beginning of row 6 of M3 and M4? Do I have to break off the yarn and retie each time or can I slip stitch until I get to the start of M3? Also what do I do when I reach the middle of M4? Do I turn and work back and forth over that half and then crochet the other half separately.
07.09.2026 - 22:44DROPS Design vastas:
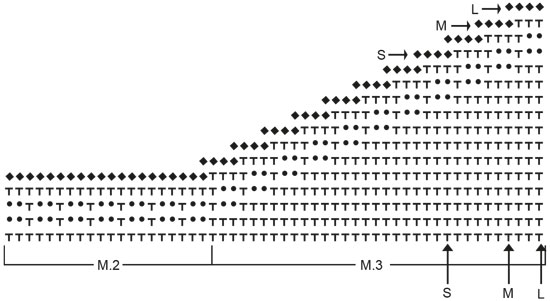
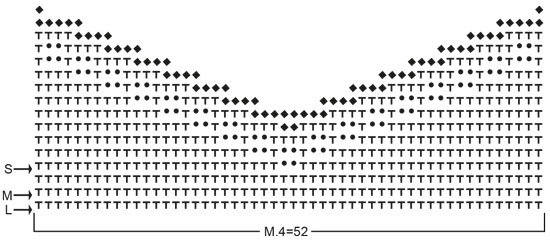
Dear Christina, work 1 double crochet (UK crochet terminology - see 2nd symbol under diagram text) in each stitch in M.2 to M.3 - when you reach the middle of M.4 you will finish each part separately, without breaking yarn just work one side to the end then join yarn again to finish the 2nd side. Happy crocheting!
08.09.2026 - 09:24
|
|||||||||||||
Sidney |
|||||||||||||
 |
 |
||||||||||||
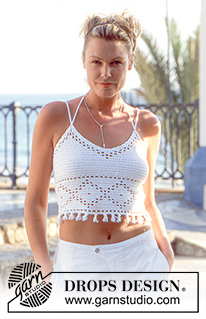
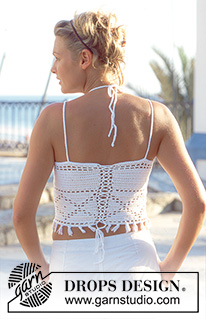
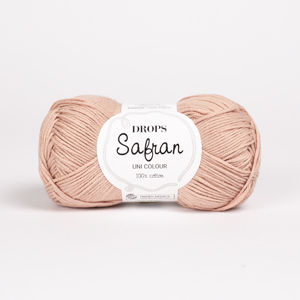
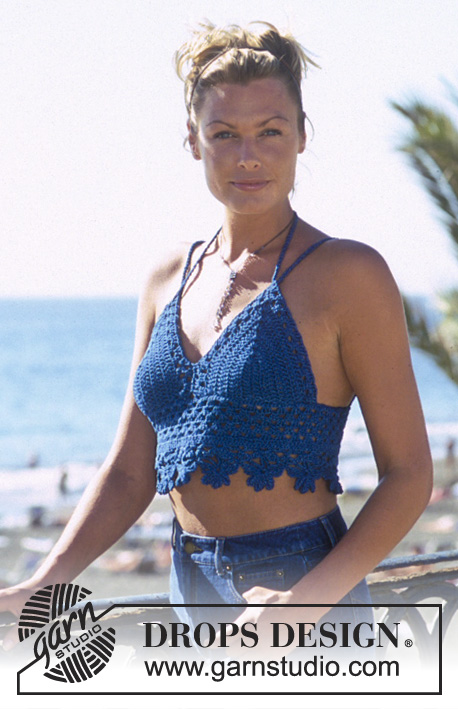
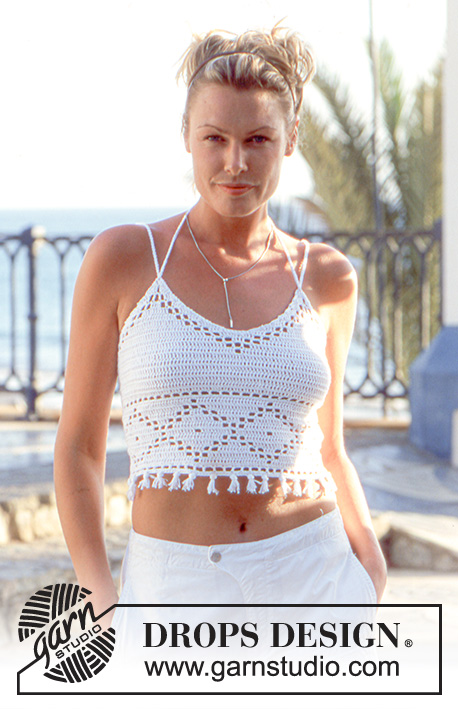
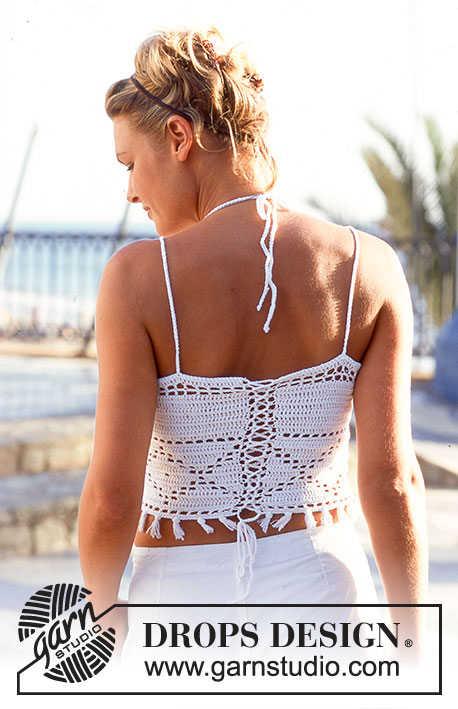
Heegeldatud DROPS topp lõngast Safran
DROPS 69-1 |
|||||||||||||
|
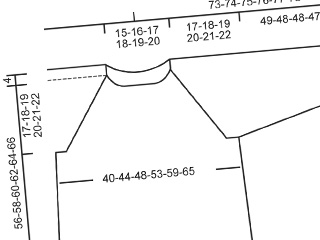
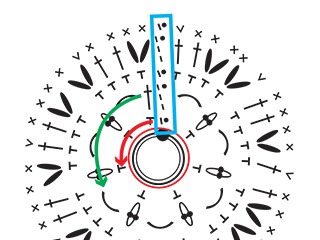
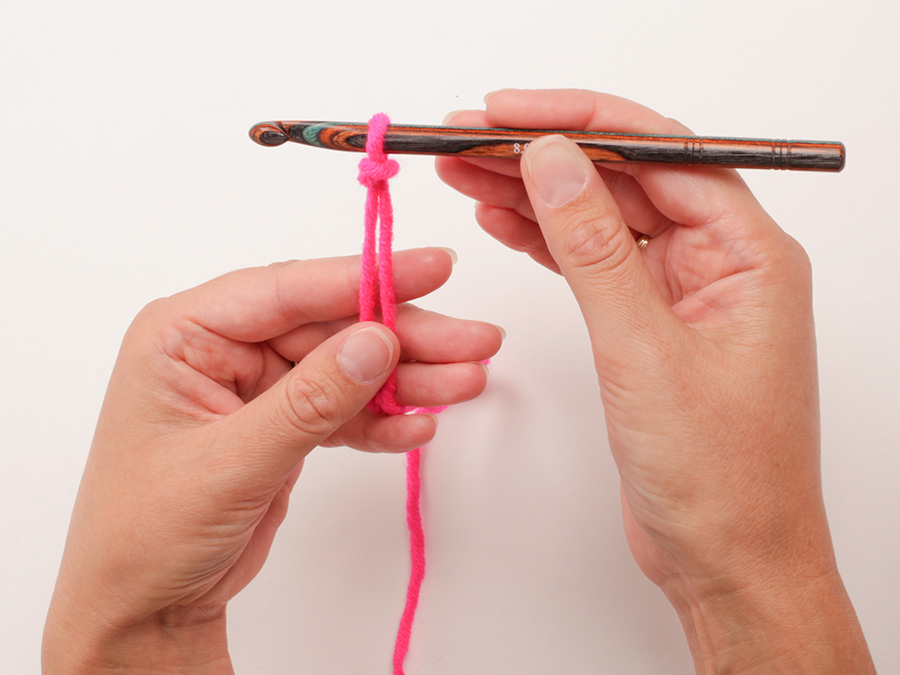
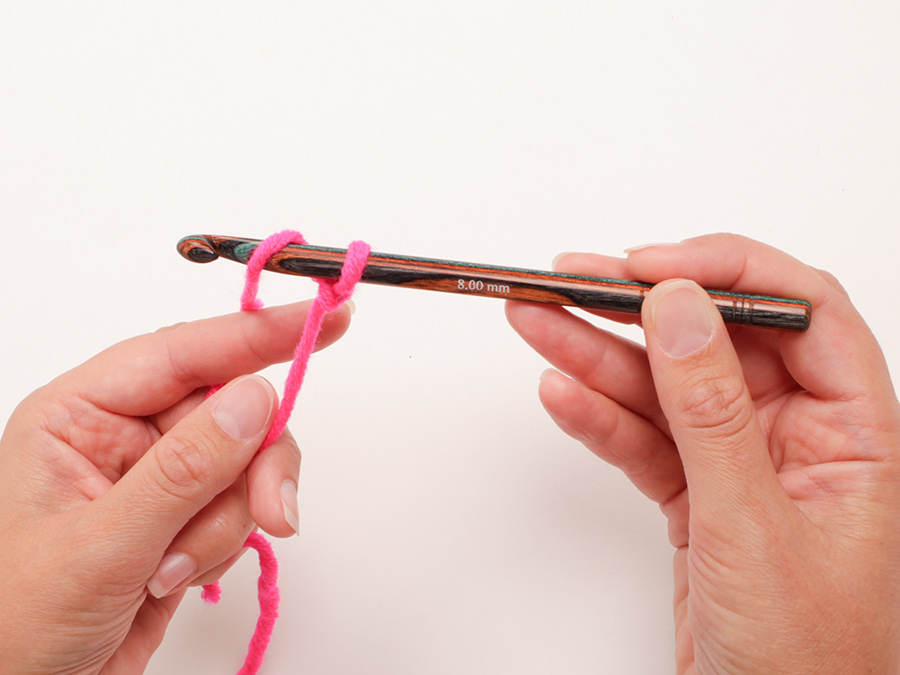
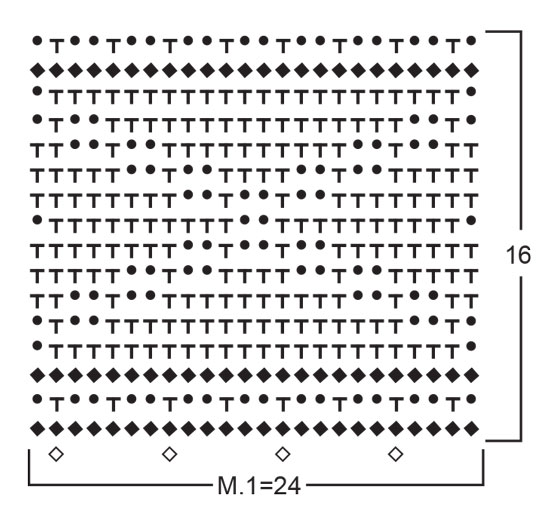
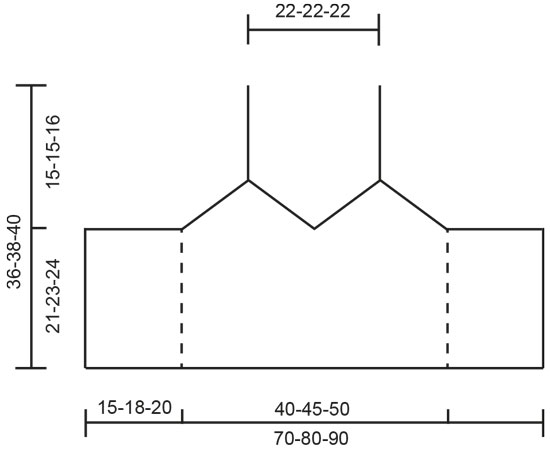
MUSTER Vaata skeeme. Skeemil M.1 ja M.2 on näidatud 1 mustrikordus. Skeemidel M.3 ja M.4 vaata suurusele sobivaid nooli. HEEGELDAMISE NIPP Pööra rea lõpus järgmiselt, rea alguses 2 ahels asendab 1 ühekordset sammast (sm) ja 1 ahels asendab 1 kinnissilmust (ks). ------------------------------- TOPP Heegelda 169-193-217 ahelsilmust 3 mm heegelnõelaga. Pööra ja heegelda muster M.1 - vaata heegeldamise nippi üleval = 168-192-216 s. Pärast skeemi M.1 jätka sammastega kõigil silmustel, aga: SUURUSED S ja M: kasvata 4 s ühtlaste vahedega esimesel real pärast skeemi M.1. SUURUS L: kahanda 2 s ühtlaste vahedega esimesel real pärast skeemi M.1. = 172-196-214 s. Kui on heegeldatud kokku 22-24-25 rida (k.a skeem M.1), on töö pikkus u. 18-20-21 cm. Jätka nii: heegelda skeemi M.2 - alusta skeemi alumise rea vasakust nurgast (või vaata skeemi peegelpildis) ja heegelda paremale järgmisel 36-42-48 silmusel, heegelda skeemi M.2 - alusta skeemi alumise rea vasakust nurgast (või vaata skeemi peegelpildis) ja heegelda paremale järgmisel 36-42-48 silmusel, heegelda skeemi M.4 (52-52-52 s), siis skeemi M.3 - alusta skeemi alumise rea paremast nurgast (suurusele vastava noole juurest) ja heegelda vasakule järgmisel 24-30-33 silmusel ning heegelda skeemi M.2 - alusta skeemi alumise rea paremast nurgast ja heegelda vasakule järgmisel 36-42-48 silmusel. Jätka niimoodi mustriga. Pärast 5 rida skeemil M.2 jätka skeemiga M.3 ja M.4, kuni skeemid on tehtud. ÕLAPAELAD Alusta u. 9 cm kauguselt parema külje ülaserval (= seljaosal). Heegelda ketti u. 90 cm kahekordse lõngaga ja 5 mm heegelnõelaga. Tõmba läbi esiosa ülemise tipu. Korda teisel küljel. Paelad seotakse kinni kaela taga. AASAD Heegelda aasad mõlemal poole külgedele (seljaosa keskel). Alusta ülevalt ja heegelda alla nii: * 1 ks, 3 ahels, jäta vahele 1 cm *, korda * kuni * kuni alumise nurgani. Heegelda u. 150 cm pikkune ahelsilmustest kett. Punu pael läbi aasade - alusta ülevalt ja punu risti läbi aasade alla, all tee seos. NARMAD 1 narmas = lõika 4 lõngajuppi pikkusega 8 cm. Murra pooleks, pista aas läbi topi alumise rea, tõmba otsad läbi - vaata narmaste asukohti skeemil M.1. Tee 28-32-36 narmast. |
|||||||||||||
Skeemi seletused |
|||||||||||||
|
|||||||||||||
 |
|||||||||||||
 |
|||||||||||||
 |
|||||||||||||
 |
|||||||||||||
Kas oled teinud seda mustrit?Lisa oma piltidele viide #dropspattern või saada link projektile meie #dropsfan galeriisse. Vajad abi selle mustriga?Garnstudio.com kodulehel on 8 õppevideot, küsimuste/vastuste osa ja muudki. © 1982-2026 DROPS Design A/S. Kõik õigused kaitstud. See dokument, ning selle alajaotused on kaitsud autoriõigustega. Loe rohkem, mida meie mustritega võib teha, iga mustrilehe alt meie kodulehel. |
|||||||||||||
Tegeledes üle 40 aasta kudumise ja heegeldamise disainidega, pakub DROPS Design ühte suurimat tasuta mustrite kollektsiooni internetis - tõlgituna 17 keelde. Tänaseks on meil 333 kataloogi ja 12548 mustrit - millest 9709 on tõlgitud Eesti keelde.
Me anname endast parima, et tuua teieni kõike mida kudumine ja heegeldamine võib pakkuda - inspiratsiooni, nõuandeid ning ka kvaliteetseid lõngu parima hinnaga! Soovid kasutada mustreid muukski, kui ainult oma tarbeks? Loe infot meie Copyright osas iga lehekülje all. Rõõmsat loomist!
Jäta kommentaar mustrile DROPS 69-1
Ootame kommentaare selle mustri kohta!
Kui soovid midagi küsida, siis kiiremaks vastuse saamiseks veendu, et valid õige kategooria alloleval formil. Vajaliku väljad *.