
Populaarsed kategooriad
Otsid lõnga?


Kommentaarid / Küsimused (119)
![]() Marcia Ebert kirjutas:
Marcia Ebert kirjutas:
The pattern calls for knitting A then B then C That would be following the pattern right to left. Is this correct? It would be much easier to follow it left to right. I find this confusing. It is a pretty sweater.
15.01.2019 - 04:08DROPS Design vastas:
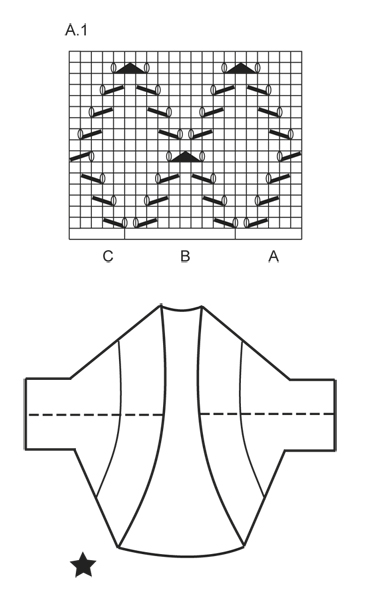
Dear Mrs Ebert, diagrams are worked top down, from RS read from the right towards the left and from WS from the left towards the right. Work A, then repeat B and finish row with C. On row 15, work the last 2 sts in A/B together with the first st B/next B/C. Happy knitting!
15.01.2019 - 09:39Carla kirjutas:
Drops 146-16. I’ve never read a pattern like this before and I’m very lost is there a tutorial showing what to do after doing the garter st for 7cm??
12.11.2018 - 00:51DROPS Design vastas:
Dear Carla, you can find the videos, related to this pattern at the left of the page, below the pictures. Also there are detailed explanation of the symbos of the pattern chart. If you need further help you can also ask for it in person in the store where you bought your DROPS yarn from. Happy Crafting!
12.11.2018 - 01:50
![]() Kitty Neijssel kirjutas:
Kitty Neijssel kirjutas:
Voor dit patroon zou voor maat XXXL 350 gram nodig zijn. Ik heb dus 7 bolletjes besteld. Al na 1 bolletje zag ik dat die hoeveelheid lang niet genoeg zou zijn. Na 4 bollen ben ik nog niet op de helft. Volgens mijn berekening heb ik nog 2 bollen nodig. Ik ben zeker geen beginnende breister ( ex-lerares Textiele Werkvormen en gedegen hobby-breister). Alles klopt volgens de stekenproef e.d. Ik ben een enthousiaste fan van Drops en tot nog toe heb ik nog nooit een probleem gehad met de patronen.
26.03.2018 - 13:20
![]() Anna kirjutas:
Anna kirjutas:
Da quale lato va letto il diagramma A1? La linea tratteggiata è la manica?
20.11.2017 - 07:53DROPS Design vastas:
Buongiorno Anna. Il diagramma si legge dal basso verso l’alto e da destra verso sinistra (lavorando avanti e indietro, i ferri pari si leggono da sinistra verso destra). Nel grafico con le misure, le linee tratteggiate sono le parti che verranno cucite: dovrà cucire sotto le maniche e i lati del davanti e dietro. Buon lavoro!
20.11.2017 - 11:04
![]() Natasja kirjutas:
Natasja kirjutas:
Hi. Im about to cast on for the sleeves, and i dont understand the 10 st. Is it 10 st in each side or 5 st in each side, and how ?
07.08.2017 - 12:24DROPS Design vastas:
Hi Natasja, You cast on 10 new stitches at the end of the next 2 rows, so 10 stitches at the end of the first row and then 10 new stitches at the end of the next row. So 20 stitches all in all. I hope this helps. Happy knitting!
07.08.2017 - 15:53
![]() Karine kirjutas:
Karine kirjutas:
Bonjour, Je tricote la taille L J'ai un souci à la première ligne du diagramme A1. 3 m. pt mousse - A1a - A1b - terminer par A1c OK mais il me reste 6 mailles avant de terminer 3 m pt mousse de la fin ? Logiquement, répétition de 5 fois diagramme A1 sur la ligne c'est juste ? Je refais plusieurs fois, j'arrive toujours pareil, je ne comprends pas :(
03.04.2017 - 17:49DROPS Design vastas:
Bonjour Karine, vérifiez bien que vous avez bien 6 m pour A.1A, 10 m pour chaque motif de A.1B et 5 m pour A.1C, ainsi, vous devriez bien avoir: 3 m point mousse, 6 m de A.1A, 11-12-13-14 fois A.1B (= 110-120-130-140 m en A1B), 5 m de A.1C et 3 m point mousse = 127-1237-147-157 m. Bon tricot!
04.04.2017 - 10:04
![]() April kirjutas:
April kirjutas:
Reading the pattern as we add the sleeves which pattern do we follow. It says to fit A.1 in before the increase. I'm confused as to which diagram we use for the sleeves.
18.07.2016 - 04:05DROPS Design vastas:
Dear April, start with 3 sts in garter st, then work A.1A on the next 6 sts (= new sts cast on for sleeve), now work first A.1B over the next 10 sts (= last st cast on for sleeve + the next 3 sts previously worked in garter st + the next 6 sts previously worked in A.1A), then repeat A.1B and A.1C as before until end of row, cast on the 10 new sts and continue as before. Happy knitting!
18.07.2016 - 09:35
![]() Arika kirjutas:
Arika kirjutas:
There is no way size L needs just 300 g. I am at 24 cm and I'm starting my 4th skein. I did the gauge and it was correct so it is not an issue of my loose knitting style. Now I have to order one more skein just to finish the garment. This is extremely frustrating as I'm not even sure if the dye lots match. Not to mention extra shipping cost (I was not planning to buy any yarn anytime soon). PLEASE correct the yardage for other knitters!
15.06.2016 - 05:07
![]() Jayne Bradbury kirjutas:
Jayne Bradbury kirjutas:
Regarding the chart: Are all rows, both right and wrong side, on the chart? Or just the right side? There are no numbers on the side of the chart to clarify and I want to be sure.
31.05.2016 - 16:17DROPS Design vastas:
Dear Mrs Bradbury, diagram shows all rows both from RS and from WS, seen from RS - read more about diagrams here. Happy knitting!
31.05.2016 - 17:01
![]() Sue kirjutas:
Sue kirjutas:
I do not understand the construction of this garment. Where are the sleeves? Where is the head?
29.05.2016 - 02:59DROPS Design vastas:
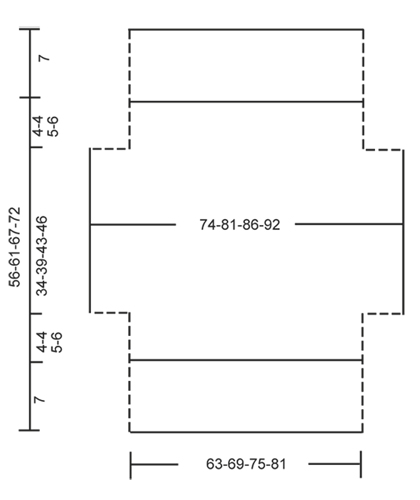
Dear Sue, the moss st edge around opening consists on the 7 cm worked at the beg of piece and the 7 cm worked at the end of piece (see measurement chart). The sts cast on /cast off on each side are for sleeves. The dotted lines on each side are the sides you will sew tog to create sleeves. In chart with black star, you can see the dotted line (seam for sleeves) and the 7 cm moss st edge around opening. Happy knitting!
30.05.2016 - 09:26
|
|||||||||||||||||||
Cassie#cassiebolero |
|||||||||||||||||||
 |
 |
||||||||||||||||||
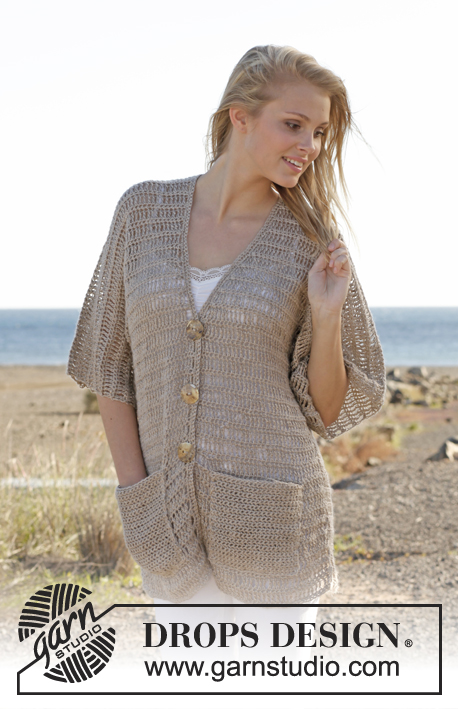
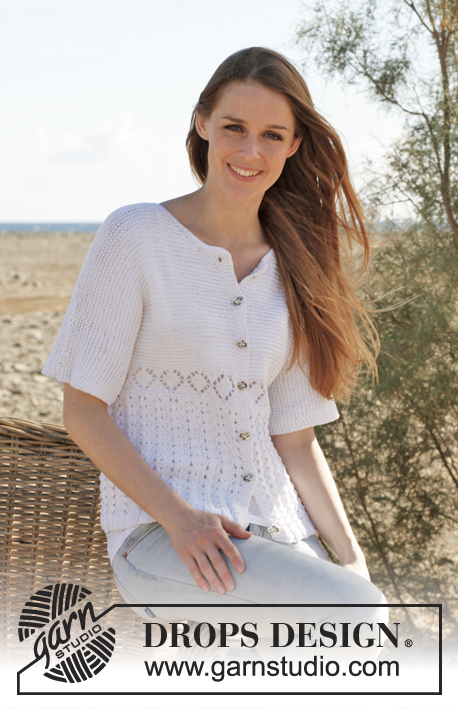
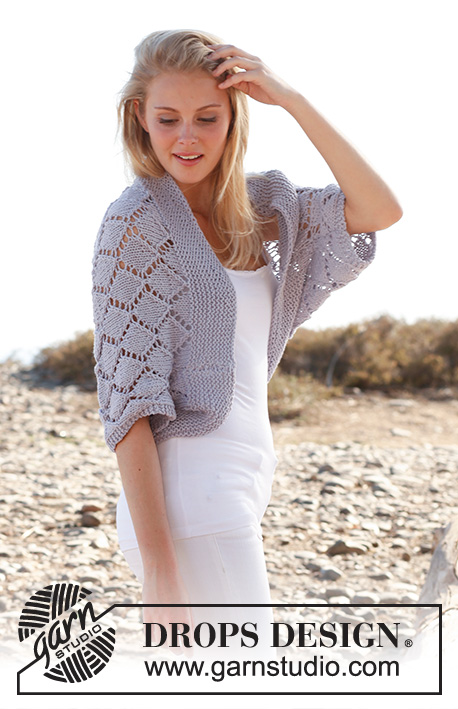
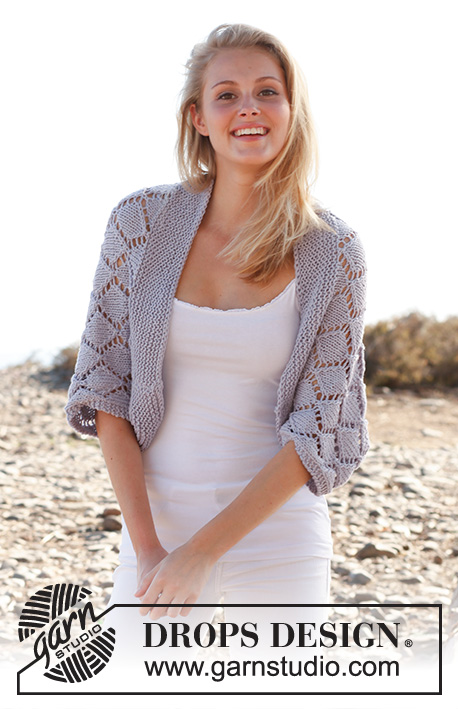
Kootud DROPSi pitsmustriga boolero ”Big Merino” lõngast. Suurused S - XXXL.
DROPS 146-16 |
|||||||||||||||||||
|
RIPSKUDE (edasi-tagasi kududes): koo kõik read parempidi. MUSTER Vaata skeemi A.1. Skeem on antud vaadatuna töö paremalt poolt (PP) ja näitab iga rida. ----------------------- BOOLERO Kootakse edasi-tagasi ringvarrastega. Loo 5 mm ringvarrastele Big Merino lõngaga 107-117-127-137 silmust. Koo ripskoes, kuni töö pikkus on 7 cm. Siis koo järgmiselt, töö PP: 3 silmust RIPSKOES – vaata ülevalt, skeemi A.1A (= 6 silmust), skeemi A.1 B järgmised 90-100-110-120 silmust, lõpetuseks koo skeemi A.1 C (= 5 silmust) ja 3 silmust RIPSKOES. Koo skeemi A.1 järgi ja mõlema serva 3 silmust ripskoes. JÄLGI KOETIHEDUST! Kui töö pikkus on 11-11-12-13 cm, loo üles varrukate jaoks 10 uut silmust kahe järgmise rea lõpus = 127-137-147-157 silmust. Koo järgmiselt: 3 silmust ripskoes, skeemi A.1A (= 6 silmust), skeemi A.1 B järgmised 110-120-130-140 silmust, skeemi A.1 C (= 5 silmust) ja 3 silmust ripskoes. NB! Koo skeemi A.1 nii, et skeemi A.1 muster sobib varrukate kasvatamistega. Kui töö pikkus on 45-50-55-59 cm, koo maha 10 silmust kahe järgmise rea alguses = 107-117-127-137 silmust. Koo järgmiselt: 3 silmust ripskoes, skeemi A.1A (= 6 silmust), skeemi A.1 B järgmised 90-100-110-120 silmust, skeemi A.1 C (= 5 silmust) ja 3 silmust ripskoes. Kui töö pikkus on 49-54-60-65 cm, koo ripskoes kõikide silmustega. Koo silmused maha, kui töö pikkus on 56-61-67-72 cm. VIIMISTLEMINE Õmble küljeõmblused ja varruka sisekülje õmblused ühe õmblusena 1 ääresilmuse kõrvalt – vaata kriipsjoont joonisel. |
|||||||||||||||||||
Skeemi seletused |
|||||||||||||||||||
|
|||||||||||||||||||
 |
|||||||||||||||||||
 |
|||||||||||||||||||
Kas oled teinud seda mustrit?Lisa oma piltidele viide #dropspattern #cassiebolero või saada link projektile meie #dropsfan galeriisse. Vajad abi selle mustriga?Garnstudio.com kodulehel on 15 õppevideot, küsimuste/vastuste osa ja muudki. © 1982-2026 DROPS Design A/S. Kõik õigused kaitstud. See dokument, ning selle alajaotused on kaitsud autoriõigustega. Loe rohkem, mida meie mustritega võib teha, iga mustrilehe alt meie kodulehel. |
|||||||||||||||||||


Tegeledes üle 40 aasta kudumise ja heegeldamise disainidega, pakub DROPS Design ühte suurimat tasuta mustrite kollektsiooni internetis - tõlgituna 17 keelde. Tänaseks on meil 324 kataloogi ja 12290 mustrit - millest 9431 on tõlgitud Eesti keelde.
Me anname endast parima, et tuua teieni kõike mida kudumine ja heegeldamine võib pakkuda - inspiratsiooni, nõuandeid ning ka kvaliteetseid lõngu parima hinnaga! Soovid kasutada mustreid muukski, kui ainult oma tarbeks? Loe infot meie Copyright osas iga lehekülje all. Rõõmsat loomist!
Jäta kommentaar mustrile DROPS 146-16
Ootame kommentaare selle mustri kohta!
Kui soovid midagi küsida, siis kiiremaks vastuse saamiseks veendu, et valid õige kategooria alloleval formil. Vajaliku väljad *.