
Populaarsed kategooriad
Otsid lõnga?


Kommentaarid / Küsimused (62)
![]() Diane kirjutas:
Diane kirjutas:
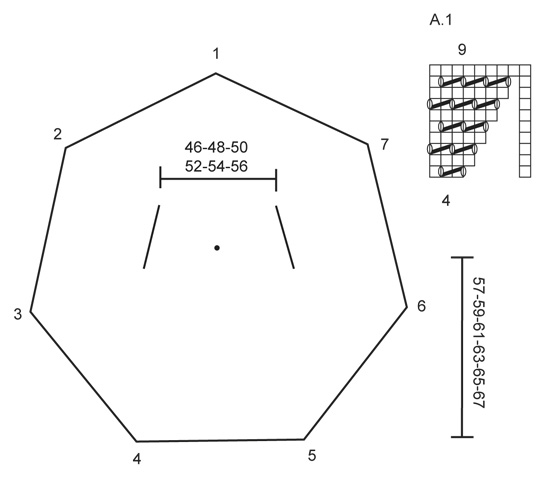
I am starting the A1 chart. I understand the first row of the chart where you increase. I also understand the 2nd row of the chart of just knitting. My problem is the 3rd row of A1. I now have 35 stitches on my needle divided into 7 parts of 5 stitches each. Can you please tell me exactly how I do the first 5 stitches where the increase is?
31.08.2024 - 22:07DROPS Design vastas:
Dear Diane, in the 3rd round: *knit 1, yarn over, knit 2 together, yarn over, knit 2 together, yarn over* between each set of markers. So you increase 1 stitch in each section, to 42. Happy knitting!
31.08.2024 - 23:38
![]() Isabelle kirjutas:
Isabelle kirjutas:
Bonjour Je viens de terminer pour la deuxième fois la partie veste de ce tricot et je remarque que j'ai à nouveau une pointe qui se forme dans le dos. J'ai utilisé une mini aiguille circulaire dès le 4ème rang à la place des aiguilles doubles pointes. Honnêtement je n'ai pas envie de recommencer une troisième fois. N'y aurait-il pas une erreur dans les explications? Merci
27.03.2024 - 18:36DROPS Design vastas:
Bonjour Isabelle, il ne doit pas y avoir de pointe, pensez à bien vérifier votre tension pour qu'elle soit la même tout du long et éviter ainsi d'éventuelles déformations, resserrez les 7 mailles du montage pour voir si vous arrivez à supprimer cette pointe, ou bien tentez un blocage, ça pourra aider aussi. Bon tricot!
02.04.2024 - 12:45
![]() Fiona Caldwell kirjutas:
Fiona Caldwell kirjutas:
What do the blank spaces mean in A1 diagram. Thank you
07.11.2022 - 19:15DROPS Design vastas:
Dear Mrs Caldwell, the first row in A.1 is worked over 4 sts but the last row over 9 sts, since you will increase sts on every other round, we need to have space after the first stitch until all increases are done, ie work 1st row as follows: *K1, YO, K2 tog, YO, K1* and repeat from *-*. Happy knitting!
08.11.2022 - 08:59
![]() Alice kirjutas:
Alice kirjutas:
I am confused about the double pointed needle size. At the top of the page where it indicates what size to use for the project, it says, "DROPS DOUBLE POINTED NEEDLES AND CIRCULAR NEEDLE (40 and 80 cm / 16'' and 32'') SIZE 7 mm/US 10.75 " But in the instructions it says, "Cast on 7 sts with Alaska and distribute them on 4 double pointed needles size 6 mm / US 10." Thank you.
06.08.2022 - 06:03DROPS Design vastas:
Dear Alice, yes, there seems to be a mistake in the pattern. You use double pointed 6mm needles for the initial lace pattern, so they should be included in the upper part of the pattern. We will correct the header as soon as possible. Thank you.
07.08.2022 - 23:05
![]() Jelena kirjutas:
Jelena kirjutas:
I was adding those 7 stitches as the instruction says, but the diagram itself is adding stitches as we go (if I read it correctly, if not, maybe there is my mistake).
08.03.2022 - 22:30DROPS Design vastas:
Dear Jelena, you are working A.1 a total of 7 times in the round, and working as shown in diagram you will automatically increase 1 stitch in each A.1 = 7 sts in total on every other round.After A.1 is done in height, repeat diagram in height until there are 31-33-35-37-39-41 sts between each marker. Hope it will help, happy knitting!
09.03.2022 - 17:49
![]() Jelena kirjutas:
Jelena kirjutas:
While working on diagram parts, I ended up with more than 100 stitches between markers, which is 2-3 times more than it's mentioned in instructions. Where did I go wrong?
08.03.2022 - 21:28DROPS Design vastas:
Dear Jelena, you should work diagram A.1 increasing 7 sts on every other round until there are 31-33-35-37-39-41 sts between each marker ( 27-28-29-30-31-32 cm from center of circle, if your tension is right). Can this help?
08.03.2022 - 22:21
![]() Corinna kirjutas:
Corinna kirjutas:
Hallo, verstehe diesen Teil nicht, können sie mir das bitte genauer erklären?Nach Diagramm A.1 das Muster mit 7 Zunahmen in jeder 2. Rd fortsetzen, die zugenommenen M fortlaufend in das Muster einarbeiten. Vielen Dank
05.03.2021 - 10:10DROPS Design vastas:
Liebe Corinna, stricken Sie wie zuvor mit *1 M re, 1 Umschlag, Lochmuster wie zuvor in A.1* und von *bis* immer so wiederholen, dh nach jeder rechte Masche am Anfang von A.1 mit 1 Umschlag zunehmen und das Lochmuster wie zuvor weiterstricken = Es wurde 7 Mal A.1 in der Runde wiederholt und jeweils 7 Masche zugenommen, wenn Sie so weiterstricken, werden Sie jeweils 7 Masche in jede 2. Runde wie zuvor zunehmen. Viel Spaß beim stricken!
05.03.2021 - 13:07
![]() Mary-Anne kirjutas:
Mary-Anne kirjutas:
I think there is a mistake where you bind off for the second sleeve. According to the diagram it should be between the 6th and 7th marker, but the pattern says to knit to 7th marker and then bind off.
01.05.2020 - 17:38DROPS Design vastas:
Dear Mary-Anne, which language are you following? The UK and US-English say both to work to 6th marker and to bind off until 7th marker (= sts between 6th and 7th will be bound off). Thank you! Happy knitting!
04.05.2020 - 10:54
![]() Cecilia kirjutas:
Cecilia kirjutas:
Buonasera vorrei tanto realizzare questo capo ma sono una principiante,sinceramente sto imparando grazie a voi.ma a volte non riesco a capire,il di dietro lo vedo anche complicato.i ferri a doppia punta mai usati,potrei farlo tutto a maglia rasata?grazie sempre gentili.
16.09.2017 - 16:24DROPS Design vastas:
Buonasera Cecilia. Spesso la lavorazione sembra più difficile di quanto non lo sia realmente. Nel caso di questa giacca, lavorarla a maglia rasata vorrebbe dire cambiare le caratteristiche della giacca stessa e ci risulterebbe difficile aiutarla. Per imparare può consultare la sezione dei video o rivolgersi al suo rivenditore Drops di fiducia. Buon lavoro!
16.09.2017 - 19:49
![]() Sylvia kirjutas:
Sylvia kirjutas:
Liebes drops Team, bitte beschreiben sie mir nochmal, Diagramm A1. Wie viele Reihen hat ein Mustersatz und ab wann nehme ich die 7 Maschen zu? Vielen Dank
22.05.2015 - 22:11DROPS Design vastas:
Sie beginnen mit A.1, wenn Sie 28 M in der Rd haben. Die Lücken im Diagramm ignorieren Sie einfach. In der 1. Rd hat A.1 4 M, Sie stricken A.1 also 7x in der Rd (zwischen 2 Markierern ist 1 Rapport A.1). In der 1. Rd machen Sie 1 Umschlag mehr, als Sie zus.str (1x zus.str, 2 Umschläge in der 1. Rd), also haben Sie nach der 1. Rd pro Rapport 1 M zugenommen, = 5 M pro Rapport, = 35 M in der 2. Rd. In der 3. Rd machen Sie wieder 1 Umschlag mehr, als Sie M zus.str (2x zus.str, 3 Umschl.), haben also in der 4. Rd 6 M pro Rapport, usw. bis A.1 9 M hat. Dann setzen Sie das Muster von A.1 zwischen den Markierern genauso weiter fort, also je 1 Umschlag mehr, das sind die 7 Zun. pro Rd.
23.05.2015 - 09:47
|
|||||||||||||
Warm Circle#warmcirclejacket |
|||||||||||||
|
|
|||||||||||||
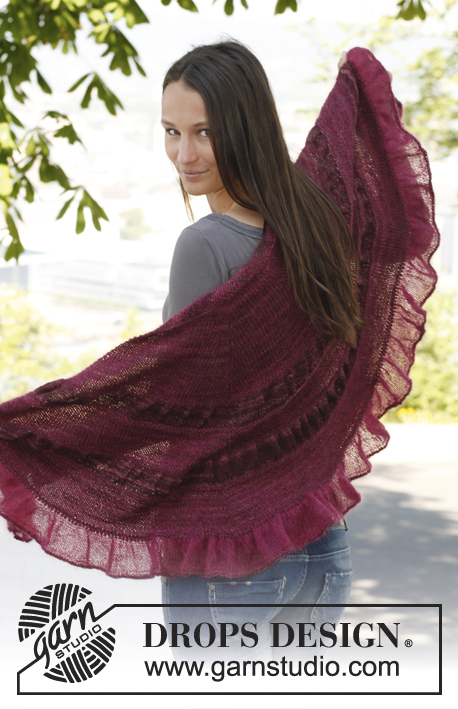
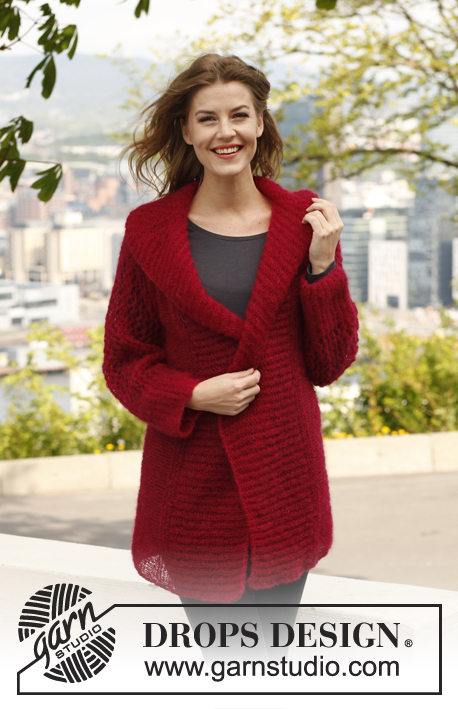
Kootud DROPSi soonikuga ringikujuline jakk lõngast ”Alaska”. Suurused S - XXXL.
DROPS 140-35 |
|||||||||||||
|
MUSTER Vaata skeemi A.1. RIPSKUDE (ringselt kududes): koo 1 ring pr, 1 ring ph. -------------------------------- JAKK Kootakse ringselt, ring algab seljaosa keskelt. Loo üles 7 silmust 6 mm sukavarrastele, jaota silmused võrdselt neljale sukavardale. Koo 1 ring pr, SAMAL AJAL koo 2 pr silmust igast silmusest = 14 silmust. Paigalda 7 silmusemärkijat (SM) nii, et iga SM-i vahele jääb 2 silmust. 1. SM on ringi algus = kaelaauk seljaosal. Koo pr, järgmisel ringil koo 2 silmust igast teisest silmusest = 21 silmust. Koo järgmisel ringil 2 silmust igast 3-ndast silmusest = 28 silmust. Koo skeemi A.1, koo 1 mustrikordus 4 silmusel iga SM-i vahel. Pärast skeemi A.1, jätka mustriga, tehes kasvatusi igal teisel real, koo kasvatatud silmused mustrisse. Vajadusel võta 6 mm ringvardad. JÄLGI KOETIHEDUST! Kui töö pikkus on 27-28-29-30-31-32 cm, mõõdatuna keskelt, koo 4 ringi ripskoes – vaata ülevalt kõikide silmustega (nüüd on umbes 31-33-35-37-39-41 silmust iga SM-i vahel = 217-231-245-259-273-287 silmust kokku). Koo pr, kuni 2. SM-i. Koo maha kõik silmused 2. ja 3. SM-i vahel (= umbes 31-33-35-37-39-41 silmust). Koo, kuni 6-nda SM-i. Koo maha kõik silmused, kuni 7-nda SM-i (= umbes 31-33-35-37-39-41 silmust). Koo, kuni 1. SM-i. Koo 1 ring ph, SAMAL AJAL loo üles mahakootud silmuste kohale sama arv silmuseid, mida kudusid maha. Koo 2 ringi ripskoes. Võta 7 mm ringvardad. Siis koo parempidise koes kõikide silmustega, SAMAL AJAL kasvata igal teisel ringil 1 silmus igal SM-i juures – kasvata vaheldumisi paremal ja vasakul pool SM-i (= 7 kasvatust igal teisel ringil) – järgmisel ringil koo kasvatatud silmused pr keerdsilmusena, et vältida augu teket. Jätka parempidises koes ja kavata, kuni töö pikkus käeaugust on 20-21-22-23-24-25 cm (nüüd peab olema umbes 49-52-55-58-61-64 silmust iga SM-i vahel ja kokku umbes 343-364-385-406-427-448 silmust). Võta uuesti 6 mm ringvardad. Koo 1 ring pr, SAMAL AJAL kohanda silmuste arvu nii, et need jaguksid 6-ga. Siis koo soonikut 3 pr / 3 ph. Kui sooniku pikkus on 3 cm, kasvata 1 silmus igal ph-osal (= 4 ph). Kui sooniku pikkus on 6 cm, kasvata uuesti 1 silmus igal ph-osal (= 5 ph). Koo soonikut 3 pr / 5 ph, kuni sooniku pikkus on 10 cm. Koo silmused soonikkoes maha. Töö pikkus keskelt on umbes 57-59-61-63-65-67 cm. VARRUKAS Korja kududes üles 62-66-70-74-78-82 silmust ümber käeaugu 7 mm lühikestele ringvarrastele ja koo ringselt parempidises koes, kuni varruka pikkus on 15 cm. Võta 6 mm ringvardad. Koo 1 ring parempidises koes, SAMAL AJAL kasvata ühtlaste vahedega 16-18-20-22-24-26 silmust = 78-84-90-96-102-108 silmust. Edasi koo soonikut 3 pr / 3 ph, kuni varruka pikkus on 30-31-32-33-34-35 cm. Koo silmused soonikkoes maha. |
|||||||||||||
Skeemi seletused |
|||||||||||||
|
|||||||||||||
 |
|||||||||||||
Kas oled teinud seda mustrit?Lisa oma piltidele viide #dropspattern #warmcirclejacket või saada link projektile meie #dropsfan galeriisse. Vajad abi selle mustriga?Garnstudio.com kodulehel on 10 õppevideot, küsimuste/vastuste osa ja muudki. © 1982-2026 DROPS Design A/S. Kõik õigused kaitstud. See dokument, ning selle alajaotused on kaitsud autoriõigustega. Loe rohkem, mida meie mustritega võib teha, iga mustrilehe alt meie kodulehel. |
|||||||||||||


Tegeledes üle 40 aasta kudumise ja heegeldamise disainidega, pakub DROPS Design ühte suurimat tasuta mustrite kollektsiooni internetis - tõlgituna 17 keelde. Tänaseks on meil 324 kataloogi ja 12290 mustrit - millest 9431 on tõlgitud Eesti keelde.
Me anname endast parima, et tuua teieni kõike mida kudumine ja heegeldamine võib pakkuda - inspiratsiooni, nõuandeid ning ka kvaliteetseid lõngu parima hinnaga! Soovid kasutada mustreid muukski, kui ainult oma tarbeks? Loe infot meie Copyright osas iga lehekülje all. Rõõmsat loomist!
Jäta kommentaar mustrile DROPS 140-35
Ootame kommentaare selle mustri kohta!
Kui soovid midagi küsida, siis kiiremaks vastuse saamiseks veendu, et valid õige kategooria alloleval formil. Vajaliku väljad *.