
Populaarsed kategooriad
Otsid lõnga?


Kommentaarid / Küsimused (15)
![]() Gabriella kirjutas:
Gabriella kirjutas:
Buonasera, voglio realizzare lo scialle Himalaya con lana Snow (previsti g. 200 di lana) ma per sbaglio ne ho acquistata g. 250; sapreste dirmi di quanto posso allungare lo scialle se uso g. 250 di Snow ? (il vostro modello prevede larghezza in alto circa 150 cm) Grazie. Cordiali saluti Gabriella
02.12.2022 - 18:51DROPS Design vastas:
Buonasera Gabriella, per un'assistenza così personalizzata può rivolgersi al suo rivenditore DROPS di fiducia. Buon lavoro!
03.12.2022 - 16:17
![]() Sonca kirjutas:
Sonca kirjutas:
I don't understand the instructions for this hat. It states that the earlaps are worked with 2 thread of white then finish with 1 thread. Does this mean you are knitting both earlaps are the same time? Can you use circular needles to make the earlaps?
19.10.2022 - 03:11DROPS Design vastas:
Hi Sonca, The ear flaps are worked with 2 strands to make them warmer, as is the first ridge on the hat itself. Each ear flap is worked back and forth separately to begin with, then they are placed on the same circular needle, stitches are cast on for the rest of the hat, which is continued first back and forth from mid-back then finished in the round. Happy knitting!
19.10.2022 - 06:55
![]() Nicoletta kirjutas:
Nicoletta kirjutas:
Buonasera, non riesco a capire come fare i paraorecchie. Il gettato per l'aumento va fatto prima di iniziare il giro dopo il primo ferro una volta avviate le maglie? Non riesco proprio a fare il 2. a specchio. Quando inizio gli aumenti? Sempre prima del 2. ferro? In questo modo però non mi trovo col dritto del lavoro. Infine i 6 punti da avviare fra i paraorecchie vanno avviati attaccati a uno dei paraorecchie o separati? Vi ringrazio per la pazienza
02.09.2021 - 23:16DROPS Design vastas:
Buonasera, gli aumenti iniziano dopo il promo giro e deve lavorare 1 gettato a entrambi i lati: inoltre, sul 1° paraorecchie deve avviare le maglie alla fine di un ferro dal diritto del lavoro, verso il dietro; per il secondo paraorecchie deve avviare le maglie alla fine di un ferro dal rovescio del lavoro e aumentare verso il centro davanti all'inizio di un ferro dal diritto del lavoro invece di un ferro dal rovescio del lavoro. Buon lavoro!
04.09.2021 - 21:15
![]() Estela kirjutas:
Estela kirjutas:
Solamente puedo tejer la orejera de la que explica el patron. Como podria tejer la otra orejera de lado contrario. Me podrian explicar porfavor. O hacer un tutorial porfavor. Gracias
30.11.2019 - 02:36DROPS Design vastas:
Hola Estela. Los dos orejeras se trabajan antes de empezar el gorro. Cuando se termina la primera orejera, dejar la labor en espera y empezar la otra orejera, pero trabajando los aumentos a la inversa. Lee atentamente el patrón.
30.11.2019 - 19:13
![]() Lindsay kirjutas:
Lindsay kirjutas:
Hello, how do I connect the ear pieces? Do the ear pieces gonnext to each other with the 16 new cast ons next, where the forehead will be? I was confused why the pattern kept referring to start mid back. Thank you!
23.11.2017 - 03:00DROPS Design vastas:
Dear Lindsay, mid back will be the side of ear flaps where you cast on 5 sts on each ear flap - when joining both ear pieces together, start on mid back on 1st ear flap (sts on needle = the 5 sts cast on are at the beg of this row), then cast on 16 sts between both pieces for front piece and work 2nd ear flap (sts put aside, the 5 sts are at the end of piece). Happy knitting!
23.11.2017 - 08:38
![]() Valerie kirjutas:
Valerie kirjutas:
After further review of the shawl pattern, it appears that on the edge, I should slip the first stitch (as if to knit, I'm assuming...it doesn't specify) and then YO. Is that a correct interpretation of that first tip and instruction? Thank you, again!
19.01.2016 - 14:31DROPS Design vastas:
Dear Valerie, that's correct - happy knitting!
19.01.2016 - 16:36
![]() Valerie kirjutas:
Valerie kirjutas:
Your shawl pattern states: "inc 1 st at beg of every row from RS - inc by working 1 YO inside 1 edge st" - does this mean "create a yo at the first edge stitch on the RS"? Meaning, to me, on the RS, knit the first stitch, then YO. Correct? Then, on the next row (WS) P YO the YO that was created on the previous row. Thank you!
19.01.2016 - 11:50DROPS Design vastas:
Dear Valerie, that's right: you inc at the beg of every row from RS= 1 edge st, 1 YO, etc and on next row from WS work the YO into back of loop to avoid hole. Happy knitting!
19.01.2016 - 16:33
![]() Katy kirjutas:
Katy kirjutas:
Hello, thank you for your help. I still don't understand. I know it has to be cast on towards the back but how do I do that if my working yarn is on the other side. I would have to add a row and after that the ear flap is going to be longer than the first one. I was hoping that you could give me row by row instructions.
12.01.2016 - 17:18DROPS Design vastas:
Dear Katy, work reversed will mean you will make on the opposite side what you made on one side for the firt piece. For 1st earfla, you cast on sts at the end of row from RS -towards back) for 2nd piece, you will cast on sts at the end of row from WS. So that both pieces will be reversed. Happy knitting!
13.01.2016 - 10:30
![]() Katy kirjutas:
Katy kirjutas:
Hello, Could you please give me a full instruction for making a second (reversed) ear flap? Thank you!
12.01.2016 - 01:35DROPS Design vastas:
Dear Katy, to work the 2nd earflap reversed, cast on the sts towards back piece at the end of a row from WS (instead of at the end of a row from RS for 1st earflap), and inc towards mid front at the beg of a row from RS instead of at the beg of a row from WS. Happy knitting!
12.01.2016 - 10:02
![]() Alessandro kirjutas:
Alessandro kirjutas:
Buongiorno, ho bisogno di un chiarimento per gli aumenti a lavoro iniziato nel cappello. Date indicazione di un video per gli aumenti a lavoro iniziato, in cui illustrate due tecniche..La prima mi sembra non adatta perché fa un bordo molto morbido, la seconda tecnica non riesco ad applicarla perché ho il filo dalla parte opposta del lavoro...come consigliate di fare? grazie
27.02.2015 - 18:24DROPS Design vastas:
Buongiorno Alessandro. La seconda tecnica presentata può essere usata per aumentare le m sia sul rovescio che sul diritto del lavoro. Le m vanno aumentate all'inizio del ferro. Ci riscriva se non abbiamo capito correttamente la sua domanda. Buon lavoro!
28.02.2015 - 23:07
|
|||||||
Himalaya#himalayaset |
|||||||
 |
 |
||||||
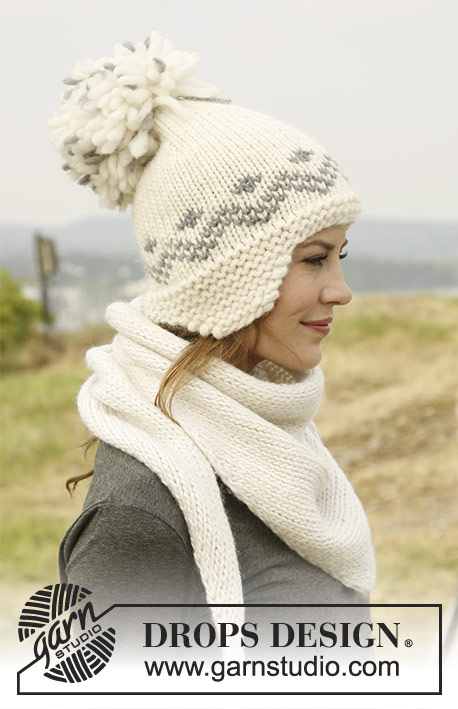
Kootud DROPSi kõrvaklapidega müts ja sall lõngast ”Snow”.
DROPS 131-21 |
|||||||
|
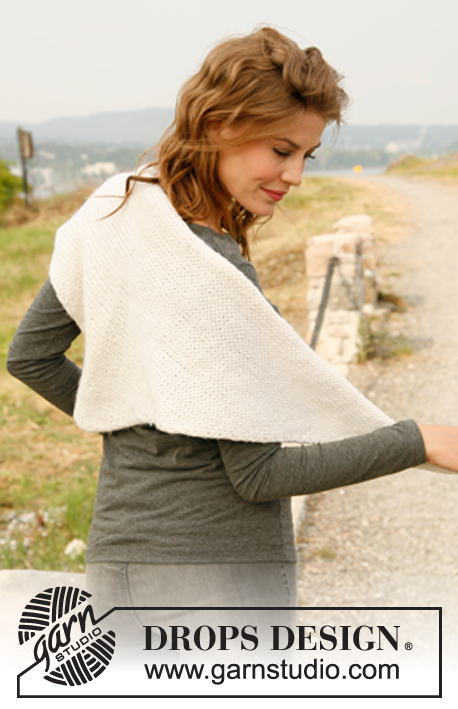
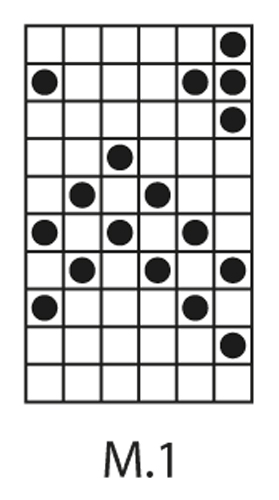
RIPSKUDE (edasi-tagasi kududes): koo kõik read parempidi. KASVATAMISE NIPP (mütsil) Kasvata tehes 1 õs ja tagasireal koo õs pr keerdsilmusena (st. silmuse tagumisest aasast), et vältida paksu õmblust. --------------------------- MÜTS Kõrvaklapid ja mütsi esimesed ripskoes read kootakse kahekordse naturaalvalge lõngaga, edasi kootakse ühekordse lõngaga. Loo 8 mm vardale üles 7 silmust kahekordse lõngaga. Koo ripskoes, SAMAL AJAL pärast 1 rida kasvata 1 silmus mõlemal serval igal teisel real kokku 3 korda – vaata KASVATAMISE NIPPI = 13 silmust. Järgmisel real loo 5 uut silmust kukla poole = 18 silmust. Koo 1 rida kõikide silmustega, kuni kududa jääb 1 silmus (esiserva poole), nüüd kasvata 1 silmus, tehes 1 õs enne viimast silmust = 19 silmust. Koo 1 rida parempidi. Aseta töö kõrvale. Koo teine kõrvaklapp, ainult peegelpildis, st. enne kasvatamist vaata, kus on kukal ja kus on otsaesine. Koo kõrvaklapid samale vardale – alusta kuklaosast ja loo 16 uut silmust klappide vahele otsaette = 54 silmust. Siis koo edasi-tagasi, alustades kukla keskelt. Koo 4 rida ripskoes kõikide silmustega. Vaheta 8 mm sukavarraste vastu ja koo ringselt ühekordse lõngaga kuklaosa keskelt, kuni töö lõpuni. Koo skeemi M.1 ja siis koo kuni töö lõpuni parempidises koes naturaalvalge lõngaga. JÄLGI KOETIHEDUST! Kui töö pikkus on 16 cm – mõõda esiosa keskel – järgmist ringi koo järgmiselt: * 2 pr kokku, 7 pr *, korda alates *-*. Koo 1 ring parempidi. Järgmine ring koo järgmiselt: * 2 pr kokku, 6 pr *, korda alates *-*. Jätka kahandamist üle ühe rea, kududes 1 silmus vähem enne igat kahandamist, kuni vardale jääb 9 silmust. Müts on umbes 26 cm pikkune esiosa keskelt. Katkesta lõng ja tõmba läbi allesjäänud silmustest läbi, pinguta ja kinnita lõngaots. Õmble kuklaosa keskelt kokku ääresilmuste eesaasast, et õmblus ei paistaks välja. Tee naturaalvalge lõngaga ja natuke keskmise halli lõngaga suur tutt. Kinnita mütsi tippu. _________________________________________________ KUDUMISE NIPP (sallil) Et serv tuleks ilusam välja, koo järgmiselt: tõsta igal real esimene silmus kudumata. SALL Loo 8 mm vardale üles 3 silmust. Vaata KUDUMISE NIPPI. Koo parempidises koes, SAMAL AJAL kasvata 1 silmus iga töö PP rea alguses – kasvata, tehes 1 õs 1 ääresilmuse kõrvale, koo õs ph keerdsilmusena (st. koo silmuse tagumisest aasast), et vältida augu teket. JÄLGI KOETIHEDUST! Kui töö pikkus on 75 cm, jääb kududa veel pool salli. Koo 2 rida kasvatamisteta. Nüüd kahanda samal serval, kus tegid kasvatamisi, kududes 3 silmust järgmiselt: 1 ääresilmus, tõsta 1 silmus kudumata parempidise võttega üle, 1 pr, tõsta kudumata silmus üle. Koo sedasi ja kahanda igal töö PP real, kuni kududa jääb 3 silmust – töö pikkus on umbes 150 cm. Koo silmused maha. |
|||||||
Skeemi seletused |
|||||||
|
|||||||
 |
|||||||
Kas oled teinud seda mustrit?Lisa oma piltidele viide #dropspattern #himalayaset või saada link projektile meie #dropsfan galeriisse. Vajad abi selle mustriga?Garnstudio.com kodulehel on 14 õppevideot, küsimuste/vastuste osa ja muudki. © 1982-2026 DROPS Design A/S. Kõik õigused kaitstud. See dokument, ning selle alajaotused on kaitsud autoriõigustega. Loe rohkem, mida meie mustritega võib teha, iga mustrilehe alt meie kodulehel. |
|||||||


Tegeledes üle 40 aasta kudumise ja heegeldamise disainidega, pakub DROPS Design ühte suurimat tasuta mustrite kollektsiooni internetis - tõlgituna 17 keelde. Tänaseks on meil 324 kataloogi ja 12290 mustrit - millest 9431 on tõlgitud Eesti keelde.
Me anname endast parima, et tuua teieni kõike mida kudumine ja heegeldamine võib pakkuda - inspiratsiooni, nõuandeid ning ka kvaliteetseid lõngu parima hinnaga! Soovid kasutada mustreid muukski, kui ainult oma tarbeks? Loe infot meie Copyright osas iga lehekülje all. Rõõmsat loomist!
Jäta kommentaar mustrile DROPS 131-21
Ootame kommentaare selle mustri kohta!
Kui soovid midagi küsida, siis kiiremaks vastuse saamiseks veendu, et valid õige kategooria alloleval formil. Vajaliku väljad *.