
Categorias populares
Procura um fio?


Comentários / Perguntas (54)
![]() April escreveu:
April escreveu:
Is there a tutorial to show placement of markers? Sweater is my next project
11.03.2026 - 04:06DROPS Design respondeu:
Hi April, Here is a link to our video showing you how to use stitch markers: https://www.garnstudio.com/video.php?id=67&lang=en Regards, Drops Team.
11.03.2026 - 06:42
![]() Jaslie escreveu:
Jaslie escreveu:
Hi I have a question after I’m on my second row of the a2 a and a3 a charts meaning I already did the first increase on that chart and I’m on the round where u work the increase twisted. Do I purl that first stich after the marker or do I do one stockinette stich and then start the chart like the previous row? Making it so that the purl stich would be on the increased stich from the previous round?
16.12.2025 - 18:20
![]() Samuel escreveu:
Samuel escreveu:
Hello! Is the cabling only supposed to be on the front of the sweater? If it is, could i adjust the pattern and knit cable on both front and back of the sweater, or would that affect the sizing?
11.06.2025 - 14:19DROPS Design respondeu:
Dear Samuel, on this pattern the cables are only on front piece; you can probably adapt the pattern to get the cable on front piece, or look at the other jumpers for men with cables here. Happy knitting!
11.06.2025 - 16:01
![]() Josh escreveu:
Josh escreveu:
Hi! I am a new knitter and this is my first project. I got stuck while knitting the Yoke. It says to knit one round and then increase on the next while starting A2&3.a. In the diagram it says to increase on the first round of A.2a. Can someone please clear this up for me.
30.03.2025 - 20:04DROPS Design respondeu:
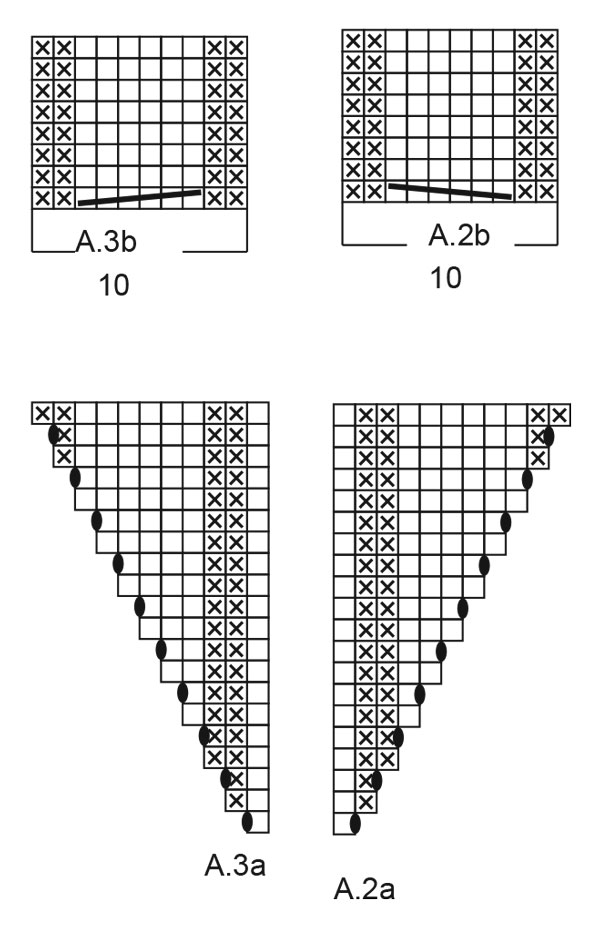
Dear Josh, in the yoke, first you knit 1 round and increase stitches evenly. In the next round you insert the markers as you work the round. Now increase on each side of the markers every other round 19-20-22-24-26-30 times in total (these are raglan increases and are not dependent on the charts). After the increases have been made 3-3-2-2-1-1 times, you will start increasing in the front piece, according to charts A.2a and A.3a, on each side of the central A.1 chart. The increases in A.2a and A.3a are only for the front piec and you will continue with the increases on each side of each marker as before. Happy knitting!
30.03.2025 - 21:08
![]() Jana escreveu:
Jana escreveu:
Good afternoon! I am a bit confused with the charts for a2 and a3 and the wording of how they fit in with A3b and A2b? I have never worked two charts over each other when cabling so please excuse my ignorance! I am trying to figure out how I knit over each other? Thank you for your patience with me! I have started the neck and it is a beautiful design!
07.03.2025 - 00:51DROPS Design respondeu:
Dear Jana, when diagrams A.2a and A.3a are done, you will just have to adjust diagrams A.2b and A.3b over the stitches worked previously, ie over the P2, K6,P2 at the beg of A.2a/end of A.3a, work the P2, (cable / K6), P2 in A.2b and A.3b. Then repeat the diagrams A.2b and A.3b (this means a cable will be worked every 8th row). Happy knitting!
07.03.2025 - 09:55
![]() Michelle escreveu:
Michelle escreveu:
Après avoir placer les marqueurs, nous avons 17m, 14m, 10m-18m-10m = 38m , 14m, 18m, après les 24 augm j'ai 17 +24 =41 m pour le demi dos, 14 + 24×2 =62 m pour la manche, 38 +24×2 =86m pour le devant, de nouveau 62m pour les manches et 18 m+24 m= 42 m pour le demi dos. Je ne retrouve pas les même chiffres dans la suite des explications après l empiècement pourtant j'ai bien les 293m de la taille xl... Ou est le problème ? Merci
17.02.2025 - 22:50DROPS Design respondeu:
Bonjour Michelle, lors de la division, la 1ère maille de la 1ère manche sera attribuée au dos, la dernière maille de la 1ère manche et la 1ère maille de la 2ème manche seront attribuées au devant et la dernière maille de la 2ème manche sera attribuée au dos, ainsi, vous aurez bien vos 41 m du dos + 1 m de la manche = 42 m au début/à la fin du tour et 62 m des manches - 2 = 60 m en attente pour les manches et 86 m du devant + 2 m = 88 m pour le devant. Bon tricot!
18.02.2025 - 10:01
![]() Raffaella escreveu:
Raffaella escreveu:
Hello! I'm starting the Snow Trail jumper. Is the recommended knitting tension (16 sts in 10 cm with 5.5 needles) obtained before or after blocking? Thanks in advance Raffaella
29.01.2025 - 18:55DROPS Design respondeu:
Dear Raffaela, we are not used to block, but if you think there might be a difference , then you might try to first block your swatch. Happy knitting!
30.01.2025 - 09:51
![]() Hilary escreveu:
Hilary escreveu:
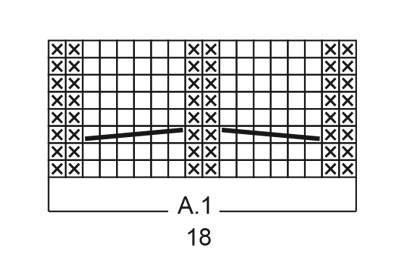
I’m struggling to get A2a & A 3a. On the diagram which edge is the marker at? Right hand side of A2a and left hand side of A3a
21.01.2025 - 19:18DROPS Design respondeu:
Dear Hillary, correct, work until 2nd marker, then work 1 stitch in stocking stitch, A.2a (= 1 stitch), 7-9-10-10-11-11 stitches in stocking stitch, A.1 over 18 stitches as before, 7-9-10-10-11-11 stitches in stocking stitch, A.3a (= 1 stitch), 1 stitch in stocking stitch (3rd marker is here), Happy knitting!
22.01.2025 - 09:09
![]() Raffaella escreveu:
Raffaella escreveu:
Hello!I'm knitting model Snow Trail in size S. Does it make any difference if I increase by M1R and M1L instead of yarn-over? Thanks in advance!
20.01.2025 - 19:01DROPS Design respondeu:
Dear Raffaella, as long as you gauge is correct (for stitches and row-count as well), and you are careful which way your increases are leaning, and remember to increase at the correct places, you can substitute the increases. Happy Knitting!
20.01.2025 - 21:16
![]() Hilary escreveu:
Hilary escreveu:
I’m doing the extra large size. I did the initial first round increases at the raglan markers. My next row would be no increases or do I make the A.2a & A.3a . The pattern says work increases as before until the second marker. It looks like I am not alone with this problem. Hope you can help
19.01.2025 - 18:41DROPS Design respondeu:
Dear Hilary, after working the initial increases 2 times, you will continue working increases while working the cable pattern. The sleeves and back piece are still worked in stocking stitch as before; the only part that changes is the section between markers 2 and 3 (front piece). Here, you work: 1 st in stocking stitch, A.2a (= 1 stitch), 10 sts in stocking stitch, A.1 over 18 stitches, 10 sts in stocking stitch, A.3a (= 1 stitch), 1 st in stocking stitch (the increases are now in the charts). The increases in the chart are in every 2nd round (as you can see in the charts) so you will continue increasing every 2nd round as before. Happy knitting!
19.01.2025 - 20:37
|
||||||||||||||||
Snow Trail#snowtrailsweater |
||||||||||||||||
 |
 |
|||||||||||||||
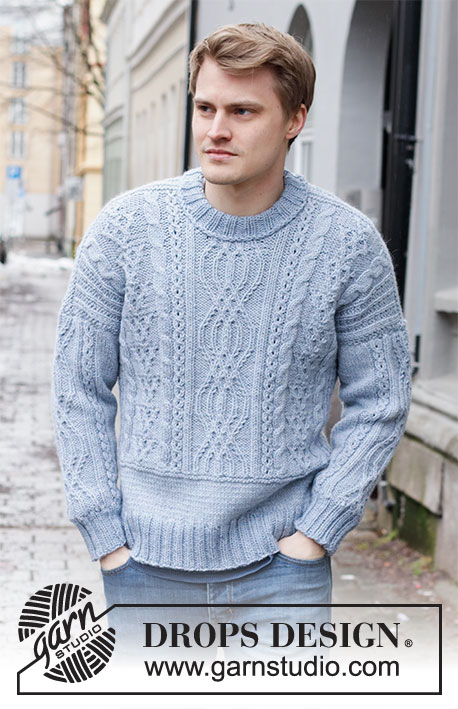
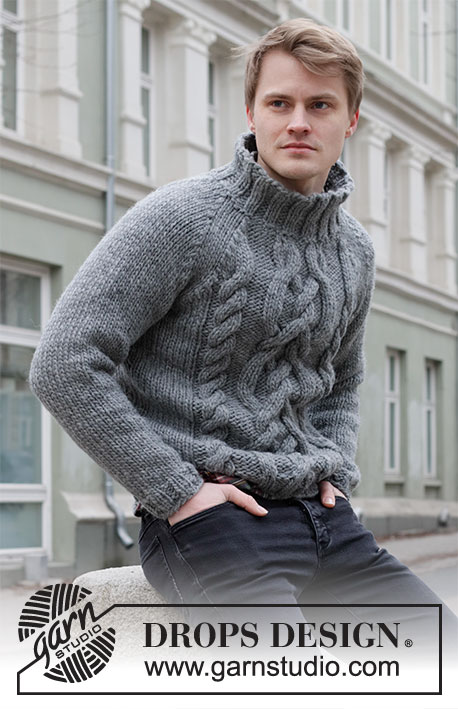
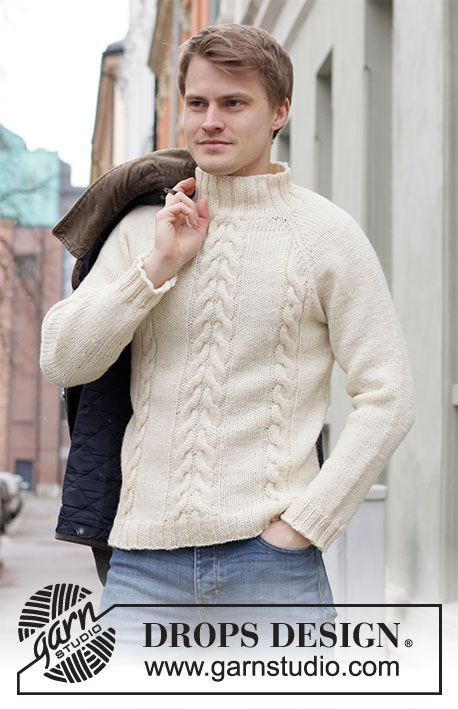
Pulôver tricotado de cima para baixo para homem com cavas raglan, torcidos e ponto meia, em DROPS Nepal. Do S ao XXXL
DROPS 219-8 |
||||||||||||||||
|
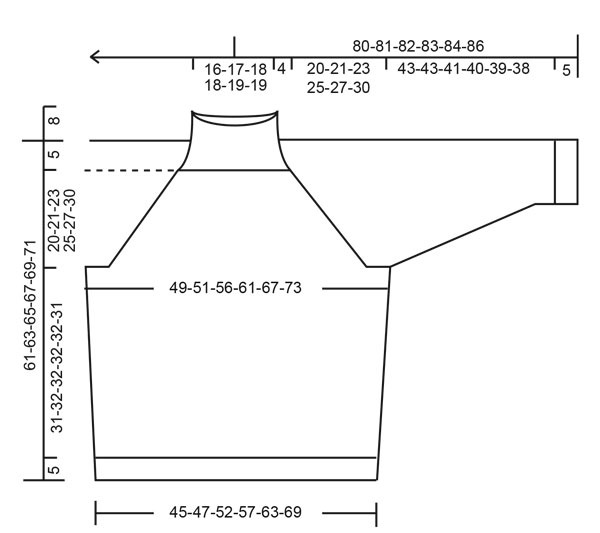
--------------------------------------------------------- TÉCNICAS USADAS: ---------------------------------------------------------- PONTO FANTASIA: Ver os diagramas A.1 a A.3. AUMENTOS (raglan): Tricotar até restar 1 malha antes do marcador, 1 laçada (= aumenta-se 1 malha), tricotar 2 malhas meia, 1 laçada (= aumenta-se 1 malha). Aumentar desta maneira a cada marcador (= aumenta-se 8 malhas). Tricotar as laçadas torcidas na carreira seguinte. Tricotar os aumentos no ponto fantasia. Ou seja, tricotam-se os aumentos das costas em ponto meia, os da frente primeiro em ponto meia, depois, seguindo A.2a/A.3a e, por fim, novamente em ponto meia. DIMINUIÇÕES (lados pulôver e mangas): Diminuir 1 malha de cada lado do fio marcador da seguinte maneira: Tricotar até restarem 4 malhas antes do fio marcador e tricotar 2 malhas juntamente em meia, 4 malhas meia (o fio marcador fica a meio destas malhas), deslizar 1 malha em meia, 1 malha meia, passar a malha deslizada por cima da malha tricotada. DICA PARA ARREMATAR: Para evitar que as malhas arrematadas fiquem demasiado apertadas, pode-se arrematar com uma agulha um tamanho acima. Se as malhas arrematadas continuarem apertadas, fazer 1 laçada depois de cerca de cada 4.ª malha e arrematar as laçadas como malhas normais. ---------------------------------------------------------- A PEÇA COMEÇA AQUI: ---------------------------------------------------------- PULÔVER - SUMÁRIO DA PEÇA: A gola e o encaixe tricotam-se de cima para baixo, em redondo na agulha circular a partir do meio das costas. Dividir então o encaixe para as costas/a frente e as mangas. As costas/a frente tricotam-se em redondo na agulha circular, de cima para baixo. As mangas tricotam-se em redondo nas agulhas de pontas duplas, de cima para baixo. GOLA: Montar 80-84-88-96-96-104 malhas com a agulha circular 4,5 mm em Nepal. Tricotar em canelado 2 malhas meia/2 malhas liga durante 8 cm. As carreiras começam a meio das costas. Continuar com a agulha circular 5,5 mm. Colocar 1 marcador no princípio de carreira - medir o encaixe a partir deste marcador! ENCAIXE: Tricotar 1 volta meia aumentando 5-9-13-5-13-5 malhas a intervalos regulares = 85-93-101-101-109-109 malhas. Tricotar a carreira seguinte da seguinte maneira (colocar os marcadores entre as malhas): Tricotar 13-15-17-17-19-19 malhas (= metade das costas), colocar o 1.º marcador, 14 malhas em ponto meia (= manga), colocar o 2.º marcador, 6-8-10-10-12-12 malhas em ponto meia, A.1 (= 18 malhas), 6-8-10-10-12-12 malhas em ponto meia (= frente), colocar o 3.º marcador, 14 malhas em ponto meia (= manga), colocar o 4.º marcador, colocar 14-16-18-18-20-20 malhas em ponto meia (= última metade das costas). Fazer seguir os marcadores à medida que for tricotando - aumentar para o raglan de cada lado de cada um desses marcadores. Na carreira seguinte, aumentar 1 malha de cada lado de cada marcador - ver AUMENTOS! Aumentar desta maneira 19-20-22-24-26-30 vezes ao todo a cada 2 carreiras mas depois de se ter aumentado 3-3-2-2-1-1 vez, tricotar os aumentos da frente no ponto fantasia – LER COM ATENÇÃO ANTES DE CONTINUAR! Depois de se ter aumentado 3-3-2-2-1-1 vez, tricotar a carreira seguinte da seguinte maneira: Tricotar e aumentar como antes até ao 2.º marcador, tricotar 1 malha em ponto meia, A.2a (= 1 malha), 7-9-10-10-11-11 malhas em ponto meia, A.1 por cima das 18 malhas seguintes como antes, 7-9-10-10-11-11 malhas em ponto meia, A.3a (= 1 malha), 1 malha em ponto meia (o 3.º marcador está aqui), tricotar e aumentar como antes até ao fim da carreira. MANTER A MESMA TENSÃO DA INDICADA PARA A AMOSTRA! Quando A.2a e A.3a tiverem sido tricotados 1 vez em altura, aumentar como explicado sob AUMENTOS (ou seja, tricotar os aumentos da frente em ponto meia) até se ter aumentado 19-20-22-24-26-30 vezes ao todo, e tricotar A.2b e A.3b por cima de A.2a e A.3a (ajustar a altura para que os torcidos estejam feitos na mesma carreira que os de A.1) = 237-253-277-293-317-349 malhas. A peça mede cerca de 19-20-22-24-26-29 cm a partir do marcador a meio das costas. Tricotar até a peça medir 20-21-23-25-27-30 cm a partir do marcador. Dividir, então, a peça para as mangas e as costas/a frente da seguinte maneira: Tricotar as 34-35-39-42-47-52 primeiras malhas (= metade das costas), colocar as 48-54-58-60-62-68 malhas seguintes em espera num alfinete de malhas para a manga e montar 10-10-10-12-12-12 malhas sob a manga, tricotar as 72-74-82-88-98-108 malhas seguintes como antes (= frente), colocar as 48-54-58-60-62-68 malhas seguintes em espera num alfinete de malhas para a manga e montar 10-10-10-12-12-12 malhas sob a manga, tricotar as 35-36-40-43-48-53 últimas malhas (= metade das costas). COSTAS & FRENTE: = 161-165-181-197-217-237 malhas. Colocar 1 fio marcador a meio das 10-10-10-12-12-12 novas malhas sob a manga (= referências para os lados do pulôver). Fazer seguir os fios marcadores à medida que for tricotando; servem para marcar as diminuições dos lados. Continuar em redondo, em ponto meia e ponto fantasia como antes. Quando a peça medir 5 cm a partir da separação, diminuir 1 malha de cada lado da peça das fios marcadores - ver DIMINUIÇÕES (= diminui-se 4 malhas). Diminuir da seguinte maneira 3 vezes ao todo a cada 9 cm = 149-153-169-185-205-225 malhas. Quando a peça medir 31-32-32-32-32-31 cm a partir da separação, tricotar 1 volta meia aumentando AO MESMO TEMPO 11-15-11-15-11-15 malhas a intervalos regulares = 160-168-180-200-216-240 malhas. Continuar com a agulha circular 4,5 mm e tricotar em canelado 2 malhas meia/2 malhas liga em redondo. Arrematar as malhas como elas se apresentam (= as malhas meia em meia e as malhas liga em liga) quando o canelado medir 5 cm - ver DICA PARA ARREMATAR. A peça mede cerca de 36-37-37-37-37-36 cm a partir da separação. MANGAS: Retomar as 48-54-58-60-62-68 malhas do alfinete de malhas de um lado da peça para as agulhas de pontas duplas 5,5 mm e levantar 1 malha em cada uma das 10-10-10-12-12-12 malhas montadas sob a manga = 58-64-68-72-74-80 malhas. Colocar 1 fio marcador a meio das 10-10-10-12-12-12 novas malhas. Fazer seguir o fio marcador à medida que for tricotando; vai servir para marcar as diminuições sob a manga. Tricotar em ponto meia em redondo. Quando a manga medir 3-3-4-5-5-5 cm a partir da separação, diminuir 1 malha de cada lado do fio marcador - não esquecer DIMINUIÇÕES (= diminui-se 2 malhas). Diminuir desta maneira 10-12-13-15-15-18 vezes ao todo a cada 3½-3-2½-2-2-1½ cm = 38-40-42-42-44-44 malhas. Quando a manga medir 43-43-41-40-39-38 cm a partir da separação, aumentar 2-4-2-6-4-4 malhas a intervalos regulares = 40-44-44-48-48-48 malhas. Continuar com as agulhas de pontas duplas 4,5 mm e tricotar em canelado 2 malhas meia/2 malhas liga em redondo. Arrematar as malhas como elas se apresentam quando o canelado medir 5 cm - ver DICA PARA ARREMATAR. Tricotar a outra manga da mesma maneira. |
||||||||||||||||
Explicações do diagrama |
||||||||||||||||
|
||||||||||||||||
 |
||||||||||||||||
 |
||||||||||||||||
 |
||||||||||||||||
Terminou este projecto?Então, identifique as suas fotos com as tags #dropspattern #snowtrailsweater ou mostre-as na galeria #dropsfan. Precisa de ajuda para este modelo?Encontrará 27 turotiais em vídeo, uma rubrica Comentários/Perguntas e muito mais ao visitar a página do modelo em www.garnstudio.com © 1982-2026 DROPS Design A/S. Todos os direitos reservados. Este documento, incluuindo as suas su-secções, tem copyrights. Saia mais o que pode fazer com os nossos modelos no fim de cada uma das páginas do nosso site. |
||||||||||||||||


Com mais de 40 anos no design de modelos de tricô e de croché, a DROPS Design oferece uma das mais vastas colecções demodelos gratuitos na Internet - traduzidos em 17 línguas. Neste dia de hoje, temos 324 catálogos e 12290 modelos - dos quais 12271 estão traduzidos em português.
Trabalhamos com muito empenho para lhe proporcionar o melhor que o tricô e o croché têm para oferecer, para lhe fornecer inspiração e conselhos bem como fios da mais elevada qualidade a preços incríveis! Gostaria de usar os nossos modelos para outros fins que não uso pessoal? Pode ler o que lhe é permitido fazer no Copyright texto que se encontra na parte de baixo de todos os nossos modelos. Bom tricô! Bom croché!
Deixe um comentário acerca do modelo DROPS 219-8
Gostaríamos muito de saber o que tem a dizer-nos acerca deste modelo!
Se deixar uma pergunta acerca do modelo, certifique-se de que escolhe a categoria adequada no formulário abaixo para acelerar o processo relativo à resposta. Os campos obrigatórios estão assinalados com um *.