
Categorias populares
Procura um fio?


Comentários / Perguntas (80)
![]() Nina Davidson escreveu:
Nina Davidson escreveu:
Hi Please disregard yesterday’s comment/question ..... I can now see what is going on - very good!
15.07.2021 - 01:27
![]() Nina escreveu:
Nina escreveu:
I’m knitting the smallest size (204 stitches in the body). I’m struggling to understand where the pattern lies ..... you only do A.2 once (14 stitches). I assumed the 2 markers are placed at the sides i.e. 102 stitches each for front and back so how does doing A.2 once only fit into the pattern - front and back are different?? Please explain. I’m considering re jigging the sections to make front and back the same (leave out A.2).
14.07.2021 - 07:56
![]() Diana Seifert escreveu:
Diana Seifert escreveu:
Thank you very much!!!
01.06.2021 - 14:16
![]() Diana Seifert escreveu:
Diana Seifert escreveu:
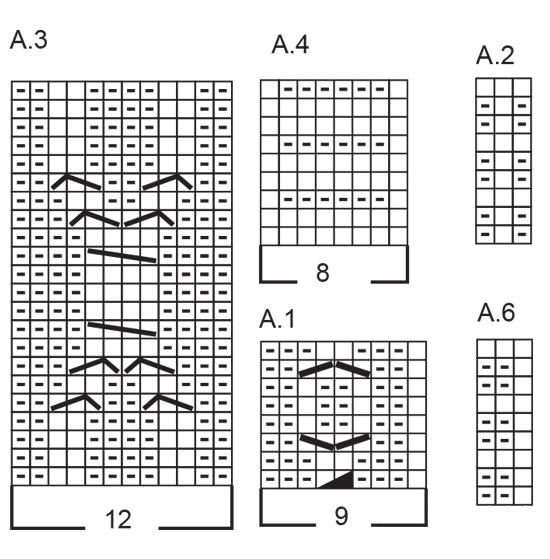
How can I work A3, A4 and A6 ( together 20 stitches) over 28 stitches? Or how can I work A.3, A.4, A.5, A.4, A.3, A.6 over the last 14 ? Thank you sooo much.
31.05.2021 - 16:20DROPS Design respondeu:
Dear Diana, it is always easier to answe if you specifya wich part you need help with (Sleeves? Front? ), and which size, the question relates to, I am just going to assume, that is the smalles size and the BODY at the beginning of the pattern. In there, you need the work A.3, THEN, A.4, and THEN repeat ,A.6 over 28 stitches (5 repeat + the first stitch). Then A.3, A.4, A.5, A.4, A.3,, and THEN repeat A.6 over the last 14 stitches (3 repeats + the first 2 stitches). Happy Knitting!
31.05.2021 - 16:40
![]() Diana Seifert escreveu:
Diana Seifert escreveu:
Hi, Thank you for your quick response. BODY: Then work pattern as follows - from beginning of round: A.2 over the first 14-17-23-29-35-41 stitches (finish with the first 2 stitches in A.2), A.3 (= 12 stitches), A.4 (= 8 stitches), A.5 (= 34 stitches), A.4, A.3, A.6 over the next 28-34-46-58-70-82 stitches (finish with first stitch in A.6), A.3, A.4, A.5, A.4, A.3, A.6 over the last 14-17-23-29-35-41 stitches (finish with the first 2 stitches in A.6).
31.05.2021 - 16:18
![]() Diana escreveu:
Diana escreveu:
Hi Thank you for this knitting pattern I have one question: I do the ice castle sweater, size s How can I knitter a3, a6, and a4 (23) ober 28 ? That makes no sense. Thank you.
30.05.2021 - 21:06DROPS Design respondeu:
Dear Diana, please tell us, exactly which part of the pattern you need help with?
31.05.2021 - 02:40
![]() Glenys Gallagher escreveu:
Glenys Gallagher escreveu:
Can I ask when initially decreasing for the sleeve head I am decreasing 2 stitches each side for a total of 8 rows, and 1 stitch for a total of 2 rows leaving me with 80 stitches. Do I then continue to decrease 2 at each end of every row until 52cms ? The sleeve head doesn't look like it will fit in to the body wormhole, it looks far too short.
18.04.2021 - 18:41DROPS Design respondeu:
Dear Glenys, when you are making the sleeve cap, you first sast off 3-3 stitches on both side of the marker (all together 6 stitches), then 2-2 stitches at the beginning of each row 8 times (that is 2 stitches cast of 4 times (= 8 stitches) on each side (all together 16 stitches), and then 1 stitch 0-0-1-2-3-4 times (depending on size), and cast off 2 stitches at the beginning of each row (thus you are casting off both side), until the piece us 52 cm long. Happy Knitting!
18.04.2021 - 22:31
![]() Glenys Gallagher escreveu:
Glenys Gallagher escreveu:
Is there a video that demonstrates casting off in the round. In splitting the front and the back I cast off 3 stitches at the beginning, 6sts in the middle but when I come to cast off the last 3 sts (to make the second total of 6) I have 1 stitch left on my needle ( in the middle of the 6). Thanks
25.03.2021 - 23:04DROPS Design respondeu:
Hi Glenys, For this last stitch you cut the strand and pull it through the stitch. Then begin on the back piece. Happy knitting!
26.03.2021 - 07:48
![]() Marlena Otsuka escreveu:
Marlena Otsuka escreveu:
Hello, I have question reg. the Sleeve for size S After the 17 Increases (to 88 Stitches), what length should my piece be for Size S, 18" or 14 3/4"? Thank you, Marlena
19.03.2021 - 03:12DROPS Design respondeu:
Dear Mrs Otsuka, the last increase on sleeve should be worked when piece measures approx. 17,36 inches (= approx. 44 cm). Happy knitting!
19.03.2021 - 07:40
![]() Glenys Gallagher escreveu:
Glenys Gallagher escreveu:
I am doing the large,size, after the first section the stitches go down to 240 but the repeats of pattern are on 259 stitches, is it offset all the way round by 19 stitches ? Thank you
15.03.2021 - 11:36DROPS Design respondeu:
Dear Mrs Gallagher, work the 240 sts as follows: A.2 over the first 23 sts (repeat the 3 sts in diagram a total of 7 times and finish with the first 2 stitches), A.3 (= 12 sts), A.4 (= 8 sts), A.5 (= 34 sts ), A.4 (= 8 sts), A.3 (= 12 sts), A.6 over the next 46 (repeat the 3 sts a total of 15 times and finish with first st in A.6), A.3 (= 12 sts), A.4 (= 8 sts), A.5 (=34 sts), A.4 (= 8 sts), A.3 (= 12 sts), A.6 over the last 23 stitches (repeat the 3 sts in diagram a total of 7 times and finish with the first 2 stitches) = 23+12+8+34+8+12+46+12+8+34+8+12+23= 240 sts. Happy knitting!
15.03.2021 - 13:11
|
|||||||||||||||||||||||||
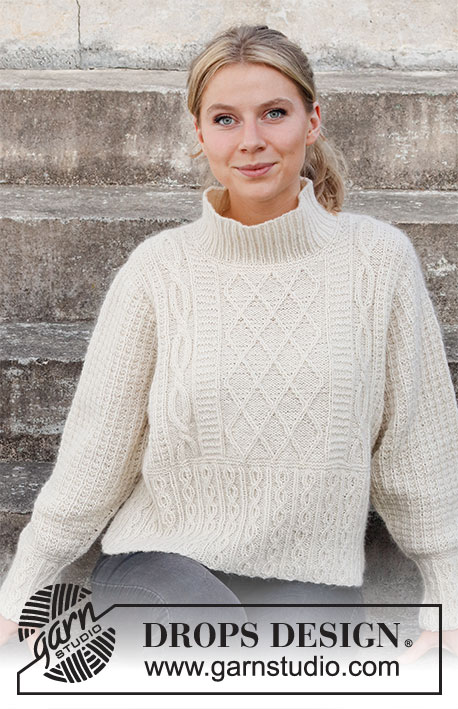
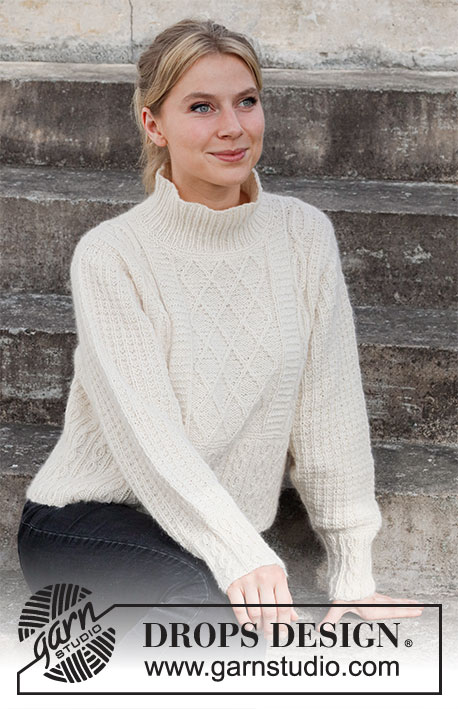
Ice Castles Sweater#icecastlessweater |
|||||||||||||||||||||||||
 |
 |
||||||||||||||||||||||||
Pulôver tricotado em DROPS Puna ou DROPS Soft Tweed, com ponto texturado e torcidos. Do S ao XXXL
DROPS 218-3 |
|||||||||||||||||||||||||
|
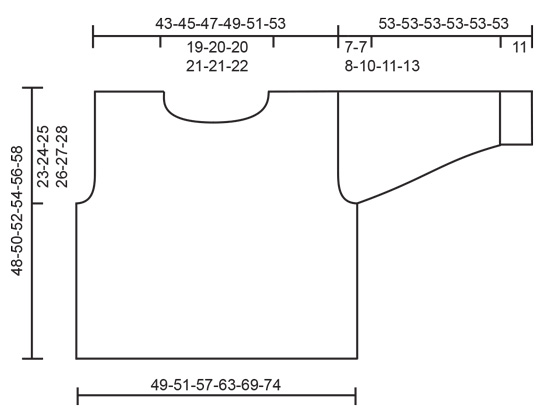
------------------------------------------------------- TÉCNICAS USADAS: ------------------------------------------------------- PONTO JARRETEIRA (em redondo): 1 barra jarreteira = 2 carreiras, ou seja tricotar 1 volta meia e 1 volta liga. PONTO FANTASIA: Ver os diagramas A.1 a A.6. AUMENTOS/DIMINUIÇÕES (a intervalos regulares): Para calcular quando aumentar/diminuir a intervalos regulares, contar o número total de malhas (por ex. 225 malhas) e dividi-lo pelo número de aumentos/de diminuições a fazer (por ex. 9) = 25. Para aumentar neste exemplo, vai-se fazer 1 laçada depois de cerca de cada 25.ª malha. Na carreira seguinte, tricotar as laçadas torcidas para evitar buracos. Para diminuir neste exemplo, vai-se tricotar juntamente cada 24.ª e 25.ª malha. AUMENTOS (meio sob as mangas): Tricotar até restar 1 malha antes do fio marcador, 1 laçada, tricotar 2 malhas meia (o fio marcador fica entre estas malhas), 1 laçada. Tricotar as laçadas torcidas na carreira seguinte, para evitar buracos - tricotar as novas malhas seguindo A.2. ------------------------------------------------------- A PEÇA COMEÇA AQUI: ------------------------------------------------------- PULÔVER - SUMÁRIO DA PEÇA: Tricota-se em redondo na agulha circular até às cavas, separa-se então a peça e termina-se a frente e costas separadamente. As mangas tricotam-se primeiro em redondo com a pequena agulha circular/as agulhas de pontas duplas, depois em idas e voltas para a cabeça de manga. COSTAS & FRENTE: Montar 207-225-243-261-288-315 malhas com a agulha circular 4 mm em Puna/Soft Tweed. Tricotar 1 volta meia. Tricotar então todas as malhas seguindo A.1 (= 23-25-27-29-32-35 motivos de 9 malhas em toda a carreira). Continuar A.1 desta maneira até a peça medir cerca de 15-16-17-18-19-20 cm - ajustar a altura para depois de um motivo completo de A.1 em altura. Tricotar então 2 barras jarreteira em todas as malhas – ver acima - ajustando na última carreira o número de malhas para 204-216-240-264-288-312 malhas. Colocar 1 fio marcador de cada lado da peça; um no princípio da carreira e um outro depois de 102-108-120-132-144-156 malhas= referências para os lados. Tricotar então da seguinte maneira - a partir do princípio da carreira: A.2 por cima das 14-17-23-29-35-41 primeiras malhas (terminar com as 2 primeiras malhas de A.2), A.3 (= 12 malhas), A.4 (= 8 malhas), A.5 (= 34 malhas), A.4, A.3, A.6 por cima das 28-34-46-58-70-82 malhas seguintes (terminar com a 1.ª malha de A.6), A.3, A.4, A.5, A.4, A.3, A.6 por cima das 14-17-23-29-35-41 últimas malhas (terminar com as 2 primeiras malhas de A.6). Continuar desta maneira. MANTER A MESMA TENSÃO DA INDICADA PARA A AMOSTRA! Quando a peça medir 25-26-27-28-29-30 cm, tricotar a carreira seguinte da seguinte maneira: Arrematar as 3-3-3-4-4-4 primeiras malhas da carreira, tricotar 96-102-114-124-136-148 malhas, arrematar 6-6-6-8-8-8 malhas, tricotar 96-102-114-124-136-148 malhas, arrematar as 3-3-3-4-4-4 últimas malhas. Cada parte tricota-se , então, separadamente em idas e voltas. Colocar as 96-102-114-124-136-148 primeiras malhas (= frente) em espera num alfinete de malhas, e tricotar as 96-102-114-124-136-148 últimas malhas (= costas). COSTAS: = 96-102-114-124-136-148 malhas. Continuar como antes, arrematando para as cavas de cada lado da peça a cada 2 carreiras: 1-1-2-3-4-5 vezes 2 malhas e 1-2-4-5-6-8 vezes 1 malha = 90-94-98-102-108-112 malhas. Quando a peça medir 46-48-50-52-54-56 cm, arrematar as 38-40-40-42-42-44 malhas centrais para o decote, e terminar cada ombro separadamente. Arrematar então 1 malha na carreira seguinte no lado do decote = 25-26-28-29-32-33 malhas. Continuar até a peça medir 48-50-52-54-56-58 cm (= 23-24-25-26-27-28 cm a partir do princípio da cava), arrematar. Tricotar o outro ombro da mesma maneira. FRENTE: = 96-102-114-124-136-148 malhas. Continuar e formar as cavas nos lados como se fez para as costas = 90-94-98-102-108-112 malhas. Quando a peça medir 42-44-46-48-49-51 cm, deslizar as 30-32-32-34-34-36 malhas centrais em espera num alfinete de malhas para o decote, e terminar os ombros separadamente. Arrematar então em todas as carreiras a partir do decote: 1 vez 2 malhas e 3 vezes 1 malha = restam 25-26-28-29-32-33 malhas para cada ombro. Continuar como antes até a peça medir 48-50-52-54-56-58 cm (= 23-24-25-26-27-28 cm a partir do princípio da cava), arrematar. Tricotar o outro ombro da mesma maneira. MONTAGEM: Costurar os ombros. MANGAS: Tricotam-se em redondo nas agulhas de pontas duplas/ a agulha circular, de cima para baixo. Dividir a peça para a cabeça da manga e terminar em idas e voltas. Montar 54-54-54-63-63-63 malhas nas agulhas de pontas duplas 4 mm em Puna/Soft Tweed. Tricotar 1 volta meia. Tricotar então todas as malhas seguindo A.1 (= 6-6-6-7-7-7 motivos de 9 malhas). Continuar A.1 desta maneira até a peça medir cerca de 11 cm - ajustar a altura para depois de um motivo completo de A.1 em altura. Tricotar 2 barras jarreteira em todas as malhas – ver acima - ajustando o número de malhas na última carreira para 54-56-58-60-64-66. Colocar um fio marcador no princípio da carreira = meio sob a manga. Continuar da seguinte maneira: 1 malha em ponto meia, A.2 por cima das 52-54-56-58-62-64 malhas seguintes, terminar com 1 malha em ponto meia. Continuar desta maneira, AO MESMO TEMPO, quando a peça medir 12 cm, aumentar 1 malha de cada lado do fio marcador - VER AUMENTOS. Aumentar 17-18-20-21-23-24 vezes ao todo a cada 2-1½-1½-1½-1-1 cm = 88-92-98-102-110-114 malhas. Quando a peça medir 46-46-45-43-42-40 cm, arrematar 3 malhas de cada lado do fio marcador (= 6 malhas arrematadas a meio sob a manga) e terminar a manga em idas e voltas arrematando no princípio de cada carreira de cada lado da peça: 4-4-4-5-5-6 vezes 2 malhas e 0-0-1-2-3-4 vezes 1 malha. Arrematar então 2 malhas de cada lado da peça até a peça medir 52 cm para todos os tamanhos. Arrematar então 3 malhas de cada lado da peça, e arrematar as restantes malhas. A manga mede 53 cm para todos os tamanhos. Tricotar a outra manga da mesma maneira. GOLA: Começando pelo direito, levantar, em Puna/Soft Tweed com a pequena agulha circular 4 mm - cerca de 96 a 106 malhas (incluindo as malhas em espera – e o número de malhas deve ser múltiplo de 2). Tricotar 1 volta liga, 1 volta meia, 1 volta liga, 1 volta meia. Continuar em canelado (1 malha meia/1 malha liga) durante 10 cm. Arrematar as malhas como elas se apresentam. MONTAGEM: Montar as mangas. |
|||||||||||||||||||||||||
Explicações do diagrama |
|||||||||||||||||||||||||
|
|||||||||||||||||||||||||
 |
|||||||||||||||||||||||||
 |
|||||||||||||||||||||||||
 |
|||||||||||||||||||||||||
Terminou este projecto?Então, identifique as suas fotos com as tags #dropspattern #icecastlessweater ou mostre-as na galeria #dropsfan. Precisa de ajuda para este modelo?Encontrará 25 turotiais em vídeo, uma rubrica Comentários/Perguntas e muito mais ao visitar a página do modelo em www.garnstudio.com © 1982-2026 DROPS Design A/S. Todos os direitos reservados. Este documento, incluuindo as suas su-secções, tem copyrights. Saia mais o que pode fazer com os nossos modelos no fim de cada uma das páginas do nosso site. |
|||||||||||||||||||||||||


Com mais de 40 anos no design de modelos de tricô e de croché, a DROPS Design oferece uma das mais vastas colecções demodelos gratuitos na Internet - traduzidos em 17 línguas. Neste dia de hoje, temos 324 catálogos e 12290 modelos - dos quais 12271 estão traduzidos em português.
Trabalhamos com muito empenho para lhe proporcionar o melhor que o tricô e o croché têm para oferecer, para lhe fornecer inspiração e conselhos bem como fios da mais elevada qualidade a preços incríveis! Gostaria de usar os nossos modelos para outros fins que não uso pessoal? Pode ler o que lhe é permitido fazer no Copyright texto que se encontra na parte de baixo de todos os nossos modelos. Bom tricô! Bom croché!
Deixe um comentário acerca do modelo DROPS 218-3
Gostaríamos muito de saber o que tem a dizer-nos acerca deste modelo!
Se deixar uma pergunta acerca do modelo, certifique-se de que escolhe a categoria adequada no formulário abaixo para acelerar o processo relativo à resposta. Os campos obrigatórios estão assinalados com um *.