
Categorias populares
Procura um fio?


Comentários / Perguntas (33)
![]() Lonnie Braagaard escreveu:
Lonnie Braagaard escreveu:
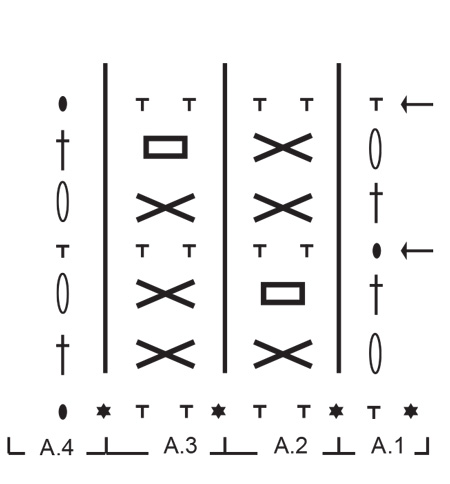
Jeg forsøger at hækle huen, men kan ikke forstå starten af opskriften. 1. række er hæklet og jeg har 68 fastmasker. 2. række ? der hækles iefter diagram men hvad skal der hækles? *T*TT og så videre eller? Håber jeg kan få hjælp
27.10.2021 - 15:14DROPS Design respondeu:
Hej Lonnie, nej, * = denne række skal ikke hækles, den er allerede hæklet og viser kun hvordan næste række skal hækles i maskerne - det vil sige at du hækler næste række :)
28.10.2021 - 14:07
![]() Olga escreveu:
Olga escreveu:
Hola, he comenzado a hacer el cuello. Si lo pongo en plano sobre la mesa me queda circular, no un rectángulo, como pensaba que tendría que quedar. Pienso que pasa esto porque en la primera vuelta dice que hay que saltarse una cadena. ¿Esto es correcto? O yo no lo he entendido bien? Gracias
19.05.2021 - 15:40DROPS Design respondeu:
Hola Olga, la forma obtenida no es por la cadeneta saltada, sino que por la tensión del tejido. Efectivamente, se tiene que saltar una cadeneta; siempre se montan más cadenetas que las necesarias para evitar que la labor se tense.
30.05.2021 - 20:53
![]() Jean escreveu:
Jean escreveu:
Thanks. However the instructions for the box (□) say 'skip 1 puff-stitch + 1 chain stitch, work 1 treble crochet in the next treble crochet' - this uses 3 stitches. The instructions for the cross (X) say 'skip 1 stitch, work 1 treble crochet in next stitch' - this uses 2 stitches. It worked in the second row of the pattern fine because the box (□)was used all the way along the row (not the cross X). Please could you get someone to explain this. Thanks.
14.04.2021 - 13:10
![]() Jean escreveu:
Jean escreveu:
The very top row of the pattern (before the last row of double crochet) doesn't seem to work for me. I am working it right to left, A1 over 1st stitch, A2 until the last 3 stitches, A3 over last 2 stitches and A1 over last stitch. Because A2 is a cross (X) and not a box (□) (like row No 2), there ends up being more puff stitches because the chain stitch isn't being missed (there is a puff stitch being made every 2 stitches instead of 3). Should this symbol not be a box to prevent this?
13.04.2021 - 21:08DROPS Design respondeu:
Dear Jean, the X is worked over 2 stitches (1 treble in the 2. one, and one puff into the first one, cossing the tr), and the square is also wprked over two stitches (puff stitch into the 2. stotch, and treble into the first one) so you should not end up (both symbols have crossed stitches, only teh direction is different), so you should not end up with extra stitches. Happy Crafting!
13.04.2021 - 21:58
![]() Annette Fuglsang escreveu:
Annette Fuglsang escreveu:
Hej ! I flere af Drops opskrifter møder jeg 3 tal med bindestreg imellem f. eks. i Drops 204-16: "hækl 1 fastmaske i hver af de 0-2-1 næste luftmasker, . . . " Hvad betyder 0-2-1 næste luftmaske ? Eller i strikkeopskriften Drops Clementin Hat "Strik 0-1-0 maske ret, strik derefter . . ." Hvad betyder det ? Med venlig hilsen Annette
25.02.2021 - 06:50DROPS Design respondeu:
Hej Annette, det er tallene i de 3 forskellige størrelser. Strikker du den mindste, følger du det første tal igennem hele opskriften osv. God fornøjelse!
25.02.2021 - 14:20
![]() Annica Lindgren escreveu:
Annica Lindgren escreveu:
Efter att ha virkat de två första varven (först fastmaskor... sedan första varvet på diagrammet) står: "Fortsätt mönstret fram och tillbaka så". Hur menas? Är det det nedersta varvet som ska upprepas till 20 cm och för att sedan gå uppåt i diagrammet? Eller ska jag följa hela diagrammet uppåt direkt? Med vänlig hälsning, Annica
31.01.2021 - 20:02DROPS Design respondeu:
Hei Annica. Den nederst raden i diagrammet hekler du kun 1 gang, slik det står beskrevet i oppskriften. I diagramteksten med sort stjerne står det: denne raden skal ikke hekles, den er allerede heklet og viser kun hvordan neste rad skal hekles i maskene . Så du skal kun repetere de 6 radene i diagrammet (starter med 3 luftmasker) i høyden. God Fornøyelse!
08.02.2021 - 10:18
![]() Béatrice Lassalle escreveu:
Béatrice Lassalle escreveu:
Bonjour, Pour faire mon échantillon, vous dites : "13 double-brides/mailles serrées de large avec 1 fil de chaque qualité = 10 cm." Je ne comprends pas bien : je fais des double-brides ou des mailles serrées ? Et dans la hauteur, comment je peux voir ce qu'il y a dans 10 cm ? Merci de me répondre car je reste bloquée sur mon échantillon !
17.11.2020 - 11:14DROPS Design respondeu:
Bonjour Mme Lasalle, vos mailles doivent être toutes de la même largeur, autrement dit 13 double-brides = 13 mailles serrées = 10 cm de large. La hauteur est indiquée pour A.2 = 3 rangs de A.2 = environ 3,25 cm. Bon crochet!
17.11.2020 - 13:56
![]() Roro escreveu:
Roro escreveu:
Thanks so much for your patience. That explains well how the row of 78 dbl crochet stitches are worked into. However, after you have done the first row of puff stitches, and then count the stitches, there are 116 stitches. This is because each X box contains 3 stitches (a treble, a chain and a puff) and this is being worked into 2 dc stitches. So at the end of the row you have 38 extra stitches (because there are 38 puff stitches). Can you possibly work out why I am going wrong here. Thanks
30.07.2020 - 09:40DROPS Design respondeu:
Dear Roro, work simply following the diagram and video previously linked, making sure you have 38 puff stitches on every row - if your tension is right, you should have then the right measurements. Happy crocheting!
30.07.2020 - 12:34
![]() Roro escreveu:
Roro escreveu:
Thanks for your response. However, there is an increase from the row of double crochets to the 1st row of puff stitches if you follow the pattern (see question below). In the pattern it looks like each 3rd double crochet is possibly missed, which would actually even out the number of stitches if that was the case - is this where I'm possibly going wrong? Thanks for your patience.
29.07.2020 - 18:01DROPS Design respondeu:
Dear Roro, on neck warmer you cast on 94-101-108 sts and work first row skipping chains evenly so that there are 78-84-90 sts at the end of this first row. Then work: A.1 over 1st st, repeat A.2 until 3 sts remain = repeat A.2 a total of 37-40-43 times in width (= over the next 74-80-86 sts), and finish with A.3 (= 2 sts) and A.4 over the last stitch = 1+74-80-86+2+1=78-84-90 sts and 38-41-44 puff stitches. Hope this help. Happy crocheting!
30.07.2020 - 08:54
![]() Roro escreveu:
Roro escreveu:
Thanks for all your help. The fundamental reason I don't understand this pattern is this: On the 1st row (after dbl crochet row ) the puff stitches which produce 3 stitches (1 treble + 1 chain + 1 puff) are worked into 2 dbl crochet stitches (1 missed - into which a puff stitch goes after the treble + 1 for the treble). This results in an increase of stitches. That would maybe make sense in the 1st row of the item, but not further up. Should the 'X' box say 'miss 2 stitches' instead? Thanks
29.07.2020 - 16:02DROPS Design respondeu:
Dear Roro, there shouldn't be any increase, you should work "straight", each treble will be worked in the treble from the previous row so that the number of sts will remain constant. This video shows how to crochet these 2 rows with same symbols. Happy crocheting!
29.07.2020 - 17:11
|
|||||||||||||||||||||||||
Fields of Blue#fieldsofblueset |
|||||||||||||||||||||||||
 |
 |
||||||||||||||||||||||||
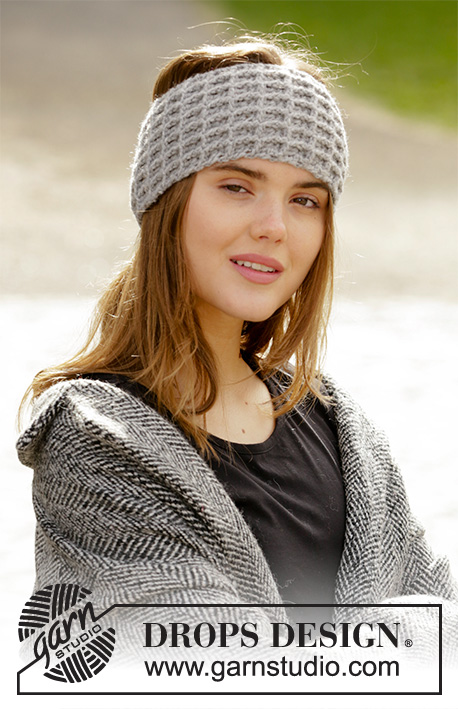
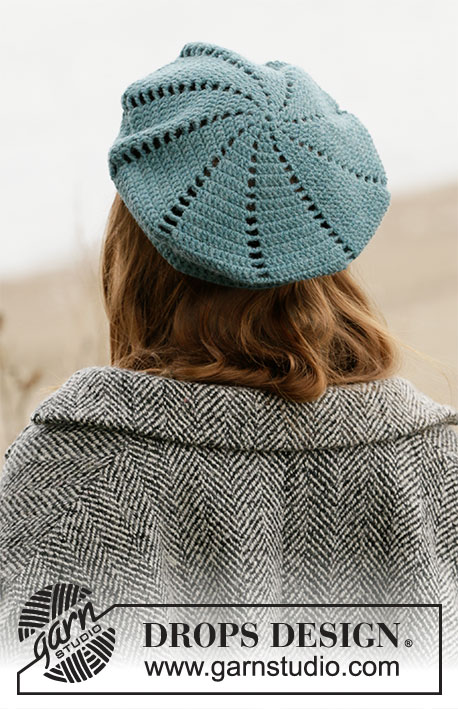
Gorro e gola crochetados em ponto soprado, em DROPS Sky e DROPS Kid-Silk.
DROPS 204-16 |
|||||||||||||||||||||||||
|
------------------------------------------------------- TÉCNICAS USADAS ------------------------------------------------------- PONTO FANTASIA (gorro e gola): Ver diagramas A.1 a A.4. PONTOS CORRENTE: Se crochetar apenas com a ponta da agulha de croché, os pontos corrente serão, na maioria das vezes, demasiado baixos; 1 ponto corrente deve ser tão comprido quanto 1 ponto baixo é largo 1 PONTO SOPRADO: Crochetar da seguinte maneira no mesmo ponto (é importante crochetar no ponto e não à volta do ponto): * Fazer 1 laçada, enfiar a agulha de croché no ponto, fazer 1 laçada e passá-la no ponto; as duas laçadas devem ser compridas (para evitar que o ponto soprado fique pequeno e compacto, é importante esticar a laçada em cerca de 2 cm de comprimento)*, repetir de * a * ao todo 5 vezes, fazer 1 laçada e crochetar todas as argolas na agulha de croché. DIMINUIÇÕES (a intervalos regulares): Para calcular quando diminuir a intervalos regulares, contar o número total de pontos (por ex. 63 pontos) e dividi-lo pelo número de diminuições a fazer (por ex. 28) = 2.3. Neste exemplo, diminuir crochetando juntamente cerca de cada 1.º e 2.º ponto da seguinte maneira: Enfiar a agulha de croché no ponto seguinte, fazer 1 laçada e passá-la no ponto, enfiar a agulha de croché no ponto seguinte, fazer 1 laçada e passá-la no ponto, fazer 1 outra laçada e crochetar juntamente nas 3 argolas da agulha de croché (= diminui-se 1 ponto). ------------------------------------------------------- A PEÇA COMEÇA AQUI: ------------------------------------------------------- GORRO – SUMÁRIO DA PEÇA: Crocheta-se de cima para baixo, em idas e voltas a partir do meio da parte de trás, com uma costura a meio da parte de trás. GORRO: Crochetar 75-77-82 pontos corrente com a agulha de croché 5,5 mm e 1 fio Sky + 1 fio Kid-Silk (= 2 fios). Crochetar a 1.ª carreira da seguinte maneira: 1 ponto baixo no 3.º ponto corrente a partir da agulha de croché, 1 ponto baixo em cada um dos 0-2-1 ponto corrente seguintes, *saltar 1 ponto corrente, 1 ponto baixo em cada um dos 5 pontos corrente seguintes*, repetir de * a * até ao fim da carreira = 62-64-68 pontos baixos. Crochetar a carreira seguinte da seguinte maneira: A.1 por cima do 1.º ponto, repetir A.2 até restarem 3 pontos, A.3 por cima das 2 pontos seguintes e terminar com A.4 por cima da última ponto. Continuar desta maneira em idas e voltas. MANTER A MESMA TENSÃO DA INDICADA PARA A AMOSTRA! Quando a peça medir cerca de 20-21-22 cm, diminuir 28-30-30 pontos a intervalos regulares, quer na carreira 3 quer na carreira 6 do diagrama (uma das duas carreiras com uma flecha no diagrama) – ver DIMINUIÇÕES = 34-34-38 pontos. Crochetar mais 2 carreiras de pontos soprados. Na carreira seguinte (um carreira de pontos baixos), diminuir crochetando todas as pontos baixos juntamente 2 a 2 = restam 17-17-19 pontos baixos. Crochetar então 2 carreiras de pontos baixos crochetando todas as pontos baixos juntamente 2 a 2 a cada um de estes carreiras = restam 5 pontos baixos para todos os tamanhos. Cortar os fios mantendo comprimento suficiente para a costura. Passar os fios pelos 5 pontos do alto do gorro, franzir e costurar. O gorro medir cerca de 26-27-28 cm de altura total. MONTAGEM: Fazer a costura da gorro a meio da parte de trás – orla com orla, na alça mais exterior dos pontos para que a costura fique lisa ------------------------------------------------------- GOLA –SUMÁRIO DA PEÇA: Crocheta-se de cima para baixo, em idas e voltas a partir da meio da parte de trás, com uma costura. GOLA: Crochetar 94-101-108 pontos corrente com a agulha de croché 5,5 mm e 1 fio Sky + 1 fio Kid-Silk (= 2 fios). Crochetar a 1.ª carreira da seguinte maneira: 1 ponto baixo no 3ème ponto corrente a partir da agulha de croché, 1 ponto baixo em cada um dos 1-2-3 pontos corrente seguintes, *saltar 1 ponto corrente, 1 ponto baixo em cada um dos 5 pontos corrente seguintes*, repetir de * a * até ao fim da carreira = 78-84-90 pontos baixos. Crochetar a carreira seguinte da seguinte maneira: A.1A por cima do 1.º ponto, A.2 até restarem 3 pontos, A.3 por cima dos 2 pontos seguintes e terminar com A.4 por cima do último ponto. MANTER A MESMA TENSÃO DA INDICADA PARA A AMOSTRA! Continuar desta maneira em idas e voltas até a peça medir cerca de 24-27-30 cm (ou até ao comprimento desejado) mas arrematar depois de quer uma carreira 3 quer uma carreira 6 dos diagramas. Cortar o fio matando comprimento suficiente para a costura. MONTAGEM: Fazer a costura a meio da parte de trás – orla com orla na alça mais exterior dos pontos para que fique lisa. |
|||||||||||||||||||||||||
Explicações do diagrama |
|||||||||||||||||||||||||
|
|||||||||||||||||||||||||
 |
|||||||||||||||||||||||||
Terminou este projecto?Então, identifique as suas fotos com as tags #dropspattern #fieldsofblueset ou mostre-as na galeria #dropsfan. Precisa de ajuda para este modelo?Encontrará 8 turotiais em vídeo, uma rubrica Comentários/Perguntas e muito mais ao visitar a página do modelo em www.garnstudio.com © 1982-2026 DROPS Design A/S. Todos os direitos reservados. Este documento, incluuindo as suas su-secções, tem copyrights. Saia mais o que pode fazer com os nossos modelos no fim de cada uma das páginas do nosso site. |
|||||||||||||||||||||||||


Com mais de 40 anos no design de modelos de tricô e de croché, a DROPS Design oferece uma das mais vastas colecções demodelos gratuitos na Internet - traduzidos em 17 línguas. Neste dia de hoje, temos 324 catálogos e 12245 modelos - dos quais 12226 estão traduzidos em português.
Trabalhamos com muito empenho para lhe proporcionar o melhor que o tricô e o croché têm para oferecer, para lhe fornecer inspiração e conselhos bem como fios da mais elevada qualidade a preços incríveis! Gostaria de usar os nossos modelos para outros fins que não uso pessoal? Pode ler o que lhe é permitido fazer no Copyright texto que se encontra na parte de baixo de todos os nossos modelos. Bom tricô! Bom croché!
Deixe um comentário acerca do modelo DROPS 204-16
Gostaríamos muito de saber o que tem a dizer-nos acerca deste modelo!
Se deixar uma pergunta acerca do modelo, certifique-se de que escolhe a categoria adequada no formulário abaixo para acelerar o processo relativo à resposta. Os campos obrigatórios estão assinalados com um *.