
Categorias populares
Procura um fio?


Comentários / Perguntas (44)
![]() Margarita escreveu:
Margarita escreveu:
Moin, ich verstehe die Maschenprobe nicht richtig. Bedeutet 24 Maschen in der Breite auch, dass nur die rechten Maschen gezählt werden? Also i. Wirklichkeit 48 Maschen auf der Nadel sind und 10 cm ergeben?
23.07.2025 - 18:01DROPS Design respondeu:
Liebe Margarita, die Maschenprobe soll 24 Maschen auf der Nadel 10 cm messen und 48 Reihen in der Höhe = 24 sichtbare rechte Maschen 10 cm messen. Viel Spaß beim Stricken!
24.07.2025 - 16:31
![]() Catharina escreveu:
Catharina escreveu:
Jeg strikkede nederdelen i uld i efteråret og har først lige færdigmontet den. Superflot og så lækker at have på. Vil nu strikke den i flere nuancer. 🤗
13.01.2025 - 20:13
![]() Ghita Forelius escreveu:
Ghita Forelius escreveu:
Förstår ej ur stickas varv A1
03.12.2024 - 15:33DROPS Design respondeu:
Hej, du börjar nederst till höger i diagrammet och stickar första varvet så här: *2 aviga maskor tillsammans, 1 omslag, lyft 1 maska som om den skulle stickas avig*, upprepa *-* (= de tre rutorna i diagrammet) hela varvet runt. Fortsätt sedan med följande varv i diagrammet (läs diagrammet från höger till vänster).
03.12.2024 - 18:18
![]() Cecilie escreveu:
Cecilie escreveu:
Der er en video om hvordan man folder kanten og syr den, men hvad gør man, når den foldede kant skal sys på noget, der er meget mere elastisk? Lige efter kanten tager man jo ud og begynder at strikke rib - hvordan undgår man at miste elasticiteten, når der kommer sting på tværs af ribbene?
14.09.2022 - 12:29DROPS Design respondeu:
Hej Cecilie, ja du har helt ret, da er det vigtigt at du syr løst, så kanten ikke mister elasticiteten :)
15.09.2022 - 15:46
![]() Elvira Eger escreveu:
Elvira Eger escreveu:
Guten Tag, ich bin gerade dabei, den Rock zu stricken und hätte da eine Frage zu dem Muster Diagramm. Es gibt das Muster A. 1 mit der ersten Reihe mit Abnahme und dann noch das Muster A. 1a, das bis zum Ende gestrickt werden soll. Ich sehe aber keinen Unterschied zwischen A. 1 und A.. 1a. Bitte melden Sie sich bald, damit ich weiter machen kann. Vielen Dank für die Bemühungen Elvira Eger
17.02.2022 - 13:16DROPS Design respondeu:
Liebe Frau Eger, bei der 1. Reihe in A.1a stricken Sie *2 Maschen links zusammen, 1 Umschlag, 1 Maschen wie zum Linksstricken abheben*, und diese 3 Maschen von *bis* wiederholen (Umschläge werden nicht als Maschen gezählt), so haben Sie abgenommen. Dann stricken Sie die 2. und 3. Reihe in A.1 und stricken Sie so weiter, dh die 2 Reihen in A.1a sind die gleichen als die 2. und die 3. Reihe in A.1. Kann das Ihnen helfen?
17.02.2022 - 13:42
![]() Carol MacDonald escreveu:
Carol MacDonald escreveu:
Hi I have pattern Drops 196-37. Can you please tell me what the measurements are for the sizes
16.10.2021 - 07:37DROPS Design respondeu:
Dear Carol, you can find all the relevant measurements of the finished piece on the shcematic drawing just below the pattern description. Happy Stitching!
17.10.2021 - 00:23
![]() Lara escreveu:
Lara escreveu:
Does anyone else find A1 not working for them? It works when I do rows, and does not when I try in rounds. Shouldn't it be "purl in one round, then knit in the next?" I watched a few videos of false English rib, it usually starts with "knit one " - not purl. Could this be an issue?
02.01.2021 - 05:50
![]() Lara escreveu:
Lara escreveu:
Dear Drops Design, Kristen seems to be right, the pattern appears to give the wrong side as "right side" when switching to false English rib. I looked up a video explaining false English rib, it appears that A1 diagram is somehow wrong, I am still trying to figure out what exactly the problem is. Maybe it has something to do with translation from Norwegian? Was anyone able to get it right using this pattern? Thank you.
01.01.2021 - 05:36
![]() Emma escreveu:
Emma escreveu:
Jeg har svært ved at forstå overgangen fra de 8 cm rib til det nye mønster. Bliver forvirret over strikkediagrammet og den vejledende video for falsk patent. Prøver de at forklare den samme ting?
18.11.2020 - 23:30DROPS Design respondeu:
Hej Emma, første pind i diagrammet er anderledes end i videoen da du strikker 2 masker vrang sammen, men herefter strikkes de to omgange skiftevis som i videoen. God fornøjelse!
23.11.2020 - 16:00
![]() Lisia escreveu:
Lisia escreveu:
Dit was de eerste keer dat ik in aanraking kwam met valse patentsteek en patentsteken überhaupt, na veel gepuzzel en googlen ontdekte ik een fout in het telpatroon. De averechtste steken in de tour van de dichte bolletjes (de toer met de extra omslagen) moeten rechtste steken zijn!
14.11.2020 - 16:42
|
||||||||||||||||
See You In Dublin#seeyouindublinskirt |
||||||||||||||||
 |
 |
|||||||||||||||
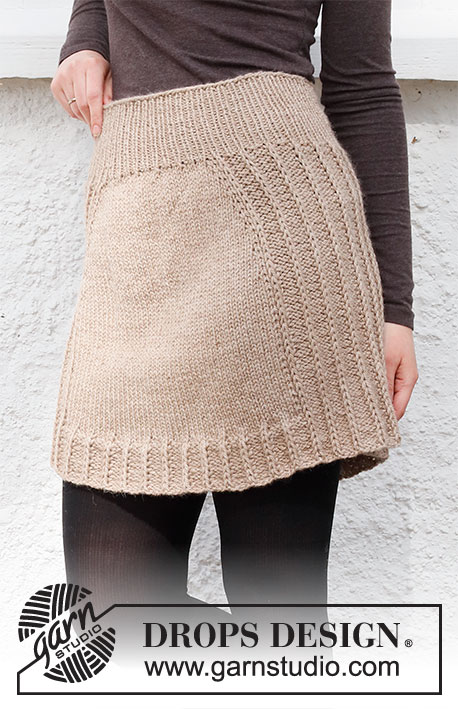
Saia tricotada em DROPS Nord, de cima para baixo, em falso canelado inglês. Do S ao XXXL
DROPS 196-37 |
||||||||||||||||
|
---------------------------------------------------------- TÉCNICAS USADAS: ---------------------------------------------------------- AMOSTRAS: A textura da saia vai alargar quando a usarmos e por conseguinte tem 2 tipos de amostras. Tensão-1: Quando se tricota a saia e se tira as medidas na horizontal. A saia deve ter esta tensão quando a fazemos. Tensão-2: tensão medida na cintura quando usamos a saia. A tension em altura é indicada seguindo as malhas meia, que se tricotam numa carreira a menos do que as malhas liga, porque as malhas meia são deslizadas frouxamente a cada 2 carreiras. Ou seja, 24 carreiras em altura contadas nas malhas meia para 10 cm = 48 carreiras contadas nas malhas liga para 10 de altura. As medidas do esquema são indicadas em cm, quando se usa a saia. AUMENTOS-1 (a intervalos regulares): Para calcular quando aumentar, contar o número total de malhas (por ex. 172 malhas) e dividi-lo pelo número de aumentos a fazer (por ex. 26) = 6.6. Neste exemplo, vai-se aumentar fazendo 1 laçada alternadamente depois de cerca decada 6.ª e 7.ª malha. Na carreira seguinte, tricotar as laçadas torcidas para evitar um buraco. AUMENTOS-2: Todos os aumentos são feitos numa carreira onde a laçada e a malha meia são tricotadas juntamente em meia. Tricotar 5 vezes a malha meia e a laçada da seguinte maneira: Tricotar juntamente em meia a laçada e a malha meia mas manter a malha e a laçada na agulha esquerda, * fazer 1 laçada na agulha direita e tricotar juntamente em meia a laçada e a malha meia*, repetir de * a * 2 vezes ao todo = 5 malhas (= aumenta-se 4 malhas) PONTO FANTASIA: Ver diagrama A.1. ---------------------------------------------------------- A PEÇA COMEÇA AQUI: ---------------------------------------------------------- SAIA – SUMÁRIO DA PEÇA: Tricota-se de cima para baixo, em redondo na agulha circular. Tricotar primeiro uma bainha para enfiar o elástico da cintura. Continuar então em canelado e falso canelado inglês. A textura da saia vai ser diferente quando a usarmos – ver AMOSTRA. BAINHA: Montar 172-188-202-228-250-292 malhas com a agulha circular 2,5 em Nord. Tricotar 1 carreira em malhas liga. Tricotar então 4 carreiras em ponto meia. Tricotar 1 carreira em malhas liga aumentando 26-28-32-36-38-44 malhas a intervalos regulares (= carreira de dobra) – ver AUMENTOS-1 = 198-216-234-264-288-336 malhas. Colocar 1 fio marcador. MEDIR A PARTIR DAQUI! SAIA: Tricotar em canelado (2 malhas liga/1 malha meia) durante 8 cm. Continuar com a agulha circular 3 mm e tricotar A.1 em todas as malhas (= 66-72-78-88-96-112 vezes em toda a carreira). Quando a 1.ª carreira de A.1 tiver sido tricotada, temos 132-144-156-176-192-224 malhas – não contar as laçadas como malhas. Quando A.1 tiver sido tricotado 1 vez em altura, repetir A.1a até ao fim. MANTER A MESMA TENSÃO DA INDICADA PARA A AMOSTRA! Quando a peça medir 10 cm a partir do fio marcador, colocar 1 marcador em cada 11.ª-12.ª-13.ª-11.ª-12.ª-14.ª malha meia (= 6-6-6-8-8-8 marcadores). Aumentar então 4 malhas em cada uma das malhas com um marcador – ver AUMENTOS-2 (= aumenta-se 24-24-24-32-32-32 malhas). Continuar em redondo em ponto fantasia e tricotar os aumentos no ponto fantasia. Aumentar desta maneira a cada 4-4-4-4½-4½-4½ cm até a peça medir 48-50-52-54-56-58 cm a partir do fio marcador – temos cerca de 348-384-396-464-512-544 malhas – ajustar a altura para que a última carreira seja uma carreira com laçadas. Arrematar então as malhas meia em meia e as malhas liga em liga, MAS arrematar as laçadas como se fossem malhas meia para evitar que as malhas arrematadas fiquem demasiado apertadas. MONTAGEM: Dobrar a bainha pelo avesso e costurar deixando uma pequena abertura para enfiar o elástico. |
||||||||||||||||
Explicações do diagrama |
||||||||||||||||
|
||||||||||||||||
 |
||||||||||||||||
Terminou este projecto?Então, identifique as suas fotos com as tags #dropspattern #seeyouindublinskirt ou mostre-as na galeria #dropsfan. Precisa de ajuda para este modelo?Encontrará 18 turotiais em vídeo, uma rubrica Comentários/Perguntas e muito mais ao visitar a página do modelo em www.garnstudio.com © 1982-2026 DROPS Design A/S. Todos os direitos reservados. Este documento, incluuindo as suas su-secções, tem copyrights. Saia mais o que pode fazer com os nossos modelos no fim de cada uma das páginas do nosso site. |
||||||||||||||||


Com mais de 40 anos no design de modelos de tricô e de croché, a DROPS Design oferece uma das mais vastas colecções demodelos gratuitos na Internet - traduzidos em 17 línguas. Neste dia de hoje, temos 324 catálogos e 12290 modelos - dos quais 12271 estão traduzidos em português.
Trabalhamos com muito empenho para lhe proporcionar o melhor que o tricô e o croché têm para oferecer, para lhe fornecer inspiração e conselhos bem como fios da mais elevada qualidade a preços incríveis! Gostaria de usar os nossos modelos para outros fins que não uso pessoal? Pode ler o que lhe é permitido fazer no Copyright texto que se encontra na parte de baixo de todos os nossos modelos. Bom tricô! Bom croché!
Deixe um comentário acerca do modelo DROPS 196-37
Gostaríamos muito de saber o que tem a dizer-nos acerca deste modelo!
Se deixar uma pergunta acerca do modelo, certifique-se de que escolhe a categoria adequada no formulário abaixo para acelerar o processo relativo à resposta. Os campos obrigatórios estão assinalados com um *.