
Categorias populares
Procura um fio?


Comentários / Perguntas (75)
![]() Ana escreveu:
Ana escreveu:
I've just finished knitting the 10cm on the mid back, but I fear I may have done it wrong, as now there's a 10 cm height difference between one side of the work and the other, which doesn't make sense as we're not casting off just yet. Should I have been knitting all the stitches and not just the 28+62?
22.10.2022 - 15:28DROPS Design respondeu:
Boa tarde, Now divide the piece mid back to work back and forth from mid back (this is done so that the seam is mid back). Work in garter stitch back and forth until piece measures 10 cm from the 28 stitches cast on mid front. Deve dividir as 152 malhas em 2 partes que tricota separadamente. até ter 10 cm medidos a partir da carreira em que montou a28 malhas, Bons tricôs!
23.10.2022 - 17:21
![]() Ana escreveu:
Ana escreveu:
I've just finished knitting the first 24cm and I'm already confused, what do you mean "cast on 1 stitch 2 times and 2 stitches 5 times"? I need a better explanation, please!
09.10.2022 - 16:36DROPS Design respondeu:
Dear Ana, cast on 1 stitch at the end of each row from each side. Cast on 1 stitch at the end of the first row from the RS and WS. Repeat this once more on the next row from the RS and WS. Then, cast on 2 stitches at the end of each row from each side, but repeat this 5 times (so you increase 2 stitches at the end of the next 5 rows from the RS and 5 rows from the WS). Happy knitting!
09.10.2022 - 19:48
![]() Anna escreveu:
Anna escreveu:
Dzień dobry, czy jest dostępny szkic/schemat do tego projektu?
09.10.2022 - 11:54DROPS Design respondeu:
Witaj Aniu, niestety nie. Napisz jeśli masz jakiś problem. Pozdrawiamy!
10.10.2022 - 10:09
![]() Jutta escreveu:
Jutta escreveu:
Hallo, wir haben mit der Anleitung angefangen, befinden uns aber grade in einer Sackgasse und kommen auch mit vereinten Denkkräften nicht weiter...Nach dem einseitige Anschlagen der 28 Maschen und dem Teilen an der hinteren Mitte können wir uns so langsam nicht mehr vorstellen wie es weiter geht und wie daraus die Kapuze entstehen soll. Hat jemand vielleicht eine Zeichnung? Was genau ist die hintere / vordere Mitte? Wie wird alles zusammengenäht? Ich hoffe jemand kann helfen
06.08.2022 - 15:54DROPS Design respondeu:
Liebe Jutta, die Arbeit wird zuerst in Reihen von der vorderen Mitte gestrickt, dann wenn die neuen Maschen für die Öffnung für Gesicht angeschlagen wurden, soll die Arbeit von der hinteren Mitte gestrickt werden (so gibt es keine Naht an der vorderen Mitte). Am Ende nähen Sie die Kapuze oben zusammen und die unteren Reihen in der hinteren Mitte (ab den neuen Maschen bis zur Abketterand). Viel Spaß beim stricken!
08.08.2022 - 08:07
![]() Tiko escreveu:
Tiko escreveu:
First time I got confused with your pattern 😊1. the whole piece is in gaeter stitch except for the 158 stitches around face? 2. Is the piece worked inthe round at any stage? 3. Is it possible to send or add to the pattern a drawing fo what the finished piece looks like prior to been assambled? Thanks for the answerrs 💚
13.03.2022 - 19:12DROPS Design respondeu:
Dear Tiko, 1. correct, only the ribbing edge around face is worked in rib, the whole work is then worked in garter stitch. 2. Piece is only worked in rows, but first from mid front (until opening for face is done), then from mid back (after you have increased/cast on the stitches for under face). 3. we have no chart for this sorry. Happy knitting!
14.03.2022 - 12:06
![]() Ana escreveu:
Ana escreveu:
Could I do the whole pattern in rib instead of garter stitch? How could I adapt from one to the other? Thank you so much!
24.02.2022 - 19:10DROPS Design respondeu:
Dear Ana, your tension would be then different and your would have to re-calculate the whole pattern. You might find another pattern among these ones. Happy knitting!
25.02.2022 - 08:59
![]() Ayra escreveu:
Ayra escreveu:
Plz explain when you pick up 158 stitches around face opening do you have to pick up all of the stitches or you have to pick up 3 and skip one. Thanks
13.02.2022 - 20:44DROPS Design respondeu:
Hi Ayra, you have to distribute new stitches evenly to have 158 stitches around face opening in total. Happy knitting!
14.02.2022 - 08:18
![]() Ayra escreveu:
Ayra escreveu:
Plz explain for mid back seam after working on 28 new cast on stitches and 62 stitches when you turn your work do you have to do the purl stitch from that side and also you have to work on 28 stitches.again so the mid back seam is done. Now you have to do garter stitch for all of the stitches. Thanks
04.02.2022 - 01:51DROPS Design respondeu:
Dear Ayra, when you cut the yarn after the hood part, you start again piece from mid back (= approx. middle of previous rows), and will then cast on new stitches for face opening, ending rows on mid back. The seam on mid back will start here and will be sewn to the bottom edge; the 28 sts are cast on on mid front, there won't be any seam here. Hope it will help. Happy knitting!
04.02.2022 - 09:16
![]() Ayra escreveu:
Ayra escreveu:
Plz explain how you sew the hood in the end? Thanks
03.02.2022 - 02:10DROPS Design respondeu:
Dear Ayra, fold the cast on edge double and sew cast on sts together; and then sew on mid back from the beginning of row worked from mid back (after face opening) towards the cast off edge. Happy knitting!
03.02.2022 - 08:47
![]() Marta escreveu:
Marta escreveu:
One follow up if I may. If there is a seam mid-back, where is the face opening. I'm really confused as you can tell.
02.02.2022 - 14:18DROPS Design respondeu:
Dear Marta, you first work the hood, back and forth from mid front, then cut the yarn and start on mid back to work now from the mid back, increasing stitches on mid front and working the 2nd half of sts to mid back. The seam will be on mid back from this part. Hope it will help. Happy knitting!
02.02.2022 - 14:29
|
|
Lawless#lawlesshood |
|
 |
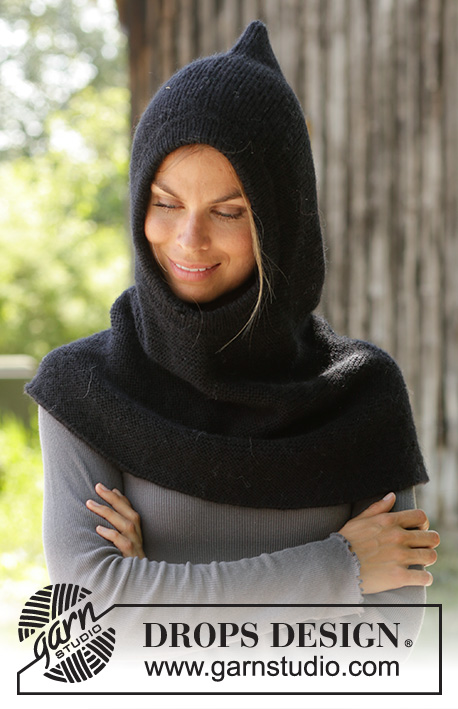 |
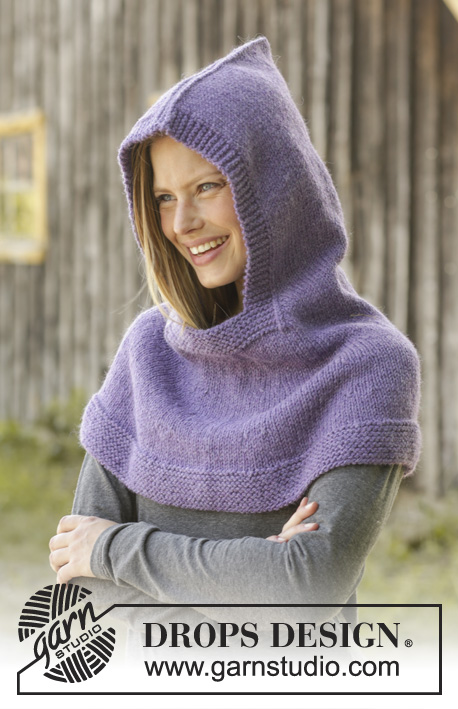
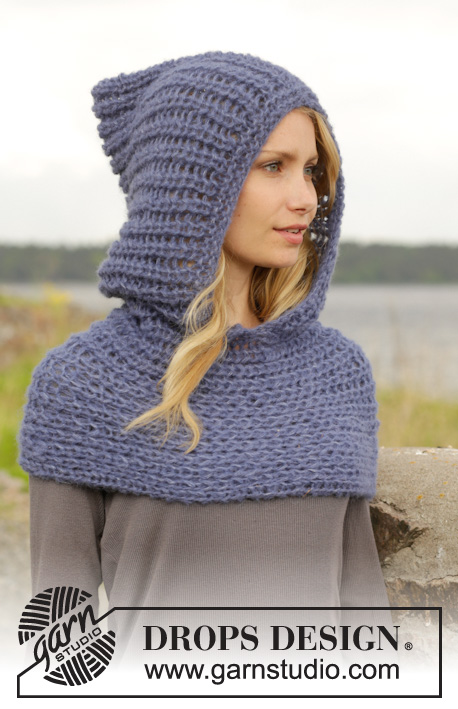
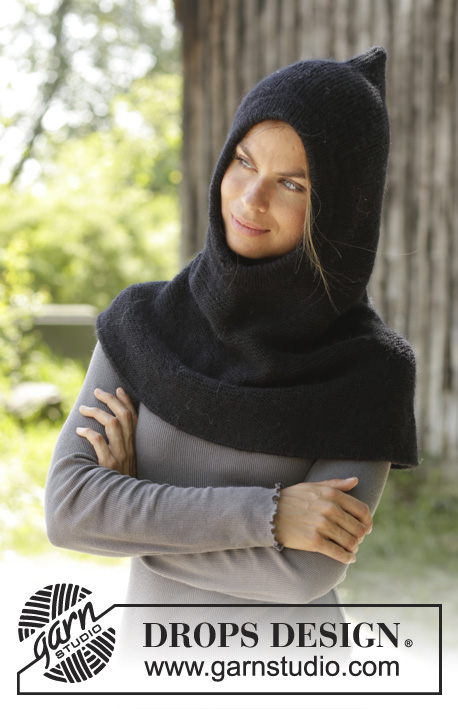
Capuz / Balaclava tricotado em DROPS Merino Extra Fine ou DROPS Karisma. Tricota-se de cima para baixo, em ponto jarreteira. Do S ao XXXL
DROPS 192-2 |
|
|
---------------------------------------------------------- ANTES DE COMEÇAR: AMOSTRA: 23 malhas em largura e 48 carreiras em altura em ponto jarreteira = 10 x 10 cm. AGULHAS: AGULHA CIRCULAR DROPS – com 80 cm de comprimento: 3 mm para o ponto jarreteira. AGULHA CIRCULAR DROPS – com 40 cm de comprimento: 2,5 mm para o canelado. O tamanho das agulhas é unicamente a título indicativo! Se a sua amostra tiver demasiadas malhas para 10 cm, experimente tricotar com agulhas mais grossas. Se a sua amostra não tiver malhas suficientes para 10 cm, experimente tricotar com agulhas mais finas. ---------------------------------------------------------- TÉCNICAS USADAS: ---------------------------------------------------------- PONTO JARRETEIRA (em idas e voltas): 1 barra jarreteira = tricotar 2 carreiras meia. AUMENTOS: Tricotar até restar 1 malha antes fo fio marcador, 1 laçada, tricotar 2 malhas meia (o fio marcador está a meio destes malhas), 1 laçada. Na carreira seguinte, tricotar as laçadas torcidas para evitar buracos. ---------------------------------------------------------- A PEÇA COMEÇA AQUI: ---------------------------------------------------------- CAPUZ – SUMÁRIO DA PEÇA: Tricota-se em idas e voltas na agulha circular, de cima para baixo. No fim, a peça é costurada na parte de trás e na parte de cima do capuz. CAPUZ: Montar 100 malhas com a agulha circular 3 mm em Merino Extra Fine ou Karisma. Tricotar em ponto jarreteira – ver acima - em idas e voltas, a partir do meio da frente. MANTER A MESMA TENSÃO DA INDICADA PARA A AMOSTRA! Quando a peça medir 24 cm, montar no fim de cada carreira de cada lado da peça (laterais do meio da frente - por baixo da abertura para a cara) da seguinte maneira: 2 vezes 1 malha e 5 vezes 2 malhas (= aumentou-se 12 malhas de cada lado da peça) = 124 malhas. No fim da carreira seguinte, montar 28 malhas = 152 malhas. Tricotar em meia até meio da parte de trás: tricotar 62 malhas meia depois das 28 malhas montadas a meio da frente. Dividir, então, a peça e tricotar em idas e voltas a partir daqui - meio da parte de trás (faz-se assim para que a costura fique a meio da parte de trás). Tricotar em ponto jarreteira em idas e voltas até a peça medir 10 cm a partir de as 28 malhas montadas a meio da frente. Colocar, então, 8 fios marcadores da seguinte maneira: Começando a meio da parte de trás, colocar o 1.º fio marcador depois de 10 malhas, colocar os 7 outros fios marcadores com um espaço de 19 malhas entre eles. Restam, então, 9 malhas depois do último fio marcador. Continuar em ponto jarreteira. Na carreira seguinte, pelo direito, aumentar 1 malha de cada lado de cada fio marcador - ver AUMENTOS. Aumentar desta maneira 6-7-8 vezes ao todo a cerca de cada 3 cm = 248-264-280 malhas. Tricotar até a peça medir 58-60-62 cm de altura total. Arrematar com 2 fios. Levantar pelo direito 158 malhas à volta da abertura para o rosto com a pequena agulha circular 2.5 mm. Tricotar 1 volta liga, 1 volta meia, 1 volta liga, 1 volta meia. Continuar então em canelado (= 1 malha meia/1 malha liga) durante 6 cm. Arrematar as malhas como elas se apresentam. Dobrar a orla ao meio pelo avesso e costurá-la. MONTAGEM: Fazer a costura na alça mais exterior das malhas a meio da parte de trás e ao longo da carreira de montagem na parte de cima do capuz ORLA A VOLTA DA CARA: Levantar, pelo direito, 158 malhas à volta da abertura para a cara com a pequena agulha circular 2.5 mm. Tricotar 1 carreira liga, 1 carreira meia, 1 carreira liga, 1 carreira meia. Continuar então em canelado (= 1 malha meia/1 malha liga) durante 6 cm. Arrematar as malhas tal como elas se apresentam. Dobrar a orla em dois pelo avesso e costurá-la. |
|
Terminou este projecto?Então, identifique as suas fotos com as tags #dropspattern #lawlesshood ou mostre-as na galeria #dropsfan. Precisa de ajuda para este modelo?Encontrará 17 turotiais em vídeo, uma rubrica Comentários/Perguntas e muito mais ao visitar a página do modelo em www.garnstudio.com © 1982-2026 DROPS Design A/S. Todos os direitos reservados. Este documento, incluuindo as suas su-secções, tem copyrights. Saia mais o que pode fazer com os nossos modelos no fim de cada uma das páginas do nosso site. |
|


Com mais de 40 anos no design de modelos de tricô e de croché, a DROPS Design oferece uma das mais vastas colecções demodelos gratuitos na Internet - traduzidos em 17 línguas. Neste dia de hoje, temos 324 catálogos e 12290 modelos - dos quais 12271 estão traduzidos em português.
Trabalhamos com muito empenho para lhe proporcionar o melhor que o tricô e o croché têm para oferecer, para lhe fornecer inspiração e conselhos bem como fios da mais elevada qualidade a preços incríveis! Gostaria de usar os nossos modelos para outros fins que não uso pessoal? Pode ler o que lhe é permitido fazer no Copyright texto que se encontra na parte de baixo de todos os nossos modelos. Bom tricô! Bom croché!
Deixe um comentário acerca do modelo DROPS 192-2
Gostaríamos muito de saber o que tem a dizer-nos acerca deste modelo!
Se deixar uma pergunta acerca do modelo, certifique-se de que escolhe a categoria adequada no formulário abaixo para acelerar o processo relativo à resposta. Os campos obrigatórios estão assinalados com um *.