
Categorias populares
Procura um fio?


Comentários / Perguntas (22)
![]() Terese escreveu:
Terese escreveu:
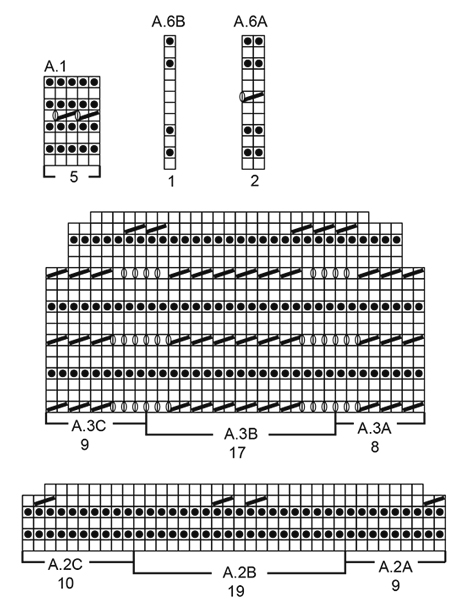
Mönstret är ju helt obegripligt! Hur många maskor är det kvar i A3A, B och C efter 3:e hålraden och sista minskningen? Det vill säga i vilken del av dessa gör man ökningar/minskningar och hur många? Jag gör stl M och den enda infon man får är att det ska vara 131 maskor på varvet när A3 stickats klart.
08.06.2025 - 21:45DROPS Design respondeu:
Hei Terese. Først vil du felle 1 maske i A.3a, 2 masker hver gang A.3B strikkes og 1 maske i A.3C (rad 13). Så vil du felle 1 maske A.3A, 3 masker hver gang A.3B strikkes og 1 maske i A.3C (rad 17). Til slutt vil du da ha 6 masker i A.3A, 12 masker i A.3B (9 rapporter x 12 masker) og 7 masker i A.3C + 5 masker i hver side (A.1) = 5+6+108+7+5= 131 masker. mvh DROPS Design
16.06.2025 - 07:54
![]() Linda McKnight escreveu:
Linda McKnight escreveu:
The pattern sizes range from small to 3X, however there are no measurements for what those sizes mean. Even the schematic on the last page doesn't indicate inches or cm and the only measurements listed in the pattern are for the width of the knitting and not an actual size. So, what are the size measurements?
28.01.2023 - 20:15DROPS Design respondeu:
Dear Linda, the measurements in the schematic are always in cm. You can see the total length and width of the garment in the schematic; each number of each sequence is for a specific size. Take into account that, when measuring the total width, it indicates the width of the back, so you may use that to check which size you want to work. Happy knitting!
29.01.2023 - 20:21
![]() Carla escreveu:
Carla escreveu:
I have a question. I don't understand how to do the increase of the sleeve. It says that I should increase in the mid under sleeve. Is that the middle of the sleeve? Ag the beginning of the sleeve? I don't get it. It also says to bind off 6 stitches in the mid under sleeve. Same problem. Please I need help. Also I don't understand the same instructions on the pattern in Spanish.
21.05.2021 - 04:15DROPS Design respondeu:
Dear Carla, sleeve is worked in the round, to increase work the round until 1 stitch remain before the marker at the end of the round, make 1 yarn over, knit 2 stitches (the marker is between these 2 stitches), make 1 yarn over and continue working all stitches as before. When measurements are right, work to the last 3 sts on the round, cast off these 3 sts + the first 3 sts at the beg of next round and continue now working in rows. Happy knitting!
21.05.2021 - 07:55
![]() Gerda escreveu:
Gerda escreveu:
Klopt het dat de patronen allemaal heel erg groot uitvallen? Ik heb 4 patronen gebreid van drops d esign. Ik begin nu bij voorbaat met de kleinste maat maar nog steeds is het model veel te groot. En als ik kleinere naalden pak wordt het breiwerk heel strak ...
28.03.2021 - 08:50DROPS Design respondeu:
Dag Gerda,
Als de stekenverhouding klopt, kun je gewoon het patroon volgen en dan worden de maten zoals aangegeven in de matentekening onderaan het patroon. Heb je van te voren een proeflapje gebreid om te controleren of de stekenverhouding klopt? Wellicht heb je dunnere naalden nodig om tot dezelfde stekenverhouding te komen.
01.04.2021 - 20:16
![]() Sandra Topke escreveu:
Sandra Topke escreveu:
Ich bin am Verzweifeln. Nach mehreren Versuchen komme ich nach A 3 nicht auf 143, sondern 147 Maschen. Ich finde meinen Fehler nicht. Was ist jeweils die erste und die letzte Masche des Rapport A 3B? Bin unsicher wegen der Umschläge.
21.05.2018 - 11:29DROPS Design respondeu:
Liebe Frau Topke, es wird zuerst 1 M in A.3A, 2 M in jedem A.3.B und 1 M in A.3C abgenommen (= insgesamt 22 M abgenommen). Dann wird es 1 M in A.3A, 3 M in jedem A.3B und 1 M in A.3C abgenommen (= insgesamt 32 M abgenommen), es waren 197 M - 54 Abnahme = 143 M. Viel Spaß beim stricken!
22.05.2018 - 09:29
![]() Doris escreveu:
Doris escreveu:
Hallo! Stricke ich die Umschläge bei Vorder- und Rückenteil verschränkt (ohne Löcher) oder so, dass es Löcher gibt? Es steht nur bei den AERMELN, dass man Löcher vermeiden soll.
05.04.2018 - 19:19DROPS Design respondeu:
Liebe Doris, die Umschläge bei Vorder- und Rückenteil werden wie im Diagram gestrickt, dh es soll Löcher enstehen, nur bei den Aufnahmen für die Ärmel werden die Umschläge verschränkt gestrickt. Viel Spaß beim stricken!
06.04.2018 - 08:34
![]() Doris Doshi escreveu:
Doris Doshi escreveu:
Ich verstehe nicht, weshalb ich hier RUNDNADELN benötige, wenn steht, dass ich in Hin- und Rückreihen stricken muss? Zudem ist das Stück ja nicht in einem Schlauch gestrickt? Wo mache ich den Überlegungsfehler?
28.03.2018 - 12:58DROPS Design respondeu:
Liebe Doris, wir geben in der Regel die Verwendung von Rundnadeln an, auch wenn in Hin- und Rück-Reihen gestrickt wird, da es bequemer ist, mit einer großen Maschenzahl wie in dieser Anleitung auf einer Rundnadel statt mit Paarnadeln zu stricken. Die Maschen und auch das Gewicht des Strickstücks verteilen sich auf dem Seil der Rundnadel besser. Viel Spaß beim Stricken!
28.03.2018 - 13:37
![]() Angela escreveu:
Angela escreveu:
Hi, I'm having trouble with this once I get to row 20 of the pattern as a hole (row 14 of pattern A3), Row 19 I have 160 sts, Row 20-22 I would have 176 sts,Row 23 147 sts, Row 24 171 sts. It says I should be ending this row with 131 sts according to the directions. How is this possible when A3B shows P 17 repeated 9 times. This would be 153 stitches and that doesn't include A3A, A3C or the A1 in the ends. I'm obviously missing something... can you please help? Thanks!
27.06.2017 - 13:55DROPS Design respondeu:
Dear Angela, you will dec first 1 st in A.3A, then 2 sts in each A.3B and 1 st in A.3C, then dec 1 st in A.3A, 3 sts in each A.3B and 1 st in A.3C = remaining: 6 sts in A.3A, 12 sts in A.3B and 7 sts in A.3C, so that you have 6+12x9 + 7 + (2 x 5 sts = A.1 on each side ) = 131 sts. Happy knitting!
28.06.2017 - 10:09
![]() Janny escreveu:
Janny escreveu:
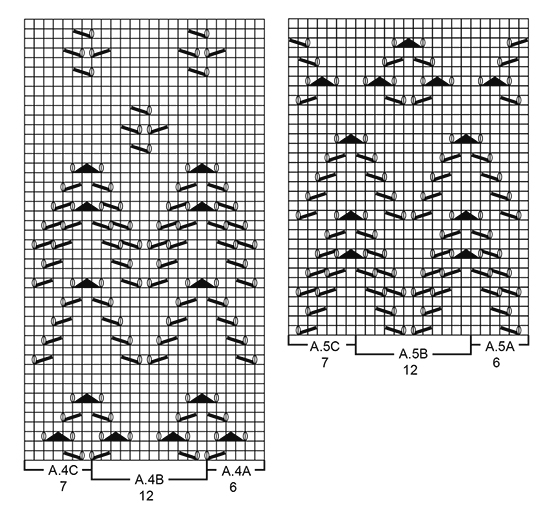
Hallo, als je 5st. a1-5st.a3-10x14st.b3=140st.-6st.3c-5st.a1 doet heb je 161 st. over ipv. 143st. ik heb nu 5st.a1-5st.recht en 1 mindering A3- 2x1mindering, 9 recht,1mindering en dit 10x in 3b-1mindering ,6recht in 3c-5st a1. is 143 st. Nu loopt het volgende patroon mooi door boven het golven patroon.
15.05.2017 - 17:06
![]() Janny escreveu:
Janny escreveu:
Ik ben dit mooie patronen aan het breien maar kom niet uit met naald 17 van patroon 3. Het patroon loopt niet recht boven elkaar en het aantal steken klopt ook niet.
04.05.2017 - 11:18DROPS Design respondeu:
Hally Janny, In telpatroon A.3 brei je eerst A.3A (waar 1 mindering in zit), dan, afhankelijk van je maat, een aantal herhalingen van A.3B (waar 3 minderingen in zitten en op het eind brei je A.3C waar 1 mindering in zit. Het klopt dat de minderingen niet recht boven de gaatjes van 4 naalden daaronder zitten. Kun je aangeven waar in het patroon het aantal steken volgens jou niet kloppen?
12.05.2017 - 19:48
|
||||||||||||||||||||||
Hummingbird#hummingbirdcardigan |
||||||||||||||||||||||
 |
 |
|||||||||||||||||||||
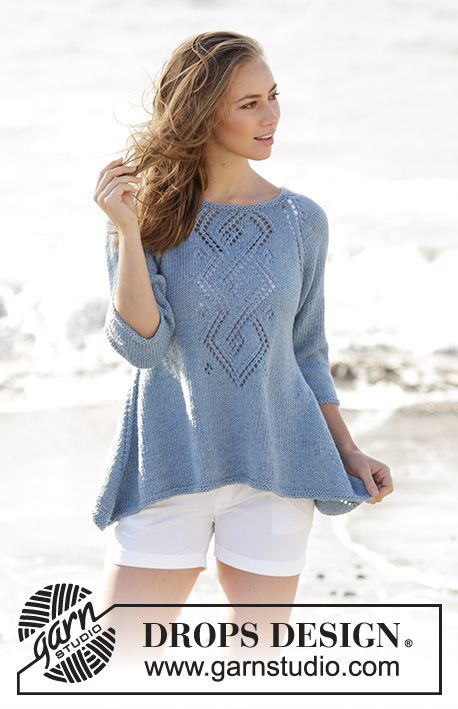
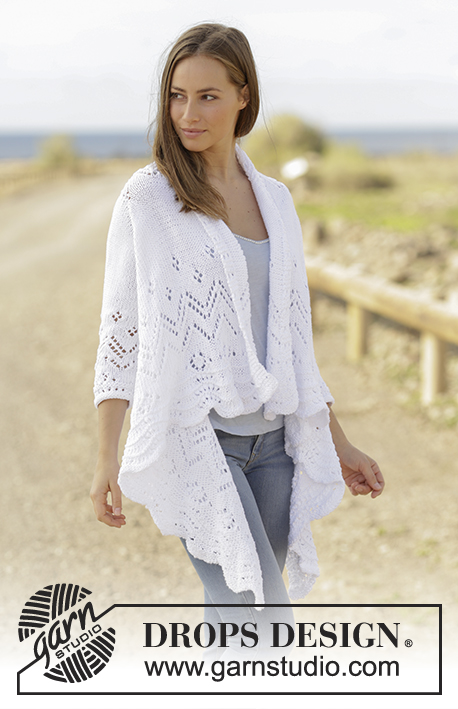
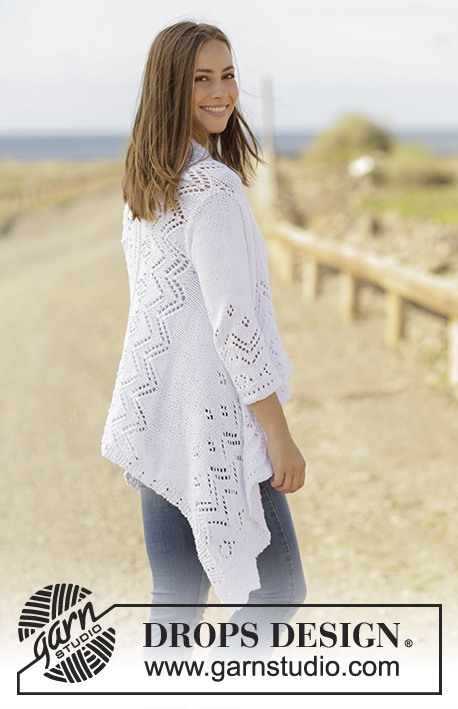
Casaco tricotado de um lado ao outro com ponto rendado e mangas ¾ em DROPS Paris. Do S ao XXXL
DROPS 177-3 |
||||||||||||||||||||||
|
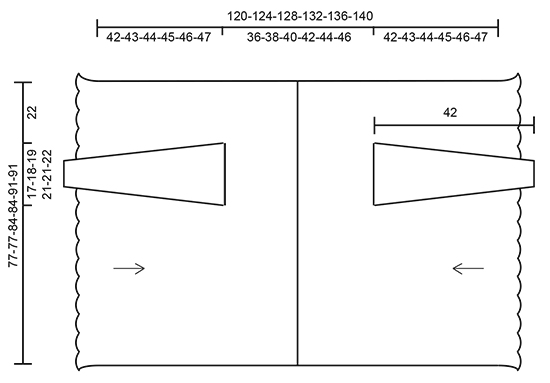
---------------------------------------------------------- PONTO FANTASIA: Ver os diagramas A.1 a A.6. Os diagramas mostram todas as carreiras do motivo, vistas pelo direito. DICA TRICÔ: Se o ponto rendado terminar antes das medidas correctas, tricotar em ponto meia com A.1 de cada lado como antes até obter as medidas correctas. AUMENTOS (mangas): Começar 1 malha antes do marcador, fazer 1 laçada, tricotar 2 malhas meia, 1 laçada. Na carreira seguinte, tricotar a laçada torcida em meia para evitar buracos. Tricotar os aumentos no ponto fantasia. ---------------------------------------------------------- CASACO: Tricota-se em idas e voltas na agulha circular, em 2 partes, a partir do meio da frente em direção ao meio da parte de trás. Tricotar as mangas em redondo nas agulhas de pontas duplas. FRENTE DIREITA E METADE DAS COSTAS: Montar 200-200-219-219-238-238 malhas com a agulha circular 5 mm em Paris. Tricotar a 1.ª carreira da seguinte maneira pelo direito: A.1 (= 5 malhas), A.2A (= 9 malhas), A.2B por cima das 171-171-190-190-209-209 malhas seguintes (= 9-9-10-10-11-11 motivos de 19 malhas), A.2C (= 10 malhas) e A.1 (= 5 malhas). Continuar desta maneira. Quando A.2 tiver sido tricotado 1 vez em altura, temos 180-180-197-197-214-214 malhas. Tricotar a carreira seguinte da seguinte maneira pelo direito: Continuar A.1 como antes, tricotar A.3A (= 8 malhas), A.3B por cima das 153-153-170-170-187-187 malhas seguintes (= 9-9-10-10-11-11 motivos de 17 malhas), A.3C (= 9 malhas) e terminar com A.1 como antes. Continuar desta maneira. Quando A.3 tiver sido tricotado 1 vez em altura, temos 131-131-143-143-155-155 malhas. Tricotar a carreira seguinte da seguinte maneira pelo direito: Continuar A.1 como antes, tricotar A.4A (= 6 malhas), A.4B por cima das 108-108-120-120-132-132 malhas seguintes (= 9-9-10-10-11-11 motivos de 12 malhas), A.4C (= 7 malhas) e terminar com A.1 como antes. Continuar desta maneira. MANTER A MESMA TENSÃO DA INDICADA PARA A AMOSTRA! Quando A.4 tiver sido tricotado, a peça mede cerca de 31 cm a partir da montagem (medir a meio do ponto de ondas). Tricotar então em ponto meia com A.1 por cima das 5 malhas de cada lado da peça como antes. Quando a peça medir 42-43-44-45-46-47 cm, arrematar para a cava da seguinte maneira pelo direito: Tricotar as 38 primeiras malhas, arrematar as 29-31-33-35-35-37 malhas seguintes e tricotar as 64-62-72-70-82-80 últimas malhas como antes. Na carreira seguinte, montar 29-31-33-35-35-37 malhas por cima das malhas arrematadas e continuar em ponto meia e A.1 de cada lado da peça como antes Quando a peça medir 44-46-48-50-52-54 cm (ou seja, 2-3-4-5-6-7 cm a partir da cava), tricotar a carreira seguinte da seguinte maneira pelo direito: Continuar A.1 como antes, tricotar A.5A (= 6 malhas), A.5B por cima das 108-108-120-120-132-132 malhas seguintes (= 9-9-10-10-11-11 motivos de 12 malhas), A.5C (= 7 malhas) e terminar com A.1 como antes. Continuar desta maneira. Quando A.5 tiver sido tricotado, a peça mede cerca de 59-61-63-65-67-69 cm a partir da montagem (medir a meio do ponto de ondas) - VER DICA TRICÔ. Continuar com a agulha circular 4 mm. Tricotar 1 carreira meia pelo avesso, tricotar 1 carreira meia pelo direito e tricotar 1 carreira meia pelo avesso. Arrematar então em meia pelo direito = não arrematar as malhas demasiado apertadas. FRENTE ESQUERDA E METADE DAS COSTAS: Montar e tricotar como se fez para a frente direita e a metade das costas até a peça medir 42-43-44-45-46-47 cm. Arrematar, então, para a cava da seguinte maneira pelo direito: Tricotar as 64-62-72-70-82-80 primeiras malhas, arrematar as 29-31-33-35-35-37 malhas seguintes e tricotar as 38 últimas malhas como antes. Na carreira seguinte, montar 29-31-33-35-35-37 malhas por cima das malhas arrematadas e continuar como se fez para a frente direita e a metade das costas. MANGAS: Montar 37-37-39-41-43-45 malhas nas agulhas de pontas duplas 4 mm. Tricotar A.6A até restar 1 m/p, tricotar A.6B (= 1 malha). Quando A.6 tiver sido tricotado 1 vez em altura, mudar para as agulhas de pontas duplas 5 mm. Colocar 1 marcador no princípio da carreira e fazer seguir o marcador à medida que for tricotando. Tricotar a carreira seguinte da seguinte maneira: 0-0-1-2-3-4 malhas em ponto meia, A.4A (= 6 malhas), A.4B por cima das 24 malhas seguintes, A.4C (= 7 malhas) e 0-0-1-2-3-4 malhas em ponto meia. Continuar desta maneira. AO MESMO TEMPO, quando a peça medir 8-6-8-6-6-8 cm, aumentar 2 malhas a meio sob a manga - VER AUMENTOS. Aumentar desta maneira 10-11-12-13-13-14 vezes ao todo a cada 3-3-2½-2½-2½-2 cm = 57-59-63-67-69-73 malhas. Quando A.4 tiver sido tricotado, tricotar todas as malhas em ponto meia até a peça medir 38 cm para todos os tamanhos. Na carreira seguinte, arrematar as 6 malhas a meio sob a manga e terminar o arredondado da manga em idas e voltas na agulha circular. Tricotar em ponto meia e arrematar as 4 primeiras malhas no princípio de cada carreira, 4 vezes ao todo de cada lado da peça = restam 19-21-25-29-31-35 malhas. Arrematar as restantes malhas. A peça mede cerca de 42 cm para todos os tamanhos. Tricotar outra manga da mesma maneira. MONTAGEM: Unir as malhas arrematadas das 2 peças a meio da parte de trás. Montar as mangas. |
||||||||||||||||||||||
Explicações do diagrama |
||||||||||||||||||||||
|
||||||||||||||||||||||
 |
||||||||||||||||||||||
 |
||||||||||||||||||||||
 |
||||||||||||||||||||||
Terminou este projecto?Então, identifique as suas fotos com as tags #dropspattern #hummingbirdcardigan ou mostre-as na galeria #dropsfan. Precisa de ajuda para este modelo?Encontrará 28 turotiais em vídeo, uma rubrica Comentários/Perguntas e muito mais ao visitar a página do modelo em www.garnstudio.com © 1982-2026 DROPS Design A/S. Todos os direitos reservados. Este documento, incluuindo as suas su-secções, tem copyrights. Saia mais o que pode fazer com os nossos modelos no fim de cada uma das páginas do nosso site. |
||||||||||||||||||||||


Com mais de 40 anos no design de modelos de tricô e de croché, a DROPS Design oferece uma das mais vastas colecções demodelos gratuitos na Internet - traduzidos em 17 línguas. Neste dia de hoje, temos 324 catálogos e 12290 modelos - dos quais 12271 estão traduzidos em português.
Trabalhamos com muito empenho para lhe proporcionar o melhor que o tricô e o croché têm para oferecer, para lhe fornecer inspiração e conselhos bem como fios da mais elevada qualidade a preços incríveis! Gostaria de usar os nossos modelos para outros fins que não uso pessoal? Pode ler o que lhe é permitido fazer no Copyright texto que se encontra na parte de baixo de todos os nossos modelos. Bom tricô! Bom croché!
Deixe um comentário acerca do modelo DROPS 177-3
Gostaríamos muito de saber o que tem a dizer-nos acerca deste modelo!
Se deixar uma pergunta acerca do modelo, certifique-se de que escolhe a categoria adequada no formulário abaixo para acelerar o processo relativo à resposta. Os campos obrigatórios estão assinalados com um *.