
Categorias populares
Procura um fio?


Comentários / Perguntas (101)
![]() Karin Conte escreveu:
Karin Conte escreveu:
Ich weiß nicht wie ich bei der Anleitung "173-1 Taschen häkeln" in den Reihen 5 - 10 die Maschen zunehmen muß, damit es im Muster passt. Mit freundlichen Grüßen Karin Conte
08.08.2023 - 18:55DROPS Design respondeu:
-Siehe Antwort unten, und vielleicht auch diese Lektion, unter Kästchendiagramme / Farbdiagramme wird es erklärt, wie man solche Diagramme häkelt. Viel Spaß beim häkeln!
09.08.2023 - 08:09
![]() Karin Conte escreveu:
Karin Conte escreveu:
Bei dieser Anleitung weiß ich nicht, wie ich in den Reihen 5 - 10 die Maschen zunehmen soll damit das Muster passt. Liebe Grüße Karin Conte
08.08.2023 - 18:51DROPS Design respondeu:
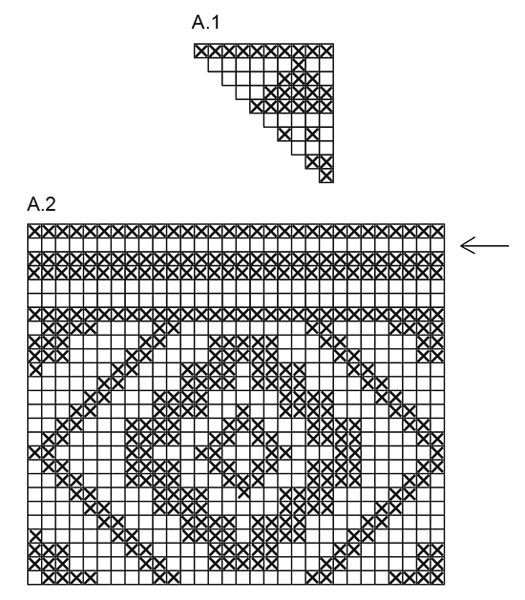
Liebe Frau Conte, die Zunahmen werden in die schriftlichen Anleitung erklärt, dh bei der 1. Runde häkeln Sie 12 Stäbchen = 12 Mal A.1; bei der 2. Runde, häkeln Sie 2 Stb in jedes Stb = 24 Stb, die wie bei der 2. Reihe A.1 gehäkelt werden; bei der 3. Runde verdoppelten Sie jedes 2. Stb = 36 Stb (12 x die 3 Stb in A.1 in der Runde) usw. Viel Spaß beim häkeln!
09.08.2023 - 08:08
![]() Guendalina escreveu:
Guendalina escreveu:
* 1 m.a in ognuna delle (prime 3 m.a /delle )3 m.a successive quindi si deve leggere così, "le prime 3 m.a. " non contano?
20.06.2023 - 17:18DROPS Design respondeu:
Buongiorno Guendalina, all'inizio del giro lavoreeà 1 maglia alta in ognuna delle prime 3 maglie, poi 1 maglia alta nelle 3 maglie successive, e così via. Buon lavoro!
21.06.2023 - 08:20
![]() Guendalina escreveu:
Guendalina escreveu:
* 1 m.a in ognuna delle prime 3 m.a /delle 3 m.a successive, me lo spiegate meglio? Non lo capisco. Grazie mille
19.06.2023 - 23:54DROPS Design respondeu:
Buonasera Guendalina, deve semplicemente lavorare 1 maglia alta in ognuna delle 3 maglie alte successive. Buon lavoro!
20.06.2023 - 16:58
![]() Guendalina Bosio escreveu:
Guendalina Bosio escreveu:
Domanda sul fondo : Come effettuare gli aumenti dalla riga 5 a 10?
13.06.2023 - 15:40DROPS Design respondeu:
Buongiorno Guendalina, deve aumentare come nei giri precedenti lavorando 1 maglia in più tra gli aumenti ad ogni giro e continuando a lavorare il motivo A.1. Buon lavoro!
14.06.2023 - 08:41
![]() Mijai escreveu:
Mijai escreveu:
I had no problem what so ever about pattern But wondering if you have a video of strap Not sure how to attetch Thanks
30.08.2022 - 23:17DROPS Design respondeu:
Dear Mijai, there is no video to the straps, make a bread with 36 strands of yarn (3 bunches of 12 strands each), starting after approx. 12 cm from one end (make a knot there). When the braid measures approx. 68 cm divide the strands into 2 bunches (18 strands each), insert one bunch into the round with holes on top of bag, from inside towards outside, insert the other bunch into the same round but 3 dc away from the first bunch and make a knot with both bunches. Unknot the knot at the beg of the braid and repeat on the other side of bag. Make another braid and fasten it the same way on the other side of bag. Hope it can help.
31.08.2022 - 07:54
![]() Luna escreveu:
Luna escreveu:
"På omg med pil hækles der således: * 1 st i hver af de 3 første/næste st, 1 lm, spring over 1 st *, gentag fra *-*. " Jeg forstår ikke. Betyder det. *1 st,1 st, 1 st, lm, spring over 1 st, forsæt med at hækle mønster ??
09.08.2022 - 13:08DROPS Design respondeu:
Hej Luna, ja det stemmer som du beskriver, sådan gør du hele vejen rundt og fortsætter bagefter med mønster :)
11.08.2022 - 09:17
![]() Rebekah Lovelady escreveu:
Rebekah Lovelady escreveu:
So on the bottom, when doing the two stitches in the increase, they are both the same color? Like if the one box indicating the color on the diagram that falls on the increase is one color but two stitches? Forgive me if this question was asked before, but there are a lot of comments on this pattern lol!
20.04.2022 - 19:09DROPS Design respondeu:
Dear Rebekah, it depends on the pattern. For example, in diagram A.1, you start with 1 stitch in dark grey. In the next round you increase to two stitches in dark grey. In the 3rd round, you increase one of them to 2 light beige stitches and work the third stitch in light beige. In the 4th round, you increase one light beige stitch to 1 dark grey stitch and 1 light beige stitch and work 1 dark grey stitch and 1 light beige stitch over the other 2 stitches. Happy crocheting!
20.04.2022 - 19:53
![]() Mona Ragheb escreveu:
Mona Ragheb escreveu:
Very nice pattern
08.03.2022 - 07:11
![]() Jaana escreveu:
Jaana escreveu:
When you have finished the A1 (bottom), you can´t start the A2 from the start, if you want to get the patterns aligned in the middle of the A1. You must begin from the third dc of the pattern A2.
30.06.2021 - 15:32
|
|||||||
Santa Fe#santafebag |
|||||||
|
|
|||||||
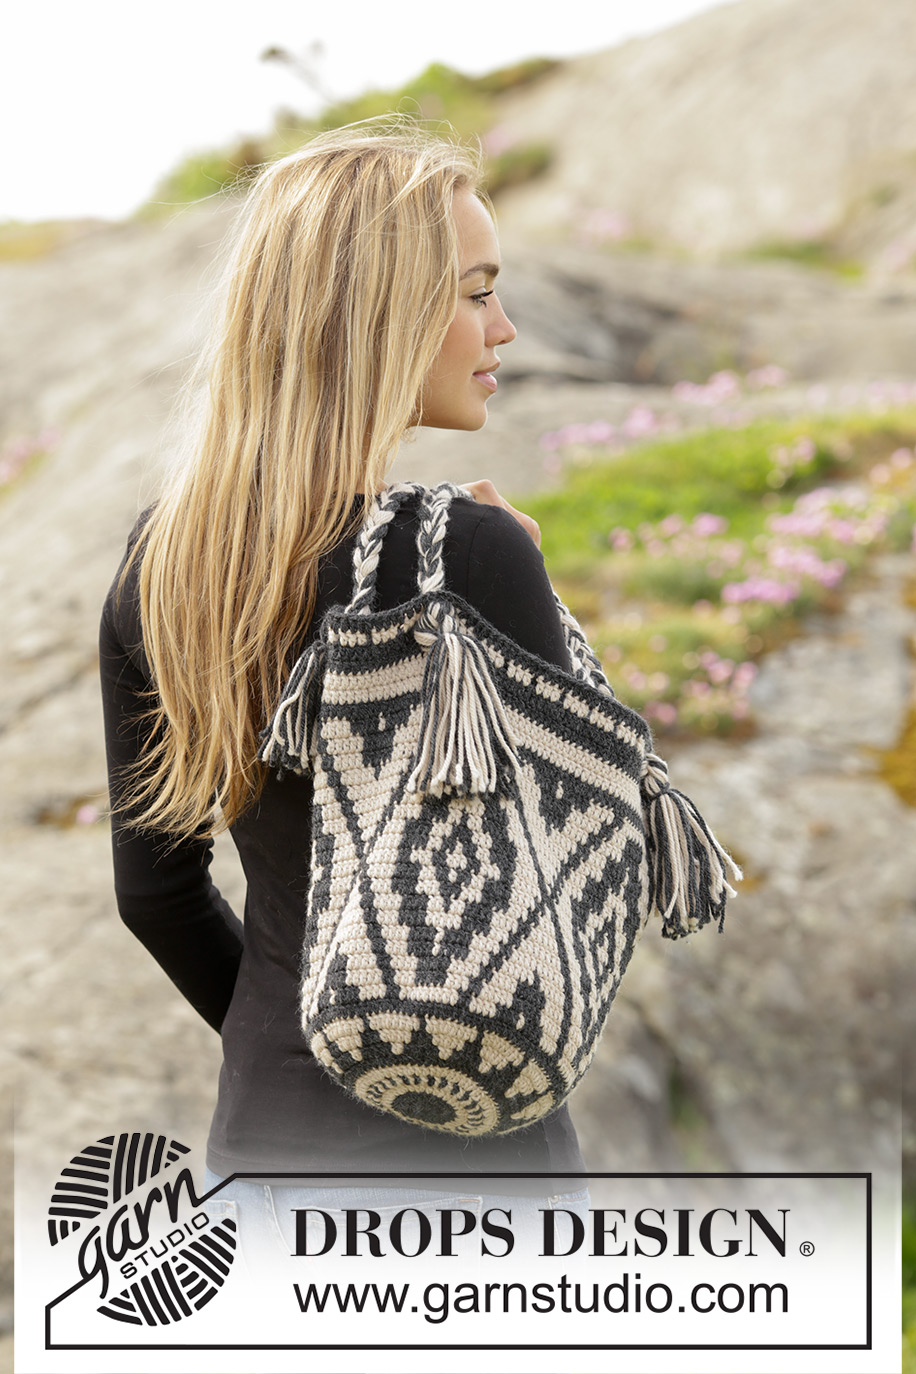
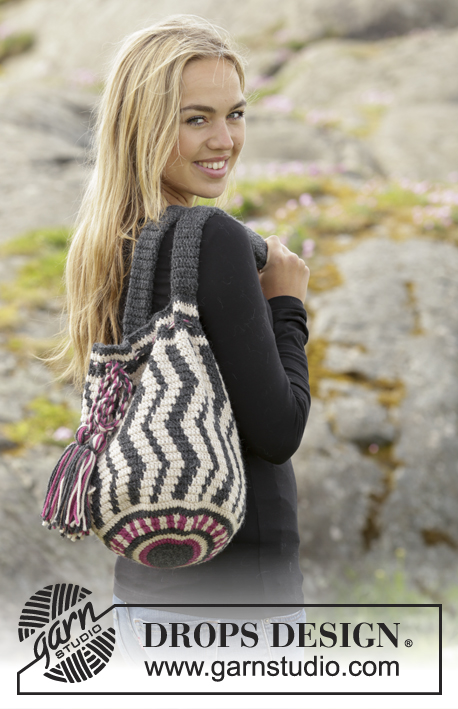
Saco jacquard DROPS em croché, em ”Nepal”.
DROPS 173-1 |
|||||||
|
---------------------------------------------------------- NOTA: Existem termos diferentes de tricô e croché em português de Portugal e do Brasil. Tricô: Malha = Ponto Canelado = Barra Ponto Jarreteira = Cordões de Tricô Ponto Liga = Ponto Tricô Croché: mpa - meio ponto alto pa - ponto alto pad - ponto alto duplo pat - ponto alto triplo pb - ponto baixo pbx - ponto baixíssimo pc - ponto corrente ---------------------------------------------------------- JACQUARD: Ver diagramas A.1 e A.2. Os diagramas mostram as cores do motivo. 1 quadrado = 1 pa. CORES JACQUARD (crochetadas em redondo): Mudar de cor da seguinte maneira: Crochetar o último pa com a 1.ª cor mas não fazer a última laçada, fazer a última laçada com a cor seguinte, crochetar então o pa seguinte. Quando se crocheta com 2 cores, colocar a cor não usada por cima dos pontos da carreira precedente e crochetar à volta do fio para que fique escondido e siga a carreira. DICA CROCHÉ: Substituir o 1.º pa no princípio de cada carreira por 3 pc, terminar a carreira com 1 pbx no 3.º pc. --------------------------------------------------------- SACO: Crocheta-se em redondo. Montar uma corrente de 5 pc em cinza escuro com a agulha de croché 3.5 mm e unir em redondo com 1 pbx no 1.º pc. Crochetar então em redondo seguindo A.1 (12 vezes A.1 em largura) - VER CORES JACQUARD. CARREIRA 1: 12 pa no aro – ver DICA CROCHÉ. CARREIRA 2: 2 pa em cada pa = 24 pa. CARREIRA 3: *1 pa no pa seguinte, 2 pa no pa seguinte *, repetir de * a * em toda a carreira = 36 pa. CARREIRA 4: *1 pa em cada um dos 2 primeiros pa, 2 pa no pa seguinte*, repetir de * a * em toda a carreira = 48 pa. NÃO ESQUECER DE MANTER A MESMA TENSÃO DA INDICADA PARA A AMOSTRA! CARREIRAS 5-10: Continuar os aumentos e o motivo como antes, ou seja em todas as carreiras, crochetar 1 pa a mais entre cada aumento = 120 pa. CARREIRA 11: Continuar em redondo mas sem aumentar e crochetar seguindo A.2 (= 4 motivos em largura). Na carreira com a flecha, crochetar da seguinte maneira: *1 pa em cada um dos 3 primeiros pa/ dos 3 pa seguintes, 1 pc, saltar 1 pa*, repetir de * a *. Continuar A.2 até ao fim e arrematar. ALÇAS: Cortar 18 fios de 120 cm de cada cor = 36 fios. Segurar nos fios juntamente e dar um nó lasso, mantendo uma ponta de cerca de 12 cm depois do nó. Distribuir os fios em 3 grupos de 12 fios cada um. Entrançar os 3 grupos em cerca de 68 cm. Dividir os fios em 2 grupos. Enfiar os 2 grupos na carreira do saco com os ajours, a 3 pa um do do outro. Atar os 2 grupos um ao outro na frente do saco. Desfazer o nó do princípio da trança e fixar ao saco da mesma maneira, mas no lado oposto. Fazer uma outra trança da mesma maneira - ver foto. |
|||||||
Explicações do diagrama |
|||||||
|
|||||||
 |
|||||||
Terminou este projecto?Então, identifique as suas fotos com as tags #dropspattern #santafebag ou mostre-as na galeria #dropsfan. Precisa de ajuda para este modelo?Encontrará 7 turotiais em vídeo, uma rubrica Comentários/Perguntas e muito mais ao visitar a página do modelo em www.garnstudio.com © 1982-2026 DROPS Design A/S. Todos os direitos reservados. Este documento, incluuindo as suas su-secções, tem copyrights. Saia mais o que pode fazer com os nossos modelos no fim de cada uma das páginas do nosso site. |
|||||||


Com mais de 40 anos no design de modelos de tricô e de croché, a DROPS Design oferece uma das mais vastas colecções demodelos gratuitos na Internet - traduzidos em 17 línguas. Neste dia de hoje, temos 324 catálogos e 12290 modelos - dos quais 12271 estão traduzidos em português.
Trabalhamos com muito empenho para lhe proporcionar o melhor que o tricô e o croché têm para oferecer, para lhe fornecer inspiração e conselhos bem como fios da mais elevada qualidade a preços incríveis! Gostaria de usar os nossos modelos para outros fins que não uso pessoal? Pode ler o que lhe é permitido fazer no Copyright texto que se encontra na parte de baixo de todos os nossos modelos. Bom tricô! Bom croché!
Deixe um comentário acerca do modelo DROPS 173-1
Gostaríamos muito de saber o que tem a dizer-nos acerca deste modelo!
Se deixar uma pergunta acerca do modelo, certifique-se de que escolhe a categoria adequada no formulário abaixo para acelerar o processo relativo à resposta. Os campos obrigatórios estão assinalados com um *.