
Categorias populares
Procura um fio?


Comentários / Perguntas (114)
![]() Caitlynn escreveu:
Caitlynn escreveu:
Hi, I really want to knit this but I'm strugling with the size. I'm right inbetween the S and M/L but I don't know how to change the pattern/ downsize it to fit. Is there a formula I can use to help with that?
23.10.2025 - 14:31DROPS Design respondeu:
Hi Caithlynn,
Based on the gauge, which tells you how many stitches there are in 10 cm, you can calculate how many stitches you need to cast on, etc., to get different measurements. 23.10.2025 - 17:54
![]() Gudrun escreveu:
Gudrun escreveu:
Cast on 402 sts on needle 3.5 mm. Work 2 ridges in GARTER ST. Switch to needle 4 mm. Then work as follows: * P 6, A.1 *, repeat from *-* 12 more times, P 6, insert 1 marker (= back piece), * P 6, A.1 *, repeat from *-* 12 more times, P 6, insert 1 marker (= front piece). Move the markers upwards when working. When A.1 has been worked 1 time vertically, there are 350 sts on needle. 6+13*9+6+6+13*9+6=258, what do i do with the other 144 sts?
15.07.2025 - 11:22DROPS Design respondeu:
Hi Gudrun, in second row of A.1 you have 7 stitches insted of 9. [(6+A.1)*13]+6= [(6+7)*13+6}=(13*13)+6=169+6=175. 175*2 (front and back)=350. Happy knitting!
17.07.2025 - 11:00
![]() Reiah N escreveu:
Reiah N escreveu:
Hi! So I’m at the decrease section in the top where it says to continue decreasing every 4 cm 3 more times for size M. does that mean I have to purl 2 together every 4cm? Or do I have to purl 2 together in every purl section in a row, then leave 4 cm until I start the next decrease row and purl 2 together again and repeat it for the third time, all while doing A.2 between each purl section? Sorry for the bother 😰!
23.01.2025 - 09:39DROPS Design respondeu:
Dear Reiah, you will decrease as indicated in the first row every 4cm vertically. That is, work 1 decrease row as indicated, work normally until you have worked 4cm from the decrease row, work a decrease row as the previous one (the decreases and the charts); repeat once more 4cm later. Happy knitting!
25.01.2025 - 19:54
![]() Reiah N escreveu:
Reiah N escreveu:
Hi! Thank you so much for the answer last time 😍. After finishing the row of A.1, and starting the next row do we have to p 6 (for size m) every time before working A.2 like with A.1 ? Until the piece measures 10 cm? Thank you so much 😁
14.01.2025 - 16:54DROPS Design respondeu:
Dear Reiah, when A.1 is done, there are 7 sts between each purl section, work now *purl 6, A.2* all the round, then after 10 cm from cast on edge, start decreasing in the purl section as explained in the written pattern. Happy knitting!
15.01.2025 - 08:03
![]() Reiah N escreveu:
Reiah N escreveu:
Hi! I’m knitting this in size medium and it says that I’m supposed to p6+7(A.1) x10 , p6, p6+7(A.1) x10 , p6. I have 30 stitches left What do I do with them? Thank you so much 🥰
11.01.2025 - 08:36DROPS Design respondeu:
Dear Reiah, you work: (purl 6, A.1)x 11 times (10 more, so 11 in total), purl 6, (marker), (purl 6, A.1) x 11 times (total), purl 6, (marker). The charts are read from the bottom up so in the first row of A.1 you have 9 stitches (which are decreased to 7). So you will have: (6+9)x11 + 6 + (6+9)x11 +6 = 342 stitches. Happy knitting!
12.01.2025 - 16:04
![]() Penny escreveu:
Penny escreveu:
Is there a straight needle instruction available for this pattern.
18.09.2024 - 06:24DROPS Design respondeu:
Dear Penny, this lesson might help you adjusting the pattern for straight needles. Happy knitting!
18.09.2024 - 08:57
![]() Nina escreveu:
Nina escreveu:
On the back piece when the 33 sts or slipped on a holder are the 22 stitches worked first as before and when the project is turned that's when K together close to the neck sts holder or are they K together at the beginning of the row?
03.06.2024 - 07:30DROPS Design respondeu:
Dear Nina, work 1 row from RS as before working the first 22 sts and slipping them on a thread or keeping them on the needle but they will be worked later; slip the next 33 sts on a thread for neck and work the last 22 sts for shoulder as before, finish now each shoulder separately. Happy knitting!
03.06.2024 - 08:24
![]() Nina escreveu:
Nina escreveu:
When working in round and doing A1 and A2 it says k from RS and P from WS. Does that mean we P6 before A1 and k3 before the passo then k3 after then back to P6 or is the 3 st before the passo part of the P6 or is it P6, P3 then passo?
20.05.2024 - 10:01DROPS Design respondeu:
Dear Nina, when working in the round you will always work from RS, ie the stitches in A.1 and in A.2 will be knitted on every round, and the purl stitches between diagrams will be always purled. When working in rows after dividing for armholes, you will then purl the stitches in A.2 from wrong side and knit the stitches between diagrams (reversed stocking stitch). Happy knitting!
21.05.2024 - 13:22
![]() Carina escreveu:
Carina escreveu:
Hej, Gäller garnval. Om jag vill byta Muskat till t.ex. Cotton Merino eller Merino extra fine, är det möjligt och hur mycket garn behöver jag då. Garnkonverteraren kunde inte svara! TACK
18.04.2024 - 11:53DROPS Design respondeu:
Hej Carina, jo det kan den, vælg Muskat, vælg antal gram for din størrelse, vælg 1 tråd, så får du både Cotton Merino og Merino Extra Fine med flere :)
19.04.2024 - 14:31
![]() Jenny escreveu:
Jenny escreveu:
Hello, in A.2, there should be a yarn-over at the beginning and at the end of each 7 stitches? I just know how to do a yarn-over before knitting the actual stitch, how is it done after knitting a stitch? Or am I misreading this, and there should only be one yarn-over in the first row? But then the total amount of stitches would be exactly the same, whereas there would be more stitches in row 3. thanks!
17.01.2024 - 13:00DROPS Design respondeu:
Dear Jenny, on first row in A.2 you start and end A.2 with a yarn over and make a double decrease in the middle, so that the number of stitches remains the same, this means work the first row in A.2 as follows: YO, K2, slip 1, K2 tog, psso, K2, YO. Happy knitting!
18.01.2024 - 08:19
|
||||||||||
Love Is In The Air#loveisintheairtop |
||||||||||
 |
 |
|||||||||
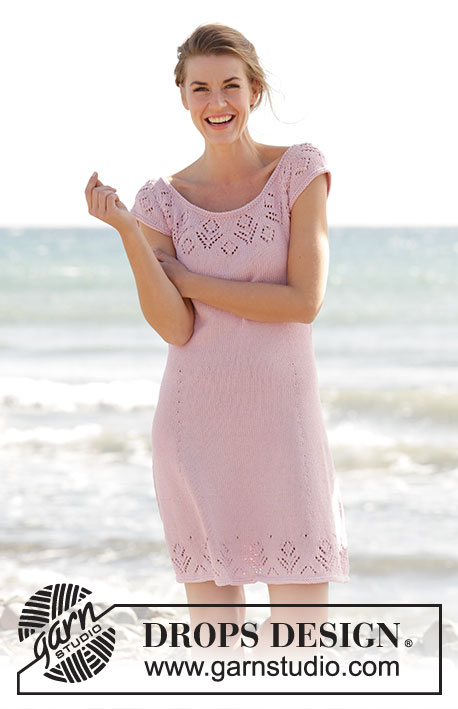
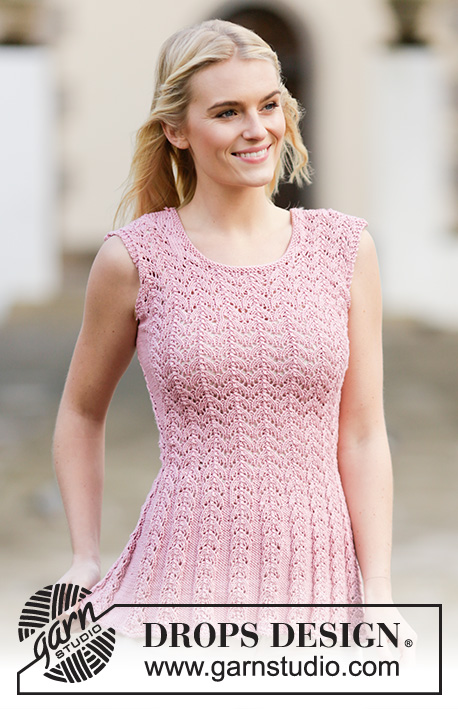
Top rendado DROPS, em ”Muskat”. Do S ao XXXL.
DROPS 160-24 |
||||||||||
|
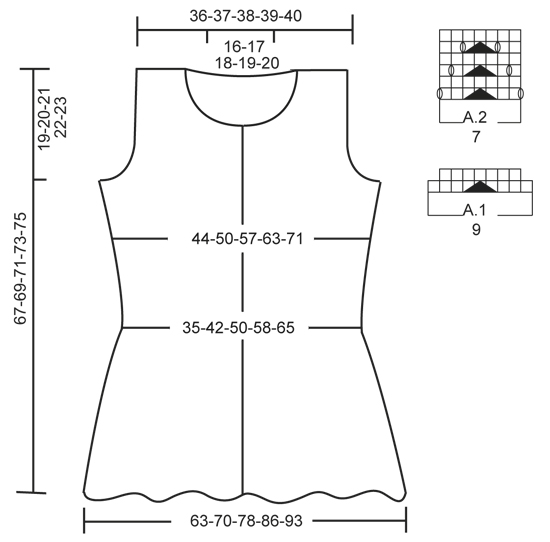
---------------------------------------------------------- NOTA: Existem termos diferentes de tricô e croché em português de Portugal e do Brasil. Malha = Ponto Canelado = Barra Ponto Jarreteira = Cordões de Tricô Ponto Liga = Ponto Tricô Croché : mpa – meio ponto alto pa – ponto alto pad – ponto alto duplo pat – ponto alto triplo pb – ponto baixo pbx – ponto baixíssimo pc – ponto corrente ---------------------------------------------------------- PONTO JARREREIRA(em idas e voltas): Tricotar todas as carreiras em meia. 1 barra jarreteira = 2 carreiras meia. PONTO JARRETEIRA (em redondo): Tricotar: *1 carreira meia, 1 carreira liga/tricô*, repetir de * a *. 1 barra jarreteira = 2 carreiras. PONTO FANTASIA: Ver os diagramas A.1 e A.2. AUMENTOS: Tricotar até restar 1 m/p antes do marcador, 1 laçada, 2 ms/pts liga/tricô (o marcador está entre estas ms/pts), 1 laçada = 2 aumentos. Na carreira seguinte, tricotar a laçada torcida em liga/tricô para evitar buracos. ---------------------------------------------------------- TOP: Tricota-se em redondo na agulha circular. Montar 302-342-402-430-486 ms/pts com a agulha circular 3.5 mm em Muskat e tricotar 2 barras em ponto jarreteira - ver acima. Continuar com a agulha circular 4 mm e tricotar então da seguinte maneira: *7-6-6-5-5 ms/pts liga/tricô, A.1*, repetir de * a * mais 8-10-12-14-16 vezes, 7-6-6-5-5 ms/pts liga/tricô, colocar 1 marcador (= costas), *7-6-6-5-5 ms/pts liga/tricô, A.1*, repetir de * a * mais 8-10-12-14-16 vezes, 7-6-6-5-5 ms/pts liga/tricô, colocar 1 marcador (= frente). Fazer seguir os marcadores à medida que for tricotando. Quando A.1 tiver sido tricotado 1 vez em altura, temos 266-298-350-370-418 ms/pts. Tricotar então A.2 (= 7 ms/pts) acima de A.1 até ao fim. A 10 cm de altura total, diminuir da seguinte maneira: *2 ms/pts tricotadas juntamente em liga/tricô, 5-4-4-3-3 ms/pts liga/tricô, A.2*, repetir de * a * mais 8-10-12-14-16 vezes, 2 ms/pts tricotadas juntamente em liga/tricô, 5-4-4-3-3 ms/pts liga/tricô, marcador, *2 ms/pts tricotadas juntamente em liga/tricô, 5-4-4-3-3 ms/pts liga/tricô, A.2*, repetir de * a * mais 8-10-12-14-16 vezes, 2 ms/pts tricotadas juntamente em liga/tricô, 5-4-4-3-3 ms/pts liga/tricô, marcador = 246-274-322-338-382 (20-24-28-32-36 diminuições). Continuar em ms/pts liga/tricô e ponto fantasia como antes até a peça medir 13-14-14-15-15 cm. Diminuir então da seguinte maneira: * 4-3-3-2-2 ms/pts liga/tricô, 2 ms/pts tricotadas juntamente em liga/tricô, A.2*, repetir de * a * mais 8-10-12-14-16 vezes, 4-3-3-2-2 ms/pts liga/tricô, 2 ms/pts tricotadas juntamente em liga/tricô, marcador, *4-3-3-2-2 ms/pts liga/tricô, 2 ms/pts tricotadas juntamente em liga/tricô, A.2*, repetir de * a * mais 8-10-12-14-16 vezes, 4-3-3-2-2 ms/pts liga/tricô, 2 ms/pts tricotadas juntamente em liga/tricô, marcador = 226-250-294-306-346 ms/pts (20-24-28-32-36 diminuições). Continuar as diminuições (ou seja, diminuir alternadamente de cada lado de todas as secções em ms/pts liga/tricô) mais 4-3-3-2-2 vezes a cada 3-4-4-5-5 cm = 146-178-210-242-274 ms/pts. Tricotar a carreira seguinte da seguinte maneira: *1 m/p liga/tricô, A.2 *, repetir de * a * mais 8-10-12-14-16 vezes, 1 m/p liga/tricô, marcador, *1 m/p liga/tricô, A.2 *, repetir de * a * mais 8-10-12-14-16 vezes, 1 m/p liga/tricô, marcador. Continuar desta maneira. A 30 cm de altura total, aumentar 1 m/p de cada lado de cada marcador (= 4 aumentos) - VER AUMENTOS! Tricotar os aumentos em liga/tricô. Repetir estes aumentos mais 9-7-6-5-5 vezes a cada 1½-2-2½-3½-3½ cm = 186-210-238-266-298 ms/pts. A 46-47-48-49-50 cm de altura total, tricotar em ponto jarreteira acima das 7 ms/pts de cada lado dos marcadores dos lados (= 14 ms/pts em ponto jarreteira de cada lado da peça), tricotar as outras ms/pts como antes. A 48-49-50-51-52 cm de altura total, tricotar apenas as 93-105-119-133-149 primeiras ms/pts da carreira (= costas), colocar as ms/pts da frente num alfinete de ms/pts. COSTAS: = 93-105-119-133-149. Continuar, então, em idas e voltas. Arrematar para as cavas 4 ms/pts no princípio das 2 carreiras seguintes = 85-97-111-125-141 m/p. Diminuir então para as cavas a 3 ms/pts em ponto jarreteira dos rebordos 4-10-16-23-29 vezes 1 m/p de cada lado da peça a cada 2 carreiras - diminuir tricotando 2 ms/pts tricotadas juntamente em liga/tricô (quando as diminuições chegarem a A.2 diminuir com 2 ms/pts tricotadas juntamente em meia, tricotar em ponto meia as ms/pts que já não se podem tricotar no ponto fantasia) = 77-77-79-79-83 ms/pts. A 65-67-69-71-73 cm de altura total, colocar as 31-33-35-37-39 ms/pts centrais num alfinete de ms/pts para o decote e terminar cada ombro separadamente = 23-22-22-21-22 ms/pts. Na carreira seguinte a partir do decote, tricotar as 2 primeiras ms/pts juntamente em meia = 22-21-21-20-21 ms/pts. Tricotar em ponto meia as ms/pts que já não se podem tricotar em A.2 no lado. Continuar A.2, com as ms/pts liga/tricô e em ponto meia como antes. A 66-68-70-72-74 cm de altura total, tricotar 1 barra em ponto jarreteira em todas as ms/pts e, depois, arrematar. Tricotar o outro ombro da mesma maneira. FRENTE: = 93-105-119-133-149 ms/pts. Continuar , então, em idas e voltas, como se fez para as costas até a peça medir 57-59-61-63-65 cm. Colocar, então, as 21-23-25-27-29 ms/pts centrais num alfinete de ms/pts para o decote e terminar cada ombro separadamente. Arrematar então a cada 2 carreiras no lado do decote 2 vezes 2 ms/pts e 2 vezes 1 m/p. Continuar as diminuições para a cava. Quando todas as diminuições estão feitas, temos 22-21-21-20-21 ms/pts. Tricotar em ponto meia as ms/pts que já não se podem tricotar em A.2 no lado. Continuar a tricotar A.2, com as ms/pts liga/tricô e em ponto meia como antes. A 66-68-70-72-74 cm de altura total, tricotar 1 barra em ponto jarreteira em todas as ms/pts e, depois, arrematar. Tricotar o outro ombro da mesma maneira. MONTAGEM: Fazer a costura dos ombros. GOLA: Levantar 100-120 ms/pts (incluindo as ms/pts em espera) com a agulha circular 3.5 mm em Muskat. Tricotar 2 barras jarreteira. Arrematar. |
||||||||||
Explicações do diagrama |
||||||||||
|
||||||||||
 |
||||||||||
Terminou este projecto?Então, identifique as suas fotos com as tags #dropspattern #loveisintheairtop ou mostre-as na galeria #dropsfan. Precisa de ajuda para este modelo?Encontrará 26 turotiais em vídeo, uma rubrica Comentários/Perguntas e muito mais ao visitar a página do modelo em www.garnstudio.com © 1982-2026 DROPS Design A/S. Todos os direitos reservados. Este documento, incluuindo as suas su-secções, tem copyrights. Saia mais o que pode fazer com os nossos modelos no fim de cada uma das páginas do nosso site. |
||||||||||


Com mais de 40 anos no design de modelos de tricô e de croché, a DROPS Design oferece uma das mais vastas colecções demodelos gratuitos na Internet - traduzidos em 17 línguas. Neste dia de hoje, temos 324 catálogos e 12290 modelos - dos quais 12271 estão traduzidos em português.
Trabalhamos com muito empenho para lhe proporcionar o melhor que o tricô e o croché têm para oferecer, para lhe fornecer inspiração e conselhos bem como fios da mais elevada qualidade a preços incríveis! Gostaria de usar os nossos modelos para outros fins que não uso pessoal? Pode ler o que lhe é permitido fazer no Copyright texto que se encontra na parte de baixo de todos os nossos modelos. Bom tricô! Bom croché!
Deixe um comentário acerca do modelo DROPS 160-24
Gostaríamos muito de saber o que tem a dizer-nos acerca deste modelo!
Se deixar uma pergunta acerca do modelo, certifique-se de que escolhe a categoria adequada no formulário abaixo para acelerar o processo relativo à resposta. Os campos obrigatórios estão assinalados com um *.