
Categorias populares
Procura um fio?


Comentários / Perguntas (91)
![]() Knitting Well Done escreveu:
Knitting Well Done escreveu:
Hello , I don't understand how to centered the diagram even if I follow the lesson... do you have a video that show exactly what to do to center it and make the sleeve? Thank you 👱🏻♀️
13.03.2022 - 11:29
![]() Vale escreveu:
Vale escreveu:
I'm so sorry to have to ask again but I don't understand: how can I decrease every 2,5 cm if there's a pattern? With 2 tog decrease, it will be deformed the pattern motif... I'm so confused .. I'm referring to this "When A.2 has been worked, continue with A.3. NOTE: Adjust pattern so that the middle st in diagram (see arrow) is one of the 2 middle sts on sleeve, AT THE SAME TIME beg dec under sleeve - remember DECREASE TIP" The decrease tip mean to knit just 2 stitches together?
20.02.2022 - 00:33DROPS Design respondeu:
Dear Vale, if your tension is right in height, you should decrease approx. on every 7th round in size M = ca on every 2,5 cm; decrease as explained under DECREASE TIP , ie work until 3 sts remain before marker and decrease as shown in this video - the pattern will not match anymore at the transitions between rounds, that's just okay. Happy knitting!
21.02.2022 - 09:58
![]() Vale escreveu:
Vale escreveu:
I'm sorry to ask but: I don't understand how to decrease every 2,5 cm, if I have a pattern? If I decrease, the pattern will be deformed... also, what decrease I should do? (2 tog?) how? This is the pattern I'm referring: "When A.2 has been worked, continue with A.3. NOTE: Adjust pattern so that the middle st in diagram (see arrow) is one of the 2 middle sts on sleeve, AT THE SAME TIME beg dec under sleeve - remember DECREASE TIP" Thank you...seems difficult without a chart.
20.02.2022 - 00:29
![]() Vale escreveu:
Vale escreveu:
Sorry, I have problems again in the instructions " When A.2 has been worked, continue with A.3. NOTE: Adjust pattern so that the middle st in diagram (see arrow) is one of the 2 middle sts on sleeve, AT THE SAME TIME beg dec under sleeve - remember DECREASE TIP. Repeat dec every 3-2½-2½-2½-2½-2½ cm / 1 1/8"-7/8"-7/8"-7/8"-7/8"-7/8" 9-12-12" etc . I don't also understand how to adjust "pattern so that the middle st in diagram is one of the 2 middle". what mean? Please..help...
19.02.2022 - 15:30DROPS Design respondeu:
Dear Vale, this lesson will explain you how to center a diagram. Happy knitting!
21.02.2022 - 09:17
![]() Pattern escreveu:
Pattern escreveu:
Sorry again but I don't understand the previously answer, in your comment says "you should increase a total of 60 sts in size L and get so 228", but I don't know what increase of 60 stitches is it exactly? Thank you again....
01.02.2022 - 17:29DROPS Design respondeu:
Oops sorry, I mistyped, I meant you have 204 sts on the needle in size L - you now increase 24 sts evenly (this lesson explains how to increase evenly on a round), there are now 228 sts and you will repeat K2, P2 all the round - US-pattern will be edited asap. Happy knitting!
02.02.2022 - 07:34
![]() Patterns Difficult escreveu:
Patterns Difficult escreveu:
Hello, this pattern have a mistake in the Body instructions. Yesterday I had to try and try. I have 230 stitches and it says to "Continue to work rib as follows: * K 2, P 2 *, repeat from *-* until 2 sts remain, K 2. When rib has been worked for 4 cm / 1½'', bind off with K over K and P over P." But with 230 stitches, it will end with 2Kand start with 2K so I will have 4 K between the others 2k p2 2k p2 etc. What happened? Why 230 stitches?It's not an Even number to do ribbing...Thanks..
01.02.2022 - 12:22DROPS Design respondeu:
Hi, it looks like there is a mistake in the US-English pattern, you should increase a total of 60 sts in size L and get so 228 sts and work K2 P2 over these 228 sts (= 57 times (K2,P2). thanks for noticing. Happy knitting!
01.02.2022 - 16:13
![]() Karine escreveu:
Karine escreveu:
Koon L suurust. Siis kui on vaja kududa varrukale mustrit A4 (5silmust) on silmuseid 48 3 simust jääb üle kuidas neid kududa?
03.01.2022 - 19:49DROPS Design respondeu:
Tere Karine! Koo nii palju silmuseid mustrisse, kui mahub, ülejäänud nii, kuidas ilusam jääb. Head kudumist!
07.01.2022 - 21:55
![]() Val escreveu:
Val escreveu:
Sorry , I have to ask again, is it sure that decrease is "work until 3 sts remain before the marker this: K2 tog, K1, slip marker, K1, slip 1 as if to K, K1, psso, and work until 3 sts remain before next marker on the other side of the jumper and repeat the decrease.”" I see that in the psso passage, Should not be simply : slip marker, K1, slip 1 as if to K , and psso? Why K1 is repeated 2 times? the video tutorial says this only (not 2 times k2) : K1, slip 1 psso
14.12.2021 - 18:16DROPS Design respondeu:
Dear Val, when working body you will decrease a total of 4 stitches on the round (= 2 sts decreased at each marker) / when working sleeve you will decrease that way only 2 sts (only 1 marker, mid under sleeve). Happy knitting!
15.12.2021 - 08:25
![]() Val escreveu:
Val escreveu:
Sorry >
14.12.2021 - 18:13
![]() Val escreveu:
Val escreveu:
Hello,I was able to adjust everything.I'm now again the beginning of the round, before start the dec tip. So, I hope this time I 've understood well: So I have to: knit the first 12 stitches, but before reach the first stitch marker of the round, 3 stitches before, I have to “work until 3 sts remain before the marker, K2 tog, K1, slip marker, K1, slip 1 as if to K, K1, psso, and work until 3 sts remain before next marker on the other side of the jumper and repeat. Right? Thank you again!
14.12.2021 - 17:43DROPS Design respondeu:
Dear Val, looks right, I'm just wondering about the first 12 stitches, rounds were worked on yoke from mid back, so that you continue from mid back towards the side, and then work until 3 sts remain before 1st marker on the side and decrease etc.. But if you could find the sides of the jumper, it looks then fine, as the decreases are worked on each side (below sleeves). Happy knitting!
15.12.2021 - 07:55
|
||||||||||
Silver Stag#silverstagsweater |
||||||||||
 |
 |
|||||||||
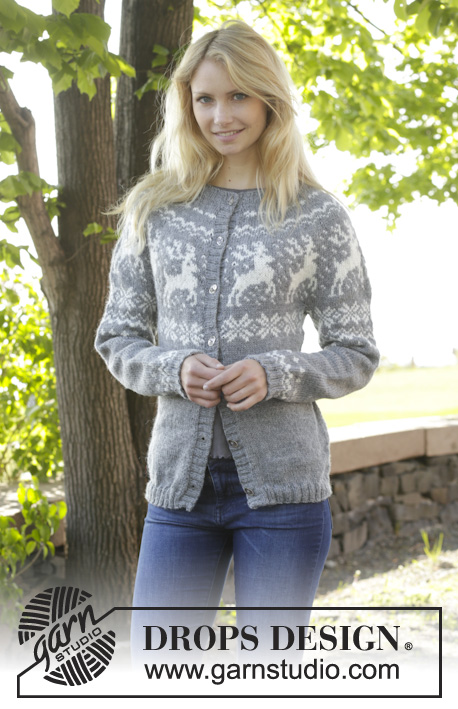
Pulôver DROPS com encaixe arredondado, jacquard de renas, tricotado de cima para baixo ou em top down, em ”Karisma”. Do S ao XXXL.
DROPS 157-23 |
||||||||||
|
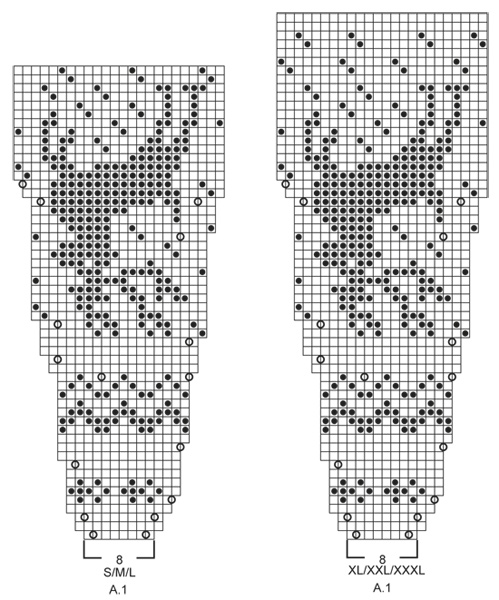
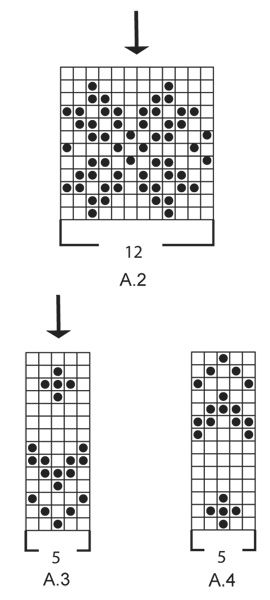
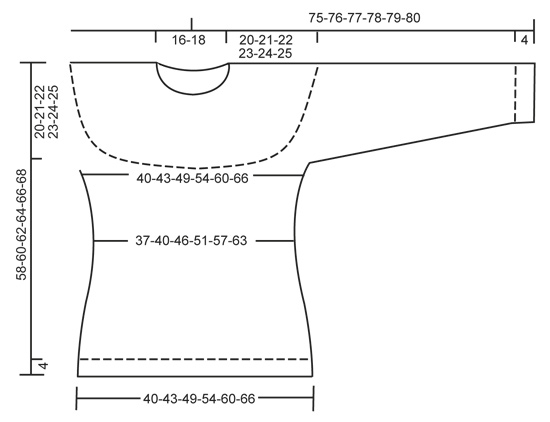
---------------------------------------------------------- NOTA: Existem termos diferentes de tricô e croché em português de Portugal e do Brasil. TRICÔ : Malha = Ponto Canelado = Barra Ponto Jarreteira = Cordões de Tricô Ponto Liga = Ponto Tricô CROCHÉ : mpa – meio ponto alto pa – ponto alto pad – ponto alto duplo pat – ponto alto triplo pb – ponto baixo pbx – ponto baixíssimo pc – ponto corrente ---------------------------------------------------------- JACQUARD: Ver os diagramas A.1 a A.4. Os diagramas mostram todas as carreiras do jacquard, vistas pelo direito. O jacquard tricota-se totalmente em ponto meia. DIMINUIÇÕES (lados e mangas): Diminuir antes do marcador e de 1 m/p meia da seguinte maneira: 2 ms/pts tricotadas juntamente em meia. Diminuir depois do marcador e de 1 m/p meia da seguinte maneira: Deslizar 1 m/p em meia, 1 m/p meia, passar a m/p deslizada por cima da m/p tricotada. AUMENTOS (lados): Aumentar 4 ms/pts ao todo por carreira. Tricotar até restar 1 m/p antes do marcador, 1 laçada, 2 ms/pts meia, 1 laçada = 2 aumentos. Na carreira seguinte, tricotar a laçada torcida em meia (ou seja, tricotar na alça de trás da laçada e não na alça da frente) para evitar buracos. ---------------------------------------------------------- PULÔVER: Tricota-se em redondo na agulha circular, de cima para baixo. As mangas tricotam-se em redondo nas agulhas de pontas duplas. ENCAIXE: Montar 88-92-96-100-104-108 ms/pts com a agulha circular 3 mm em cinza médio e tricotar em canelado/barra 2 ms/pts liga/tricô/2 ms/pts meia até a peça medir 3 cm. Continuar , então, com a agulha circular 4 mm e tricotar 1 carreira em ponto meia e, AO MESMO TEMPO, distribuir 0-4-8-20-24-28 aumentos = 88-96-104-120-128-136 ms/pts. Tricotar, então, da seguinte maneira: 11-12-13-15-16-17 vezes A.1 (= 8 ms/pts) em largura. NÃO ESQUECER DE MANTER A MESMA TENSÃO DA INDICADA PARA A AMOSTRA! Quando A.1 tiver sido tricotado 1 vez em altura, temos 264-288-312-360-384-408 ms/pts. Tricotar 3-5-9-5-7-11 carreiras em cinza médio. NOTA: Nos tamanho S, L, XL, XXXL parar 24 ms/pts (= 1 vez o diagrama) antes da última m/p da carreira – passar a ser o princípio das carreira seguintes. O ponto fantasia está, agora, correctamente alinhado depois de as ms/pts terem sido divididas para as mangas/costas/frente. Tricotar a carreira seguinte da seguinte maneira: Tricotar as primeiras 37-40-46-52-58-64 ms/pts (= metade das costas), colocar as 58-64-64-76-76-76 ms/pts seguintes num alfinete de ms/pts (= manga), montar 10 ms/pts sob a manga, colocar um marcador a meio dessas 10 ms/pts, tricotar as 74-80-92-104-116-128 ms/pts seguintes (= frente), colocar as 58-64-64-76-76-76 ms/pts seguintes num alfinete de ms/pts (= manga), montar 10 ms/pts sob a manga, colocar um marcador a meio dessas 10 ms/pts, tricotar as restantes 37-40-46-52-58-64 ms/pts (= metade das costas). COSTAS & FRENTE: Temos, então, 168-180-204-228-252-276 ms/pts para as costas e a frente. Tricotar, então, A.2 (= 12 ms/pts) em todas as ms/pts. Continuar desta maneira até A.2 ter sido tricotado 1 vez em altura. Continuar, então, ponto meia, em cinza médio. Na carreira seguinte, diminuir 1 m/p de cada lado de cada marcador nos lados - ver DIMINUIÇÕES. Repetir estas diminuições mais 2 vezes a cada 2 cm = 156-168-192-216-240-264 ms/pts. A 12-13-14-15-16-17 cm a partir do marcador sob as mangas, aumentar 1 m/p de cada lado dos marcadores nos lados – ver AUMENTOS. Repetir estes aumentos mais 2 vezes a cada 2 cm = 168-180-204-228-252-276 ms/pts. A 56-58-60-62-64-66 cm de altura total, continuar com a agulha circular 3 mm e distribuir 20-24-24-28-28-32 aumentos = 188-204-228-256-280-308 ms/pts. Continuar em canelado/barra *2 ms/pts meia, 2 ms/pts liga/tricô*, repetir de * a *. Quando o canelado/barra tiver sido tricotado durante 4 cm, arrematar as ms/pts como elas se apresentam. MANGAS: Tricotar primeiro em jacquard, depois, continuar em cinza médio. Retomar as ms/pts em espera para as agulhas de pontas duplas 4 mm. Temos 58-64-64-76-76-76 ms/pts para a manga. Tricotar 1 carreira meia e montar 10 ms/pts para a parte de baixo da manga = 68-74-74-86-86-86 ms/pts. Colocar um marcador a meio dessas novas ms/pts. Tricotar então em redondo. Tricotar, então, A.2. NOTA: Ajustar a altura para que as 2 ms/pts do meio do diagrama (ver flecha) sejam as 2 ms/pts a meio na manga. Depois de A.2, tricotar A.3. NOTA: Ajustar a altura para que a m/p central do diagrama (ver flecha) seja uma das 2 ms/pts a meio na manga e, AO MESMO TEMPO, começar a diminuir sob a manga - ver DIMINUIÇÕES. Repetir estas diminuições mais 9-12-12-12-12-12 vezes a cada 3-2½-2½-2½-2½-2½ cm = 48-48-48-60-60-60 ms/pts. Quando a manga medir 38 cm, tricotar A.4. NOTA: Ajustar a altura para que a m/p central do diagrama (ver flecha) seja uma das 2 ms/pts a meio na manga. Depois de A.4, mudar para as agulhas de pontas duplas 3 mm e distribuir 4-8-8-0-4-4 aumentos = 52-56-56-60-64-64 ms/pts. Continuar então em canelado/barra (= 2 ms/pts meia/2 ms/pts liga/tricô) durante 3 cm. Arrematar as ms/pts como elas se apresentam. MONTAGEM: Fechar a abertura sob as mangas com uma costura. |
||||||||||
Explicações do diagrama |
||||||||||
|
||||||||||
 |
||||||||||
 |
||||||||||
 |
||||||||||
Terminou este projecto?Então, identifique as suas fotos com as tags #dropspattern #silverstagsweater ou mostre-as na galeria #dropsfan. Precisa de ajuda para este modelo?Encontrará 25 turotiais em vídeo, uma rubrica Comentários/Perguntas e muito mais ao visitar a página do modelo em www.garnstudio.com © 1982-2026 DROPS Design A/S. Todos os direitos reservados. Este documento, incluuindo as suas su-secções, tem copyrights. Saia mais o que pode fazer com os nossos modelos no fim de cada uma das páginas do nosso site. |
||||||||||


Com mais de 40 anos no design de modelos de tricô e de croché, a DROPS Design oferece uma das mais vastas colecções demodelos gratuitos na Internet - traduzidos em 17 línguas. Neste dia de hoje, temos 324 catálogos e 12290 modelos - dos quais 12271 estão traduzidos em português.
Trabalhamos com muito empenho para lhe proporcionar o melhor que o tricô e o croché têm para oferecer, para lhe fornecer inspiração e conselhos bem como fios da mais elevada qualidade a preços incríveis! Gostaria de usar os nossos modelos para outros fins que não uso pessoal? Pode ler o que lhe é permitido fazer no Copyright texto que se encontra na parte de baixo de todos os nossos modelos. Bom tricô! Bom croché!
Deixe um comentário acerca do modelo DROPS 157-23
Gostaríamos muito de saber o que tem a dizer-nos acerca deste modelo!
Se deixar uma pergunta acerca do modelo, certifique-se de que escolhe a categoria adequada no formulário abaixo para acelerar o processo relativo à resposta. Os campos obrigatórios estão assinalados com um *.