
Categorias populares
Procura um fio?


Comentários / Perguntas (68)
![]() Jean Brickey escreveu:
Jean Brickey escreveu:
First I agree with Ann Marie Marshall, I wish the pattern was written simpler. I am not sure if you are doing the foot in the round or in pieces. If in the round then why can't you use circular needles? Second it says to work 4 ridges. What is a ridge? and what is A.1? Not sure where you are going with this.
08.10.2014 - 19:46DROPS Design respondeu:
Dear Mrs Brickey, start with the cuff (around ankle), then work the instep back & forth over the first 10 sts (+ 2 sts inc), then pick up sts each side of instep + knit back sts from st holder and work foot in the round, dec then for heel and toe (seam is under foot). Finish then with the loose edge to sew around the slipper. 1 ridge = K2 rows or K1 round, P1 round. A.1= diagram for the pattern. You may use circular needle for foot but maybe then with magic loop technic. Happy knitting!
09.10.2014 - 09:54
![]() Maggie Marshall escreveu:
Maggie Marshall escreveu:
Would live these knitted slipper boot patterns but they wouldn't print
07.10.2014 - 04:52DROPS Design respondeu:
Dear Mrs Marshall, when you click on the button "Print:pattern", make sure your browser allows popup windows, a new window with an add will open, click on "continue to print the pattern" in this new window to launch printing. Happy knitting!
07.10.2014 - 09:24
![]() Ann Marie Marshall escreveu:
Ann Marie Marshall escreveu:
Please I need help on the pattern slippers 158-47 I do not understand the pattern I wish it was written out better that that
03.10.2014 - 19:53DROPS Design respondeu:
Dear Mrs Marshall, you first work some rounds around ankle, then work the upper foot over the first 10 sts (inc 1 st each side), then work around picking up sts along both side of upper foot to finish with sole. A video will comme soon, please stay tuned. Happy knitting!
04.10.2014 - 17:20
![]() Nadine Lowden escreveu:
Nadine Lowden escreveu:
Pattern says all slippers require 300g. but when you go to order it is only 200g. I am confused. will 200g do a pair.
03.10.2014 - 16:42DROPS Design respondeu:
Dear Mrs Lowden, you need 300 g Andes to work these slippers, ie 3 balls Andes, check stock of your Drops store and contact them if necessary to know when they will have more if they don't have 3 balls right now. Happy knitting!
03.10.2014 - 16:49
![]() Marie Hall escreveu:
Marie Hall escreveu:
What is the tension for the slipers
01.10.2014 - 18:14DROPS Design respondeu:
Dear Mrs Hall, tension to this pattern is 13 sts x 17 rows in stockinette st = 10 x 10 cm ( 4'' x 4''). Happy knitting!
02.10.2014 - 08:58
![]() Amanda escreveu:
Amanda escreveu:
I'm trying to make the foot i just want to know where it says K2 tog on each side of marker 4 a round is it with each marker as it says to put 2 markers. I've knitted patterns before but I'm so confused with this one
30.09.2014 - 17:34DROPS Design respondeu:
Dear Amanda, you insert 2 markers, one at the mid top of toe and the 2nd one at the mid heel, then work K2 tog each side of these both markers = 4 dec sts per dec round (= every other round). You dec then 2 sts on top of toe and 2 sts on mid back. Happy knitting!
01.10.2014 - 09:18
![]() Rose MAcPherson escreveu:
Rose MAcPherson escreveu:
Is there a video that I can watch for this pattern,. I do not understand it at all. I have started them but have no idea how or what to do. Thank you for any help at all.
22.09.2014 - 17:57DROPS Design respondeu:
Dear Mrs MacPherson, a video showing how to work this pattern be uploaded as soon as possible. Stay tuned ! Happy knitting!
02.10.2014 - 14:08
![]() Cindy escreveu:
Cindy escreveu:
I am not used to a pattern explained this way. I am used to row 1... row 2... row 3.. etc. But these patterns are so beautiful! I have to try. Will let you know how it goes :)
19.09.2014 - 05:39
![]() Knut escreveu:
Knut escreveu:
27-27-29 refers to different sizes, 37-37-37 also
18.09.2014 - 08:29
![]() Terry escreveu:
Terry escreveu:
I am stuck at the foot. I have done the leg, 37-37-39. Next I am to keep first 10 stiches on the needle, then put remaining 27-27-29 on a stich holder. 37-37-39 = 113. 10 + 27-27-29 = 93. where are the remaining 20 stiches?
18.09.2014 - 02:45DROPS Design respondeu:
Dear Terry, when leg part is done, you work foot over the first 10 sts, the remaining 27 sts (1st and 2nd size) or 29 sts (3rd size) go onto a st holder. You then work over the first 10 sts the lenght stated for your size, then pick up sts (either 12, 14 or 16 sts - see size) each side of the middle piece + knit back sts from st holder = 61 sts in 1st size, 65 sts in 2nd size, 71 sts in larger size). Happy knitting!
18.09.2014 - 09:00
|
|||||||
One Step Ahead#onestepaheadslippers |
|||||||
 |
 |
||||||
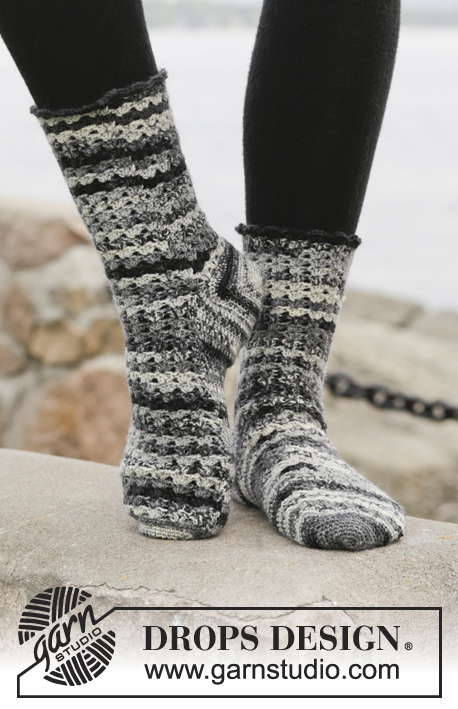
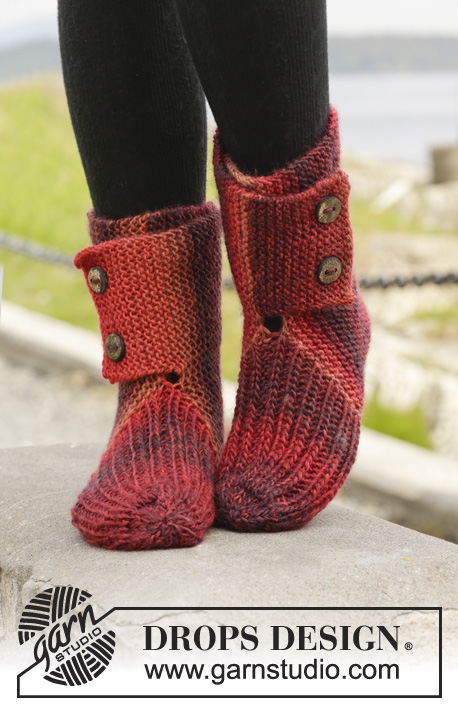
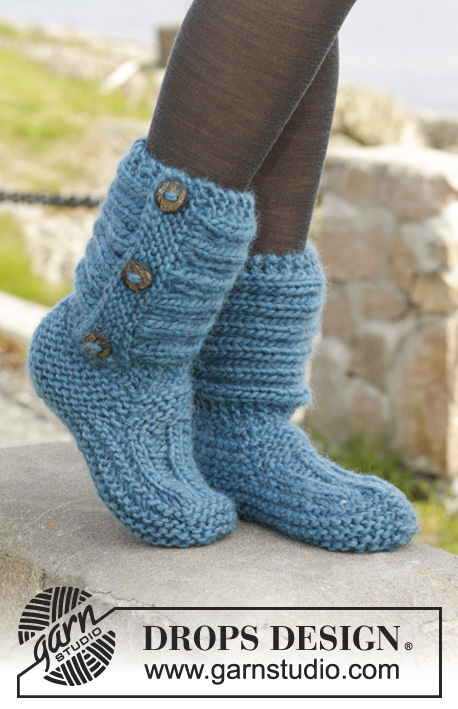
Pantufas DROPS em ponto jarreteira com canelado/barra, em "Andes".
DROPS 158-47 |
|||||||
|
---------------------------------------------------------- NOTA: Existem termos diferentes de tricô e croché em português de Portugal e do Brasil. TRICÔ : Malha = Ponto Canelado = Barra Ponto Jarreteira = Cordões de Tricô Ponto Liga = Ponto Tricô CROCHÉ : mpa – meio ponto alto pa – ponto alto pad – ponto alto duplo pat – ponto alto triplo pb – ponto baixo pbx – ponto baixíssimo pc – ponto corrente ---------------------------------------------------------- PONTO JARRETEIRA (em redondo nas agulhas de pontas duplas): Tricotar: *1 carreira meia, 1 carreira liga/tricô*, repetir de * a *. 1 barra jarreteira = 2 carreiras. PONTO JARRETEIRA (em idas e voltas): Tricotar todas as carreiras em meia. 1 barra jarreteira = 2 carreiras meia. PONTO FANTASIA: Ver diagrama A.1. PONTO FANTASIA 2: Carreira 1 (= pelo direito): *2 ms/pts meia, 2 ms/pts liga/tricô*, repetir de * a * até restarem 2 ms/pts, 2 ms/pts meia. Carreira 2 (= pelo avesso): Tricotar as ms/pts meia em meia e as ms/pts liga/tricô a em liga/tricô. Repetir a carreira 2 ---------------------------------------------------------- PANTUFAS: Tricotar primeiro uma orla na parte de baixo da perna, depois, o pé. Terminar com a orla à volta da perna. PERNA: Montar 37-37-39 ms/pts com as agulhas de pontas duplas 6 mm e o fio Andes. Tricotar em ponto jarreteira em redondo - ver acima - até a peça medir cerca de 4 cm - terminar depois de 1 carreira de ms/pts liga/tricô. NÃO ESQUECER DE MANTER A MESMA TENSÃO DA INDICADA PARA A AMOSTRA! PÉ: Continuar em idas e voltas. Manter, então, as 10 primeiras ms/pts nas agulhas, colocar as restantes 27-27-29 ms/pts num alfinete de ms/pts. Tricotar, então, as 10 ms/pts da parte central em PONTO FANTASIA 2 – ver acima – e, AO MESMO TEMPO, no fim das 2 carreiras seguintes montar 1 m/p ourela (tricotar as ms/pts ourela em ponto jarreteira - ver acima) = 12 ms/pts. Quando a parte central medir 7-8½-10 cm, diminuir 1 m/p ourela de cada lado da peça = 10 ms/pts. Retomar então as ms/pts em espera e levantar 12-14-16 ms/pts de cada lado da parte central (a 1 m/p dos rebordos) = 61-65-71 m/p. MEDIR , ENTÃO, A PARTIR DAQUI! Colocar 1 marcador a meio das 10 ms/pts da parte central (= ao nível da frente, no lado da ponta do pé) e 1 outro marcador na m/p na parte de trás do calcanhar. Temos 30-32-35 ms/pts entre os marcadores de cada lado da peça. Continuar , então, em redondo, em ponto jarreteira. A 2 cm, tricotar a cada 2 carreiras 2 ms/pts tricotadas juntamente em meia de cada lado de cada marcador (= 4 ms/pts a menos por carreira). Continuar estas diminuições até a peça medir 5-5-6 cm. Arrematar as restantes ms/pts. Fazer a costura sob o pé na alça mais exterior das ms/pts para evitar uma costura demasiado grossa. ORLA À VOLTA DA PERNA: Tricota-se em idas e voltas. Montar 22 ms/pts com as agulhas 6 mm em Andes. Tricotar 4 barras jarreteira e, AO MESMO TEMPO, na última carreira, distribuir 6 aumentos = 28 ms/pts. Tricotar seguindo A.1 (= 28 ms/pts) até a peça medir cerca de 35-36-38 cm. Tricotar então 4 barras jarreteira e, AO MESMO TEMPO, na 1.ª carreira, distribuir 6 diminuições = 22 ms/pts. Arrematar. Colocar as ms/pts arrematadas por cima das ms/pts montadas, e costurar 3 botões no canelado/barra jarreteira da orla. MONTAGEM: Costurar a orla da perna na carreira de montagem da perna (ou seja, as ms/pts montadas para a perna, no início das explicações). Colocar a orla de maneira a que os botões estejam na parte exterior, com a abertura para trás, do lado do calcanhar – costurar pelo avesso para que a costura seja invisível. Tricotar outra pantufa igual – ter atenção para que a abertura fique no outro lado. |
|||||||
Explicações do diagrama |
|||||||
|
|||||||
 |
|||||||
Terminou este projecto?Então, identifique as suas fotos com as tags #dropspattern #onestepaheadslippers ou mostre-as na galeria #dropsfan. Precisa de ajuda para este modelo?Encontrará 18 turotiais em vídeo, uma rubrica Comentários/Perguntas e muito mais ao visitar a página do modelo em www.garnstudio.com © 1982-2026 DROPS Design A/S. Todos os direitos reservados. Este documento, incluuindo as suas su-secções, tem copyrights. Saia mais o que pode fazer com os nossos modelos no fim de cada uma das páginas do nosso site. |
|||||||


Com mais de 40 anos no design de modelos de tricô e de croché, a DROPS Design oferece uma das mais vastas colecções demodelos gratuitos na Internet - traduzidos em 17 línguas. Neste dia de hoje, temos 324 catálogos e 12290 modelos - dos quais 12271 estão traduzidos em português.
Trabalhamos com muito empenho para lhe proporcionar o melhor que o tricô e o croché têm para oferecer, para lhe fornecer inspiração e conselhos bem como fios da mais elevada qualidade a preços incríveis! Gostaria de usar os nossos modelos para outros fins que não uso pessoal? Pode ler o que lhe é permitido fazer no Copyright texto que se encontra na parte de baixo de todos os nossos modelos. Bom tricô! Bom croché!
Deixe um comentário acerca do modelo DROPS 158-47
Gostaríamos muito de saber o que tem a dizer-nos acerca deste modelo!
Se deixar uma pergunta acerca do modelo, certifique-se de que escolhe a categoria adequada no formulário abaixo para acelerar o processo relativo à resposta. Os campos obrigatórios estão assinalados com um *.