
Categorias populares
Procura um fio?


Comentários / Perguntas (52)
![]() Irene Aho escreveu:
Irene Aho escreveu:
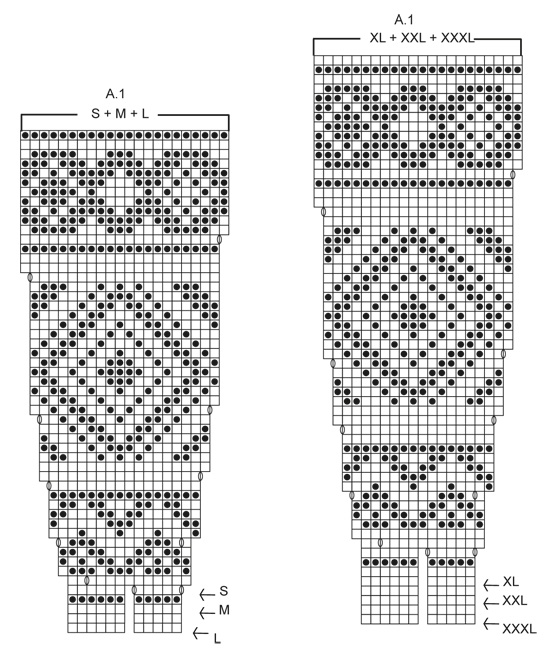
Ohjeessa lukee, että kun A1 on neulottu loppuun koossa M silmukoiden määrä on kasvanut 242. Lisäksi soikio tuntuu indikoivan lisäyskerrosta. Kuinka monta silmukkaa lisätään milläkin lisäyskerroksella? Kuviohan menee sekaisin mikäli lisään väärän määrän väärässä kohtaa. Useissa dropsin ohjeissa on tarkka ohje kuinka monta silmukkaa lisätään kullakin lisäykskirroksella, tästä ohjeesta ne puuttuvat.
04.07.2020 - 21:33
![]() Bonté escreveu:
Bonté escreveu:
Bonjour pkoi il manque une case dans le dessin du diagramme dans le début cela fait un trou je comprends pas
18.01.2020 - 08:37DROPS Design respondeu:
Bonjour Mme Bonté, parce qu'aux premiers rangs du diagramme, on n'a pas encore augmenté 1 maille au milieu, et pour que le diagramme soit juste, on n'a pas dessiné la case, vous allez ainsi tricoter et répéter le diagramme sur le nombre de cases indiqué, dès que vous aurez fait les 2 premières augmentations, vous aurez la case manquante au milieu (= le jeté approximativement au milieu du diagramme). Bon tricot!
20.01.2020 - 08:24
![]() Nicol escreveu:
Nicol escreveu:
Hallo liebes Drops-Team, ich hätte eine generelle Frage bei der Anleitung: ich habe nun schön öfter festgestellt, dass in der Beschreibung steht (nachdem man das hohe Halsbündchen gestrickt hat), dass erst Maschen abgenommen werden sollen, die ein paar wenige Reihen später wieder aufgenommen werden, und irgendwie mag sich mir der Grund dafür nicht erschließen. Schon im Voraus lieben Dank fürs "aufklären". :)
28.10.2019 - 14:18DROPS Design respondeu:
Liebe Nicol, beim Hals strickt man Bündchen/Rippenmuster mit kleineren Nadeln, dann muss man abnehmen bei der 1. Runde mit der grösseren Nadeln um den richtigen Umfang zu haben, dann strickt man hier verkürzten Reihen und dann wird es zugenommen, damit es die richtige Breite und die richtige Maschenanzahl für das Muster gibt. Viel Spaß beim stricken!
04.11.2019 - 12:59
![]() Caroline escreveu:
Caroline escreveu:
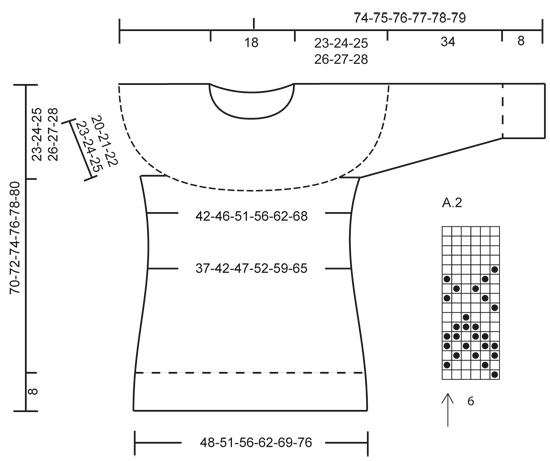
Dear Drops, Thank you very much for your quick reply about knitting the sleeve. Please could you tell me how to find the middle stitch on top of the sleeve as I'm not sure what this is. Best wishes Caroline
23.05.2019 - 09:31DROPS Design respondeu:
Dear Caroline, the middle stitch on top of sleeve is the one in the middle of the round (start counting from beg of the round = mid under arm) - read more about how to center a diagram here. Happy knitting!
23.05.2019 - 09:57
![]() Caroline escreveu:
Caroline escreveu:
Hello drops, I've just started the sleeve using the M sizes, and I have 63 sts in accordance with your pattern. I now need to knit chart A2 which is a pattern of 6-stitch repeats. As 63 is not divisible by 6, I can't see how this will work without losing the pattern at some point under the sleeve, which will look a mess. Please could you give me some advice about what to do here. Best wishes Caroline
21.05.2019 - 08:56DROPS Design respondeu:
Hi Caroline, Under the sleeve the pattern will not fit as you say and you will be decreasing as you go as well. So stop working A.2 wherever you are at the end of the round and start the next round where you began A.2 on the previous round - the most important thing is to get the stitch with the arrow (middle stitch in A.2) to match the middle stitch on top of sleeve. I hope this helps and happy knitting!
21.05.2019 - 09:52
![]() Anita Danell escreveu:
Anita Danell escreveu:
Hej! På mönstret är det precis i början (vid markeringarna S M L ) som ett sprund/ 2 ben de första varven. Vad ska jag göra där, hoppa över en maska? För det är väl ingen utökning eftersom det inte är markerat med ökningssymbolen? Vänliga hälsningar Anita Danell
22.02.2019 - 15:29DROPS Design respondeu:
Hej, här ska du bara fortsätta till följande ruta i diagrammet. Senare ökas det maskor, så då fortsätter diagrammet som vanligt.
22.02.2019 - 16:26
![]() Marion escreveu:
Marion escreveu:
Skal jeg på 1. økning øke 1 maske etter hver 5. maske, og så etter hver 6. maske annenhver gang? Og på neste omgang øke etter hver 13. maske?
16.08.2018 - 11:57DROPS Design respondeu:
Hei Marion Ja, det stemmer at du på 5 omgang øker helt på starten av omgangen, og så videre etter hver 5 og 6 maske annenhver gang. Det stemmer også at du på 6 omgang øker først etter 11 masker, og så etter 13 masker på resten av omgangen. Om du syntes det er vanskelig å holde oversikten kan du sette 1 merke mellom hver rapport av mønsteret så er det lettere å se hvor du er i arbeidet ditt. God fornøyelse.
23.08.2018 - 11:33
![]() Marion escreveu:
Marion escreveu:
Hei. Jeg kommer helt feil ut når jeg øker i mønsteret, men greier ikke å se hvor jeg gjør feil. Savner at det står hvor mange masker en skal ha på pinnen etter hver økning!
16.08.2018 - 11:42DROPS Design respondeu:
Se svar på spørsmål over :)
23.08.2018 - 11:33
![]() Monica Ruud escreveu:
Monica Ruud escreveu:
Hei. Skal strikke Drops 156-12 aldri strikket ovenfra og ned og finner ikke noen video jeg kan se på. Kan du hjelpe meg så jeg garantert noe å lære etter. Vennlig hilsen Monica Ruud
02.08.2018 - 17:46DROPS Design respondeu:
Hei Monica. Du skal strikke på samme måte som du ville strikket om du strikket nedenfra og opp, bare at du øker når du ville felt, og feller når du ville økt – Men dette står forklart i oppskriften, så det er bare å gjøre akkurat som det står: Du begynner altså med halskanten, når denne er ferdig strikkes det forhøyning i nakken (forkortede pinner) så strikkes bærestykke (mønster leses som vanlig fra nederste til øverst, fra høyre mot venstre), alle økinger er markert i diagrammet. Videre settes masker av til ermer, nye masker legges opp og bolen strikkes nedover. God fornøyelse.
17.08.2018 - 13:24
![]() Lousha escreveu:
Lousha escreveu:
According to the pattern I'm supposed to put the sleeve stitches on holders once A1 chart is fully worked. But according to the picture that is pretty much at the stomach... Certainly much lower than the armpit. So if I knit like this, I won't be able to lift my arms up. Is this a mistake in the pattern or just some strange design?
07.06.2018 - 19:31DROPS Design respondeu:
Dear Lousha, you will divide sts for sleeves and body after A.1 has been worked (deep armholes - see measurements in chart: 23-28 cm)) and then work A.2 on body - make sure your tension in height is right (=22 rows stocking st = 10 cm). Happy knitting!
08.06.2018 - 08:17
|
||||||||||
Eir#eirsweater |
||||||||||
|
|
||||||||||
Pulôver DROPS com jacquard norueguês e encaixe arredondado, tricotado de cima para baixo ou em top down, em "Nepal". Do S ao XXXL.
DROPS 156-12 |
||||||||||
|
---------------------------------------------------------- NOTA: Existem termos diferentes de tricô e croché em português de Portugal e do Brasil. TRICÔ : Malha = Ponto Canelado = Barra Ponto Jarreteira = Cordões de Tricô Ponto Liga = Ponto Tricô CROCHÉ : mpa – meio ponto alto pa – ponto alto pad – ponto alto duplo pat – ponto alto triplo pb – ponto baixo pbx – ponto baixíssimo pc – ponto corrente ---------------------------------------------------------- JACQUARD: Ver os diagramas A.1-A.2. Tricotam-se em ponto meia. Ver o diagrama indicado para cada tamanho. DICA PARA MEDIR: Devido ao peso da peça, todas as medidas devem ser tiradas quando a peça é suspensa senão ficará demasiado comprida quando usada. AUMENTOS: Para aumentar 1 m/p, levantar 1 m/p da carreira precedente e tricotá-la em meia. DIMINUIÇÕES: Diminuir da seguinte maneira depois do marcador: Deslizar 1 m/p em meia, 1 m/p meia, passar a m/p deslizada por cima da m/p tricotada. Diminuir da seguinte maneira 2 ms/pts antes do marcador: 2 ms/pts tricotadas juntamente em meia. ---------------------------------------------------------- ENCAIXE: Tricota-se de cima para baixo, em redondo, na agulha circular. Montar 102-102-108-108-114-114 ms/pts com a agulha circular 4 mm em verde acinzentado claro. Tricotar em canelado/barra 1 m/p meia/2 ms/pts liga/tricô em todas as ms/pts. NÃO ESQUECER DE MANTER A MESMA TENSÃO DA INDICADA PARA A AMOSTRA! A 14-14-15-15-16-16 cm de altura total, tricotar 1 carreira meia e, AO MESMO TEMPO, distribuir 26-22-24-20-22-18 diminuições = 76-80-84-88-92-96 ms/pts. Continuar com a agulha circular 5 mm e tricotar então uma elevação para o decote das costas, em idas e voltas, da seguinte maneira: colocar 1 marcador no princípio da carreira e tricotar 9-10-11-12-13-14 ms/pts meia, virar e tricotar 18-20-22-24-26-28 ms/pts liga/tricô. Virar, tricotar 27-29-31-33-35-37 ms/pts meia, virar e tricotar 36-38-40-42-44-46 ms/pts liga/tricô. Virar e tricotar 45-47-49-51-53-55 ms/pts meia, virar e tricotar 54-56-58-60-62-64 ms/pts liga/tricô. Virar e tricotar em meia até ao marcador. Continuar , então, em redondo. Tricotar 1 carreira meia e, AO MESMO TEMPO, distribuir 34-41-48-55-62-80 aumentos = 110-121-132-143-154-176 ms/pts. Tricotar então e aumentar seguindo A.1 – ver diagrama indicado para cada tamanho. Começar o jacquard para cada tamanho na flecha indicada no diagrama. Quando A.1 tiver sido tricotado 1 vez em altura, temos 220-242-264-286-308-352 ms/pts e a peça mede cerca de 23-24-25-26-27-28 cm – ver DICA PARA MEDIR. Tricotar 1 carreira meia em verde acinzentado claro e, AO MESMO TEMPO, distribuir 8-10-8-10-16-0 aumentos = 228-252-272-296-324-352 ms/pts. Tricotar as 32-36-40-44-49-54 primeiras ms/pts (= metade das costas), colocar as 51-55-57-61-65-69 ms/pts seguintes num alfinete de ms/pts para a manga, montar 8 ms/pts acima dessas ms/pts, tricotar as 63-71-79-87-97-107 ms/pts seguintes (= frente), colocar as 51-55-57-61-65-69 ms/pts seguintes num alfinete de ms/pts para a outra manga, montar 8 ms/pts acima dessas ms/pts, tricotar as restantes 31-35-39-43-49-53 ms/pts = 142-158-174-190-210-230 ms/pts. COSTAS & FRENTE: Tricotar 1 carreira em ponto meia e , AO MESMO TEMPO, distribuir 2-4-0-2-0-4 aumentos = 144-162-174-192-210-234 ms/pts. Tricotar A.2 (= 6 ms/pts) e, AO MESMO TEMPO, na última carreira, distribuir 2-4-0-2-0-4 diminuições = 142-158-174-190-210-230 ms/pts. Quando A.2 tiver sido tricotado 1 vez em altura, continuar em verde acinzentado claro. Colocar 6 marcadores distribuídos da seguinte maneira: Tricotar 15-16-17-17-18-20 ms/pts, colocar o 1.º marcador, tricotar 21-24-27-31-35-38 ms/pts, colocar o 2.º marcador (marca um dos lados), tricotar 21-24-27-31-35-38 ms/pts, colocar o 3.º marcador, tricotar 29-31-33-33-35-39 ms/pts, colocar o 4.º marcador, tricotar 21-24-27-31-35-38 ms/pts, colocar o 5.º marcador (marca o outro lado), tricotar 21-24-27-31-35-38 ms/pts, colocar o 6.º marcador, tricotar as restantes 14-15-16-16-17-19 ms/pts. Fazer seguir os marcadores à medida que for tricotando. Diminuir então da seguinte maneira: Diminuir depois do 3.º e do 6.º marcador e antes do 1.º e do 4.º marcador - VER DIMINUIÇÕES. Repetir estas diminuições 4-4-4-3-2-2 vezes ao todo a cada 1-1-1.5-1.5-3.5-3.5 cm = 126-142-158-178-202-222 ms/pts. LER COM ATENÇÃO AS RETANTES EXPLICAÇÕES ANTES DE CONTINUAR! A 38-40-42-44-46-48 cm de altura total, aumentar depois do 3.º e do 6.º marcador e antes do 4.º e do 1.º marcador - VER AUMENTOS. Repetir estes aumentos 5 vezes ao todo a cada 4½ cm. AO MESMO TEMPO, quando a peça medir 38-40-42-44-46-48 cm, aumentar 1 m/p de cada lado do 2.º e do 5.º marcador (= nos lados). Repetir estes aumentos nos lados 4-3-3-3-3-4 vezes ao todo a cada 6-9-9-9-9-6 cm. Quando todos os aumentos estão feitos, temos 162-174-190-210-234-258 ms/pts. Continuar até a peça medir 62-64-66-68-70-72 cm. Tricotar 1 carreira meia e, AO MESMO TEMPO, distribuir 42-45-50-66-78-90 aumentos = 204-219-240-276-312-348 ms/pts. Continuar com a agulha circular 4 mm e tricotar em canelado/barra 1 m/p meia/2 ms/pts liga/tricô. A 70-72-74-76-78-80 cm de altura total, arrematar as ms/pts como elas se apresentam. MANGAS: Retomar as ms/pts em espera na agulha circular 5 (= 51-55-57-61-65-69 ms/pts) e montar 8 ms/pts au meio sob a manga = 59-63-65-69-73-77 ms/pts. Colocar 1 marcador. MEDIR , ENTÃO, A PARTIR DAQUI! Tricotar A.2– NOTA: Centrar o motivo - a flecha no diagrama marca o meio da parte de cima da manga. AO MESMO TEMPO, quando a peça medir 4 cm a partir do marcador, começar a diminuir – ver DIMINUIÇÕES! Repetir estas diminuições mais 8-10-11-10-12-14 vezes a cada 2-1½-1½-1½-1½-1 cm = restam 41-41-41-47-47-47 ms/pts. A 34 cm, distribuir 4 aumentos = 45-45-45-51-51-51 m/p. Mudar para as agulhas de pontas duplas 4 mm e tricotar em canelado/barra 1 m/p meia/2 ms/pts liga/tricô. Arrematar as ms/pts como elas se apresentam quando a peça medir 42 cm. Tricotar a outra manga da mesma maneira. MONTAGEM: Fechar a abertura sob as mangas com uma costura |
||||||||||
Explicações do diagrama |
||||||||||
|
||||||||||
 |
||||||||||
 |
||||||||||
Terminou este projecto?Então, identifique as suas fotos com as tags #dropspattern #eirsweater ou mostre-as na galeria #dropsfan. Precisa de ajuda para este modelo?Encontrará 24 turotiais em vídeo, uma rubrica Comentários/Perguntas e muito mais ao visitar a página do modelo em www.garnstudio.com © 1982-2026 DROPS Design A/S. Todos os direitos reservados. Este documento, incluuindo as suas su-secções, tem copyrights. Saia mais o que pode fazer com os nossos modelos no fim de cada uma das páginas do nosso site. |
||||||||||


Com mais de 40 anos no design de modelos de tricô e de croché, a DROPS Design oferece uma das mais vastas colecções demodelos gratuitos na Internet - traduzidos em 17 línguas. Neste dia de hoje, temos 324 catálogos e 12290 modelos - dos quais 12271 estão traduzidos em português.
Trabalhamos com muito empenho para lhe proporcionar o melhor que o tricô e o croché têm para oferecer, para lhe fornecer inspiração e conselhos bem como fios da mais elevada qualidade a preços incríveis! Gostaria de usar os nossos modelos para outros fins que não uso pessoal? Pode ler o que lhe é permitido fazer no Copyright texto que se encontra na parte de baixo de todos os nossos modelos. Bom tricô! Bom croché!
Deixe um comentário acerca do modelo DROPS 156-12
Gostaríamos muito de saber o que tem a dizer-nos acerca deste modelo!
Se deixar uma pergunta acerca do modelo, certifique-se de que escolhe a categoria adequada no formulário abaixo para acelerar o processo relativo à resposta. Os campos obrigatórios estão assinalados com um *.