
Categorias populares
Procura um fio?


Comentários / Perguntas (26)
![]() Eva-Lisa Johnsson escreveu:
Eva-Lisa Johnsson escreveu:
Hej! Jag ska sticka den här halsvärmaren(155-29) och i mönstret ska man sticka fram och tillbaka,räta alla varv…då ser det inte ut som slätstickning som på bilden. Varvet mellan omslags/hoptagningar måste väl sticka avigt?
12.03.2023 - 22:41DROPS Design respondeu:
Hei Eva-Lisa Ja, er må det være en feil. Forklaringen til det øverste diagramikonet (blank firkant) burde være: = rett fra retten, vrang fra vragen. Da får du glattstrikk (slätstickning). Takk for at du gjorde oss oppmerksom på dette. mvh DROPS Design
14.03.2023 - 06:38
![]() Jutta escreveu:
Jutta escreveu:
Vilen Dank für die Antwort . Jetzt grhts los mit dem schulterwärmer😊
13.04.2021 - 08:47
![]() Jutta escreveu:
Jutta escreveu:
Wie stricke ich die rückreihen bei Schulterwärmer beatrice.
12.04.2021 - 21:36DROPS Design respondeu:
Liebe Jutta, die Rück-Reihen sind im Diagramm eingezeichnet, es zeigt alle Muster-Reihen. In Hin-Reihen wird gemustert, in Rück-Reihen wird links gestrickt. Viel Spaß beim Stricken!
12.04.2021 - 23:47
![]() Ingvill escreveu:
Ingvill escreveu:
Hei! Jeg lurer på hvorfor halsen skal strikkes fram og tilbake, er det ikke enklere å strikke den rundt? Hva må evt. endres for at den kan strikkes rundt?
10.03.2019 - 09:54DROPS Design respondeu:
Hej Ingvill, jo men du må gerne strikke halsen rundt på rundpind. God fornøjelse!
12.03.2019 - 14:57
![]() Francesca escreveu:
Francesca escreveu:
Buonasera, non riesco a capire questo passaggio :"sono state diminuite 4 m in ogni ripetizione (cioè 60-68-76 diminuzioni in totale sul f) = 236-266-296 m rimaste". Devo diminuire di 60m nell'ultimo ferro dello schema? Grazie
26.01.2019 - 22:20DROPS Design respondeu:
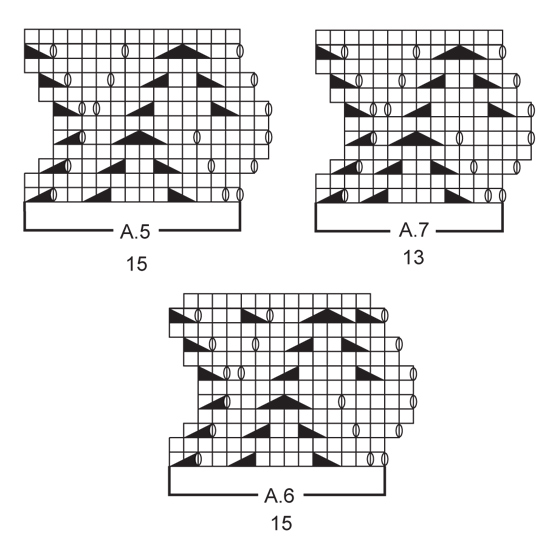
Buongiorno Francesca. Il diagramma A4, inizia con 19 maglie per ogni ripetizione e finisce con 15 maglie. Le diminuzioni sono nel diagramma stesso, alla riga 11 e alla penultima riga. Non ci sono diminuzioni da fare sull’ultima riga. Buon lavoro!
27.01.2019 - 09:31
![]() Ulrike escreveu:
Ulrike escreveu:
Hallo, ich möchte dieses Muster gerne in Runden stricken. Welchen Mustersatz muss ich dann nehmen? Vielen Dank
10.10.2018 - 23:43DROPS Design respondeu:
Liebe Ulrike, die "Hinreihen" wie im Diagram stricken, und die "Rückreihen" (= jede 2. Runde) einfach links (= rechts von der Vorderseite gesehen) stricken. Die Randmaschen brauchen Sie dann nicht anzuschlagen (= 2 M weniger anschlagen). Viel Spaß beim stricken!
11.10.2018 - 10:22
![]() Andrea escreveu:
Andrea escreveu:
Oh je... Lieben Dank 👍👍 wer lesen kann ist klar im Vorteil!!! Danke...
26.05.2016 - 20:38
![]() Andrea escreveu:
Andrea escreveu:
Oh je... Irgendwie scheitere ich schon am Anfang 😢😢 schon die erste Reihe in Größe xxl kommt bei mir nicht hin... Ich Ende nie auf den Punkt, bzw. kommt das Muster nicht auf. Ich stricke doch A1 und A2 im Wechsel und Ende mit A 3 und der Randmasche. Wenn ich jedoch A1 und A2 19mal wiederholen soll, kann das doch gar nicht passen... Hilfe... Was mache i h falsch??
21.05.2016 - 22:49DROPS Design respondeu:
Liebe Andrea, Sie stricken 1 x A.1, dann insgesamt 15-17-19 x A.2 und dann 1 x A.3 (und die Rand-Maschen). Also A.1 und A.2 wird nicht im Wechsel gestrickt.
23.05.2016 - 10:25
![]() Suk escreveu:
Suk escreveu:
Thank you very much.
02.11.2015 - 10:29
![]() Suk escreveu:
Suk escreveu:
A.1 Row 5 from 4 stitches(row 4) reduce to 3 stitches, how come there is 4 stitches in row 6? A.3 Row 5 increase from 5 stitches (row 4) to 6 stitches, how come there is only 5 stitches in row 6 ?
01.11.2015 - 23:47DROPS Design respondeu:
Dear Mrs Suk, on row 5 in A.1, you will work a yo at the beg of row 5 in A.2 => this yo will be included in A.1 on next row so that you have K4 on row 6 in A.1. After last A.2, make 1 YO (beg of A.3) to keep correct number of sts. On next row, there will be 1 dec in A.2 that will be worked with the previous yo. Just follow diagram as it is shown, add markers if necessary after correct number of sts on each row, pattern will then match tog. Happy knitting!
02.11.2015 - 09:44
|
||||||||||||||||
Beatrice#beatriceneckwarmer |
||||||||||||||||
|
|
||||||||||||||||
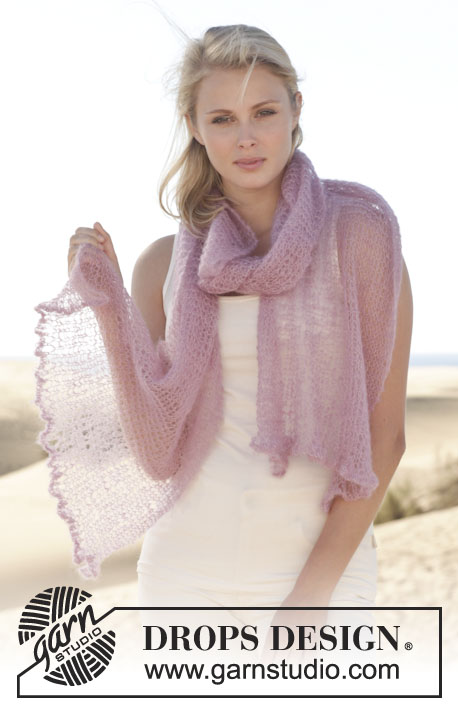
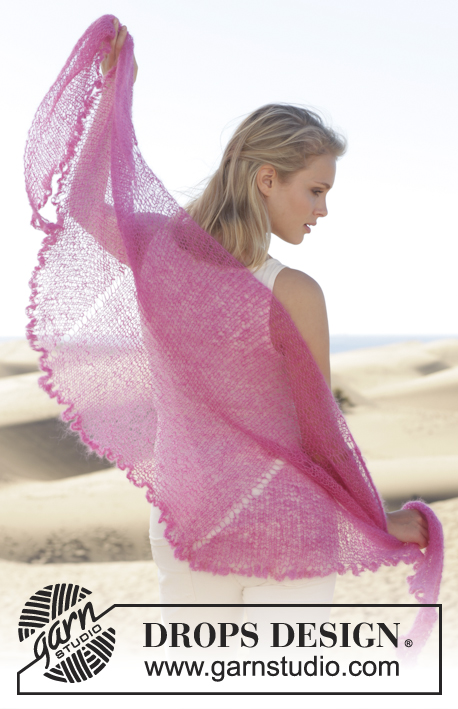
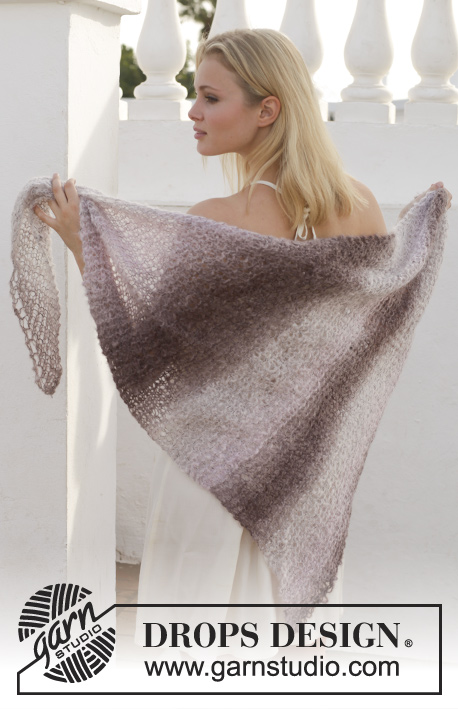
Gola rendada DROPS, em ”Alpaca”.
DROPS 155-29 |
||||||||||||||||
|
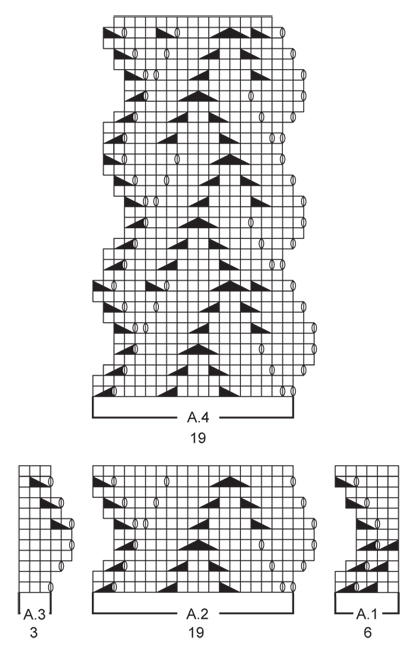
---------------------------------------------------------- NOTA: Existem termos diferentes de tricô e croché em português de Portugal e do Brasil. TRICÔ : Malha = Ponto Canelado = Barra Ponto Jarreteira = Cordões de Tricô Ponto Liga = Ponto Tricô CROCHÉ : mpa – meio ponto alto pa – ponto alto pad – ponto alto duplo pat – ponto alto triplo pb – ponto baixo pbx – ponto baixíssimo pc – ponto corrente ---------------------------------------------------------- PONTO JARRETEIRA (em idas e voltas) : Tricotar todas as carreiras em meia. 1 barra jarreteira = 2 carreiras meia. PONTO FANTASIA : Ver os diagramas A.1-A.7. Os diagramas mostram todas as carreiras do ponto fantasia, vistas pelo direito. ---------------------------------------------------------- GOLA: Tricota-se em idas e voltas na agulha circular. Montar 296-334-372 ms/pts com a agulha circular 3.5 mm em Alpaca. Tricotar 2 barras em PONTO JARRETEIRA - ver acima. Tricotar, então, da seguinte maneira pelo direito: 1 m/p ourela em ponto jarreteira, A.1 (= 6 ms/pts), 15-17-19 vezes A.2 (= 19 ms/pts) em largura, A.3 (= 3 ms/pts), 1 m/p ourela em ponto jarreteira. Continuar desta maneira, em idas e voltas, até A.1, A.2 e A.3 terem sido tricotados 2-2-3 vezes em altura. NÃO ESQUECER DE MANTER A MESMA TENSÃO DA INDICADA PARA A AMOSTRA ! Continuar, então, da mesma maneira, mas tricotar A.4 em vez de A.2 e as outras ms/pts como antes. Quando A.4 tiver sido tricotado 1 vez em altura, diminuiu-se 4 ms/pts em cada motivo (ou seja, 60-68-76 ms/pts diminuições ao todo) = restam 236-266-296 ms/pts. Tricotar, então, no ponto fantasia como antes mas tricotar, agora, A.5 (= 15 ms/pts) em vez de A.4. Continuar até A.5 ter sido tricotado 1-2-3 vezes em altura. Tricotar, então, no ponto fantasia como antes mas tricotar, agora, A.6 (= 15 ms/pts) em vez de A.5. Quando A.6 tiver sido tricotado 1-1-1 vez em altura, diminui-se 2 ms/pts em cada motivo (ou seja, 30-34-38 ms/pts diminuições ao todo) = restam 206-232-258 ms/pts. Tricotar, então, no ponto fantasia como antes mas tricotar, agora, A.7 (= 13 ms/pts) em vez de A.6. Continuar até a gola medir 41-45-49 cm, tricotar 2 barras jarreteira em todas as ms/pts. Tricotar, então, 1 carreira meia pelo direito e arrematar frouxamente pelo avesso. MONTAGEM : Fazer a costura da gola a meio da parte de trás, a 1 m/p ourela do rebordo em ponto jarreteira. Cortar e entretecer o fio. |
||||||||||||||||
Explicações do diagrama |
||||||||||||||||
|
||||||||||||||||
 |
||||||||||||||||
 |
||||||||||||||||
Terminou este projecto?Então, identifique as suas fotos com as tags #dropspattern #beatriceneckwarmer ou mostre-as na galeria #dropsfan. Precisa de ajuda para este modelo?Encontrará 12 turotiais em vídeo, uma rubrica Comentários/Perguntas e muito mais ao visitar a página do modelo em www.garnstudio.com © 1982-2026 DROPS Design A/S. Todos os direitos reservados. Este documento, incluuindo as suas su-secções, tem copyrights. Saia mais o que pode fazer com os nossos modelos no fim de cada uma das páginas do nosso site. |
||||||||||||||||


Com mais de 40 anos no design de modelos de tricô e de croché, a DROPS Design oferece uma das mais vastas colecções demodelos gratuitos na Internet - traduzidos em 17 línguas. Neste dia de hoje, temos 324 catálogos e 12290 modelos - dos quais 12271 estão traduzidos em português.
Trabalhamos com muito empenho para lhe proporcionar o melhor que o tricô e o croché têm para oferecer, para lhe fornecer inspiração e conselhos bem como fios da mais elevada qualidade a preços incríveis! Gostaria de usar os nossos modelos para outros fins que não uso pessoal? Pode ler o que lhe é permitido fazer no Copyright texto que se encontra na parte de baixo de todos os nossos modelos. Bom tricô! Bom croché!
Deixe um comentário acerca do modelo DROPS 155-29
Gostaríamos muito de saber o que tem a dizer-nos acerca deste modelo!
Se deixar uma pergunta acerca do modelo, certifique-se de que escolhe a categoria adequada no formulário abaixo para acelerar o processo relativo à resposta. Os campos obrigatórios estão assinalados com um *.