
Categorias populares
Procura um fio?


Comentários / Perguntas (30)
![]() Marcsi escreveu:
Marcsi escreveu:
Szia A fodros szél második sorát sima szemekkel kell kötni? Csak az 1 sor van megadva Köszönöm
31.03.2023 - 12:13DROPS Design respondeu:
Kedves Marcsi! A hullámos szél második sorát ugyanúgy kell kötni mint az első sorát (* 1 sima, 1 RH * ismételjük a *-* közötti részt, és 1 sima szemmel fejezzük be.) Sikeres kézimunkázást!
03.04.2023 - 02:00
![]() Patricia escreveu:
Patricia escreveu:
Is het mogelijk dat de omlagdoek toch van onder naar boven moet worden gebreid, de breedte bij 54 steken komt niet overeen met het aantal cm in de bes hrijving. Met dank!
29.05.2022 - 22:34DROPS Design respondeu:
Dag Patricia,
De breedte van de 54 steken is ongeveer de breedte van het middenstuk, dus tussen de gaatjes en niet de volledige breedte van 143 cm. Het werk wordt van boven naar beneden gebreid.
04.06.2022 - 21:35
![]() Els Adens escreveu:
Els Adens escreveu:
Als de zijde die tegen de hals komt de bovenzijde is, dan wordt er toch van onder naar boven gebreid? Ik begrijp ook niet dat de golvende rand op het einde gebreid wordt, dan zit die toch tegen de hals, waar het meest aantal steken zit??
16.09.2021 - 15:31DROPS Design respondeu:
Dag Els,
De omslagdoek wordt van boven naar beneden gebreid, dus vanaf de hals naar de golvende rand. De golvende rand brei je dus op het einde.
17.09.2021 - 09:49
![]() Laura escreveu:
Laura escreveu:
Il lavoro è eseguito col filato a capo o doppio o singolo? Grazie
05.02.2021 - 12:04DROPS Design respondeu:
Buonasera Laura, lo scialle è lavorato a 1 filo. Buon lavoro!
05.02.2021 - 19:17
![]() Jeanny escreveu:
Jeanny escreveu:
I meant do you repeat row 1 to get 48 on opposite side? Where do you put 2nd marker. I’m totally confused. Please help
15.12.2020 - 03:56DROPS Design respondeu:
Dear Jeanny, you will increase on every other row (= on every row from RS) 1 stitch inside 1 edge stitch + 1 stitch on either side of the 2 markers: K1, YO, knit to marker, YO, marker, k48, marker, YO, knit to last st, YO, K1. The number of sts before and after the 48 sts will increase, but you always should have the same 48 sts as before in the middle of piece. Happy knitting!
15.12.2020 - 08:52
![]() Jeannie escreveu:
Jeannie escreveu:
I’m a bit confused on directions. Do you reprove 1 to get the marker on the other side? It doesn’t say where to place the 2nd marker. I’m confused. Please help
15.12.2020 - 03:21DROPS Design respondeu:
Hi Jeannie, Marker 1 is inserted before the 48 knitted stitches and marker 2 straight after these stitches. Happy knitting!
15.12.2020 - 06:48
![]() Dagmar escreveu:
Dagmar escreveu:
Tak for svar - det lyder dejligt så fortsætter jeg - er næsten færdig og rigtig spændt på det :)
03.06.2019 - 14:09
![]() Dagmar escreveu:
Dagmar escreveu:
Jeg forstår ikke I skriver den bliver strikket ovenfra og ned, da man begynder med få masker og øger, sjalet er vel bredest for oven ikke? Og I skriver man skal lave bølgekant til slut, men er den ikke forneden? Skal man selv tage maskerne på igen forneden, efter man har afsluttet arbejdet?
01.06.2019 - 14:19DROPS Design respondeu:
Hej Dagmar, jo men det stemmer, sjalet bliver strikket ovenfra og ned. Hvis du følger opskrifter bliver det som på billedet. Sørg for at du ikke strikker for stramt. God fornøjelse!
03.06.2019 - 08:22
![]() Rhonda escreveu:
Rhonda escreveu:
Hi! Sorry just counted stitches- I have 264 stitches and my gauge is 6 stitches to 1 inch - therefore I actually have 44 inches wide and 7 inches deep. Should I continue adding 4 stitches to every R S row to get 60 to 65 inches in final width before blocking? Thanks!
29.05.2019 - 17:34
![]() Rhonda escreveu:
Rhonda escreveu:
Hi! I mentioned I was knitting this shawl in Kid silk on 4.5 mm needles and increasing 2 stitches at each edge. That is 4 stitches every RS line as per pattern. You said since I was using smaller needles I would have to increase 4 stitches per RS line. Did you mean 8 stitches? At present i’ve Got about 24 inches in width and about 7 inches in depth. Would you say I need to increase more than 4 stitch perRS line to get about 60 inches in width? And about 16 or 17 inches in depth?
29.05.2019 - 16:36DROPS Design respondeu:
Dear Rhonda, we are unfortunately not able to adjust every pattern to every single request. If you wish to work this shawl with smaller needle, you will have to adjust the pattern to your own tension; For any further personnal assistance please contact the store where you bought the yarn - even per mail or telephone. Happy knitting!
31.05.2019 - 08:27
|
|
Spring Is Here#springishereshawl |
|
|
|
|
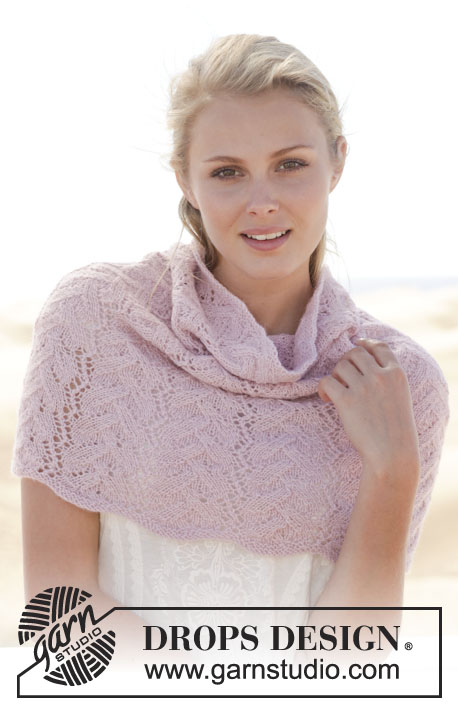
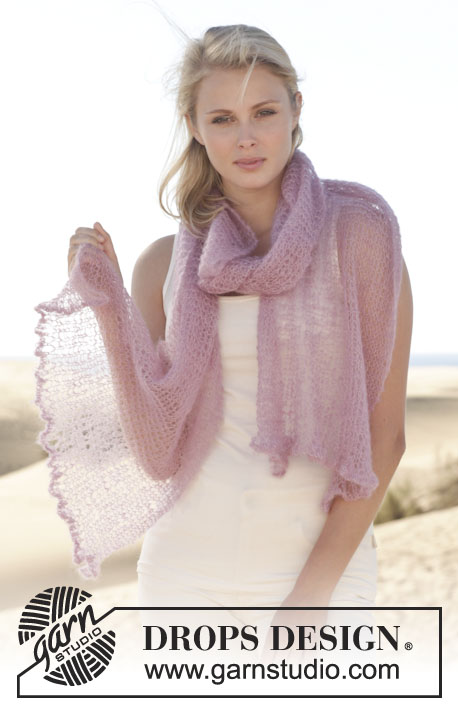
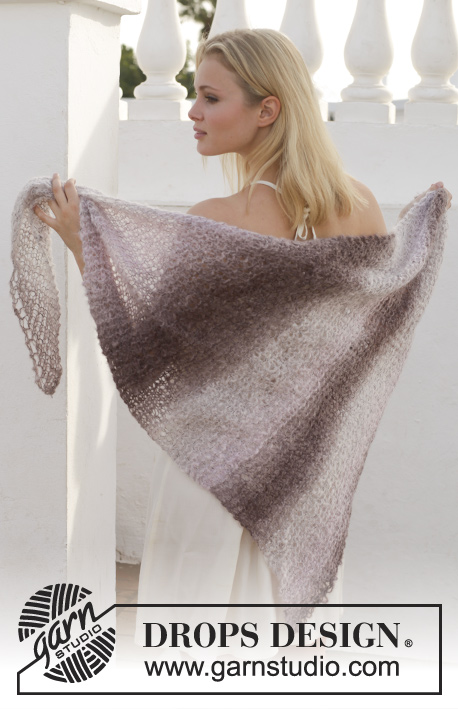
Xaile DROPS em ponto jarreteira, em "Kid-Silk".
DROPS 155-12 |
|
|
---------------------------------------------------------- NOTA: Existem termos diferentes de tricô e croché em português de Portugal e do Brasil. TRICÔ : Malha = Ponto Canelado = Barra Ponto Jarreteira = Cordões de Tricô Ponto Liga = Ponto Tricô CROCHÉ : mpa – meio ponto alto pa – ponto alto pad – ponto alto duplo pat – ponto alto triplo pb – ponto baixo pbx – ponto baixíssimo pc – ponto corrente ---------------------------------------------------------- ORLA ONDULADA : * 1 m/p meia, 1 laçada *, repetir de * a * e terminar com 1 m/p meia. Repetir esta carreira mais 1 vez. ---------------------------------------------------------- XAILE: Tricota-se em idas e voltas, de cima para baixo, na agulha circular. Montar 54 ms/pts com a agulha circular 8 mm em Kid-Silk. Tricotar 1 carreira meia e, depois, a carreira seguinte da seguinte maneira: 1 m/p meia, 1 laçada, 2 ms/pts meia, 1 laçada, 48 ms/pts meia (colocar um marcador de cada lado dessas 48 ms/pts e fazê-los deslizar à medida que vai tricotando), 1 laçada, 2 ms/pts meia, 1 laçada, 1 m/p meia = 58 ms/pts. Tricotar, então, todas as carreiras em meia - AO MESMO TEMPO, aumentar com laçadas (depois da 1.ª m/p, antes do 1.º marcador, depois do 2.º marcador e antes da última m/p da carreira) a cada 2 carreiras (= 4 aumentos) até ao fim. A cerca de 50 cm de altura total, tricotar a ORLA ONDULADA – ver acima. Arrematar as ms/pts e as laçadas em meia. BLOCAGEM: Colocar a peça em água morna até ficar completamente molhada. Pressionar delicadamente para retirar o excesso de água – não torcer. Enrolar, então, a peça numa toalha e pressionar para retirar o excesso de água que ainda haja - a peça está, agora, apenas húmida. Colocar a peça sobre um tapete ou um colchão – esticar delicadamente a peça para ficar com as medidas indicadas na parte de cima das explicações. Deixar secar. Repetir sempre depois de cada lavagem. |
|
Terminou este projecto?Então, identifique as suas fotos com as tags #dropspattern #springishereshawl ou mostre-as na galeria #dropsfan. Precisa de ajuda para este modelo?Encontrará 7 turotiais em vídeo, uma rubrica Comentários/Perguntas e muito mais ao visitar a página do modelo em www.garnstudio.com © 1982-2026 DROPS Design A/S. Todos os direitos reservados. Este documento, incluuindo as suas su-secções, tem copyrights. Saia mais o que pode fazer com os nossos modelos no fim de cada uma das páginas do nosso site. |


Com mais de 40 anos no design de modelos de tricô e de croché, a DROPS Design oferece uma das mais vastas colecções demodelos gratuitos na Internet - traduzidos em 17 línguas. Neste dia de hoje, temos 324 catálogos e 12290 modelos - dos quais 12271 estão traduzidos em português.
Trabalhamos com muito empenho para lhe proporcionar o melhor que o tricô e o croché têm para oferecer, para lhe fornecer inspiração e conselhos bem como fios da mais elevada qualidade a preços incríveis! Gostaria de usar os nossos modelos para outros fins que não uso pessoal? Pode ler o que lhe é permitido fazer no Copyright texto que se encontra na parte de baixo de todos os nossos modelos. Bom tricô! Bom croché!
Deixe um comentário acerca do modelo DROPS 155-12
Gostaríamos muito de saber o que tem a dizer-nos acerca deste modelo!
Se deixar uma pergunta acerca do modelo, certifique-se de que escolhe a categoria adequada no formulário abaixo para acelerar o processo relativo à resposta. Os campos obrigatórios estão assinalados com um *.