
Categorias populares
Procura um fio?


Comentários / Perguntas (63)
![]() Muriël escreveu:
Muriël escreveu:
Goedenavond, wordt hier de Patentsteek of de Engelse Patentsteek bedoeld? Vriendelijke groet, Muriël
14.01.2025 - 20:00DROPS Design respondeu:
Dag Muriël,
Dit is inderdaad Engelse patentsteek.
15.01.2025 - 20:03
![]() Rena escreveu:
Rena escreveu:
Sehr, sehr gute Anleitung und ein tolles Ergebnis. Beim Stirnband habe ich allerdings 13 statt nur 10 Maschen angeschlagen, wodurch es um eine Rippe breiter wurde. Das war gut so. Ansonsten habe ich genau nach Anleitung gestrickt. Vielen, vielen Dank... 😊
20.01.2021 - 01:22
![]() Mary Forrest escreveu:
Mary Forrest escreveu:
I finished your pattern 134-53 now i can't figure out how you make your twist in the front. It would be so much easier if you had a video with sound.
13.12.2019 - 01:09DROPS Design respondeu:
Hello Mary! You have to twist the work before sewing together mid-back. Hope it helps!
13.12.2019 - 22:13
![]() Mary Forrest escreveu:
Mary Forrest escreveu:
I love your pattern 134-53 headband but i keep coming up short one stitch on each row i've tried 4 times always the same I started with 10 stitches and end up with only a few stitches do you have a video of this pattern so i can see how it done? I'm using English Rib[ back and forth on needle].
09.12.2019 - 17:40DROPS Design respondeu:
Dear Mrs Forrest, on first row in English Rib, you will decrease by K2 tog, that's the reason why there are fewer stitches at the end of this row 1. = 7 sts remain. Happy knitting!
10.12.2019 - 09:30
![]() Stephanie Atterton escreveu:
Stephanie Atterton escreveu:
This is so beautiful!! I just wanted to have a wine charisma's
25.10.2019 - 14:12
![]() Joan Taylor escreveu:
Joan Taylor escreveu:
I have tried and tried to do the first row of English rib but it leaves me with one stitch short every time. Because I feel I should have done yarn over after the first knit stitch otherwise I'm short. What am I doing wrong?
24.02.2019 - 04:39DROPS Design respondeu:
Dear Mrs Taylor, when you work the English rib back and forth, you will have 1 st in garter st on each side, then start and finish the same way from RS ie with K2 tog on first row (= K tog YO and slipped st on row 3) - when working in the round, you need an even number of sts and repeat the 2 sts. Happy knitting!
25.02.2019 - 10:25
![]() Ursula Moths escreveu:
Ursula Moths escreveu:
Hallo, ich habe noch einen Rest von 'Air' übrig und würde sehr gerne das Bold and Beautiful Stirnband mit dem Garn stricken. Leider bin ich mir mit der Umrechnung auf das dünnere Garn unsicher. Können Sie mir vielleicht eine Anleitung, wieviel Maschen, wieviele Reihen bei Nadelstärke 9 geben? Vielen Dank!
01.12.2018 - 07:26DROPS Design respondeu:
Liebe Frau Moths, leider können wir jede Anleitung nach jeder individuellen Anfrage anpassen, aber 4 Fäden DROPS Air können 1 Faden Polaris ersetzen - hier lesen Sie mehr. Viel Spaß beim stricken!
03.12.2018 - 10:54
![]() Kimberley Jean escreveu:
Kimberley Jean escreveu:
There seems to be a conflict between the pattern as it is written here and your youtube video on how to knit the fishermans rib on straight needles below the youtube video the instructions say you must start with an uneven amount of stitches, however here for the headband, it states to cast on 10 sts, which of course is an even number. Can you please clarify this. Thank you
03.01.2018 - 09:53DROPS Design respondeu:
Dear Kimberley, the video is showing the standard technique for Fisherman's rib on an uneven number of sts, working the headband with 10 sts, work as explained under pattern: ENGLISH RIB (back and forth on needle), which is almost the same, starting the same way as in video and ending row a bit differently (one stitch less), so that you can repeat row 2 and 3 as shown in video over your even number of sts. Happy knitting!
03.01.2018 - 14:15
![]() Myriam De Meyer escreveu:
Myriam De Meyer escreveu:
Bij de hoofdband merk ik het volgende: Ik zet 10 steken op, na de eerste naald zijn er maar 9, na de tweede naald terug 10. Klopt dit?
11.11.2017 - 20:27DROPS Design respondeu:
Hallo Myriam, Ja, dat klopt hoor. In de eerste naald brei je een keer meer 2 steken samen dan dat je omslagen maakt en in de tweede naald wordt dat gecompenseerd door een extra omslag.
13.11.2017 - 21:51
![]() Annette escreveu:
Annette escreveu:
I watched other videos on knitting in the round and they suggest the length of circular needles should not be too long as this makes it difficult to manage work on space between needles.
16.12.2015 - 19:16
|
|
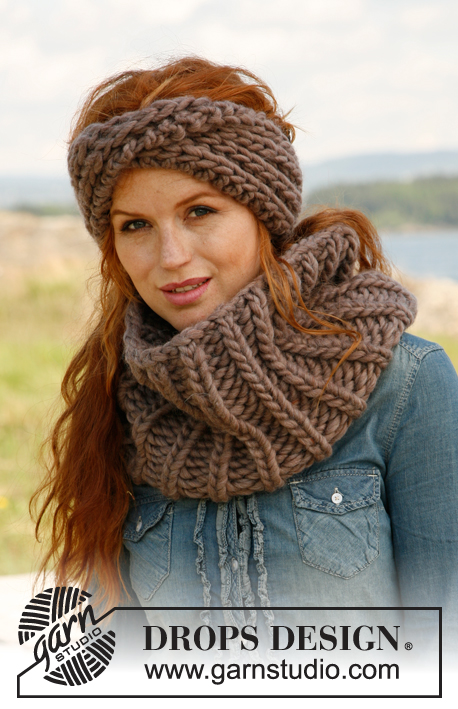
Bold and Beautiful#boldandbeautifulset |
|
 |
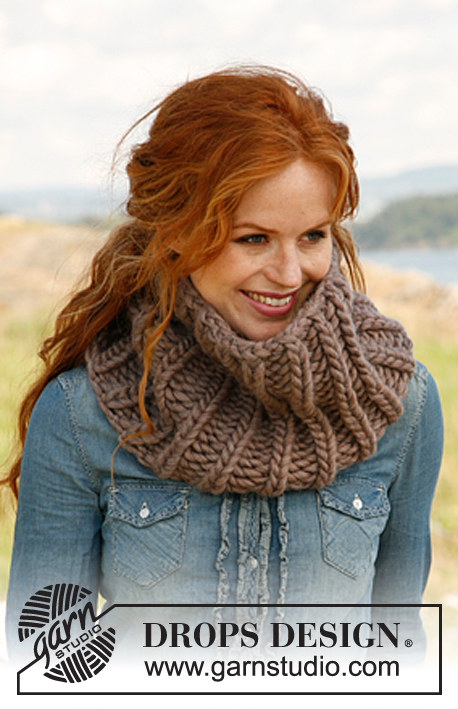 |
Fita de cabelo e gola DROPS em canelado/barra inglês, em ”Polaris”.
DROPS 134-53 |
|
|
-------------------------------------------------------- NOTA: Existem termos diferentes de tricô e croché em português de Portugal e do Brasil. TRICÔ : Malha = Ponto Canelado = Barra Ponto Jarreteira = Cordões de Tricô Ponto Liga = Ponto Tricô CROCHÉ : mpa – meio ponto alto pa – ponto alto pad – ponto alto duplo pat – ponto alto triplo pb – ponto baixo pbx – ponto baixíssimo pc – ponto corrente -------------------------------------------------------- CANELADO/BARRA INGLÊS (em idas e voltas) : CARREIRA 1 : 1 m/p em ponto jarreteira, * 2 ms/pts tricotadas juntamente em meia, 1 laçada, deslizar 1 m/p em liga/tricô *, repetir de * a * até restarem 3 ms/pts, terminar com 2 ms/pts tricotadas juntamente em meia e 1 m/p em ponto jarreteira. CARREIRA 2 : 1 m/p em ponto jarreteira, * 1 laçada, deslizar 1 m/p em liga/tricô, tricotar juntamente em meia a laçada e a m/p deslizada *, repetir de * a * num total de 2 vezes, terminar com 1 laçada, deslizar 1 m/p em liga/tricô, 1 m/p em ponto jarreteira. CARREIRA 3 : 1 m/p em ponto jarreteira, * tricotar juntamente em meia a laçada e a m/p deslizada, 1 laçada, deslizar 1 m/p em liga/tricô *, repetir de * a * até restarem 3 ms/pts, tricotar juntamente em meia a laçada e a m/p deslizada, 1 m/p em ponto jarreteira. Repetir a 2.ª e a 3.ª carreira. CANELADO/BARRA INGLÊS (em redondo na agulha circular) : CARREIRA 1 : *1 laçada, deslizar 1 m/p em liga/tricô, 1 m/p meia *, repetir de * a *. CARREIRA 2 : * tricotar juntamente em liga/tricô a laçada e a m/p deslizada, 1 laçada, deslizar 1 m/p em liga/tricô *, repetir de * a *. CARREIRA 3 : *1 laçada, deslizar 1 m/p em liga/tricô, tricotar juntamente em meia a laçada e a m/p deslizada *, repetir de * a *. Repetir a 2.ª e a 3.ª carreira. DICA DE MUDANÇA DENOVELO : Para mudar de novelo com o fio Polaris, dividir o fio da novelo que acabou em 2 nos últimos 15 s cm – cortar uma dessas 2 partes e fazer o mesmo com o fio do novo novelo. Colocar os 15 primeiros e os 15 últimos cm, um por cima do outro, para que o fio tenha uma espessura normal e continuar a tricotar, apertando o novo fio criado – esta dica permite obter uma mudança de fios invisível. -------------------------------------------------------- FITA DE CABELO : Montar 10 ms/pts com as agulhas 12 mm e o fio Polaris. Tricotar em CANELADO/BARRA INGLÊS, em idas e voltas - ver acima. Não esquecer de ler a DICA DE MUDANÇA DE NOVELO ! A cerca de 55 cm de altura total, (ou do comprimento desejado) – ajustar a altura para depois de uma carreira 3 do canelado/barra inglês - tricotar a carreira seguinte da seguinte maneira : 1 m/p em ponto jarreteira, * 1 m/p liga/tricô, tricotar juntamente em meia a laçada e a m/p deslizada *, repetir de * a * até restarem 2 ms/pts, terminar com 1 m/p liga/tricô e 1 m/p em ponto jarreteira. Arrematar as ms/pts como elas se apresentam. Enrolar a fita de cabelo uma vez no sentido do comprimento e costurar as extremidades a meio da parte de trás com pequenos pontos para que a costura seja invisível. Fazer alguns pontos de costura a meio da frente para fixar o torcido da fita de cabelo (ver fotografia). GOLA : Tricota-se em redondo na agulha circular. Montar 38 ms/pts na agulha circular 12 mm com o fio Polaris. Tricotar em CANELADO/BARRA INGLÊS em redondo na agulha circular - ver acima – até a peça medir cerca de 30 cm. Ajustar a altura para depois de uma carreira 2 de canelado/barra inglês - tricotar, depois, a carreira seguinte da seguinte maneira : 1 m/p meia, * tricotar juntamente em meia a laçada e a m/p deslizada, 1 m/p liga/tricô *, repetir de * a * até restar 1 m/p, terminar com 1 m/p meia. Em seguida, arrematar as ms/pts como elas se apresentam. |
|
Terminou este projecto?Então, identifique as suas fotos com as tags #dropspattern #boldandbeautifulset ou mostre-as na galeria #dropsfan. Precisa de ajuda para este modelo?Encontrará 10 turotiais em vídeo, uma rubrica Comentários/Perguntas e muito mais ao visitar a página do modelo em www.garnstudio.com © 1982-2026 DROPS Design A/S. Todos os direitos reservados. Este documento, incluuindo as suas su-secções, tem copyrights. Saia mais o que pode fazer com os nossos modelos no fim de cada uma das páginas do nosso site. |
|


Com mais de 40 anos no design de modelos de tricô e de croché, a DROPS Design oferece uma das mais vastas colecções demodelos gratuitos na Internet - traduzidos em 17 línguas. Neste dia de hoje, temos 324 catálogos e 12290 modelos - dos quais 12271 estão traduzidos em português.
Trabalhamos com muito empenho para lhe proporcionar o melhor que o tricô e o croché têm para oferecer, para lhe fornecer inspiração e conselhos bem como fios da mais elevada qualidade a preços incríveis! Gostaria de usar os nossos modelos para outros fins que não uso pessoal? Pode ler o que lhe é permitido fazer no Copyright texto que se encontra na parte de baixo de todos os nossos modelos. Bom tricô! Bom croché!
Deixe um comentário acerca do modelo DROPS 134-53
Gostaríamos muito de saber o que tem a dizer-nos acerca deste modelo!
Se deixar uma pergunta acerca do modelo, certifique-se de que escolhe a categoria adequada no formulário abaixo para acelerar o processo relativo à resposta. Os campos obrigatórios estão assinalados com um *.