
Categorias populares
Procura um fio?


Comentários / Perguntas (102)
![]() Silje escreveu:
Silje escreveu:
Ville bare spørre om overstykket betyr den korte eller lange siden? :)
02.12.2012 - 13:56DROPS Design respondeu:
Oversiden af ryggstk er den brede kant af firkanten. Se ogsaa tegning paa mönstret. Du begynder med at haekle rundt fra her.
03.12.2012 - 15:45
![]() Charlotte escreveu:
Charlotte escreveu:
Jag undrar över ökningen i kantstycket. Man ska öka med 34 m 3 ggr men är det bara under varvet med fm? Virkar man varv ett och två och sen ökning i tredje varvet 3 ggr?
06.08.2012 - 14:09DROPS Design respondeu:
Ja, der skal ökas 34 m 3 ggr - bara under varvet med fm.
01.05.2013 - 16:56
![]() Johanna escreveu:
Johanna escreveu:
Ich verstehe die Anweisung für die Kante nicht. Erst heißt es man solle "über dem Rückenteil je ein Stb in jedes Stb" häkeln, dann kommt bei Gr. s/m 56 Maschen raus - aber ich habe doch 62 (steht im Text).
03.08.2012 - 16:45DROPS Design respondeu:
Sie häkeln 1 Stb in jedes Stb und dann 56-58-60-64 Lm = Luftmaschen. Dies ergibt die Armlöcher.
06.08.2012 - 21:01DeeDee Watson escreveu:
Hi, as it written in the description that I make a double crochet above each double crochet from the first row! and then continue the same way, but when I reach 7 cm it doesn't give me squares like the picture! there are squares made and above them looks like a double crochet! How did that happen? How can I make mine looks the same? Is that a different way to do it? Please help it's really depressing me :(
26.06.2012 - 23:14DROPS Design respondeu:
Dear Mrs Watson, back piece is worked in dc rows. "Empty squares" as you can see on the picture are done with the edge piece, in the round afterwards. Happy crocheting !
06.12.2012 - 14:50
![]() Josephine Angeles escreveu:
Josephine Angeles escreveu:
Hi Can you explain this, i don't know how to do it. I am just a beginner. "Crochet 1 tr in each tr along top of back piece, crochet 56-58-60-64 ch, 1 tr in each tr along bottom of back piece, crochet 56-58-60-64 ch and finish with 1 sl st in first tr on the top of back piece. Now crochet 1 tr in each tr from back piece and around each ch band crochet 42-44-46-48 tr = 204-220-236-248 tr in total."
01.06.2012 - 12:46
![]() Sheila escreveu:
Sheila escreveu:
I am having a difficult time following the M.1 instructions. Do I complete the mofit then cut thread and join back to the main piece? Where? The repeat shown does not show this. Or do I sc x-number of times, ch 4, then sc x-number of times and ch 4 all the way around? This is not clear on the diagram.
28.05.2012 - 04:36
![]() Marie escreveu:
Marie escreveu:
Bonjour!Pour un modèle S au niveau de la bordure:comment crocheter 42B dans les 56 ml de la chainette?Faut-il les répartir le long de la chainette ou laisser 7ml de chaque côté?Très joli modèle j'ai hâte de le terminer!
12.05.2012 - 10:08DROPS Design respondeu:
Bonjour Marie, il faut répartir les brides sur la chaînette et donc sauter des ml à espaces réguliers. Bon crochet !
14.05.2012 - 10:59
![]() Janice escreveu:
Janice escreveu:
I am making a size LG. On the edge you start with 220 dc in the round and then when piece measures 4" you increase 34 dcs on the round and the pattern says you should then have 322 dcs? How?
02.05.2012 - 03:05DROPS Design respondeu:
Pattern tells you to inc 34 SC when edge measures 2", 4" and at 6" - not only at 4".
04.05.2012 - 00:36Dimitra escreveu:
Please help me with this: BACK PIECE 1.in the start and after i crochet the ch i want how mane ch i have to make just to turn the piece (ch3?) 2.When piece measures 7 cm / 2¾'' inc 1 dc each side. i will inc 2sc in each dc? and then how mane ch i have to make to turn my piece? then i have to inc again each sc with 2sc each? thank you!!!
05.04.2012 - 14:45DROPS Design respondeu:
1. the number of ch you make includes the ch to turn with, as you can see it say to turn and crochet in the 4th ch from hook, so 3 ch are included already. 2. Inc 1 dc each side of work by working 2 dc in first and last dc on row. Repeat at 15 cm/ 6". 3. For turning your rows - replace first dc on each row with 3 ch.
13.04.2012 - 00:32
![]() Soumya escreveu:
Soumya escreveu:
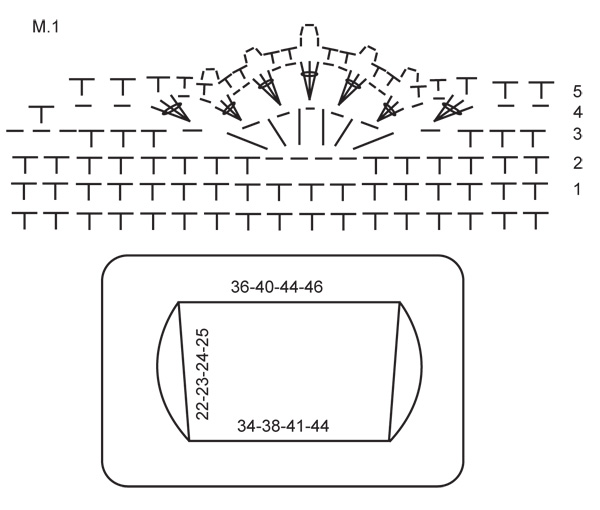
1. line 2 in M.1 is little confusing. after how many dc's are the chains? 2.the 3rd line of the diagram shows a measure of 3 dc, 3 chain, 6tr, 3dc and then 3ch...so is this how we continue throughout?
19.03.2012 - 17:15DROPS Design respondeu:
1. 6 dc (US sc) and then ch 4. 2. UK version: 3 dc, ch1, 1tr, 1ch, 1tr, 1ch, 1tr, 1ch, 1tr, 1ch, 1tr, 1ch,1 tr, ch1, 3 dc, ch3 - repeat! Chart is giving you 1 repetition of the pattern.
20.03.2012 - 17:27
|
|||||||||||||
Peach Perfection#peachperfectionbolero |
|||||||||||||
 |
 |
||||||||||||
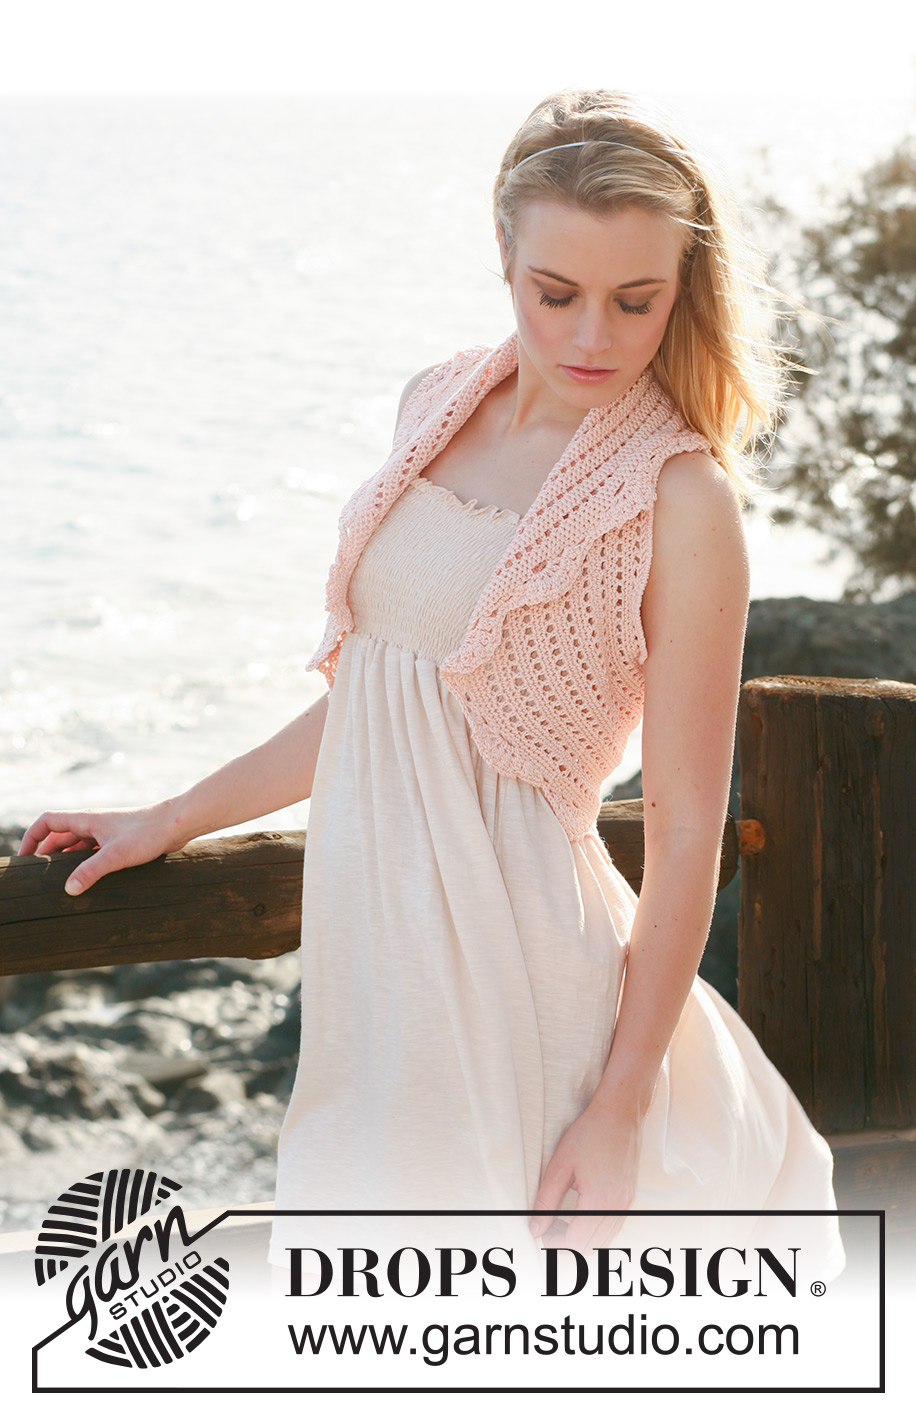
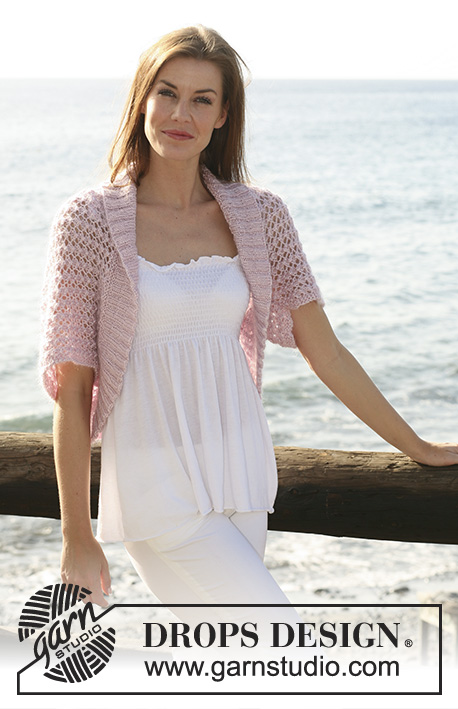
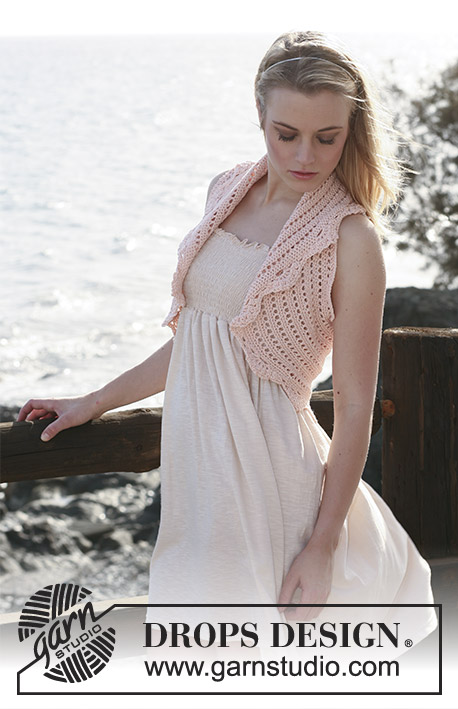
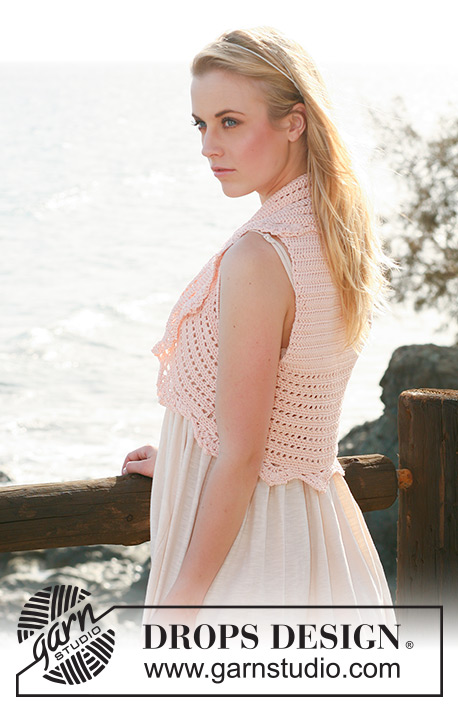
Colete DROPS em croché em ”Muskat”. Do S ao XXXL. DROPS design: Modelo no R-559
DROPS 119-22 |
|||||||||||||
|
-------------------------------------------------------- NOTA: Existem termos diferentes de tricô e croché em português de Portugal e do Brasil. TRICÔ : Malha = Ponto Canelado = Barra Ponto Jarreteira = Cordões de Tricô Ponto Liga = Ponto Tricô CROCHÉ : mpa – meio ponto alto pa – ponto alto pad – ponto alto duplo pat – ponto alto triplo pb – ponto baixo pbx – ponto baixíssimo pc – ponto corrente -------------------------------------------------------- DICA CROCHÉ : Costas : Substituir o 1.º pb de cada carreira por 1 pc. Orla : Substituir o 1.º pb de cada carreira por 1 pc. Terminar cada carreira com 1 pbx no último pc da carreira precedente. Substituir o 1.º pa de cada carreira por 3 pc. Terminar cada carreira com 1 pbx no último pc do princípio da carreira precedente. AUMENTOS : Aumentar, crochetando 2 pontos no mesmo ponto. ------------------------------------------------------------ ------------------------------------------------------------ COSTAS : Com o fio Muskat e a agulha de croché 4 mm, montar frouxamente uma corrente de 78-86-94-99 pc. Crochetar 1 pa no 4.º pc a partir da agulha de croché, *1 pa em cada um dos 3 pc seguintes, saltar 1 pc *, repetir de * a * e terminar com 1 pa em cada um dos 2-2-2-3 últimos pc = 58-64-70-74 pa. Continuar em pa (= 1 pa em cada pa). A 7 cm de altura total, aumentar 1 pa de cada lado – ver AUMENTOS - e repetir estes aumentos a 15 cm de altura total = 62-68-74-78 pa. Continuar até 22-23-24-25 cm de altura total. ORLA : Crochetar 1 pa em cada pa ao longo da parte de cima das costas, e, depois, crochetar 56-58-60-64 pc, 1 pa em cada pa ao longo da parte de baixo das costas, 56-58-60-64 pc e unir com 1 pbx no 1.º pa da parte de cima das costas. Crochetar, depois, 1 pa em cada pa das costas e, em cada corrente, crochetar 42-44-46-48 pa = 204-220-236-248 B. Continuar em redondo da seguinte maneira : 1.ª CARREIRA : 1 pa no 1.º pa, *1 pc, saltar 1 pa, 1 pa no pa seguinte *, repetir de * a * e terminar com 1 pc, saltar 1 pa, 1 pbx no pa do princípio da carreira. 2.ª CARREIRA : 1 pb em cada pa e 1 pb em cada pc. 3.ª CARREIRA : 1 pb em cada pb. Repetir estas 3 carreiras e, AO MESMO TEMPO, a 5, 10 e 15 cm (ajustar a altura para que coincida com uma carreira de pb), distrbuir 34-34-34-36 pb – VER AUMENTOS = 306-322-338-356 pb. A 17-18-19-20 cm de altura total (ajustar para que a carreira seginte seja uma carreira de pb), crochetar 1 carreira de pb e, AO MESMO TEMPO, distribuir 0-1-2-1 aumento = 306-323-340-357 pb. Continuar com M1. NOTA : Começar na carreira 1 do diagrama. Crochetar 1 vez M1 em altura, cortar e arrematar o fio. |
|||||||||||||
Explicações do diagrama |
|||||||||||||
|
|||||||||||||
 |
|||||||||||||
Terminou este projecto?Então, identifique as suas fotos com as tags #dropspattern #peachperfectionbolero ou mostre-as na galeria #dropsfan. Precisa de ajuda para este modelo?Encontrará 8 turotiais em vídeo, uma rubrica Comentários/Perguntas e muito mais ao visitar a página do modelo em www.garnstudio.com © 1982-2026 DROPS Design A/S. Todos os direitos reservados. Este documento, incluuindo as suas su-secções, tem copyrights. Saia mais o que pode fazer com os nossos modelos no fim de cada uma das páginas do nosso site. |
|||||||||||||


Com mais de 40 anos no design de modelos de tricô e de croché, a DROPS Design oferece uma das mais vastas colecções demodelos gratuitos na Internet - traduzidos em 17 línguas. Neste dia de hoje, temos 324 catálogos e 12290 modelos - dos quais 12271 estão traduzidos em português.
Trabalhamos com muito empenho para lhe proporcionar o melhor que o tricô e o croché têm para oferecer, para lhe fornecer inspiração e conselhos bem como fios da mais elevada qualidade a preços incríveis! Gostaria de usar os nossos modelos para outros fins que não uso pessoal? Pode ler o que lhe é permitido fazer no Copyright texto que se encontra na parte de baixo de todos os nossos modelos. Bom tricô! Bom croché!
Deixe um comentário acerca do modelo DROPS 119-22
Gostaríamos muito de saber o que tem a dizer-nos acerca deste modelo!
Se deixar uma pergunta acerca do modelo, certifique-se de que escolhe a categoria adequada no formulário abaixo para acelerar o processo relativo à resposta. Os campos obrigatórios estão assinalados com um *.