
Categorias populares
Procura um fio?


Comentários / Perguntas (40)
![]() Nicolle escreveu:
Nicolle escreveu:
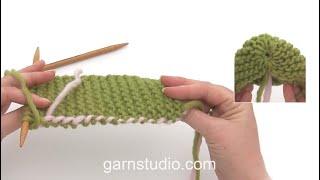
Hi, I was wondering how to do kitchener stitches according to the video tutorial that uses two rows both on knitting needles, when in my knitting the first original row is already off the needle? Then i am left with two pieces, one on the needle (the last row) and the one off the needle (first row) to graft together. Or is there another way of doing it? Thanks in advance, Nicolle
29.08.2024 - 10:01DROPS Design respondeu:
Dear Nicolle, you have to make a mix of 2 techniques: grafting for the stitches on needle on one side and this technique for the stitches of the cast on edge. Happy knitting!
30.08.2024 - 07:46
![]() Moira escreveu:
Moira escreveu:
Hello, could you please help me understand the set of 16 stitches for M1. It says to knit on wrong side in the chart oh, but I don't understand that because I'm still on the right side? Could you please advise right from the start? (After cast on) Continue as follows from RS: 52-58-64 garter sts, 16-16-20 sts in M.1. Insert a marker after st no 42-48-54 from RS. Thank you, I LOVE Drops!
02.03.2021 - 17:07DROPS Design respondeu:
Dear Moira, on first row you are working from right side of sock: 52-58-64 sts in garter stitch, and 16 or 20 sts as shown in M.1,: *Work 3 sts in first st (= P1, YO, P1), P3 sts, psso 1st st then 2nd st over last st = 1 st remain*, repeat from *to* a total of 8 or 10 times. From WS knit all stitches (= the 16-20 sts of M.1) and the remaining sts (garter stitch). On next row from RS work 3rd row in M.1 over the last 16-20 sts: *P3 sts, psso 1st st then 2nd st over last st , (P1, YO, P1) in next st* repeat from *-* and knit remaining sts. Hope this will help, happy knitting!
03.03.2021 - 06:52
![]() Nicole escreveu:
Nicole escreveu:
Ich habe Probleme mit M1. Die erste Reihe habe ich gestrickt, wie angegeben von der Vorderseite. Die nächste Reihe ( also die Rückreihe) zeigt laut Diagramm (x im Kästchen) "re. Von der Vorderseite ". Mir ist unklar, wie ich diese Maschen stricken soll, weil ich mich doch auf der Rückseite befinde.
18.01.2021 - 15:20DROPS Design respondeu:
Liebe Nicole, hier sollte es "recht bei den Rückreihen" sein, eine Korrektur erfolt so bald wie möglich. D.h. bei den Rückreihen (= Rückseite) stricken Sie alle Maschen in A.1 rechts. Viel Spaß beim stricken!
18.01.2021 - 15:27
![]() Diana escreveu:
Diana escreveu:
I have done a lot of patterns but l just can't figure it out. Is there a way you can explain the first paragraph a different or other way? I love the slippers and would like to make them. Thank you for any help.
16.10.2019 - 18:07DROPS Design respondeu:
Dear Diana, work 4 rows with: 52-58-64 sts garter st, 16-16-20 sts as in M.1, on 5th row (= from RS), start decrease on each side of the marker for the heel. At the same time, you will work short rows for toe: every 4th row (= every other row from WS), work until 8-10-12 sts in garter st remain and turn (= short rows). Hope it helps, happy knitting!
17.10.2019 - 09:51
![]() Odeth escreveu:
Odeth escreveu:
El patrón no lo veo claro en la parte del talón gracias
21.09.2019 - 04:39DROPS Design respondeu:
Hola Odeth. El talón lo formamos trabajando disminuciones (2 puntos juntos de derecho a cada lado del marcapuntos) un total de 10 veces.
17.10.2019 - 19:45
![]() Lyly escreveu:
Lyly escreveu:
Je ne comprends pas les explications concernant les rangs raccourcis de la pointe : au 6e rg, sur l\\\'env du travail, on ne tricote pas les 8 dernières mailles pour la taille S ? Combien de fois doit-on laisser ces mailles en attente ? Je ne comprends absolument pas comment faire la pointe du chausson.les rgs raccourcis se font sur l\\\'endroit ou l\\\'envers du travail ?
08.04.2019 - 23:30DROPS Design respondeu:
Bonjour Lyly, les rangs raccourcis pour la pointe vont se tricoter en commençant sur l'envers: tricotez le rang jusqu'à ce qu'il reste 8 m (= pointe), tournez et tricotez le rang suivant sur l'endroit (diminuez sur l'endroit si besoin), tournez et tricotez le rang suivant sur toutes les mailles, tournez et tricotez le rang suivant sur toutes les mailles - n'oubliez pas les diminutions si besoin - continuez ainsi, les 8 m de la fin du rang ne sont simplement plus travaillées = rangs raccourcis; cf vidéo. Bon tricot!
09.04.2019 - 09:24
![]() Emmah escreveu:
Emmah escreveu:
Min socka har väldigt dålig passform (stor) från hälen och hela vägen upp på skaftet. Resten av socken sitter perfekt. Vad har jag gjort för fel?
26.12.2018 - 17:35DROPS Design respondeu:
hei Emmah. Denne modellen er en del løsere rundt ankelen enn tradisjonelle sokker, du kan se det på bildet også om du ser etter. Så den skal være sånn. Om du gjerne vil ha den strammere kan du feks prøve å feste et bånd som du kan knyte rundt ankelen? God fornøyelse.
08.01.2019 - 14:44Erica escreveu:
I\'m stuck again 😞 I\'m doing the middle size. Continue until piece measures 15cm. I\'ve done that but no idea how to do the next paragraph: work 38 garter st and 16 sts of m1 and increase for heel. I don\'t know which sue is the heel! I have 44sts of pattern and a separate 10sts of garter stitch for the toe...
13.12.2018 - 13:38DROPS Design respondeu:
Dear Erica, when piece measures 15 cm from the last dec, work now: the first 38 sts seen from RS in garter st and the last 16 sts in M.1, now increase for heel on each side of the marker placed in the 38th st from RS. Happy knitting!
13.12.2018 - 14:40Erica escreveu:
Im confused about how to p into same stitch. Pattern = p1, yo, p1 all in same stitch but my sts are decreasing. I did p1, yo and then I slipped the yo onto other needle and purled that. Where am I going wrong?!
07.12.2018 - 11:39DROPS Design respondeu:
Dear Erica, y ou have to work the same stitch a total of 3 times, purl next stitch on the left needle without dropping this off the needle, make a YO on right needle, then purl the same stitch on left needle one more time and drop it from left needle = you should have now 3 sts on the right needle. The next 3 sts will be purled together = the number of stitches keep constant. Happy knitting!
07.12.2018 - 11:59
![]() Dufour Arlette escreveu:
Dufour Arlette escreveu:
Je reviens vers vous, je vous ai posée une question hier je tenais a vous dire qu'après avoir fait et refait j'ai trouvée ,je vous remercie Mme Dufour
27.09.2018 - 08:22
|
||||||||||
Cotton Patch#cottonpatchsocks |
||||||||||
 |
 |
|||||||||
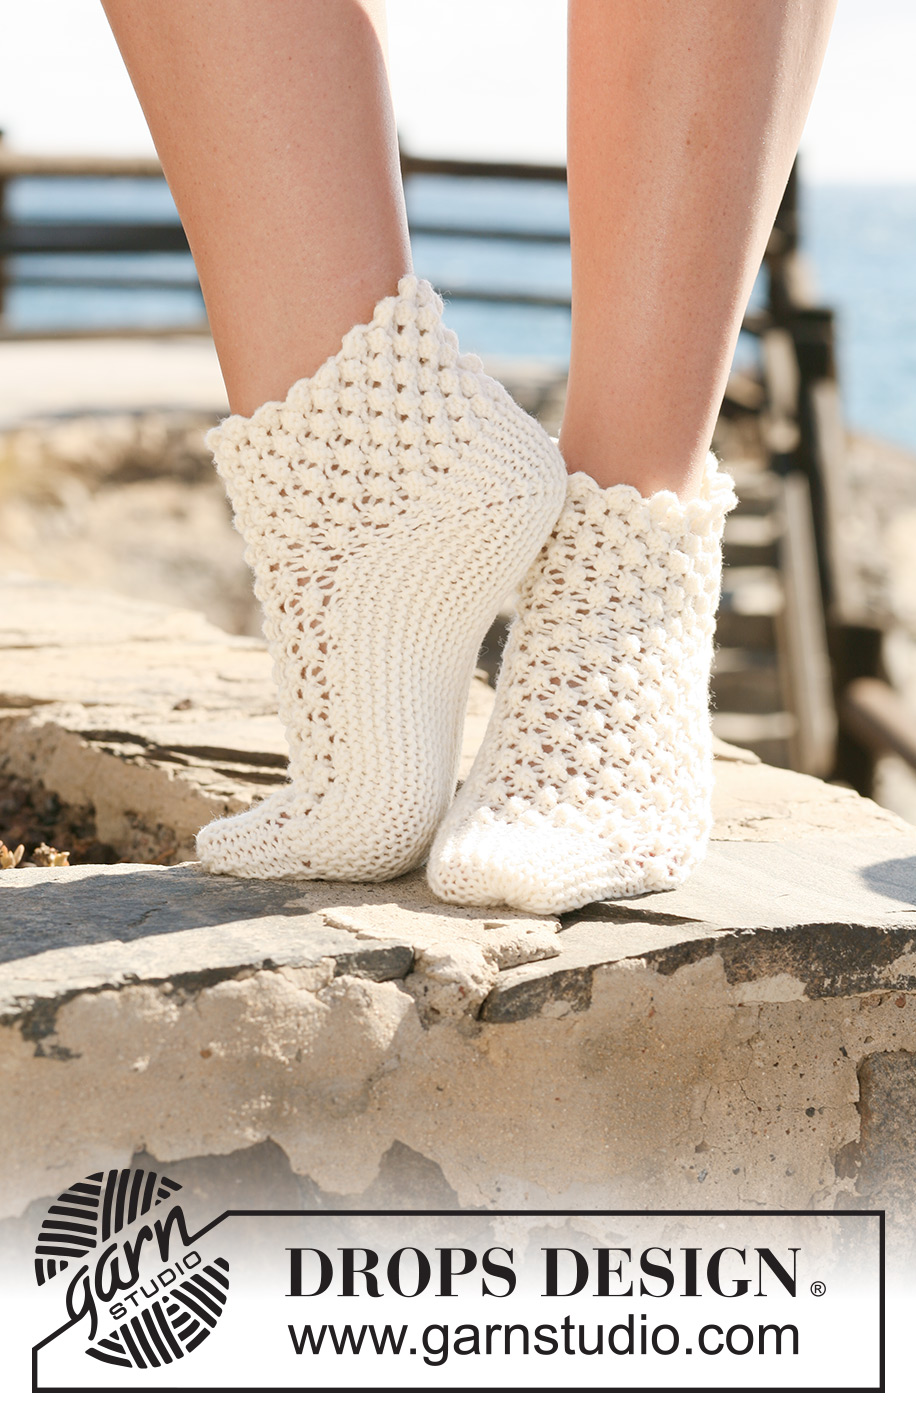
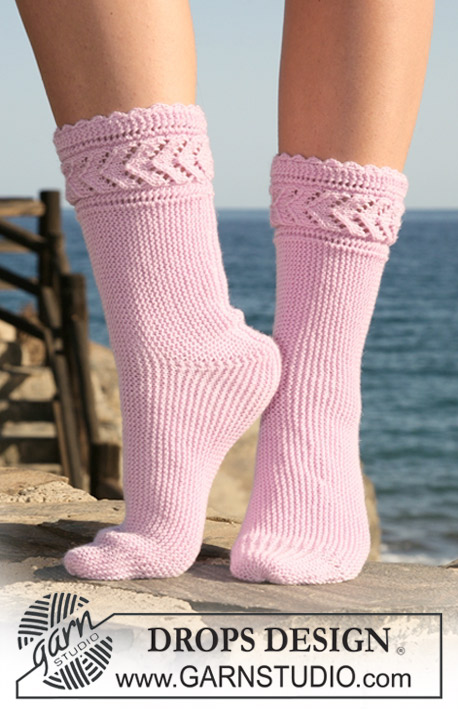
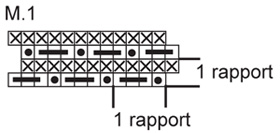
Meias DROPS tricotadas no sentido do comprimento em ponto astrakan em ”Merino Extra Fine”. DROPS design: Modelo no ME-018
DROPS 119-32 |
||||||||||
|
-------------------------------------------------------- NOTA: Existem termos diferentes de tricô e croché em português de Portugal e do Brasil. TRICÔ : Malha = Ponto Canelado = Barra Ponto Jarreteira = Cordões de Tricô Ponto Liga = Ponto Tricô CROCHÉ : mpa – meio ponto alto pa – ponto alto pad – ponto alto duplo pat – ponto alto triplo pb – ponto baixo pbx – ponto baixíssimo pc – ponto corrente -------------------------------------------------------- PONTO JARRETEIRA (em idas e voltas): tricotar todas as carreiras em ponto meia. DICA CARREIRAS ENCURTADAS : Quando se vira a peça a meio de uma carreira, deslizar a 1.ª m/p em meia, puxar bem o fio e tricotar a carreira de volta (para evitar um buraco a cada transição). PONTO ASTRAKAN: Ver diagrama M1. O diagrama mostra o ponto pelo direito. 1.ª carreira = direito. DICA de MONTAGEM : Enfiar um fio nas alças exteriores das ms/pts do lado da ponta do pé e deixar que este fio siga a peça, porque será usado, mais tarde, para franzir a ponta da meia. -------------------------------------------------------- MEIAS : Tricotam-se em idas e voltas na agulha a partir da sola do pé, tricota-se, depois, o peito do pé e, depois, novamente a sola do pé. Quando fizer as diminuições e os aumentos do calcanhar também tricotar em carreiras encurtadas as ms/pts da ponta do pé, da seguinte maneira: A cada 2 carreiras do lado da ponta do pé (ou seja, a cada 4 carreiras) virar quando restarem 8-10-12 ms/pts e tricotar a carreira de volta – ver DICA CARREIRAS ENCURTADAS ! A ponta do pé fica no princípio da carreira, vista pelo direito da peça. NÃO ESQUECER DE MANTER A MESMA TENSÃO DA INDICADA PARA A AMOSTRA ! Com o fio Merino e as agulhas 4 mm montar 68-74-84 ms/pts. Continuar da seguinte maneira pelo direito : 52-58-64 ms/pts ponto jarreteira, as 16-16-20 ms/pts seguintes em M1. Colocar um marcador, pelo direito, depois da 42.ª-48.ª-54.ª m/p. Continuar desta maneira e, AO MESMO TEMPO, na 5.ª carreira, diminuir para o calcanhar da seguinte maneira (não esquecer de fazer as carreiras encurtadas nas ms/pts da ponta do pé): 2 ms/pts tricotadas juntamente em meia de ambos os lados de cada marcador a cada 2 carreiras num total de 10 vezes = 48-54-64 ms/pts. Continuar, pelo direito, da seguinte maneira (não fazer carreiras encurtadas nas ms/pts do lado da ponta do pé): 8-10-12 ms/pts em ponto jarreteiras (= ponta do pé), M1 nas restantes ms/pts. Continuar desta maneira até a peça medir 13-15-17 cm a partir da última diminuição – NOTA: medir a meio, acima das diminuições. Então, tricotar 32-38-44 ms/pts em ponto jarreteira e 16-16-20 ms/pts em M1. Aumentar para o calcanhar da seguinte maneira (tricotar as carreiras encurtadas nas ms/pts do lado da ponta do pé): colocar um marcador, pelo direito, depois da 32.ª-38.ª-44.ª. Aumentar 1 m/p de ambos os lados de cada marcador a cada 2 carreiras num total de 10 vezes – aumentar, fazendo 1 laçada e, na carreira seguinte, tricotar a laçada torcida (enfiar a agulha na parte de trás da laçada) e tricotar as ms/pts aumentadas em ponto jarreteira = 68-74-84 ms/pts. Tricotar 4 carreiras em todas as ms/pts com 52-58-64 ms/pts em ponto jarreteira e 16-16-20 ms/pts em M1. Colocar todas as ms/pts em espera num alfinete de ms/pts. Tricotar a outra meia. MONTAGEM : Unir as ms/pts em espera no alfinete de ms/pts às ms/pts de montagem usando a técnica do grafting. A costura ficará a meio da sola do pé e ao longo da parte de trás da perna. Franzir as pontas dos pés – ver DICA MONTAGEM – e arrematar o fio. |
||||||||||
Explicações do diagrama |
||||||||||
|
||||||||||
 |
||||||||||
Terminou este projecto?Então, identifique as suas fotos com as tags #dropspattern #cottonpatchsocks ou mostre-as na galeria #dropsfan. Precisa de ajuda para este modelo?Encontrará 17 turotiais em vídeo, uma rubrica Comentários/Perguntas e muito mais ao visitar a página do modelo em www.garnstudio.com © 1982-2026 DROPS Design A/S. Todos os direitos reservados. Este documento, incluuindo as suas su-secções, tem copyrights. Saia mais o que pode fazer com os nossos modelos no fim de cada uma das páginas do nosso site. |
||||||||||


Com mais de 40 anos no design de modelos de tricô e de croché, a DROPS Design oferece uma das mais vastas colecções demodelos gratuitos na Internet - traduzidos em 17 línguas. Neste dia de hoje, temos 324 catálogos e 12290 modelos - dos quais 12271 estão traduzidos em português.
Trabalhamos com muito empenho para lhe proporcionar o melhor que o tricô e o croché têm para oferecer, para lhe fornecer inspiração e conselhos bem como fios da mais elevada qualidade a preços incríveis! Gostaria de usar os nossos modelos para outros fins que não uso pessoal? Pode ler o que lhe é permitido fazer no Copyright texto que se encontra na parte de baixo de todos os nossos modelos. Bom tricô! Bom croché!
Deixe um comentário acerca do modelo DROPS 119-32
Gostaríamos muito de saber o que tem a dizer-nos acerca deste modelo!
Se deixar uma pergunta acerca do modelo, certifique-se de que escolhe a categoria adequada no formulário abaixo para acelerar o processo relativo à resposta. Os campos obrigatórios estão assinalados com um *.