
Categorias populares
Procura um fio?


Comentários / Perguntas (19)
![]() David Porter escreveu:
David Porter escreveu:
Hi Just to add has anyone else knitted this and had the same problem David
02.01.2022 - 00:55DROPS Design respondeu:
Dear David, you might want to try and put that question up in th eDROPS Workshop group on Facebook. Maybe there will you find someone who also made this piece. Happy Stitching!
03.01.2022 - 02:03
![]() David Porter escreveu:
David Porter escreveu:
Very disappointed in this, i am 3 quarter through the pattern and i thought i would put the stitches on a piece of yarn to try it on. Its far too small i cant get both arms in to pull it over my head. David 😭😢
01.01.2022 - 23:55
![]() David Porter escreveu:
David Porter escreveu:
Further to my question, I am talking about normal straight needles not DPN'S.. David
15.12.2021 - 23:54DROPS Design respondeu:
Sure - see answer below
16.12.2021 - 07:29
![]() David Porter escreveu:
David Porter escreveu:
Is it possible to do this pattern on straight needles please. Looking forward to hearing from you. David Porter
15.12.2021 - 23:44DROPS Design respondeu:
Dear Mr Porter, this lesson explains how to adjust a pattern for circular needles into straight needles and should be able to help you. Happy knitting!
16.12.2021 - 07:28
![]() David Porter escreveu:
David Porter escreveu:
How can the pattern start 24cm up, the picture doesnt show that. Is this pattern suppose to be top down then i can understand the 24cm bit. There isnt 24cm at the bottom before the pattern starts looking at the picture
22.11.2021 - 10:48DROPS Design respondeu:
Dear Mr Porter, diagram 1 is worked when piece measures 24 cm from cast on edge, but on the picture you cannot see the very bottom of jumper because ribbing edge is tightening the bottom of jumper. Happy knitting!
22.11.2021 - 16:09
![]() David Porter escreveu:
David Porter escreveu:
So do you start the pattern straight after the increase
22.11.2021 - 00:02DROPS Design respondeu:
Dear David no. After the ribbing, you increase the stitches, knit stockinett with black until the piece is 24 cm long, and then start the pattern. Happy stitching!
22.11.2021 - 00:50
![]() David Porter escreveu:
David Porter escreveu:
Hi can anyone help please, i dont understand the bit after the rib on the body, where it says work 24cm before starting M1. Has the pattern been printed incorrectly. David Porter
20.11.2021 - 01:07DROPS Design respondeu:
Dear David, after the ribbing you will have to increase the number of stitches. See THIS video on how to increase evenly. Then you will have to start knitting the pattern when your piece is 24 cm long (from the casting on- so including the ribbing). Happy Stitching!
21.11.2021 - 15:01
![]() David Porter escreveu:
David Porter escreveu:
What does in mean steek stitching for armhole, i would love to knit thus but not done armholes like this before. I have done it in nordic patterns where t goes in with stitches knitted from stitch holder or normal sown in ones. Looking forward to hearing from you David
11.11.2021 - 18:36DROPS Design respondeu:
Dear Mrs Porter, steek stitches are stitches you cast on extra over armholes instead of casting off and dividing piece and you will then continue working in the round. This video shows how to work steek stitches and cut piece for armholes. and This one another way to work and cut these sts for a jacket. Happy knitting!
12.11.2021 - 07:37
![]() Christina Faurbye escreveu:
Christina Faurbye escreveu:
Hejsa Jeg vil gerne strikke den her trøje med de her farver, men farverne stemmer slet ikke overens med billedet. Som det fremgår af billedet er bundfarven sort, men der står marineblå, og denne er slet ikke den samme farve. Ingen af farverne i karisma stemmer overens med de her stærke farver. Lilla 012, findes overhovedet ikke i karisma. Jeg tænker om det er noget helt andet garn end karisma, som trøjen er strikket i? Mvh Christina
10.04.2014 - 19:00DROPS Design respondeu:
Hej Christina. Farver kan fremkomme anderledes paa din computer ifm indstillinger/lys osv. Men den er i bundfarven marineblaa. Og den er strikket i Karisma, men det er ogsaa en gammel sag, saa farverne i Karisma er tilpasset siden da. Findes en farve ikke mere, saa er der alternativer du kan vaelge.
11.04.2014 - 09:48
|
|||||||||||||
DROPS 16-13 |
|||||||||||||
|
|
|||||||||||||
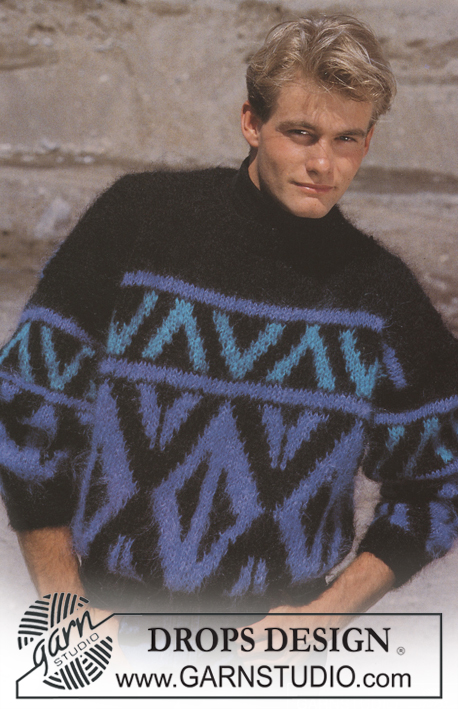
Pulôver para homem DROPS com jacquard de losangos em “Karisma. Do S ao L.
DROPS 16-13 |
|||||||||||||
|
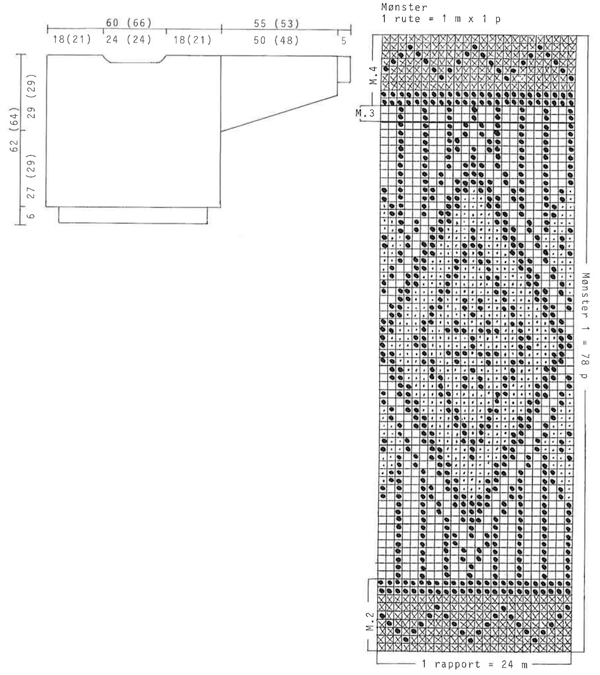
Explicações JACQUARD: Ver diagramas abaixo. Os diagramas mostram o motivo pelo direito e tricotam-se em ponto meia. Manga: 1 cm azul marinho, M.2, azul marinho até 31.5-29.5 cm de altura total, M.2, 7 cm de M.3, M.4, terminar a peça em azul marinho. CANELADO: * 1 malha torcida em meia (enfiar a agulha na alça de trás da malha), 1 malha liga *, repetir de * a *. COSTAS & FRENTE: O pulôver tricota-se em redondo com a agulha circular com malhas steek cortadas depois ao meio para as cavas. Montar 190-200 malhas com a agulha circular 2.5 mm e o fio azul marinho e tricotar 6 cm de canelado. Continuar com a agulha circular 4 mm em ponto meia e, AO MESMO TEMPO, distribuir 50-64 aumentos na 1.ª carreira = 240-264 M. Manter a mesma tensão da indicada para a amostra! A 24 cm de altura total, tricotar M.1 e terminar então a peça em azul marinho. Ao mesmo tempo, a 33-35 cm de altura total, montar 5 malhas de cada lado da peça (malhas steek a cortar depois para as cavas a tricotar em ponto meia, não em jacquard). A 59-61 cm de altura total, arrematar para o decote da frente as 44 malhas centrais e terminar a peça em idas e voltas. Arrematar no lado do decote a cada 2 carreiras: 2 vezes 1 malha. Ao mesmo tempo, a 61-63 cm de altura total arrematar as 46 malhas centrais para o decote das costas e diminuir 1 malha no lado do decote na carreira seguinte. Arrematar as restantes malhas para o ombro a 62-64 cm de altura total. MANGAS: Montar 46-48 malhas com as agulhas de pontas duplas 2,5 mm e o fio azul marinho e tricotar 5 cm de canelado. Continuar com as agulhas de pontas duplas 4 mm em jacquard – ver acima – e, AO MESMO TEMPO, distribuir 13-13 aumentos na 1.ª carreira = 59-61 M. Ao mesmo tempo, depois do canelado aumentar 2 malhas a meio sob a manga 29-28 vezes ao todo a cada 4 carreiras = 117-117 M. A 55-53 cm de altura total, tricotar 5 carreiras em ponto liga (para a costura aos rebordos cortados das costas e da frente). Arrematar. MONTAGEM: Costurar um fio marcador a meio das malhas steek, de cada lado da peça para as cavas. Fazer 2 costuras à máquina à volta do marcador, a 1.ª a ½ malha do marcador, a 2.ª a ½ malha da 1.ª costura. Cortar ao meio para as cavas. Costurar os ombros. Levantar cerca de 100 malhas à volta do decote com a agulha circular 2.5 mm e o fio azul marinho e tricotar 3 cm de canelado, e arrematar. Unir as mangas pelo direito da seguinte maneira: costurar alternadamente uma malha da última carreira tricotada da manga, antes da orla em ponto liga, às costas/frente depois da costura à máquina. Virar o pulôver pelo avesso e costurar a parte em ponto liga da manga por cima do rebordo cortado das costas e da frente. |
|||||||||||||
Explicações do diagrama |
|||||||||||||
|
|||||||||||||
 |
|||||||||||||
 |
|||||||||||||
Terminou este projecto?Então, identifique as suas fotos com as tags #dropspattern ou mostre-as na galeria #dropsfan. Precisa de ajuda para este modelo?Encontrará 27 turotiais em vídeo, uma rubrica Comentários/Perguntas e muito mais ao visitar a página do modelo em www.garnstudio.com © 1982-2026 DROPS Design A/S. Todos os direitos reservados. Este documento, incluuindo as suas su-secções, tem copyrights. Saia mais o que pode fazer com os nossos modelos no fim de cada uma das páginas do nosso site. |
|||||||||||||


Com mais de 40 anos no design de modelos de tricô e de croché, a DROPS Design oferece uma das mais vastas colecções demodelos gratuitos na Internet - traduzidos em 17 línguas. Neste dia de hoje, temos 324 catálogos e 12290 modelos - dos quais 12271 estão traduzidos em português.
Trabalhamos com muito empenho para lhe proporcionar o melhor que o tricô e o croché têm para oferecer, para lhe fornecer inspiração e conselhos bem como fios da mais elevada qualidade a preços incríveis! Gostaria de usar os nossos modelos para outros fins que não uso pessoal? Pode ler o que lhe é permitido fazer no Copyright texto que se encontra na parte de baixo de todos os nossos modelos. Bom tricô! Bom croché!
Deixe um comentário acerca do modelo DROPS 16-13
Gostaríamos muito de saber o que tem a dizer-nos acerca deste modelo!
Se deixar uma pergunta acerca do modelo, certifique-se de que escolhe a categoria adequada no formulário abaixo para acelerar o processo relativo à resposta. Os campos obrigatórios estão assinalados com um *.