
Popular categories
Looking for a yarn?


Comments / Questions (19)
![]() Steinunn Benna wrote:
Steinunn Benna wrote:
Blessuð. Blessuð Steinunn. Pufflykkjan á að fara yfir stuðulinn þannig að stuðullinn sjáist á röngu á peysunni. Gangi þér vel. Spurningin er hvernig er það gert?
03.01.2023 - 13:07DROPS Design answered:
heklið 1 pufflykkju í loftlykkju sem hoppað var yfir (pufflykkjan á að krossa yfir stuðul þannig að stuðullinn kemur til með að verða aftan við pufflykkju/ á bakvið pufflykkju)
06.01.2023 - 11:47
![]() Steinunn wrote:
Steinunn wrote:
Hoppið yfir 1 pufflykkju + 1 loftlykkju, heklið 1 stuðul í næsta stuðul, heklið 1 loftlykkju, heklið 1 pufflykkju í loftlykkju sem hoppað var yfir (pufflykkjan á að krossa yfir stuðul þannig að stuðullinn kemur á röngu á peysunni) Hvernig á að krossa svo starfsemi komi á röngu? Á að fara framan í eða aftan í lykkju eða í báðar? Komin í öngþveiti eftir að prófa og rekja upp.
01.01.2023 - 23:50DROPS Design answered:
Blessuð Steinunn. Pufflykkjan á að fara yfir stuðulinn þannig að stuðullinn sjáist á röngu á peysunni. Gangi þér vel.
02.01.2023 - 14:49
![]() Steinunn Benna wrote:
Steinunn Benna wrote:
Leiðbeiningar segja að mikilvægt sé að hekla í lykkjuna ekki um lykkjuna. Á þá að fara framan í hana eða aftan í hana eða skiptir það ekki máli upp á að stuðull sjáist á röngu? Hvernig lætur kona stuðul sjást á röngu með að krossa yfir með kúlu?
20.12.2022 - 21:54DROPS Design answered:
Blessuð Steinunn. Þú heklar í sjálfa lykkjuna og þú stingur heklunálinni inn í lykkjuna að framan.
30.01.2023 - 11:30
![]() Steinunn Benna wrote:
Steinunn Benna wrote:
Er með SK-057. Skil ekki leiðbeiningar á púff lykkju. Í myndbandi er henni lokað með ll en leiðbeiningar segja 1 stuðul og loftlykkja svo púff. Í 2. Umferð í A3 er þá líka farið í hálfa lykkju? Fór aftaní lykkju í 1. umferð munstur.
18.12.2022 - 22:51DROPS Design answered:
Blessuð Steinunn. Fylgdu útskýringu í uppskrift. Myndbandið er til hliðsjónar hvernig hægt er að gera pufflykkjur en er ekki merkt með þessu mynstri. Veit ekki alveg hvað þú átt við með að fara í hálfa lykkju. Vona að þetta hjálpi. Gangi þér vel.
20.12.2022 - 10:57
![]() Isi wrote:
Isi wrote:
Hallo, ich habe bei der Passe den teil mit den Puffmaschen jetzt abgeschlossen und beginne mit A5-A7. Dort steht, dass man so lange häkeln soll bis die Höhe des entsprechenden Maßes erreicht ist. Wo kann ich diese Höhe denn ablesen. Und wo sollen dann die festen Maschen zugenommen werden? Vielen Dank im Voraus!
06.04.2021 - 09:19DROPS Design answered:
Liebe Isi, die Angabe "bis zum fertigen Maß" bedeutet an dieser Stelle, dass Sie die Muster bis zum Ende häkeln, d.h. es geht in diesen Mustern stets weiter. Die Maße finden Sie dann im weiteren Verlauf der Anleitung, d.h. die festen Maschen nehmen Sie bei der nächsten cm-Angabe zu. Viel Spaß beim Weiterhäkeln!
06.04.2021 - 11:49
![]() Natalia wrote:
Natalia wrote:
La foto no coincide con el patrón de puntos puff, estoy realizando la talla L y ya con la tercera flecha de aumentos y sus correspondientes 81 repeticiones de puntos puff me da el tamaño de 14 cm recomendado. Voy a continuar el patrón desde allí salteando la indicación del aumento de la cuarta flecha y sus puntos puff. Espero poder contarles que pude realizar el patrón.
20.05.2020 - 16:44
![]() Caroline Spooner-Kenyon wrote:
Caroline Spooner-Kenyon wrote:
Love this pattern. I do not understand the instruction re puff stitch should CROSS OVER THE TREBLE CROCHET so that treble crochet is on the wrong side. Do I turn the work around to cross over that treble crochet and get it on the wrong side? Is there a video for this?
30.11.2019 - 23:02
![]() Mirka wrote:
Mirka wrote:
È bellissimo... spero di vedere presto il pattern per realizzarlo. Grazie
22.08.2019 - 17:27
![]() Kim Nelson wrote:
Kim Nelson wrote:
Please include this cardigan/jacket. It's something that my customers would definitely purchase. It's beautiful and different than many of the crocheted sweaters you use.
21.08.2019 - 23:01
|
|||||||||||||||||||||||||||||||
Autumn Gold Jacket#autumngoldjacket |
|||||||||||||||||||||||||||||||
 |
 |
||||||||||||||||||||||||||||||
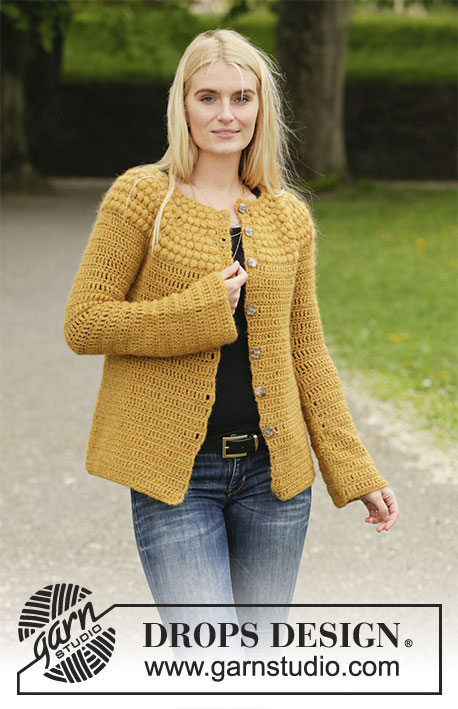
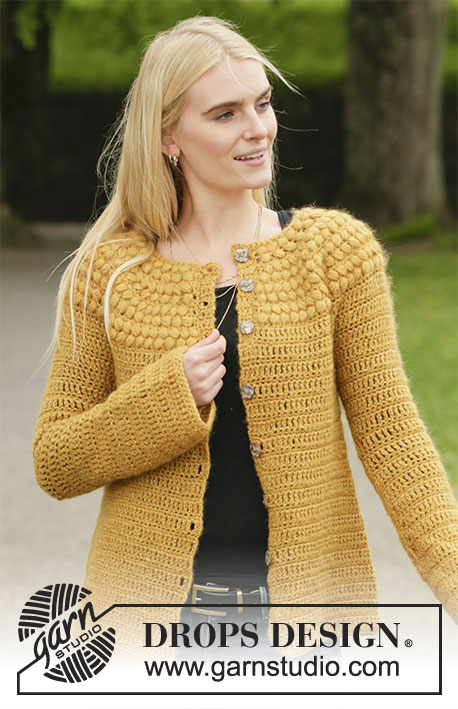
Crocheted jacket in DROPS Sky and DROPS Kid-Silk. The piece is worked with a round yoke, top down and with puff-stitches on the yoke. Sizes S - XXXL.
DROPS 207-20 |
|||||||||||||||||||||||||||||||
|
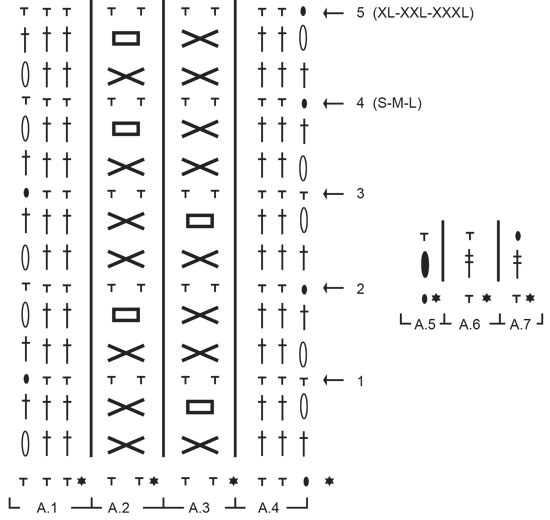
------------------------------------------------------- EXPLANATIONS FOR THE PATTERN: ------------------------------------------------------- CHAIN STITCH: If you work outermost on the hook the chain stitch will often be too tight; 1 chain stitch should be as long as 1 double crochet/treble crochet/double treble crochet is wide. INCREASE TIP-1 (evenly spaced): To work out how to increase evenly, count the total number of stitches on the row (e.g. 66 stitches) and divide by the number of increases to be made (e.g. 12) = 5.5. In this example, increase by working 2 double crochets in alternately each 5th and 6th stitch from the previous row. PATTERN: See diagrams A.1 to A.7. 1 PUFF-STITCH: Work as follows in the same stitch (important to work in the stitch not around the stitch): * Make 1 yarn over, insert the hook through the stitch, make 1 yarn over and pull it through the stitch; make both yarn overs long (to avoid the puff-stitch being small and compact it is important to pull the yarn overs to approx. 2 cm in length) *, work from *-* a total of 5 times, make a yarn over and pull the strand through all 11 loops on the hook. INCREASE TIP-2 (for sides of body): Increase 1 stitch by working 2 stitches in the same stitch. Increase on each side of the marker thread as follows: Work until there are 4 stitches left before the marker thread, increase 1 stitch in the next stitch, work 6 stitches (marker thread sits in the middle of these 6 stitches), increase 1 stitch in the next stitch (= 2 stitches increased at each marker thread and a total of 4 stitches increased on the row). DECREASE TIP (for each side of sleeve): Decrease on a row of double crochets by working the 2 outermost stitches on the row together as follows: Insert the hook through the next-to-outermost stitch, make 1 yarn over and pull the yarn over through the stitch, insert the hook through the next stitch, make 1 yarn over and pull the yarn over through the stitch, make 1 more yarn over and pull it through all 3 loops on the hook (= 1 stitch decreased). ------------------------------------------------------- START THE PIECE HERE: ------------------------------------------------------- JACKET – SHORT OVERVIEW OF THE PIECE: The yoke is worked back and forth from mid front and top down. The yoke is divided for body and sleeves and the body is continued back and forth in the same way. The sleeves are worked back and forth, top down (this is done so you get the same texture on the sleeves as on the body) YOKE: Work 68-70-74-76-78-80 CHAIN STITCHES – read description above, with hook size 5.5 mm and 1 strand Sky + 1 strand Kid-Silk (= 2 strands). The first row is worked as follows from the wrong side: Work 1 double crochet in the 3rd chain stitch from the hook and then 1 double crochet in each chain stitch to the end of the row = 66-68-72-74-76-78 double crochets on the row. Work 1 row of double crochets from the right side with 1 double crochet in each double crochet and increase at the same time 12 double crochets evenly spaced on the row – read INCREASE TIP-1 = 78-80-84-86-88-90 double crochets. The next row is worked as follows from the wrong side: Work A.1 over the first 3 stitches, A.2 over the next 2 stitches and repeat A.3 until there are 3 stitches left on the row (= 35-36-38-39-40-41 repeats of 2 stitches) and finish with A.4 over the last 3 stitches (= 35-36-38-39-40-41 repeats of 2 stitches). Continue this pattern back and forth. REMEMBER THE CROCHET TENSION! AT THE SAME TIME on each row marked with an arrow in A.4, increase double crochets evenly spaced as described below – remember INCREASE TIP-1: Arrow-1: Increase 36-36-38-40-40-42 double crochets evenly spaced = 114-116-122-126-128-132 stitches (there is now room for 53-54-57-59-60-62 repeats of A.2 in width). Arrow-2: Increase 16-20-24-24-26-30 double crochets evenly spaced = 130-136-146-150-154-162 stitches (there is now room for 61-64-69-71-73-77 repeats of A.2 in width). Arrow-3: Increase 16-20-24-24-26-30 double crochets evenly spaced = 146-156-170-174-180-192 stitches (there is now room for 69-74-81-83-86-92 repeats of A.2 in width). Arrow-4: Increase 16-20-24-22-24-30 double crochets evenly spaced = 162-176-194-196-204-222 stitches (there is now room for 77-84-93-94-98-107 repeats of A.2 in width). Continue working A.1 to A.4 up to and including the row marked for your size; i.e. sizes S-M-L are now finished. Continue in sizes XL-XXL-XXXL and increase on the last row as follows: Arrow-5: NOTE: Do not turn on this row but cut the strand and work the row from the right side so the next row will be from the wrong side – increase 12-24-28 double crochets evenly space = 208-228-250 stitches. When A.1 to A.4 have been completed for your size, the piece measures approx. 14-14-14-17-17-17 cm from the cast-on edge mid front. The next row is worked as follows from the wrong side: Work A.5 over the first stitch, repeat A.6 (= 1 stitch) until there is 1 stitch left on the row and finish with A.7 over the last stitch. Continue this pattern; A.5 to A.7 are repeated in height to finished length. When the piece measures approx. 17-18-20-21-22-24 cm from the cast-on edge mid front – adjust so the next row is a row of double crochets, increase 4-10-12-6-14-12 double crochets evenly spaced = 166-186-206-214-242-262 stitches. Continue working until the piece measures approx. 19-21-23-25-27-29 cm from the cast-on edge mid front – adjust so the next row is a row of double crochets. Now divide the yoke for body and sleeves; i.e. the next row is worked as follows from the right side: Work 1 double crochet in each of the first 26-29-31-33-37-41 stitches (= front piece), work 6-6-6-8-8-8 loose chain stitches (= in side under sleeve), skip the next 34-38-44-44-50-52 stitches (= sleeve), work 1 double crochet in each of the next 46-52-56-60-68-76 stitches (= back piece), work 6-6-6-8-8-8 loose chain stitches (= in side under sleeve), skip the next 34-38-44-44-50-52 stitches (= sleeve) and work 1 double crochet in each of the last 26-29-31-33-37-41 stitches (= front piece). Body and sleeves are finished separately. THE PIECE IS NOW MEASURED FROM HERE! BODY: = 110-122-130-142-158-174 stitches (including the 6-6-6-8-8-8 chain stitches under each sleeve). Insert 1 marker thread 29-32-34-37-41-45 stitches in from each side (= 52-58-62-68-76-84 stitches between the threads on the back piece). Allow the marker threads to follow your work onwards; they will be used when increasing in the sides. Continue back and forth with patterns A.5 to A.7 as before. When the body measures 8 cm from the division, increase 2 stitches in each side – read INCREASE TIP-2. Increase like this every 9 cm a total of 3 times in each side = 122-134-142-154-170-186 stitches. Continue working until the body measures 35 cm from the division but finish after a row of double crochets from the right side. Cut and fasten the strands. The jacket measures approx. 56-58-60-62-64-66 cm from the shoulder down. SLEEVE: The sleeve is worked back and forth from mid under the sleeve (so the texture matches on the body and sleeve). Start from the wrong side, in the middle of the 6-6-6-8-8-8 stitches under the sleeve and work 1 double treble crochet in each of the 3-3-3-4-4-4 stitches from the middle outwards, work 1 double treble crochet in each of the 34-38-44-44-50-52 stitches which were skipped and finish with 1 double treble crochet in each of the last 3-3-3-4-4-4 stitches mid under sleeve = 40-44-50-52-58-60 stitches, turn the piece. Continue back and forth with patterns A.5 to A.7 as before. When the piece measures approx. 3 cm from the division decrease 1 stitch on each side – read DECREASE TIP. Decrease like this every 5-3-2-2-1½-1½ cm a total of 3-4-6-6-8-8 times on each side = 34-36-38-40-42-44 stitches. When the sleeve measures 16-16-16-15-15-15 cm from the division increase 1 stitch on each side by working 2 stitches in the next-to-outermost stitch on each side. Increase like this every 9-9-8-8-6-5½ cm a total of 3-3-3-3-4-4 times on each side = 40-42-44-46-50-52 stitches. Continue working until the sleeve measures 45-44-42-41-39-38 cm from the division but finish after a row of double crochets (you can try the jumper on and continue to desired length). NOTE: Shorter measurements in larger sizes due to wider neck and longer yoke. Cut and fasten the strands. Work the other sleeve in the same way. ASSEMBLY: Sew the seam under the sleeve – sew in the outermost loop of the outermost stitch. Sew the buttons onto the left band. The first button is placed approx. 1½-2 cm down from the neck, then the other 6-6-6-7-7-7 buttons with approx. 6½-7-7½-6½-7-7 cm between each one. The buttons are buttoned between the second and third treble crochet/double treble crochet on the right band. |
|||||||||||||||||||||||||||||||
Diagram explanations |
|||||||||||||||||||||||||||||||
|
|||||||||||||||||||||||||||||||
 |
|||||||||||||||||||||||||||||||
 |
|||||||||||||||||||||||||||||||
Have you finished this pattern?Tag your pictures with #dropspattern #autumngoldjacket or submit them to the #dropsfan gallery. Do you need help with this pattern?You'll find 12 tutorial videos, a Comments/Questions area and more by visiting the pattern on garnstudio.com. © 1982-2026 DROPS Design A/S. We reserve all rights. This document, including all its sub-sections, has copyrights. Read more about what you can do with our patterns at the bottom of each pattern on our site. |
|||||||||||||||||||||||||||||||


With over 40 years in knitting and crochet design, DROPS Design offers one of the most extensive collections of free patterns on the internet - translated to 17 languages. As of today we count 324 catalogues and 12290 patterns translated into English (UK/cm). 12290
We work hard to bring you the best knitting and crochet have to offer, inspiration and advice as well as great quality yarns at incredible prices! Would you like to use our patterns for other than personal use? You can read what you are allowed to do in the Copyright text at the bottom of all our patterns. Happy crafting!
Post a comment to pattern DROPS 207-20
We would love to hear what you have to say about this pattern!
If you want to leave a question, please make sure you select the correct category in the form below, to speed up the answering process. Required fields are marked *.