
Oblíbené kategorie
Hledáte přízi?


Komentáře / Otázky (6)
![]() Jackie napsala:
Jackie napsala:
Make sure you have the stitch markers in place. Think of M1a chart as the 1st stitch, then repeat M1b 3 times, so you reach the 2nd stitch marker or the half way point. Now M1a becomes your next stitch and then repeat M1b another 3 times. When you come to the 6th row of the pattern remember to put in that stitch from M1a after each stitch marker. The M1a chart is the line of stitches you will use to crochet into when you make the border. Good luck. Jackie
14.11.2023 - 17:54
![]() Kelly Robertson napsala:
Kelly Robertson napsala:
I would call myself an intermediate knitter. I understood the pattern right away. I am not putting anyone down in anyway, I just want to help. I am taking pictures as I progress if they are any use to you. I think people just need to see the start of it in picture form. And then they will say ahhhh now I get it!!! So easy and cute. I want others to be able to whip these up :)
10.01.2023 - 23:42
![]() Paula napsala:
Paula napsala:
I have tried all ways to use this pattern but cannot make any sense. I have even tried to mark out on a graph.
14.12.2019 - 18:34Odpověď DROPS Design :
Dear Paula, should you need any individual assistance, you are welcome to contact the store where you bought the yarn, even per mail or telephone. Happy knitting!
16.12.2019 - 09:40
![]() Patti napsala:
Patti napsala:
I am an experienced knitter, but this pattern does not make sense. I understand that it is double side, but it does work woth the diagram. Is there just a written pattern for row to row and you could just sew both sides together or crochet them together with the crochet edging?
11.12.2019 - 03:02Odpověď DROPS Design :
Dear Patti, you will work the potholder in the round, ie cast on 74 stitches and then work the diagrams in the round as follows: M.1A (= first stitch at beg of each round = side of piece), repeat M.1B a total of 3 times (= snowmenn) = 1 st + 3x 12 sts= 37 sts. Then repeat one more time M.1A (= 38th stitch = other side of potholder) and M.1B. When piece is knitted, just crochet the 2 rounds for the edge around whole potholder (working in cast-on edge, sides and cast off edge). But you can just sew bottom and top without crochet edge if your rather. Happy knitting!
11.12.2019 - 08:45
![]() Salli Bordfeld napsala:
Salli Bordfeld napsala:
Is there a tutorial for this pattern? I am an experienced knitter but can’t figure out the pattern whatsoever! How can you knit a circular way for a flat cloth? Also casting on 74 stitches doesn’t seem To work out w the graph of stitches!
07.09.2019 - 06:24Odpověď DROPS Design :
Dear Sali, this is a double-side pot holder, so you'll knit it in the round, then fold it and work a crochet finishing border through both layers. Happy crafting!
08.09.2019 - 10:47
![]() Marit Haug napsala:
Marit Haug napsala:
Jeg forsøker å strikke disse grytelappene, men jeg sliter med å forstå mønsteret.Jeg får det ikke til å stemme.For det første , er det " snømenn" på begge sider av grytekluter? For det andre, skal både mønster M1A og M1B fortsette rundt det hele.For hvis jeg starter på M1A på 6 omgang blir det fire hvite masker først.Er det riktig? Gjentar jeg dette omgangen rundt ,stemmer det ikke på neste omgang. Jeg er ingen dreven strikker.😄
05.01.2019 - 15:37Odpověď DROPS Design :
Hei Marit. Ja, det er snømenn på begge sider: Du strikker M.1A (=1 m) og så gjentas M.1B 3 ganger = 37 m (den ene siden av grytekluten). Så gjentar du dette mønsteret 1 gang til. Du fortsetter slik oppover, med M.1A over maskene med merker i. På 6 omgang vil du få 4 m med hvit etter hverandre akkurat i overgangen mellom A.1A og A.1B (starten og midten av omgangen). Du vil avslutte 6 omgang med 3 hvite og 1 rød m, og videre starte 7 omgang med 1 hvit, 1 rød, 1 hvit, 3 rød osv. mønsteret vil derfor «brytes» i overgangen mellom A.1A og A.1B. Husk at du skal brette arbeidet ved merkene så dette vil ikke synes like godt når det er ferdig. God fornøyelse.
07.01.2019 - 09:56
|
||||||||||||||||
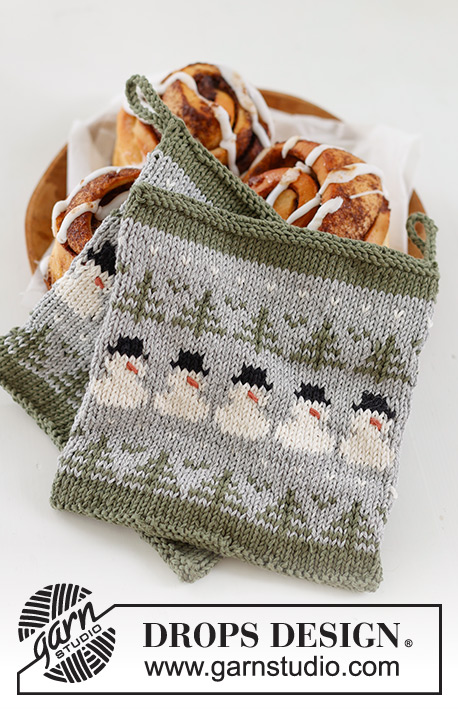
3 Little Snowmen#3littlesnowmenpotholders |
||||||||||||||||
 |
 |
|||||||||||||||
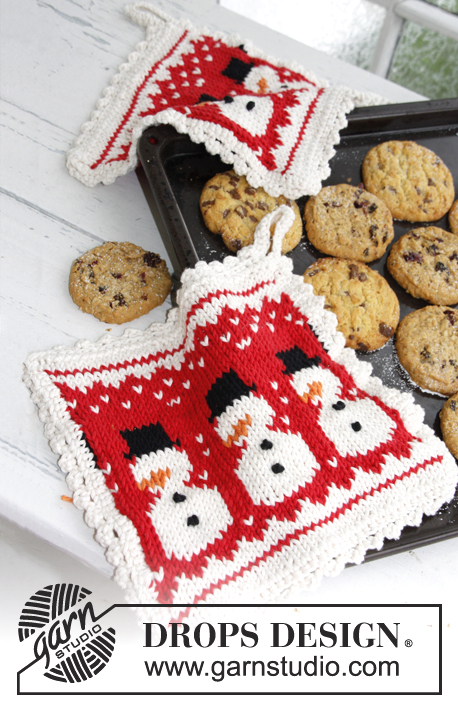
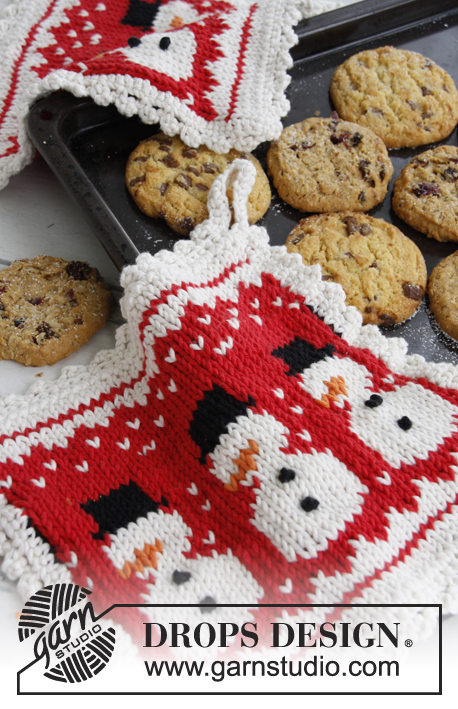
DROPS chňapka s vánočním vzorem pletená z příze „Paris“.
DROPS Extra 0-792 |
||||||||||||||||
|
VZOR: Viz schéma M. 1A a M. 1B. FRANCOUZSKÝ UZEL: Jehlu vpíchneme do místa, kde tvoříme suk. Kolem jehle 2x pevně omotáme přízi. Jehlu protáhneme skrz obě smyčky na jehle, na přízi tak vznikne dvojitý suk. Jehlu propíchneme skrz pleteninu ve stejném místě a na rubové straně pevně utáhneme. ---------------------------------------------------------------------- Pleteme na kruhové jehlici v řadách dokola. Na kruhovou jehlici č. 4 nahodíme přírodní barvou 74 ok. Do prvního oka umístíme značku, druhou pak do 28. oka (= boční šev). Pokračujeme: * 1 x vzor M. 1A, 3 x vzor M. 1B*, mezi *-* opakujeme celkem 2 krát. Vzory upleteme 1x na výšku. Oka přírodní barvou uzavřeme. Hvězdy na schemata vyšijeme černou barvou francouzským uzlem. Podložku přeložíme na polovinu, označená oka jsou po stranách. HÁČKOVANÝ LEM: Háčkujeme přírodní barvou, skrz obě vrstvy z lícové strany háčkem č. 4. Začínáme v levém rohu a háčkujeme podél okraje podložky: 1. kruhová řada: KS do rohu, do každého oka podél okraje háčkujeme KS, řadu končíme 14 řo – šňůrka. Šňůrku připojíme pevným okem do KS v ruhu na začátku řady. 2. kr. ř.: * 3 řo, do prvního řo ze tří řo háčkujeem KS (= pikotka), vynecháme 2 KS, KS do dalšího KS*, mezi *-* opakujeme, řadu končíme 14 KS kolem šňůrky a pevným okem do pevného oka předchozí řady. Přízi ustřihneme a zapošijeme. |
||||||||||||||||
Vysvětlivky ke schématu |
||||||||||||||||
|
||||||||||||||||
 |
||||||||||||||||
Dokončili jste tento model?Pak označte své fotky tagem #dropspattern #3littlesnowmenpotholders nebo je pošlete do galerie #dropsfan. Potřebujete s tímto návodem poradit?Otevřete-li si návod na stránce garnstudio.com, najdete tam 13 výukových video-ukázek, Komentáře/Dotazy a další užitečné informace. © 1982-2026 DROPS Design A/S. Vyhrazujeme si veškerá práva. Tento dokument, včetně všech jeho dílčích částí, podléhá autorským právům. Podrobnější komentář k možnostem užití našich návodů najdete dole pod každým návodem na našich stránkách. |
||||||||||||||||


V oblasti pletené a háčkované módy působí DROPS Design více než 40 let. Díky tomu vám můžeme nabídnout jednu z nejrozsáhlejších kolekcí modelů s bezplatnými návody dostupnými na internetu - navíc v 17 jazycích. K dnešnímu dni máme na 324 katalogů a 12290 návodů celkem - z nich je už 7602 dostupných v [češtině].
Přidejte komentář k návodu DROPS Extra 0-792
Rádi bychom věděli, co si o tomto modelu myslíte!
Pokud se chcete na něco zeptat, dbejte prosím na to, abyste ve formuláři níže vybrali správnou kategorii - díky tomu se dříve dozvíte, co potřebujete vědět. Povinná pole jsou označena *.