
Leder du efter et garn?


Kommentarer / Spørgsmål (109)
![]() CHATILLON skrev:
CHATILLON skrev:
Bonjour, nous aimerions avoir le diagramme complet pour realiser ce pull. Merci par avance Cordialement Me CHATILLON
18.11.2018 - 17:00DROPS Design svarede:
Bonjour Mme Chatillon, nous n'avons pas de diagramme complet pour chaque taille, suivez bien attentivement en même temps les diagrammes et les explications pour votre taille. Bon crochet!
19.11.2018 - 09:08
![]() Dina skrev:
Dina skrev:
I am sorry to say that my yoke size is small to start the diagram so May I add more rows to increase its length and to be under bust as shown in the photo ...or I had to repeat work by adding more rows in the WS ie working row 1RS then 3more rows then row 2RS then 3more rows and so on????!please advice
06.08.2018 - 17:02DROPS Design svarede:
Dear Dina, make sure to check and keep your tension, you should have 18 dc x 9 rows = 10 x 10 cm - if your tension is still too tight in height you can adjust the yoke length working some more rows evenly between the rows with increases. Hapy crocheting!
07.08.2018 - 09:44
![]() Dina skrev:
Dina skrev:
I am sorry to say that my yoke size is small to start the diagram so May I add more rows to increase its length and to be under bust as shown in the photo ...or I had to repeat work by adding more rows in the WS ie working row 1RS then 3more rows then row 2RS then 3more rows and so on????!please advice
06.08.2018 - 16:59
![]() Carrie skrev:
Carrie skrev:
On next row from RS, inc as follows: Inc 1 dc on each side of every marker (= 24 dc inc), repeat inc on every row from RS 3-3-4-6-7-9 times in total, then inc before every marker (= 12 dc inc), repeat inc on every row from RS 4-4-4-2-2-0 times in total I'm having trouble with this part. I did the 1st row but don't understand how many more rows I am supposed yo do or how exactly to increase... Can you please help?
31.07.2018 - 03:25DROPS Design svarede:
Dear Carrie, you will now increase for the round yoke 1 dc on each side of each marker (= 24 sts increased). Depending on your size you will work these increases on every row 3-3 times in total in size S and M, 4 times in total in size L, 6 times in total in size XL, 7 times in total in size XXL, 9 times in total in size XXXL. Then repeat these increase every other row 4 times in total in size S, M and L and 2 times in total in total in size XL and XXL (no increase every other row in the largest size). Happy crocheting!
31.07.2018 - 10:01
![]() Ellen skrev:
Ellen skrev:
Your explanation on the chains at beginning of pattern A1 is very confusing!! Looking through peoples questions you haven't answered simply you just say follow A1,A2,A3 then join. BUT the chain shows especially on bobble row. Does the starting point after the joins veer to left each time and not run vertically down the back of jumper? The start of the row of bobbles is particually confusing. To recap PLEASE explain starting chains IN VERY EASY DIALOGUE.
29.06.2018 - 18:03DROPS Design svarede:
Dear Ellen, you start either A.1 depending on the row with either 1, 3 or4 chains and finish each round with 1 sl st in the 1st, 3rd or 4th chain from beg of round. On the row with bobbles you start with 4 ch (then work 4 ch = 1st sch-space and 1 boblle, 3 ch = A.1) and finish with 1 sl st in the 4th ch from beg of round. Happy crocheting!
02.07.2018 - 08:49
![]() Sarah skrev:
Sarah skrev:
When doing the row before bobble it starts 3 chains then 2 chains 4 trebles 2 chains etc. At end of row 2 chains and sl st into previous 3 chains. I am left with a single line of chains where I have joined!!! Which doesn't look right! To recap- 4 trebles,2 Ch joined into 3 Ch at start which looks as if I have one line treble in the pattern. Please explain step by step where I am going wrong with the starting chains
28.06.2018 - 14:54DROPS Design svarede:
Dear Sarah, when working A.z you start round with A.1 and finish the round with A.3 = 2 chains at the end of last repeat before the sl st joining the beg of round. Happy crocheting!
28.06.2018 - 18:00
![]() Paula M skrev:
Paula M skrev:
Es muy enredada la explicación, mucha palabras, especialmente para el canesu, debieran colocar un video de cómo aumentar los puntos y especificar bien dónde comienzan los marcadores,los puntos se aumentan antes o después. Prefiero los patrones y no tanta letra sin sentido, dice repetir de *-* y ves cuentos de asteriscos(✴), al final no sabes de donde a dónde se repite!
27.06.2018 - 20:23
![]() Sarah skrev:
Sarah skrev:
WHEN STARTING THE PATTERN ARE THE 3 CHAINS AT BEGINNING TO BE USED AS THE FIRST TREBLE STITCH? IF NOT I AM CONFUSED ON WHAT TO DO WITH THEM AT THE JOINS????
26.06.2018 - 17:42DROPS Design svarede:
Dear Sarah, the 3 ch replace the first st at beg of row only when working piece back and forth, finish then each row with a sl st in the 3rd ch from beg of row, turn piece, work 3 ch at the beg of row and finish with 1 sl st in the 3rd ch from beg of round. When working diagrams, the first st in A.1 shows how to start and finish the round. Happy crocheting!
27.06.2018 - 08:19
![]() Yvonne skrev:
Yvonne skrev:
On lacey days jumper continuing with my previous question i cannot get neck size correct, far to wide and it is shoulder high not neck height?? i am determined to get it right but struggling how to do it!! i have unpicked it endlesss times! tension, chains and hook all correct!!!!
19.06.2018 - 15:14DROPS Design svarede:
Deaer Yvonne, see previous answer and check the number of chains and number of sts in your size. Hapy crocheting!
19.06.2018 - 15:54
![]() Yvonne skrev:
Yvonne skrev:
On lacey days jumper i am not getting on too good,!!!! I have correct amount of chains at the start,correct tension, i have just finished yoke, but the neck opening is far too big and it is too far down my back??? there is no way when i do neck edge it will be as high as the picture. what have i done wrong.?
19.06.2018 - 14:25DROPS Design svarede:
Dear Yvonne, at the very first round on yoke, you will skip chains evenly so that you should have 124-124-132-136-140-148 tr at the end of this first round over the 153-153-163-168-173-183 ch (this is to avoid that the foundation chain is too tight and prevent a tight neck edge). Happy crocheting!
19.06.2018 - 15:53
|
||||||||||||||||||||||||||||||||||
Lacey Days Jumper#laceydaysjumper |
||||||||||||||||||||||||||||||||||
 |
 |
|||||||||||||||||||||||||||||||||
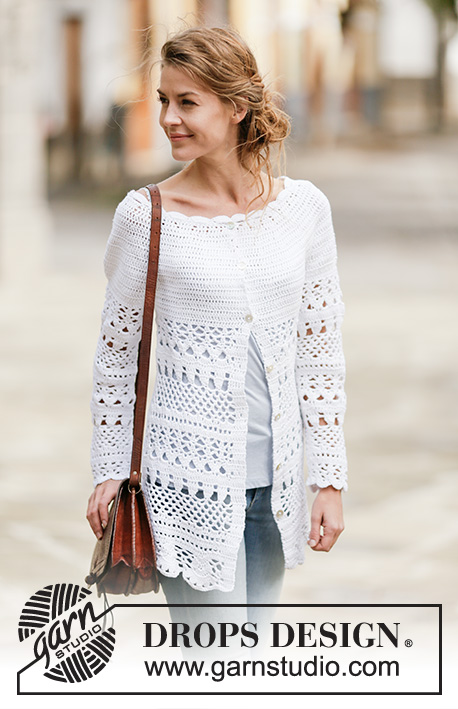
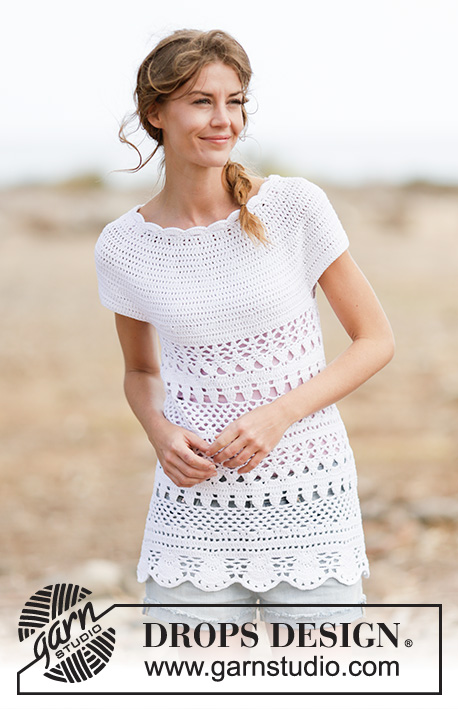
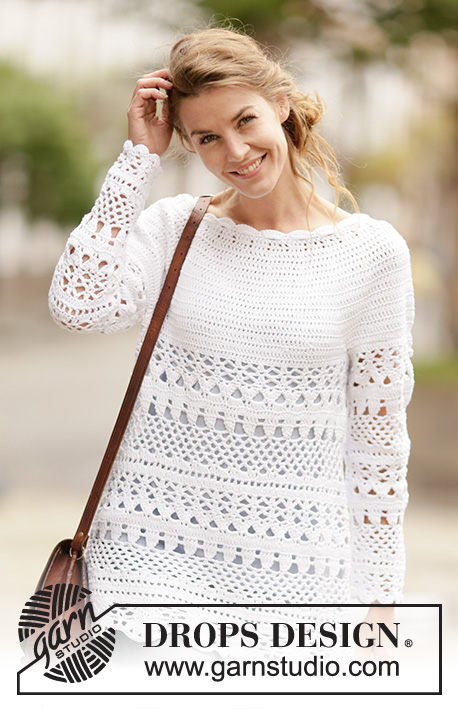
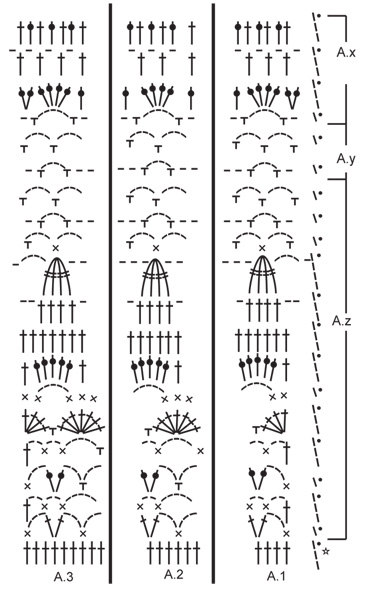
Hæklet DROPS bluse i ”Cotton Light” med hulmønster og rundt bærestykke, hæklet oppefra og ned. Str S - XXXL.
DROPS 162-27 |
||||||||||||||||||||||||||||||||||
|
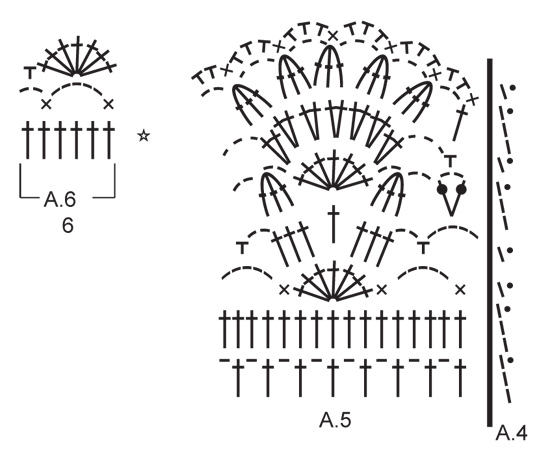
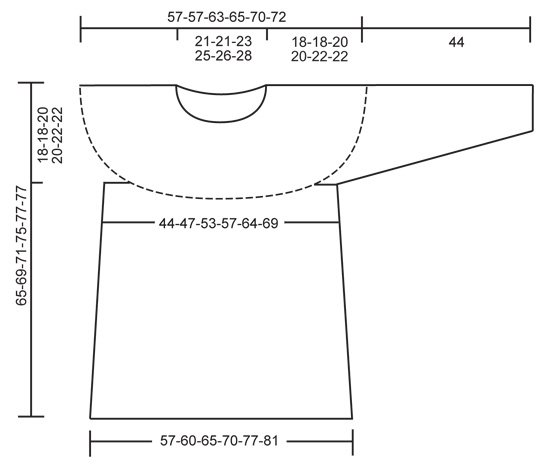
HÆKLEINFO: Gælder når arb hækles frem og tilbage. På hver række med st erstattes første st med 3 lm, rækken afsluttes med 1 km i 3.lm. UDTAGNINGSTIPS: Der tages 1 st ud ved at hækle 2 st i 1 st. INDTAGNINGSTIPS: Hækl 1 st, men vent med sidste gennemtræk (= 2 m på nålen), hækl derefter næste st, men når sidste gennemtræk gøres trækkes tråden gennem alle m på nålen - der er nu taget 1 st ind. MØNSTER: Se diag A.1-A.6. A.4 viser hvordan mønsteret starter og slutter når der hækles rundt. ---------------------------------------------------------- BÆRESTK: Arb hækles oppefra og ned fra midt bagpå. Hækl 153-153-163-168-173-183 lm på nål 4 med Cotton Light og sæt dem sammen til en ring med 1 km i første lm. Hækl næste omg således: 3 lm (= 1 st), 1 st i første lm fra lm-ringen, 1 st i hver af de 2 næste lm, * spring over 1 lm, 1 st i hver af de 4 næste lm *, gentag fra *-* = 124-124-132-136-140-148 st. Nu hækles arb frem og tilbage. Hver række hækles sammen i slutningen af rækken med 1 km i 3.lm i begyndelsen af rækken. Vend arb. LÆS HÆKLEINFO! Sæt 12 mærker i arb således: Hækl 15-15-17-18-19-21 st Samtidig med at der tages 1-5-3-3-4-2 st ud jævnt fordelt – læs UDTAGNINGSTIPS, sæt første mærke, * hækl 4 st, sæt næste mærke *, gentag fra *-* 1 gang til, hækl 16 st, sæt næste mærke, * hækl 4 st, sæt næste mærke *, gentag fra *-* 1 gang til, hækl 30-30-34-36-38-42 st Samtidig med at der tages 2-10-6-6-8-4 st ud jævnt fordelt, sæt næste mærke, * hækl 4 st, sæt næste mærke *, gentag fra *-* 1 gang til, hækl 16 st, sæt næste mærke, * hækl 4 st, sæt næste mærke *, gentag fra *-* 1 gang til, hækl 15-15-17-18-19-21 st Samtidig med at der tages 1-5-3-3-4-2 st ud jævnt fordelt = 128-144-144-148-156-156 st. HUSK PÅ HÆKLEFASTHEDEN! Vend arb. På næste række fra retsiden tages der ud således: Tag 1 st ud på hver side af hvert mærke (= 24 st taget ud), gentag udtagningen på hver række fra retsiden totalt 3-3-4-6-7-9 gange, derefter tages der ud før hvert mærke (= 12 st taget ud), gentag udtagningen på hver række fra retsiden totalt 4-4-4-2-2-0 gange = 248-264-288-316-348-372 st. Arb måler nu ca 17-17-19-19-21-21 cm. På næste række hækles der således: 35-38-42-47-53-57 st (halve rygstk), 8 lm (ærmegab), spring over 54-56-60-64-68-72 st fra forrige række (skal bruges senere til ærme), 70-76-84-94-106-114 st Samtidig med at der tages 1-1-3-1-1-3 st ud jævnt fordelt (forstk), 8 lm (ærmegab), spring over 54-56-60-64-68-72 st fra forrige række (skal bruges senere til ærme) og 35-38-42-47-53-57 st (halve rygstk) = 157-169-187-205-229-247 st/lm. Arb hækles nu rundt uden at vende. Videre hækles der således: A.1, A.2 totalt 24-26-29-32-36-39 gange i bredden, afslut med A.3. Hækl de første 7 omg af A.z. På 8.omg i A.z (= st-omg) tages der 6 st ud jævnt fordelt – læs UDTAGNINGSTIPS = 163-175-193-211-235-253 st. Fortsæt at hækle A.z som før, men A.2 hækles nu 25-27-30-33-37-40 gange i bredden. Når A.z er hæklet 1 gang i højden hækles A.y over A.z totalt 1-2-2-3-3-3 gange i højden. Derefter hækles A.x over A.y. På 2.omg i A.x tages der 12 st ud jævnt fordelt = 175-187-205-223-247-265 st. Fortsæt at hækle A.x som før, men A.2 hækles nu 27-29-32-35-39-42 gange i bredden. På sidste omg i A.x tages der 6 st ud jævnt fordelt = 181-193-211-229-253-271 st. Derefter hækles A.z over A.x (A.2 hækles nu 28-30-33-36-40-43 gange i bredden). På 8.omg i A.z tages der 12 st ud jævnt fordelt = 193-205-223-241-265-283 st. Fortsæt at hækle A.z som før, men A.2 hækles nu 30-32-35-38-42-45 gange i bredden. Når A.z er hæklet 1 gang i højden hækles A.y over A.z totalt 1-2-2-3-3-3 gange i højden. Derefter hækles A.x over A.y. På 2.omg i A.x tages der 6 st ud jævnt fordelt = 199-211-229-247-271-289 st. Fortsæt at hækle A.x som før, men A.2 hækles nu 31-33-36-39-43-46 gange i bredden. På sidste omg i A.x tages der 9-13-11-9-17-15 st ud jævnt fordelt = 208-224-240-256-288-304 st. Derefter hækles der således: A.5 totalt 13-14-15-16-18-19 gange (A.4 viser hvordan omg starter og slutter). Klip og hæft tråden når A.5 er hæklet 1 gang i højden. Arb måler ca 65-69-71-75-77-77 cm. ÆRME: Ærmet hækles rundt, ovenfra og ned. Start med at hækle midt under ærmet således: Hækl 1 fm i den 5.lm af de 8 lm som blev hæklet i ærmegabet på ryg- og forstykke. Hækl 3 lm (= 1 st). Videre hækles der 1 st i hver af de næste 3 lm. Videre hækles der 1 st i hver st over ærmet Samtidig med at der tages 1-3-1-5-3-1 st ind jævnt fordelt – læs INDTAGNINGSTIPS, før der hækles 1 st i hver af de resterende 4 lm under ærmet = 61-61-67-67-73-79 st. Nu hækles der således: A.1, A.2 8-8-9-9-10-11 gange i bredden, afslut med A.3. På 8.omg i A.z (= st-omg) tages der 6 st ind jævnt fordelt = 55-55-61-61-67-73 st. Fortsæt at hækle A.z som før, men A.2 hækles nu 7-7-8-8-9-10 gange i bredden. Når A.z er hæklet 1 gang i højden hækles A.y over A.z. Når A.y er hæklet 1 gang i højden hækles A.x over A.y. På sidste omg i A.x tages der 6 st ind jævnt fordelt = 49-49-55-55-61-67 st. Derefter hækles A.z over A.x. A.2 hækles nu 6-6-7-7-8-9 gange i bredden. På 8.omg tages der 6 st ind jævnt fordelt = 43-43-49-49-55-61 st. Når A.z er hæklet 1 gang i højden hækles A.y over A.z. Derefter hækles A.x over A.y. På sidste omg i A.x tages der 0-0-0-0-6-6 st ind jævnt fordelt = 43-43-49-49-49-55 st. Derefter hækles de første 5 omg af A.z. A.2 hækles nu 5-5-6-6-6-7 gange i bredden. Klip og hæft tråden. Ærmet måler ca 44 cm i alle str. Hækl det andet ærme på samme måde. HALSKANT: Kanten hækles rund i lm-omg i halsen på nål 4 med Cotton Light og med start midt bagpå fra retsiden således: Hækl 114-114-120-120-126-126 st i lm-omg. Derefter hækles A.6 totalt 19-19-20-20-21-21 gange i bredden. Klip og hæft tråden. |
||||||||||||||||||||||||||||||||||
Diagram forklaring |
||||||||||||||||||||||||||||||||||
|
||||||||||||||||||||||||||||||||||
 |
||||||||||||||||||||||||||||||||||
 |
||||||||||||||||||||||||||||||||||
 |
||||||||||||||||||||||||||||||||||
Har du lavet denne opskrift?Så tagger du dine billeder med #dropspattern #laceydaysjumper eller send dem til #dropsfan galleriet. Behøver du hjælp med opskriften?Du finder 15 instruktionsvideoer, kommentarer/spørgsmål og mere i opskriften på www.garnstudio.com © 1982-2026 DROPS Design A/S. Alle rettigheder er reserveret. Dette dokument med tilhørende underdokumenter har copyright. Læs mere om hvad du kan gøre med vore opskrifter, nedert i alle vore opskrifter på hjemmesiden. |
||||||||||||||||||||||||||||||||||


Med over 40 år i strikke- og hæklebranchen tilbyder DROPS Design en af de mest omfattende kollektioner med gratis opskrifter på internettet - oversat til 17 sprog. Dags dato har vi 324 kataloger og 12290 opskrifter på Dansk.
Vi arbejder hårdt for at kunne tilbyde Dig det bedste man kan få af strik og hækling, inspiration og gode råd men også kvalitetsgarn til fantastiske priser! Vil du bruge vore opskrifter til andet end for privat brug? Du kan læse om hvilke regler som gælder under teksten Copyright nederst på siden i alle vore opskrifter. God fornøjelse!
Kommentere opskrift DROPS 162-27
Vi vil gerne høre din mening om denne model!
Hvis du ønsker at stille et spørgsmål, så husk at vælge rigtig kategori i menuen under - det vil give dig hurtigere svar. Obligatoriske felter er markeret med *.