
Popular categories
Looking for a yarn?


Comments / Questions (64)
![]() Helle Kloster wrote:
Helle Kloster wrote:
Det er angående huen der står jeg skal strikke 122 -134 p med picotkant så skulle den måle ca 47-51 cm det passer ikke og jeg overholder strikkefastheden . Mvh Helle Kloster
11.12.2015 - 12:11DROPS Design answered:
Hej Helle, der skal stå Når der er strikket 122-132 riller (Rille er norsk og 1 rille = 2p retstrik). Det skal vi få rettet i opskriften. God fornøjelse!
17.12.2015 - 10:53
![]() Sophie wrote:
Sophie wrote:
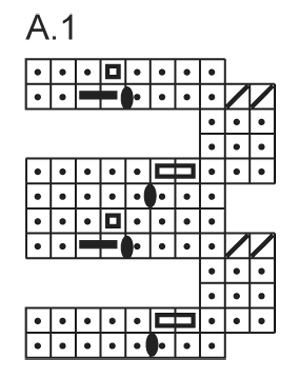
Bonjour J'ai très envie de tricoter cette écharpe que je trouve très jolie malheureusement, je ne comprends pas bien le diagramme notamment le rang 6. Quand vous dites de tricoter le 1er jeté et de lâcher le deuxième, personnellement je n'ai plus de jeté à ce moment la puisque je les ai tricotés à la fin du rang précédent. Ou alors, je n'ai pas bien compris. Merci d'avance pour votre aide.
07.12.2014 - 23:56DROPS Design answered:
Bonjour Sophie, au rang 5, vous rabattez 2 m, puis 4 m end, 1 double jeté (ovale noir), 2 m ens torse à l'end, 2 m end - au rang 6, vous tricotez 3 m end, puis vous avez le double jeté du rang 5, tricotez le 1er à l'end et lâchez le 2e et terminez par 4 m end. Bon tricot!
08.12.2014 - 09:33
![]() Elizabeth wrote:
Elizabeth wrote:
When reading the diagram, do I start in the lower right and read from right to left? Do I then read row two from left to right and so on?
22.09.2014 - 16:39DROPS Design answered:
Dear Elizabeth, in the diagram 1 square = 1 st x 1 row. Start from the bottom corner on the right side towards the left every row from RS - every row from WS are worked from left towards the right. Happy knitting!
22.09.2014 - 17:17
![]() Veronica wrote:
Veronica wrote:
Thank you but how to I get the corresponding rows 3 & 4 on the opposite side?
16.09.2014 - 12:53DROPS Design answered:
Dear Veronica, on 1st row, you work A.1 over the first sts and K rest of row. On row 2, you work row 1 in A.1 over the first sts, K the middle sts and work row 2 in A.1 over the last sts. Work then row 3 & 4 over the first sts one side, then row 5 over the first sts, then row 2 over the last sts on same row, then row 3 & 4 over the first sts on the other side and so on. Happy knitting!
16.09.2014 - 13:46
![]() Veronica wrote:
Veronica wrote:
Could someone please explain the chart I am having difficulty understanding
15.09.2014 - 20:56DROPS Design answered:
Dear Véronica, you will find here some informations about diagrams - in this diagram, you are working some short rows, so that some rows are over 3 sts only, and some other over all sts in diagram. Happy knitting!
16.09.2014 - 09:21
![]() Helene wrote:
Helene wrote:
Je crois avoir trouve
15.02.2014 - 16:37
![]() Helene wrote:
Helene wrote:
J adore ce modele, mais je ne comprends pas la bordure, les rgs 3,4,9,10???? Serait il possible de les avoir en ecrit ligne par ligne? Je mets mon tricot de cote. Merci bonne journee
15.02.2014 - 16:34DROPS Design answered:
Bonjour Hélène, les rangs 3+4 et 9+10 sont des rangs raccourcis = on ne tricote que les 3 m montrées dans le schéma. Bon tricot!
17.02.2014 - 09:18
![]() Francesca wrote:
Francesca wrote:
Eseguendo il vostro schema, non so come, lo spazio fra le due file di trafori mi risulta diverso dalla vostra foto. ho deciso di eseguire la stessa lavorazione su sette punti invece di usarne otto e così mi sembra più simile alla fotografia. grazie!
13.02.2014 - 15:42DROPS Design answered:
Buongiorno Francesca, se ha seguito attentamente il diagramma non dovrebbe venire diverso dalla foto, in ogni caso siamo contente che abbia risolto il problema. Buon lavoro!!
13.02.2014 - 15:45
![]() Francesca wrote:
Francesca wrote:
Eseguendo il vostro schema, non so come, lo spazio fra le due file di trafori mi risulta diverso dalla vostra foto. ho deciso di eseguire la stessa lavorazione su sette punti invece di usarne otto e così mi sembra più simile alla fotografia. grazie!
11.02.2014 - 19:02DROPS Design answered:
Buongiorno Francesca, se ha seguito attentamente il diagramma non dovrebbe venire diverso dalla foto, in ogni caso siamo contente che abbia risolto il problema. Buon lavoro!!
13.02.2014 - 15:45
![]() Francesca wrote:
Francesca wrote:
Ho provato a eseguire il motivo della sciarpa ma non mi risulta come da fotografia allegata. potrebbe esserci un errore nella descrizione? vorrei ulteriori spiegazioni. salut. grazie!
10.02.2014 - 11:00DROPS Design answered:
Buongiorno Francesca, può indicarci esattamente cosa non le torna nel motivo? La descrizione è corretta, il diagramma si legge dal basso verso l'alto, da destra verso sinistra, e i f 3, 4, 9 e 10 devono essere lavorati a f accorciati come descritto. Se ci indica qual è esattamente il suo problema possiamo aiutarla in modo più preciso. Buon lavoro!!
10.02.2014 - 13:07
|
|||||||||||||||||||
Emily#emilyset |
|||||||||||||||||||
 |
 |
||||||||||||||||||
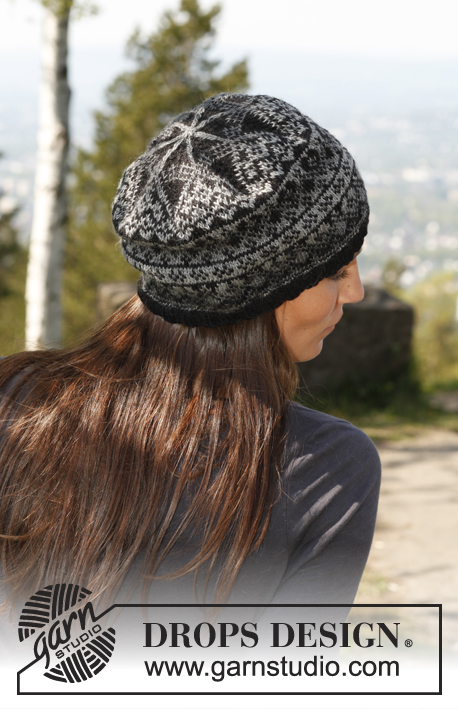
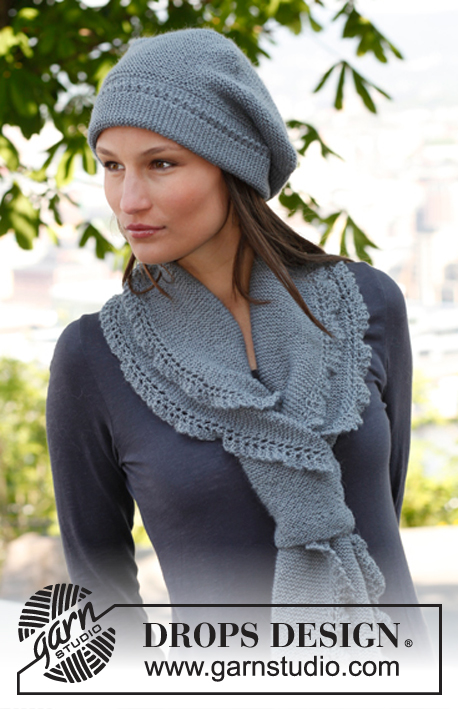
Knitted DROPS beret and scarf in garter st with lace edges in ”BabyAlpaca Silk”.
DROPS 140-38 |
|||||||||||||||||||
|
GARTER ST (back and forth on needle): K all rows. 1 ridge = 2 rows K. GARTER ST WITH PICOT EDGE (back and forth on needle). ROW 1: K all sts. ROW 2: K all sts. ROW 3: K until 4 sts remain, work these sts as follows: K 2 tog, 1 YO, work 2 sts in the last 2 sts = 2 new sts on the row. ROW 4: Slip 1st st as if to K, K 1, psso, K 1 and slip the last st on right needle over the foremost st, now 2 sts are dec - then K the remaining sts. Repeat rows 1 to 4. PATTERN: See diagram A.1. Diagram shows all rows in pattern from RS. No of sts in A.1 will vary from 8 to 10 depending on where you are in the diagram. On 3rd and 4th row in diagram work short rows as follows: K 3, turn piece, tighten thread and work rest of row. Do the same on 9th and 10th row in diagram. ---------------------------------------------------------- HAT: Worked back and forth on needle. Beg with a folding edge at the bottom of hat. Then knit up new sts along one long side on edge and work the hat before sewing it tog mid back. Cast on 30-30 sts on needles size 2.5 mm with BabyAlpaca Silk. Work GARTER ST WITH PICOT EDGE - see explanation above. When 122-132 ridges have been worked (piece measures approx. 47-51 cm), cast off. Knit up 1 st at the edge in every ridge along the side without picot edge = 122-132 sts (incl 1 edge st in each side). Insert 5 markers in the piece as follows: Insert first after 1 st, insert the next 4 24-26 sts apart, after last marker there are 25-27 sts. Then work in GARTER ST back and forth on needle AT THE SAME TIME inc 1 st on the left side of all markers as follows: Inc every other row (i.e. on every row from RS) a total of 4 times and then every 4th row a total of 7 times = 177-187 sts – NOTE: Inc 1 st by making 1 YO, on next row K YO twisted to avoid holes. When piece measures 9-10 cm from where sts were knitted up, dec 1 st on the left side of all markers as follows: Dec every other row (i.e. on every row from RS) a total of 31-33 times = 22-22 sts remain on needle – NOTE: Dec 1 st by K 2 tog. On next row K all sts tog 2 by 2. Cut the thread and pull it through the remaining sts and tighten tog. Sew the hat tog mid back inside 1 edge st. Fold the edge at the bottom of hat. SCARF: Loosely cast on 48 sts on needle size 3 mm with BabyAlpaca Silk. Work in GARTER ST - see explanation above. When piece measures 9 cm, cast on 8 new sts at end of the next 2 rows = 64 sts. Insert 1 marker on the inside of the 8 new sts in each side (= 48 sts between markers). Then work in garter st with pattern according to diagram A.1 over the outermost sts in each side as follows: Work 1st row in A.1 (= 8 sts – see explanation above), K the rest of row and turn piece. On next row beg with 1st row in A.1 over the first 8 sts, K until next marker and work 2nd row in A.1. Continue the pattern like this - NOTE: Read explanation on PATTERN above. When piece measures approx. 110 cm (measure when flat) - finish after 1 whole repetition vertically - P 1 row over all sts before loosely casting off. ASSEMBLY: Place scarf double alongside and sew bottom section on scarf (the 9 cm long section in garter st without lace edge in each side) tog along the side – sew edge to edge in front loop of outermost st to avoid a chunky seam. When wearing the scarf, insert opposite end of scarf down through opening that was made and pull end of scarf through opening. |
|||||||||||||||||||
Diagram explanations |
|||||||||||||||||||
|
|||||||||||||||||||
|
|||||||||||||||||||
Have you finished this pattern?Tag your pictures with #dropspattern #emilyset or submit them to the #dropsfan gallery. Do you need help with this pattern?You'll find 13 tutorial videos, a Comments/Questions area and more by visiting the pattern on garnstudio.com. © 1982-2025 DROPS Design A/S. We reserve all rights. This document, including all its sub-sections, has copyrights. Read more about what you can do with our patterns at the bottom of each pattern on our site. |
|||||||||||||||||||


With over 40 years in knitting and crochet design, DROPS Design offers one of the most extensive collections of free patterns on the internet - translated to 17 languages. As of today we count 314 catalogues and 11820 patterns translated into English (UK/cm). 11820
We work hard to bring you the best knitting and crochet have to offer, inspiration and advice as well as great quality yarns at incredible prices! Would you like to use our patterns for other than personal use? You can read what you are allowed to do in the Copyright text at the bottom of all our patterns. Happy crafting!
Post a comment to pattern DROPS 140-38
We would love to hear what you have to say about this pattern!
If you want to leave a question, please make sure you select the correct category in the form below, to speed up the answering process. Required fields are marked *.