
Popular categories
Looking for a yarn?


Comments / Questions (47)
![]() Anna Maria wrote:
Anna Maria wrote:
Buongiorno,ho terminato il cappello con della lana che avevo a casa,ma è venuto troppo piccolo,spero tanto che quando arriverà la lana che ho ordinato sarà perfetto
26.04.2013 - 07:10DROPS Design answered:
Buongiorno Annamaria, il suo campione corrispondeva a quello indicato? quando le arriverà la lana si assicuri che il campione corrisponda perfettamente, e lo lavori con gli stessi ferri con cui lavorerà il modello. Buon lavoro!!
27.04.2013 - 10:26
![]() Anna Maria wrote:
Anna Maria wrote:
Buongiorno,scusa la mia ignoranza il punto legaccio non vuol dire tutti i ferri a diritto?non ho capito la spiegazione 1 costa a legaccio=2 ferri a dir.grazie
22.04.2013 - 09:08DROPS Design answered:
Buonasera Anna Maria, ha ragione, il punto legaccio sui ferri dritti si lavora tutto a diritto; le coste vengono menzionate solo quando si devono riprendere le maglie, che vanno riprese in ogni costa. Buon lavoro!
22.04.2013 - 21:07
![]() Anna Maria wrote:
Anna Maria wrote:
Buongiorno ho misurato la treccia ma non mi corrisponde la lunghezza è più lunga di cm 49-55 dove sbaglio? il motivo è di 16 righi oltre il rovescio bene cosi? grazie
19.04.2013 - 11:07DROPS Design answered:
Buongiorno, il diagramma mostra tutti i ferri del motivo visti dal diritto del lavoro, quindi sia i ferri di andata che quelli di ritorno; nei ferri a rovescio deve lavorare i quadratini neri a diritto e quelli bianchi a rovescio. Buon lavoro!!
20.04.2013 - 16:42
![]() Anna Maria wrote:
Anna Maria wrote:
Buongiorno,ho già ordinato la lana nepal,per il momento avevo della lana e sto terminando la treccia del cappello siete molto gentile e paziente grazie della vostra disponibilità
18.04.2013 - 10:38
![]() Anna Maria wrote:
Anna Maria wrote:
Buongiorno ho incominciato a lavorare il cappello,ma non ho capito perché si devono usare i ferri circolare grazi mille
16.04.2013 - 15:41DROPS Design answered:
Buongiorno Anna Maria, il cappello può benissimo essere lavorato tutto sui ferri dritti, dato che non si lavora in tondo; vengono indicati i circolari per il numero di maglie elevato. Buon lavoro!!
17.04.2013 - 14:37
![]() Baconnet wrote:
Baconnet wrote:
Merci beaucoup pour vos conseils. j'ai fini. résultat parfaitement conforme et c'est mon premier bonnet !
19.03.2013 - 21:12
![]() Baconnet wrote:
Baconnet wrote:
J'ai defait 2 fois mon echantillon de torsade ca ne ressemblait pas vraiment. comment lit on ce diagramme ? toujours de gauche à droite ? y at'il les rangs pairs et impairs ?
16.03.2013 - 18:21DROPS Design answered:
Bonjour Madame Baconnet, les rangs sur l'endroit se lisent de droite à gauche et ceux sur l'envers de gauche à droite, on commence par la 1ère case en bas à droite. Pour toute aide complémentaire, n'hésitez pas à vous adresser au forum DROPS. Bon tricot !
18.03.2013 - 09:14
![]() Baconnet wrote:
Baconnet wrote:
Merci beaucoup; En revanche le haut et le bas du bonnet c'est avec les circulaires, alors dans ce cas est ce qu'il est possible de tricoter le haut et le bas en rond pour éviter les coutures . Si oui le chapeau aura t'il la même allure ? merci
16.03.2013 - 10:18DROPS Design answered:
Effectivement, le haut et la bordure se tricotent en rond, mais vous pouvez les tricoter en allers et retours si vous le voulez, ajoutez 1 m lis de chaque côté pour les coutures et faites une couture la plus invisible possible à la fin - vous la mettrez dans le dos. Bon tricot !
16.03.2013 - 10:21
![]() Baconnet wrote:
Baconnet wrote:
Bonjour, si cela se tricote en aller retours peut on utiliser des aiguilles droites ?
15.03.2013 - 23:07DROPS Design answered:
Bonjour Madame Baconnet, la torsade peut tout à fait se tricoter sur aiguilles droites. Bon tricot!
16.03.2013 - 10:06
![]() Jane wrote:
Jane wrote:
De kabelrand van deze muts : 22 steken opzetten, maar het patroon heeft 28 steken.
30.01.2013 - 14:21
|
|||||||||||||||||||||||||
Runa#runahat |
|||||||||||||||||||||||||
 |
 |
||||||||||||||||||||||||
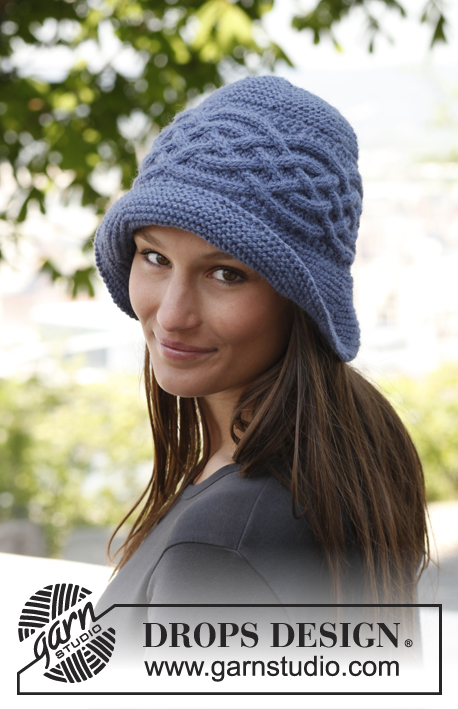
Knitted DROPS hat with sideways cable in ”Nepal”.
DROPS 141-42 |
|||||||||||||||||||||||||
|
GARTER ST (back and forth on needle): K all rows. 1 ridge = 2 rows K. PATTERN: See diagram A-1. Diagram shows 1 repetition of pattern in breadth and vertically, the diagram shows pattern from RS. ---------------------------------------------------------- HAT: First work the cable back and forth sideways. Then knit up sts along one side of cable and work crown of hat. Then knit up sts along the other side of cable and work brim of hat. Finally sew the hat tog mid back. CABLE EDGE: Worked back and forth on needle size 4.5 mm. Cast on 22 sts with Nepal. K 1 row from WS. Work next row as follows: 2 sts in GARTER ST – see explanation above, * P 2, K 2 in each of the next 2 sts (= K 4), P 2 *, repeat from *-* 2 more times, finish with 2 sts in garter st = 28 sts. Work 1 row from WS with K over K and P over P with 2 sts in garter st in each side. Continue with A-1 until 7-8 repetitions have been worked (piece measures approx. 49-55 cm). Work next row as follows: 2 sts in garter st, * P 2, K 2 tog, K 2 tog, P 2 *, repeat from *-* 2 more times, finish with 2 sts in garter st = 22 sts. K 1 row from WS over all sts, then cast off. Edge is approx. 12 cm wide. CROWN OF HAT: Worked back and forth on circular needle size 4 mm. Knit up 1 st in every ridge in front loop of outermost st along one side of cable edge. K 1 row from WS while at the same time inc evenly to 90-100 sts (inc by working 2 sts in 1 st). Insert 1 marker at beg of row (from RS) and then 1 marker for every 10th st (= 9-10 markers in total). Work in GARTER ST back and forth - see explanation above. AT THE SAME TIME on 4th row from when sts where knit up (= row from RS), dec 1 st after every marker by K 2 tog. Repeat dec every 4 rows 3 more times and then every other row 5 times = 9-10 sts remain on needle. Cut the thread and pull it through the remaining sts and tighten tog. BRIM OF HAT: Worked back and forth on circular needle size 4 mm. Knit up 1 st in every ridge along the other side of cable edge. K 1 row from WS while at the same time inc evenly to 90-100 sts. Insert 1 marker at beg of row (from RS) and then 1 marker for every 10th st (= 9-10 markers in total). Work in GARTER ST back and forth - see explanation above. AT THE SAME TIME on 2nd row from when sts where knit up (= row from RS), inc 1 st after every marker by making 1 YO. On next row K YOs twisted to avoid holes. Repeat inc every other row 2 more times and then every 4 rows 2 times = 135-150 sts. Working in garter st without inc until brim measures 7½-8 cm, cast off from RS (NOTE: Do not cast off too loosely). ASSEMBLY: Sew hat tog mid back in front loop of outermost st to avoid a chunky seam. |
|||||||||||||||||||||||||
Diagram explanations |
|||||||||||||||||||||||||
|
|||||||||||||||||||||||||

|
|||||||||||||||||||||||||
Have you finished this pattern?Tag your pictures with #dropspattern #runahat or submit them to the #dropsfan gallery. Do you need help with this pattern?You'll find 9 tutorial videos, a Comments/Questions area and more by visiting the pattern on garnstudio.com. © 1982-2025 DROPS Design A/S. We reserve all rights. This document, including all its sub-sections, has copyrights. Read more about what you can do with our patterns at the bottom of each pattern on our site. |
|||||||||||||||||||||||||


With over 40 years in knitting and crochet design, DROPS Design offers one of the most extensive collections of free patterns on the internet - translated to 17 languages. As of today we count 314 catalogues and 11820 patterns translated into English (UK/cm). 11820
We work hard to bring you the best knitting and crochet have to offer, inspiration and advice as well as great quality yarns at incredible prices! Would you like to use our patterns for other than personal use? You can read what you are allowed to do in the Copyright text at the bottom of all our patterns. Happy crafting!
Post a comment to pattern DROPS 141-42
We would love to hear what you have to say about this pattern!
If you want to leave a question, please make sure you select the correct category in the form below, to speed up the answering process. Required fields are marked *.