
Popular categories
Looking for a yarn?


Comments / Questions (47)
![]() JoAnne Wade wrote:
JoAnne Wade wrote:
Im confused with the first part of the cable pattern. Ive been knitting for years but don't understand P2 K2 in each of the next 2 sts (=k4) are these just increases? how does p2k2 equal 4 knits. Thanks
15.02.2015 - 23:16DROPS Design answered:
Dear Mrs Wade, you will work the 2 K sts into back and front loop to inc 2 sts, ie work P2 then Kfbl next 2 K sts (= you have now K4 over K2). Happy knitting!
16.02.2015 - 11:18
![]() Pime wrote:
Pime wrote:
Buenos dias, una pregunta : He terminado la torsada, 7 repeticiones y cuando voy a levantar los puntos de la corona del sombrero solo tengo 59 puntos, si debo aumentar hasta 90-100 no puedo aumentar cada 10 puntos. ¿ Que he hecho mal ? Muchas gracias
18.01.2015 - 11:55DROPS Design answered:
Hola Pime! De los 59 pts que tienes hasta 90 si es la talla pequeña o 100 si es la grande tienes que aumentar pts. Suponiendo que sea la talla pequeña tienes que aumentar 31 pts hasta los 90 (esto es, de esos 59 pts tendrás que aumentar en 31 trabajando 2 pts en cada uno de esos 31). No lo hagas en 31 pts seguidos sino en aprox 1 de cada 2.
18.01.2015 - 23:13
![]() Lotte wrote:
Lotte wrote:
In de uitleg van het kabelpatroon a1 moeten de bovenste twee symbolen met elkaar verwisseld worden. Dit geld ook voor de onderste twee. Anders kom je niet uit
13.09.2013 - 22:58DROPS Design answered:
Hoi Lotte. We hebben de teltekening en het model bekeken en kunnen hier geen fouten vinden.
03.10.2013 - 11:15
![]() Donatella wrote:
Donatella wrote:
Buongiorno,una domanda riguardo alle diminuzioni,ma se ho 100 punti e faccio la quantità di diminuzioni segnate alla fine non mi rimangono 10 maglie,in cosa sbaglio?grazie
08.08.2013 - 09:01DROPS Design answered:
Buongiorno Donatella. Ogni volta che diminuisce, vengono diminuite 10 m. Deve fare un ferro con diminuzioni ogni 4 ferri, in tutto 4 volte (= 40 m diminuite – abbiamo modificato leggermente il testo in questo punto) e poi ogni 2 ferri per 5 volte (= 50 m diminuite). Vengono complessivamente diminuite 90 m e quindi ne restano 10 sui ferri. Ci riscriva se è ancora in difficoltà. Buon lavoro!
08.08.2013 - 12:42
![]() Donatella wrote:
Donatella wrote:
Buongiorno ,ho un'altro punto che non mi è chiaro,approfitto della vostra gentilezza,non capisco il punto dove si deve aumentare..2 a legaccio 2 rov 2 dir dove si dovrebbe aum 2 m giusto?per altre 2 volte..ma come devo ripartire questi aum nel ferro?non posso cominciare subito con 28 m ?
05.08.2013 - 15:04DROPS Design answered:
Buonasera. Per aumentare: lavori le prime 2 m a legaccio, * le 2 m successive a rov, lavora la m successiva sia nell’asola anteriore che in quella posteriore (1 m aumentata), lavora la m successiva sia nell’asola anteriore che in quella posteriore (1 m aumentata) (abbiamo così le 4 m dir), le 2 m successive a rov *, ripeta da *-* altre 2 volte, e lavori le ultime 2 m a legaccio. Non si inizia subito con le 28 m perché la lavorazione a coste e a trecce stringe un po’ il lavoro. Buon lavoro!
05.08.2013 - 22:39
![]() Donatella wrote:
Donatella wrote:
Grazie mille per il chiarimento cosi tempestivo,non riuscivo proprio a fare il campione.
05.08.2013 - 00:13
![]() Donatella wrote:
Donatella wrote:
Buonasera,non riesco a fare queste trecce,ma nello schema è compreso anche il ferro a rovescio? o si lavorano le maglie come si presentano?si parte sempre da sinistra verso destra o anche destra verso sinistra?grazie
04.08.2013 - 21:31DROPS Design answered:
Buonasera. Nel diagramma sono riportati tutti i ferri, sia quelli sul diritto del lavoro che quelli sul rovescio. Il diagramma si legge dal basso verso l'alto; la prima riga (diritto del lavoro) si legge da destra verso sinistra; la seconda riga (rovescio del lavoro) da sinistra verso destra e così via. Ci riscriva se si trova ancora in difficoltà. Buon lavoro!
04.08.2013 - 22:37
![]() Anna Maria wrote:
Anna Maria wrote:
Buon pomeriggio,per ottenere una misura esatta quale devo fare 18mx23 o 18mx36 ? grazie
29.04.2013 - 15:08DROPS Design answered:
Buongiorno Anna Maria, in realtà dovrebbe riuscire ad ottenere entrambi i campioni, perchè servono entrambi i tipi di ferri per il cappello. Buon lavoro!
30.04.2013 - 16:17
![]() Anna Maria wrote:
Anna Maria wrote:
Buon pomeriggio,vorrei sapere per il campione quale devo fare 18m x 23 ferri o 18x36 a punto legaccio? grazie
29.04.2013 - 15:06DROPS Design answered:
Buongiorno Anna Maria, in realtà dovrebbe riuscire ad ottenere entrambi i campioni, perchè servono entrambi i tipi di ferri per il cappello. Buon lavoro!
30.04.2013 - 16:21
![]() Anna Maria wrote:
Anna Maria wrote:
Buonasera,la lana che ho comprato è quella indicata da voi per fare il cappello nepal unicolor n6314 blu denim penso che non occorre fare il campione grazie
27.04.2013 - 17:30DROPS Design answered:
Buonasera Anna Maria, il campione va sempre fatto, perchè la sua tensione potrebbe essere diversa da quella indicata e potrebbe essere necessario usare un numero di ferri diverso da quello indicato per avere quella tensione. Buon lavoro!
27.04.2013 - 19:08
|
|||||||||||||||||||||||||
Runa#runahat |
|||||||||||||||||||||||||
 |
 |
||||||||||||||||||||||||
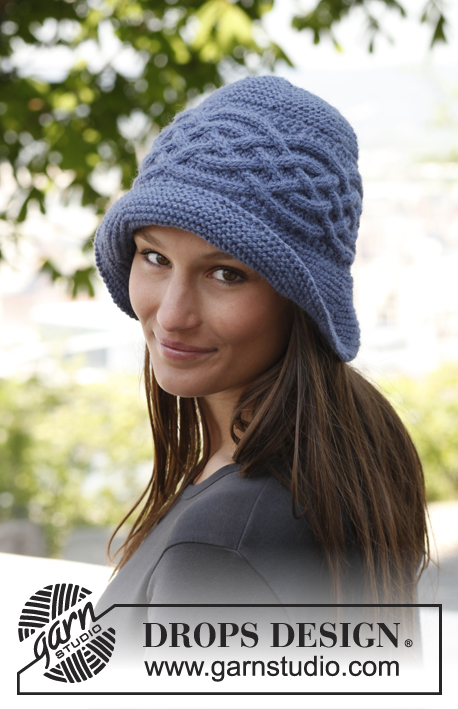
Knitted DROPS hat with sideways cable in ”Nepal”.
DROPS 141-42 |
|||||||||||||||||||||||||
|
GARTER ST (back and forth on needle): K all rows. 1 ridge = 2 rows K. PATTERN: See diagram A-1. Diagram shows 1 repetition of pattern in breadth and vertically, the diagram shows pattern from RS. ---------------------------------------------------------- HAT: First work the cable back and forth sideways. Then knit up sts along one side of cable and work crown of hat. Then knit up sts along the other side of cable and work brim of hat. Finally sew the hat tog mid back. CABLE EDGE: Worked back and forth on needle size 4.5 mm. Cast on 22 sts with Nepal. K 1 row from WS. Work next row as follows: 2 sts in GARTER ST – see explanation above, * P 2, K 2 in each of the next 2 sts (= K 4), P 2 *, repeat from *-* 2 more times, finish with 2 sts in garter st = 28 sts. Work 1 row from WS with K over K and P over P with 2 sts in garter st in each side. Continue with A-1 until 7-8 repetitions have been worked (piece measures approx. 49-55 cm). Work next row as follows: 2 sts in garter st, * P 2, K 2 tog, K 2 tog, P 2 *, repeat from *-* 2 more times, finish with 2 sts in garter st = 22 sts. K 1 row from WS over all sts, then cast off. Edge is approx. 12 cm wide. CROWN OF HAT: Worked back and forth on circular needle size 4 mm. Knit up 1 st in every ridge in front loop of outermost st along one side of cable edge. K 1 row from WS while at the same time inc evenly to 90-100 sts (inc by working 2 sts in 1 st). Insert 1 marker at beg of row (from RS) and then 1 marker for every 10th st (= 9-10 markers in total). Work in GARTER ST back and forth - see explanation above. AT THE SAME TIME on 4th row from when sts where knit up (= row from RS), dec 1 st after every marker by K 2 tog. Repeat dec every 4 rows 3 more times and then every other row 5 times = 9-10 sts remain on needle. Cut the thread and pull it through the remaining sts and tighten tog. BRIM OF HAT: Worked back and forth on circular needle size 4 mm. Knit up 1 st in every ridge along the other side of cable edge. K 1 row from WS while at the same time inc evenly to 90-100 sts. Insert 1 marker at beg of row (from RS) and then 1 marker for every 10th st (= 9-10 markers in total). Work in GARTER ST back and forth - see explanation above. AT THE SAME TIME on 2nd row from when sts where knit up (= row from RS), inc 1 st after every marker by making 1 YO. On next row K YOs twisted to avoid holes. Repeat inc every other row 2 more times and then every 4 rows 2 times = 135-150 sts. Working in garter st without inc until brim measures 7½-8 cm, cast off from RS (NOTE: Do not cast off too loosely). ASSEMBLY: Sew hat tog mid back in front loop of outermost st to avoid a chunky seam. |
|||||||||||||||||||||||||
Diagram explanations |
|||||||||||||||||||||||||
|
|||||||||||||||||||||||||

|
|||||||||||||||||||||||||
Have you finished this pattern?Tag your pictures with #dropspattern #runahat or submit them to the #dropsfan gallery. Do you need help with this pattern?You'll find 9 tutorial videos, a Comments/Questions area and more by visiting the pattern on garnstudio.com. © 1982-2025 DROPS Design A/S. We reserve all rights. This document, including all its sub-sections, has copyrights. Read more about what you can do with our patterns at the bottom of each pattern on our site. |
|||||||||||||||||||||||||


With over 40 years in knitting and crochet design, DROPS Design offers one of the most extensive collections of free patterns on the internet - translated to 17 languages. As of today we count 314 catalogues and 11820 patterns translated into English (UK/cm). 11820
We work hard to bring you the best knitting and crochet have to offer, inspiration and advice as well as great quality yarns at incredible prices! Would you like to use our patterns for other than personal use? You can read what you are allowed to do in the Copyright text at the bottom of all our patterns. Happy crafting!
Post a comment to pattern DROPS 141-42
We would love to hear what you have to say about this pattern!
If you want to leave a question, please make sure you select the correct category in the form below, to speed up the answering process. Required fields are marked *.