
Popular categories
Looking for a yarn?


Comments / Questions (118)
![]() Birgit Svarrer wrote:
Birgit Svarrer wrote:
Ang. sammensyningen på Anatolia filtet taske. De 2 første og sidste felter i stribe 3 på 20 m og 34 p bliver for lange og passer ikke på kortsiderne på stribe 1 og 2 i hver side. Hvad kan være årsagen, når strikkefastheden passer?
14.09.2013 - 13:36DROPS Design answered:
Hver rude/farve skal være lige så høj som den er bred da vil alle sømme passe i højden og på bredden.
18.09.2013 - 15:06
![]() Isabelle wrote:
Isabelle wrote:
Pourrait-on avoir les dimensions des bandes tricotées... lorsque je tricote 20 m et 34 rangs cela mesure 11 cm sur 16 cm. Est-ce que les dimensions sont bonnes ? merci
25.05.2013 - 07:24DROPS Design answered:
Bonjour Isabelle, vous devez avoir une tension de 17 m x 22 rangs en jersey = 10 cm avant feutrage, et 20 m x 34 rangs = 10 x 10 cm après feutrage. Essayez à nouveau avec des aiguilles plus fines pour avoir le bon échantillon et ainsi les mesures correctes pour le sac. Bon tricot !
25.05.2013 - 09:50
![]() Loni wrote:
Loni wrote:
Ich habe die Tasche für eine Freundin gestrickt. Sie ist der abolute Hit. Jeder will nun so eine Tasche haben. Sie fällt allerdings kleiner aus, als das Foto vermuten lässt. Und ich schließe mich Bine an,dass die braune Wolle nicht reicht. Also ein Knäuel mehr bestellen.
11.04.2013 - 14:58
![]() Karin wrote:
Karin wrote:
Hallo, ich verstehe den anfang einfach nicht.muß ich jedes Quadrat einzeln stricken? Wenn nicht wie stricke ich dann die Reihen mit dem Farbwechsel??
15.03.2013 - 09:15DROPS Design answered:
Liebe Karin, dies steht am Anfang der Anleitung: „Man strickt 5 Steifen, die dann zusammengenäht werden.“ Für den Farbwechsel beginnen Sie die neue Reihe einfach mit der neuen Farbe. Die Fäden werden zum Schluss vernäht.
18.03.2013 - 09:12
![]() Jessica wrote:
Jessica wrote:
C'è una parola sbagliata nella traduzione ... "Al seguente lavaggio, lavorare la borsa con il programma normale per la lana." ma credo la parola giusta sia lavare. Ciao e ancora complimenti per il bellissimo sito!!!
05.03.2013 - 15:23DROPS Design answered:
Buongiorno. Abbiamo corretto. Grazie e buon lavoro!
05.03.2013 - 19:07
![]() Vanessa wrote:
Vanessa wrote:
Hallo Zusammen! Wenn ich den bunten Teil der Tasche lieber einfarbig stricken möchte,wie viel Wolle brauche ich denn da ungefähr? Liebe Grüße!
27.02.2013 - 13:37DROPS Design answered:
Liebe Vanessa, wir haben diese Anleitung leider nur für die bunte Tasche. da die Tasche nicht mehr hier ist, kann ich sie auch nicht wiegen. Evtl. brauchen Sie weniger als bei der bunten Tasche, aber ich kann Ihnen die Menge leider nicht sagen. Sie können sich an einfarbigen Taschenmodellen orientieren.
28.02.2013 - 09:26
![]() Bine wrote:
Bine wrote:
Habe die Tasche genau nach Anleitung gestrickt.Leider reicht die dunkelbraune Wolle nicht.Also lieber ein Knäuel mehr kaufen.
24.02.2013 - 16:16
![]() Maria wrote:
Maria wrote:
Habe die Streifen mit dem Rückstich (und einem Wollgarn)zusammengenäht. Wird die Tasche beim Filzen trotzdem gleichmäßig einlaufen können, oder ist diese Naht zu fest?
19.02.2013 - 17:51DROPS Design answered:
Liebe Maria, mit Alaska kann man gut nähen (es ist kein Dochtgarn), daher empfehlen wir, die Tasche mit dem Originalgarn zusammenzunähen. Da ich das von Ihnen benutzte Garn nicht kenne, kann ich nicht beurteilen wie es sich beim Filzen verhält. Eine Naht mit Rückstichen ist in Ordnung.
20.02.2013 - 07:51
![]() Maria wrote:
Maria wrote:
Habe die Runde mit Umschlägen in Farbe 23 gestrickt, sind aber 216 maschen geworden. müssen aber, wenn ich richtig verstehe, 200 sein? was mache ich falsch?
17.02.2013 - 19:50DROPS Design answered:
Liebe Maria, dann haben Sie zu viele Maschen aufgefasst: Sie haben ja insgesamt über 10 Quadraten Maschen aufzufassen (je 4 vorne und hinten und je 1 auf der Seite) – nun müssen Sie einfach darauf achten, pro Quadrat etwa 20 M aufzufassen.
18.02.2013 - 10:03
![]() Heide wrote:
Heide wrote:
Muss man die für die Träger die 2 m lange Schnur zweimal stricken? Und wie wird sie dann eingefädelt?
16.01.2013 - 09:50DROPS Design answered:
Liebe Heide, die Schnur wird nur 1 x gestrickt und nach dem Filzen wie auf dem Foto sichtbar durch die Löcher gefädelt (die beiden Enden mit Knoten innen in der Tasche fixieren).
17.01.2013 - 13:45
|
|||||||
Anatolia#anatoliabag |
|||||||
|
|
|||||||
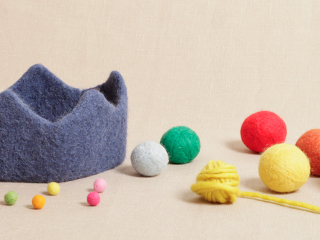
Felted DROPS bag in ”Alaska”.
DROPS 140-33 |
|||||||
|
BAG: The entire bag is worked in stocking st, work 5 strips that are sewn tog when finished. STRIP 1 (make 2): Worked back and forth on circular needle. Cast on 20 sts on circular needle size 5 mm with colour no 54 and work 34 rows in each colour in the following order: Colour no 54, 53, 58, 37, cast off. STRIP 2 (make 2): Worked back and forth on circular needle. Cast on 20 sts on circular needle size 5 mm with colour no 56 and work 34 rows in each colour in the following order: Colour no 56, 11, 57, 45, cast off. STRIP 3 (make 1): Worked back and forth on circular needle. Cast on 20 sts on circular needle size 5 mm with colour no 45 and work 34 rows in each colour in the following order: Colour no 45, 57, 37, 58, 53, 54, 11, 56, cast off. Sew strips tog sideways – see figure for placement. Sew the rest of strip 3 to short side on strip 1 and 2 in each side. Knit up 200 sts around the upper edge of bag with colour no 23 on circular needle size 5 mm. Insert 1 marker in the middle st from one short side = beg of round. Work in stocking st in the round. When 3 cm have been worked, work as follows: K 8, 2 YO, K 2 tog, K 18, 2 YO, K 2 tog, K 38, 2 YO, K 2 tog, * K 18, 2 YO, K 2 tog *, repeat from *-* 3 times, K 38, 2 YO, K 2 tog, K 18, 2 YO, K 2 tog, K 10. On next row slip one YO off the needle and K the other YO – make sure that holes are made. Continue in stocking st. When piece measures 7 cm, work as follows: Cast off the first 40 sts on round, work 20 sts, cast off the remaining sts. Cut the thread. Work 28 rows in stocking st over the 20 sts, work next row as follows: Work 9 sts, 2 YO, K 2 tog, work the rest of row. On next row slip one YO off the needle and K the other YO – make sure that a hole is made. Work 5 rows in stocking st over all sts, cast off. TIE: Work a tube with 4 sts back and forth on circular needle size 5 mm as follows: Cast on 4 sts with colour no 23 and K 1 row. Then work as follows: * Slide all sts to the right side of needle without turning the piece, tighten thread and K over all sts *, repeat from *-* until tie measures 200 cm. Cut and fasten the thread. FELTING: Place the bag and the tie in the washing machine with a detergent without enzymes and optical bleach. Wash at 40 degrees with normal spin but no pre-wash. After wash shape the bag to the right size while still wet and leave to dry flat. At subsequent wash, wash the bag at regular wool programme. Thread tie up and down the holes and tie ends tog inside the bag. Sew button on top of bag. AFTER FELTING: If the piece is not felted enough and is too big: Wash the piece one more time in the washing machine while it is still wet add a terry towel that measures approx. 50 x 70 cm - NOTE: Do not use a short program. If the piece has been felted too much and is too small: While the piece is still wet stretch it to the correct measurements, if the piece is dry, make sure to soak it first. Remember: All subsequent washes are as a normal wool garment. |
|||||||
Diagram explanations |
|||||||
|
|||||||

|
|||||||
Have you finished this pattern?Tag your pictures with #dropspattern #anatoliabag or submit them to the #dropsfan gallery. Do you need help with this pattern?You'll find 6 tutorial videos, a Comments/Questions area and more by visiting the pattern on garnstudio.com. © 1982-2025 DROPS Design A/S. We reserve all rights. This document, including all its sub-sections, has copyrights. Read more about what you can do with our patterns at the bottom of each pattern on our site. |
|||||||


With over 40 years in knitting and crochet design, DROPS Design offers one of the most extensive collections of free patterns on the internet - translated to 17 languages. As of today we count 314 catalogues and 11820 patterns translated into English (UK/cm). 11820
We work hard to bring you the best knitting and crochet have to offer, inspiration and advice as well as great quality yarns at incredible prices! Would you like to use our patterns for other than personal use? You can read what you are allowed to do in the Copyright text at the bottom of all our patterns. Happy crafting!
Post a comment to pattern DROPS 140-33
We would love to hear what you have to say about this pattern!
If you want to leave a question, please make sure you select the correct category in the form below, to speed up the answering process. Required fields are marked *.