
Beliebte Kategorien
Suchen Sie nach einem Garn?


Kommentare / Fragen (60)
![]() Catherine hat geschrieben:
Catherine hat geschrieben:
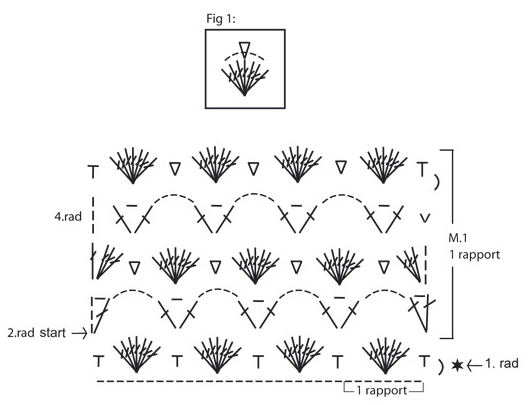
Bonjour, Je ne comprends absolument rien aux lignes 2 et 4 du diagramme...serait-il possible d'avoir plus d'explications? Merci
29.01.2013 - 09:47DROPS Design hat geantwortet:
Bonjour Catherine, rang 2: 4 ml, 1B dans la même m, *5 ml, sauter le groupe de B et dans la ms suiv : 1 B, 1 ml, 1B*. R3 :3ml, 3B dans la même m,*1 ms dans la ml du r2 + dans la 4ème B du groupe de B, 1 groupe de B dans la ml suiv*. R4 :3 ml, *1B,1ml,1B dans la ms, 5 ml*. Répétez de *-* tous les rangs. Bon crochet !
29.01.2013 - 09:58
![]() DROPS Design hat geschrieben:
DROPS Design hat geschrieben:
Ashlee - that symbol is just a bent dash that is the symbol for a chain st taking you to next row.
09.06.2010 - 18:41
![]() Ashlee hat geschrieben:
Ashlee hat geschrieben:
Ok, I took a break from this pattern, cleared my head and started again, it's working wonderfully. Only problem is there is a symbol in the M1 that doesn't have an explanation. On the 5th row (top) of the diagram, there's a comma looking thing in the first step, no where in the instructions can I find that.
08.06.2010 - 19:25
![]() DROPS Design hat geschrieben:
DROPS Design hat geschrieben:
You are supposed to have 5 chains go over the 7 tc (US dc), then in next dc work 1 tc, ch 1, 1 tc, then chain 5 and so on.
26.02.2010 - 17:48
![]() Ashlee hat geschrieben:
Ashlee hat geschrieben:
I understand that the pattern is in a different language and the english translation is above but in the diagram...the second row doesn't add up to me. If the 2 tc at the dc are right next to each other (as shown) there there should be at least 7 chains...there's only 5...or am I supposed to have 5 chains go over the 7tcs? I don't get it. And is that right? 5 chains over the 7 with no attachment? I'm sorry...I really don't get it.
26.02.2010 - 17:18
![]() DROPS Design hat geschrieben:
DROPS Design hat geschrieben:
Hej, Enligt diagram skall börjar du 4. rad i vänster sida, då ser du att varvet blir lika i början och slutet.
29.01.2010 - 12:21
![]() Camilla hat geschrieben:
Camilla hat geschrieben:
Jag älskar detta mönster och väskan blir otroligt söt. Undrar dock över 4.rad i M.1 rapport. Varvet påbörjas med 3 luftmaskor och avslutas med en smygmaska. Då blir ju varvet olika i början och slutet. Har jag missuppfattat mönstret? Vore tacksam för vägledning.
16.01.2010 - 13:53
![]() DROPS Design hat geschrieben:
DROPS Design hat geschrieben:
If you don't get the patterns to work, we would like to ask you to go to the retailer where you bought the yarn. Our retailers are there to give you help when you don’t know how to continue. If you have bought original Garnstudio yarn, you can be sure that you have bought yarn from a shop that are specialized on DROPS patterns, and you have also supported our work with our webpages.
21.05.2008 - 17:31
![]() Jen hat geschrieben:
Jen hat geschrieben:
The diagram is really hard to understand, is there anyone who has completed this bag that could explain it in simpler instructions. I see the translation and know what each of the symbols represents, but I don't understand how to put it all together.
21.05.2008 - 17:27
![]() DROPS Design hat geschrieben:
DROPS Design hat geschrieben:
The translations for the Diagrams for all Garnstudio patterns are included within the text of the Pattern itself. If you look immediately above the diagram, you will find lines starting with an = sign. These are the translations, and they are given in the same vertical order as the chart symbols within the diagram.
14.04.2008 - 16:29
|
||||||||||||||||||||||
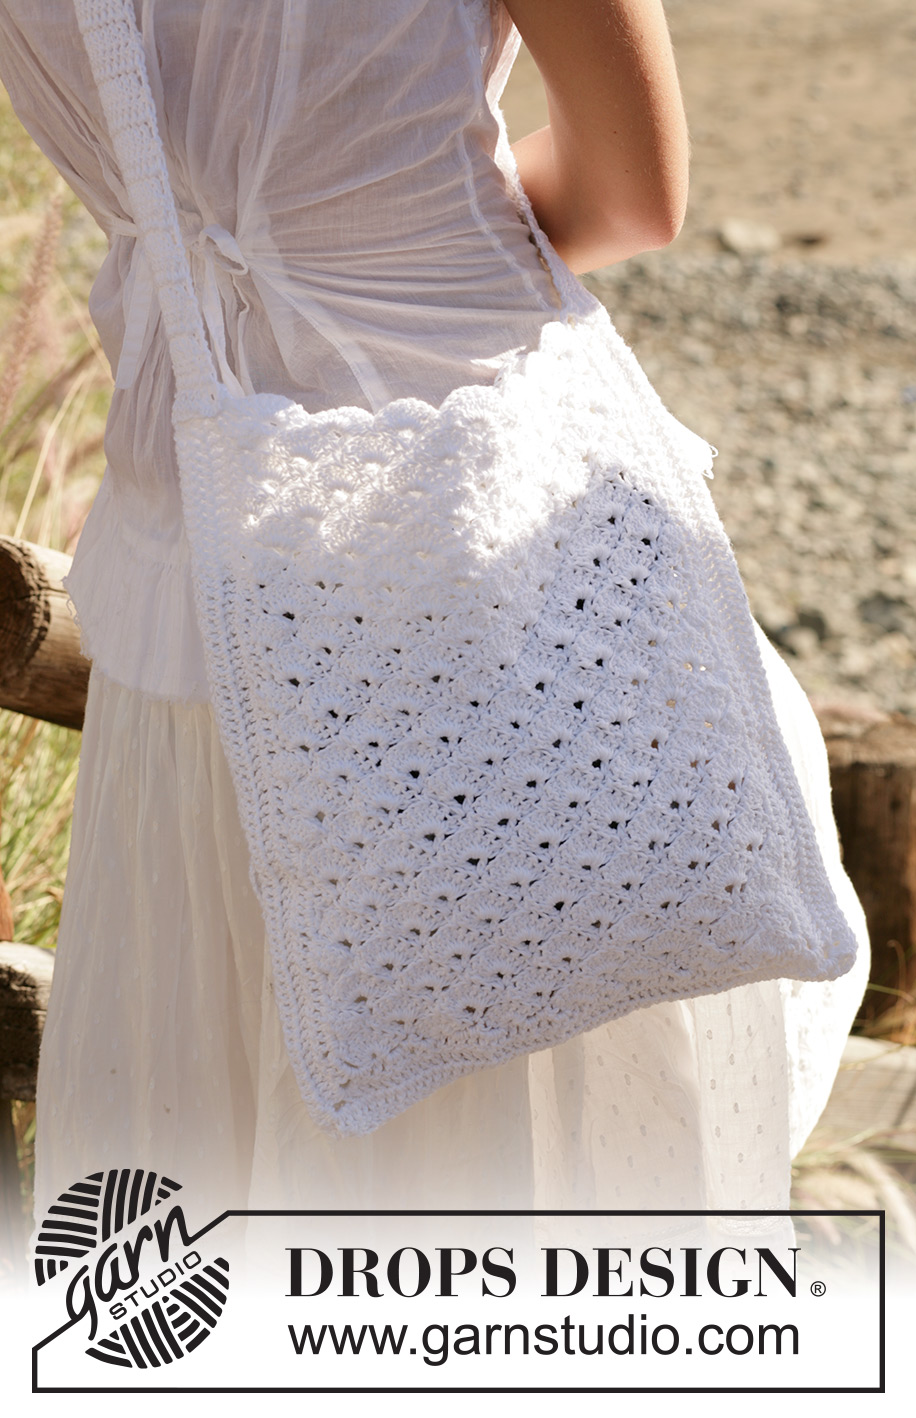
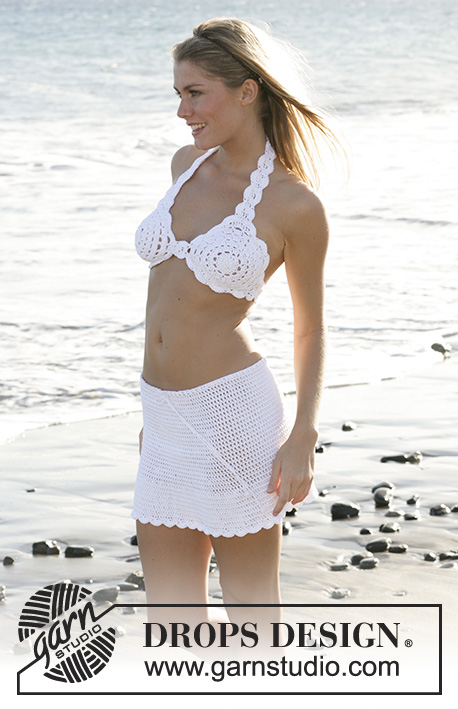
White Honey Comb#whitehoneycombbag |
||||||||||||||||||||||
|
|
||||||||||||||||||||||
Gehäkelte DROPS Tasche in „Bomull-Lin“
DROPS 99-24 |
||||||||||||||||||||||
|
Muster: Siehe Diagramm M1 Häkelinfo: 1 Rapport = 8 Lm. Wenn Sie die Tasche breiter häkeln wollen, häkeln Sie pro Rapport 8 Lm mehr. Das erste Stb jeder R. wir mit 3 Lm ersetzt. Falls Sie möchte können Sie eine Kante um die Träger häkeln: *6 Stb in ein Stb vom Träger, 2 cm überspringen, 1 fM, 2 cm überspringen*, von *-* wiederholen. Tasche: Die Tasche wird in 2 Teile gehäkelt, Vorderteil und Rückenteil. Vorderteil: Mit Bomull-Lin auf Ndl. Nr. 4, 58 Lm häkeln (inkl. 1 Lm zum drehen) – siehe Häkelinfo! 1 fM in die 2. Lm, * 3 Lm überspringen, 7 Stb in die nächste Lm, 3 Lm überspringen, 1 fM in die nächste Lm *, von *-* total 7 Mal wiederholen. Danach M1 häkeln und nach ca. 33 cm den Faden abschneiden ca. 33 cm – nach einem ganzen Rapport. An der Unterkante und an den Seiten 3 R. mit Stb häkeln - siehe Häkelinfo. An den Ecken wie folgt häkeln: 1 Stb, 3 Lm, 1 Stb. Rückenteil: Wie das Vorderteil. Träger: 12 Lm (inkl. 3 Lm zum drehen) – siehe Häkelinfo! Danach 1 Stb in jede Lm häkeln (= 10 Stb) bis der Träger ca. 80 cm misst. Faden abschneiden. Zusammennähen: Die Unterkante und die Seiten zusammennähen und die Träger in der Stb Partie annähen. |
||||||||||||||||||||||
Erklärungen zum Diagramm |
||||||||||||||||||||||
|
||||||||||||||||||||||
 |
||||||||||||||||||||||
Haben Sie diese Anleitung nachgearbeitet?Dann taggen Sie Ihre Fotos mit #dropspattern #whitehoneycombbag oder schicken Sie sie an die #dropsfan Galerie Brauchen Sie Hilfe bei dieser Anleitung?Sie finden 4 Videotutorials, einen Kommentar/Fragen-Bereich und vieles mehr, wenn sie die Anleitung bei garnstudio.com aufrufen. © 1982-2026 DROPS Design A/S. Wir besitzen alle Rechte. Dieses Dokument, einschließlich aller Untersektionen, hat Urheberrechte. Mehr dazu, was Sie mit unseren Anleitungen machen können, finden Sie ganz unten auf der Seite zu jeder Anleitung. |
||||||||||||||||||||||


Mit über 40 Jahren Tätigkeit im Entwerfen von Strick- und Häkelmustern bietet Ihnen DROPS Design eine der umfangreichsten Sammlungen von kostenlosen Anleitungen im Internet - in 17 Sprachen übersetzt. Zum jetzigen Zeitpunkt haben wir insgesamt 324 Handarbeitshefte und 12290 Anleitungen auf Deutsch. 12202
Unser Ziel ist es, Ihnen die besten Angebote zum Stricken und Häkeln, Inspirationen und Ratschläge sowie qualitativ hochstehende Garne zu unglaublichen Preisen zu bieten! Möchten Sie unsere Anleitungen nicht nur für den persönlichen Gebrauch nutzen? Unsere Copyright Bedingungen finden Sie bei allen unseren Anleitungen ganz unten auf der jeweiligen Seite. Viel Spaß beim Handarbeiten!
Kommentieren Sie die Anleitung DROPS 99-24
Wir würden gerne Ihre Meinung zu diesem Modell erfahren!
Wenn Sie eine Frage stellen möchten, prüfen Sie bitte, dass Sie die richtige Kategorie im unten stehenden Formular gewählt haben - so bekommen Sie schneller eine Antwort. Die obligatorischen Felder sind mit einem * gekennzeichnet.