
Beliebte Kategorien
Suchen Sie nach einem Garn?


Kommentare / Fragen (26)
![]() Rosy hat geschrieben:
Rosy hat geschrieben:
Buongiorno xfavore non capisco come lavorare il rovescio di questo diagramma grazie
15.04.2021 - 13:37DROPS Design hat geantwortet:
Buonasera Rosy, i diagrammi si leggono dal basso verso l'alto, da destra verso sinistra nei ferri di andata e da sinistra verso destra nei ferri di ritorno. Quindi sul rovescio deve leggere il diagramma da sinistra verso destra e lavorare come indicato. Buon lavoro!
15.04.2021 - 19:22
![]() Linda LYNN hat geschrieben:
Linda LYNN hat geschrieben:
Please can I knit this garment on straight needles even if I have to knit back and front separately hopefully you can help
19.08.2020 - 17:38DROPS Design hat geantwortet:
Dear Mrs Lynn, sure you can, you will read more about how to adapt a pattern into straight needles here. Happy knitting!
20.08.2020 - 09:54
![]() Angela Barnes hat geschrieben:
Angela Barnes hat geschrieben:
Hello I cannot work the sizes out please? Please can you tell me the three sizes? I am about a 40 inch chest Thank you
04.02.2020 - 12:19DROPS Design hat geantwortet:
Dear Mrs Barnes, measure a similar garment you have and like the shape and compare to the measurements in chart to find out the matching size. read more about sizing here. Happy knitting!
04.02.2020 - 12:39
![]() Judith Foley hat geschrieben:
Judith Foley hat geschrieben:
You have indicated that patter for 1 and 2 are below the measurment section. I do not see any information for pattern 1 or 2 on the printed pattern. Do you have an updated version?
22.07.2019 - 15:56DROPS Design hat geantwortet:
Dear Judith, if you have in your printed version drawing/ chart of the sweater with measures, you will find pattern diagram chart on the right - see M.1, M.2. If you have no chart, there is probably one whole page missing in you printed version, so check all then pages for print. Happy knitting!
22.07.2019 - 16:07
![]() Judith Foley hat geschrieben:
Judith Foley hat geschrieben:
I just downloaded this pattern. In the QA section Elaine Singer asked for the patterns 1 & 2. You indicated they were below the measurement chart. I cannot find them when I print the pattern. Do you have an updated version?
22.07.2019 - 15:54
![]() Vicky Williams hat geschrieben:
Vicky Williams hat geschrieben:
I assume that when you do the M1 and M2 pattern that the even rows are worked from the left and are the wrong side of the top so need to be purl stitch instead of knit etc??
10.02.2019 - 20:39DROPS Design hat geantwortet:
Hello Vicky. Yes, the even rows are worked on the wrong side of the work, from the left to the right. You will knit the black squares, and purl the white squares. Happy knitting!
10.02.2019 - 23:00
![]() Gunnel hat geschrieben:
Gunnel hat geschrieben:
Ytterligare en fråga till förra, från avigsidan, ska man inte sticka avig på räta och räta på avig? I diagrammets förklaring står det att tom ruta är rm och prick i ruta är avigruta. Och då blir det ju på de tre maskorna rätstickning i stället för slätstickning? Enligt diagrammet så stickar man på varv 2, 4 etc 7 aviga och 3 räta! Rätt eller fel? Dessutom ser inte hålmönstret likadant ut på mönstret och bilden!
28.03.2018 - 17:42DROPS Design hat geantwortet:
Hej, diagrammet visar mönstret sett från rätsidan, så du har helt rätt i att det ska vara 3 maskor i slätstickning i början på diagrammet.
05.04.2018 - 16:45
![]() Gunnel hat geschrieben:
Gunnel hat geschrieben:
I M1 och M2 visar skissen att de tre första maskorna ska stickas räta på varje varv men de de tre första och de tre sista på varje varv ska stickas i slätstickning. På bilden ser det ut som om även de tre maskorna i M1 och M2 är stickat som slätstickning. Ska alla dessa tre maskor stickas som rätstickning eller slätstickning?
28.03.2018 - 16:52
![]() Dia hat geschrieben:
Dia hat geschrieben:
Thank you for the clarification, I clearly missed that part. :)
12.10.2017 - 13:41Diana hat geschrieben:
I don't understand the description. It says 235 stitches for the body, but later it says 58 for the front and 111 for the back. Confusing. How many parts of this jacket should be knitted? How many front parts? Or am I missing something?
11.10.2017 - 21:15DROPS Design hat geantwortet:
Dear Diana, the jacket is worked from bottom up in one piece to armholes, ie work over the 235 sts until piece measures 33 cm, then cast off for armholes: work 58 sts for front piece, cast off the next 4 sts, work the next 111 sts for back piece, cast off the next 4 sts and work the last 58 sts for front piece. Work now each part separately to the end starting with one of the front piece. Slip sts from back piece and 2nd front piece on a st holder, they will be worked later. Happy knitting!
12.10.2017 - 09:11
|
|||||||||||||
South Bay#southbaycardi |
|||||||||||||
|
|
|||||||||||||
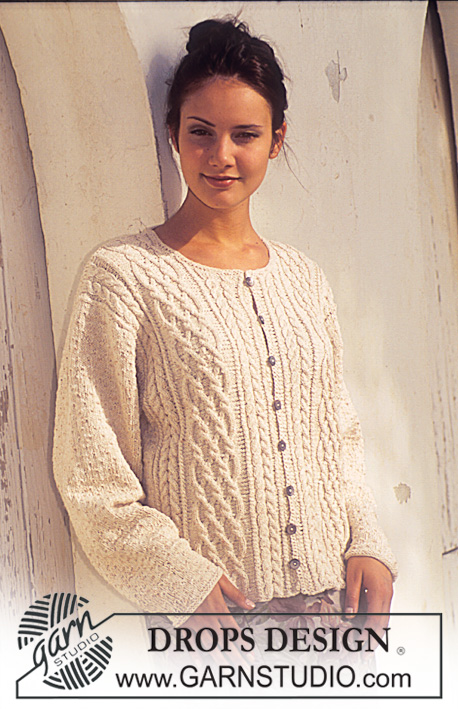
DROPS Jacke in “Safran”
DROPS 51-8 |
|||||||||||||
|
Krausrippe (hin und zurück): 1 Krausrippe = 2 R. re. Muster: Siehe Diagram. Das Diagramm zeigt das Muster von der rechten Seite. Vorder- und Rückenteil: Die Arbeit wird, auf einer Rundstricknadel, hin und zurück gestrickt. Mit gelb auf Rundstricknadel Nr. 3,5, 235 (245-255) M. anschlagen (inkl. 1 Randm. auf beiden Seiten) und M1 wie folgt stricken: 1 Randm, M1 x 23 (24-25), 3 M. glatt, 1 Randm. Stimmt die Maschenprobe? Nach 29 (29-29) M2 bis zur fertigen Lägnge wie folgt: 1 Randm, M2 x 23 (24-25), 3 M. glatt, 1 Randm. Gleichzeitig nach 33 (33-33) cm wie folgt: 58 (61-63) M. für das Vorderteil, 4 M. für das Armloch abk., 111 (115-121) M. für das Rückenteil stricken, 4 M. für das Armloch abk., 58 (61-63) M. für das Vorderteil stricken. Jetzt jede Seite einzeln fertig stricken. Vorderteil: = 58 (61-63) M. Weiter, bei jeder 2. R. gegen das Armloch abk.: 2 M. x 2 (2-2), 1 M. x 3 (4-5) = 51 (53-54) M. Nach 45 (46-47) cm bei jeder 2. R. gegen den Hals abk.: 6 (8-7) M. x 1, 3 M. x 1, 2 M. x 3, 1 M. x 2 und danach bei jeder 4. R.: 1 M. x 2. Nach 55 (56-57) cm abk. Rückenteil: = 111 (115-121) M. Wie beim Vorderteil für das Armloch abk. = 97 (99-103) M. Nach 53 (54-55) cm die mittleren 29 (31-31) M. für den Hals abk. Bei der nächsten R. 2 M.g gegen den Hals abk. Nach 55 (56-57) cm abk. Ärmel: Mit gelb auf Nadelspiel Nr. 3,5, 78 (78-82) M. anschlagen und M2 stricken. Gleichzeitig unter dem Ärmel bei jeder R. aufnehmen: 2 M. x 12 (14-14) = 102 (106-110) M. (Die neuen Maschen werden nach und nach ins Muster eingestrickt. Nach 5 (5,5-6) cm unter dem Ärmel 4 M. abk. und die Arbeit hin und zurück fertig stricken. Weiter, bei jeder 2. R. gegen die Schulter abk.: 3 M. x 8 (9-9), 4 M. x 2.Danach abk. Die Arbeit misst ca. 12 (13-14) cm. Zusammennähen: Die Schulternaht zusammennähen. Rund um den Hals mit gelb auf Ndl. Nr. 3,5, ca. 120 M. aufnehmen und 2 Krausrippen stricken. Danach abk. Blende: Am linken Vorderteil mit gelb auf Ndl. Nr. 2,5, eine Kante häkeln: 2 R. mit ca. 73 fM. Auf der rechten wiederholen jedoch nach der 1. R. (oben anfangen) wie folgt Knopflöcher einhäkeln: 2 fM, * 2 Lm, 2 fM überspringen und ca. 8-9 fM *. von *-* wiederholen. Die Ärmel einnähen und die Knöpfe annähen. |
|||||||||||||
Erklärungen zum Diagramm |
|||||||||||||
|
|||||||||||||
 |
|||||||||||||
Haben Sie diese Anleitung nachgearbeitet?Dann taggen Sie Ihre Fotos mit #dropspattern #southbaycardi oder schicken Sie sie an die #dropsfan Galerie Brauchen Sie Hilfe bei dieser Anleitung?Sie finden 24 Videotutorials, einen Kommentar/Fragen-Bereich und vieles mehr, wenn sie die Anleitung bei garnstudio.com aufrufen. © 1982-2026 DROPS Design A/S. Wir besitzen alle Rechte. Dieses Dokument, einschließlich aller Untersektionen, hat Urheberrechte. Mehr dazu, was Sie mit unseren Anleitungen machen können, finden Sie ganz unten auf der Seite zu jeder Anleitung. |
|||||||||||||


Mit über 40 Jahren Tätigkeit im Entwerfen von Strick- und Häkelmustern bietet Ihnen DROPS Design eine der umfangreichsten Sammlungen von kostenlosen Anleitungen im Internet - in 17 Sprachen übersetzt. Zum jetzigen Zeitpunkt haben wir insgesamt 324 Handarbeitshefte und 12245 Anleitungen auf Deutsch. 12157
Unser Ziel ist es, Ihnen die besten Angebote zum Stricken und Häkeln, Inspirationen und Ratschläge sowie qualitativ hochstehende Garne zu unglaublichen Preisen zu bieten! Möchten Sie unsere Anleitungen nicht nur für den persönlichen Gebrauch nutzen? Unsere Copyright Bedingungen finden Sie bei allen unseren Anleitungen ganz unten auf der jeweiligen Seite. Viel Spaß beim Handarbeiten!
Kommentieren Sie die Anleitung DROPS 51-8
Wir würden gerne Ihre Meinung zu diesem Modell erfahren!
Wenn Sie eine Frage stellen möchten, prüfen Sie bitte, dass Sie die richtige Kategorie im unten stehenden Formular gewählt haben - so bekommen Sie schneller eine Antwort. Die obligatorischen Felder sind mit einem * gekennzeichnet.