
Populære kategorier
Ser du etter et garn?


Kommentarer / Spørsmål (17)
![]() Monica Panera skrev:
Monica Panera skrev:
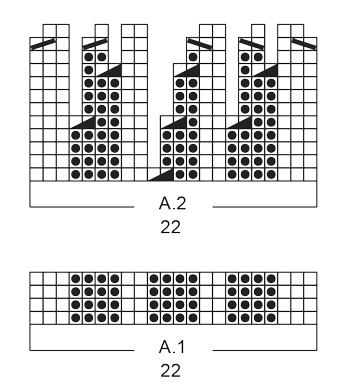
Buongiorno, ho difficoltà a capire lo schema A2 della fascia per capelli che sto facendo Warm Lavender modello:ee-536 Quando nello schema non vi sono quadratini che spiegano il punto da fare ma c'è il vuoto cosa significa? Che il punto è da passare sull'altro ferro senza lavorarlo? Aspetto una vostra gentile risposta.Grazie
12.12.2018 - 16:49DROPS Design answered:
Buongiorno Monica. Trova un vuoto perchè al ferro precedente è stata diminuita una maglia. Quando incontra il vuoto, deve lavorare la maglia come indicato nel quadratino successivo. Quindi per es., alla riga 6 del diagramma A2 (riga lavorata sul rovescio, quindi si legge da sinistra verso destra), lavora: 3 m rovescio, 3 m diritto, 2 maglie rovescio e così via. Buon lavoro!
12.12.2018 - 17:02
![]() Alva skrev:
Alva skrev:
Hur många masker ska man lägga upp om man har 4mm stickor och garn till stickorna?
23.02.2018 - 21:35DROPS Design answered:
Hei Alva. Oppskriften er skrevet til pinne 7 og Eskimo ... et garn som er tykkere og koster ca 15 kr for 50 gr ... kanske du skulle bytte garn - da blir den myk og fin og du kan bruke oppskriften :) Go Fornøyelse.
24.02.2018 - 09:34
![]() Sandra skrev:
Sandra skrev:
What is meant by: K YO twisted on next row & P YO twisted on next row?
25.11.2017 - 22:47DROPS Design answered:
Hi Sandra, To avoid a hole after increasing by making a yarn over (YO) you need to work them twisted. Either this will be knitted twisted or purled twisted depending on the pattern. To work twisted you need to insert the needle in the back loop of the stitch, rather than the front. I hope this helps. Happy knitting!
26.11.2017 - 06:49
![]() Sandra skrev:
Sandra skrev:
Part 2: I am so confused! YouTube person says that when you are reading charts in the round, everything is always read from Right to Left. So what is the right way?
23.11.2017 - 01:03DROPS Design answered:
Dear Sandra, that's right, diagrams will be read here from the right towards the left every round (= you are working here in the round, ie from RS) starting on the bottom corner on the right side. Read more here. Happy knitting!
23.11.2017 - 08:35
![]() Sandra skrev:
Sandra skrev:
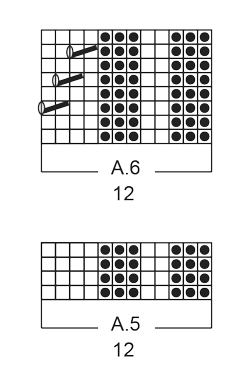
Part 1: A friend of mine read chart A.6 as this: "I'm looking at that exact pattern and this particular chart A6 is just k2tog, yo, k, k. The cable is worked in chart A3. In laments terms this would read: R1: p4, k3, p2, k3 R2: p3, k2, p3, k2tog, yo, k2 R3: p4, k3, p2, k3 R4: p3, k2, p3, k1, k2tog, yo, k1 R5: p4, k3, p2, k3 R6: p3, k2, p3, k2, k2tog, yo R7: p4, k3, p2, k3 R8: p3, k2, p3, k4" Is this correct?
23.11.2017 - 01:02DROPS Design answered:
Dear Sandra, start reading diag. from the bottom corner on the right side towards the left on every round (from RS), so that on row 3 in A.3 work the cable (previous and next rows are K from RS) and work row 3 in A.6 as follows: P3, K2, P3, K2, K2 tog, YO. When diagrams are done in height, repeat from row 1. Happy knitting!
23.11.2017 - 08:33
![]() Sandra skrev:
Sandra skrev:
Hi again...sorry for bugging you. In chart A6 of the neck warmer pattern - 1 slant from Right to Left over 2 squares then a yarn over is a cable (right?). How does this work? Slip 2 sts onto a cable needle (to the front or back yarn over then yarn over then knit from the cable?
22.11.2017 - 01:33DROPS Design answered:
Dear Sandra, the symbol used in A.6 with a slant line is 3rd symbol under diagram text, ie Knit 2 stitches together (and then make a YO (= 5th symbol) to compensate this dec). Happy knitting!
22.11.2017 - 09:10
![]() Sandra Delamont skrev:
Sandra Delamont skrev:
I have just finished the headband successfully after numerous attempts. I am very new to knitting and reading charts in patterns - so this is my first. When I look at the picture the neck warmer I see cable patterns. However, when I read the chart and words there is no mention of slipping stitches onto cable needles. What am I missing in the chart/directions? Can you please help me? Thanks. Sandra
11.11.2017 - 20:19DROPS Design answered:
Hi Sandra, The diagram A6 has the cables - just 2 this time (the sloping lines over 2 squares) and A6 is worked after you have worked A5 for 4 cm. You work A6 until the neck warmer measures 20-22 cm and then A5 for another 4 cm. I hope this helps and happy knitting!
12.11.2017 - 06:33
|
|||||||||||||||||||||||||
Warm Lavender |
|||||||||||||||||||||||||
|
|
|||||||||||||||||||||||||
Settet består av: Strikket DROPS pannebånd og hals i ”Snow” med vrbord
DROPS Extra 0-1234 |
|||||||||||||||||||||||||
|
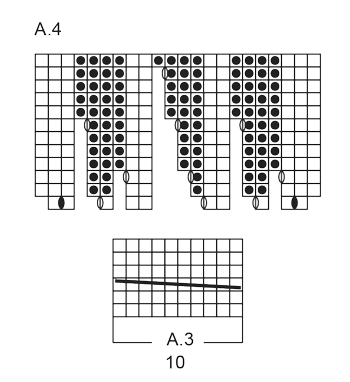
RILLE (strikkes frem og tilbake): 1 rille = 2 p rett. MØNSTER: Se diag A.1-A.6. Diag viser alle p i mønsteret sett fra retten. ---------------------------------------------------------- PANNEBÅND: Arb strikkes frem og tilbake på pinne. Legg opp 22 m på p 7 med Snow. Strikk 1 RILLE – se forkl over. Deretter strikkes A.1 (= 22 m). HUSK PÅ STRIKKEFASTHETEN! Gjenta A.1 til arb måler 14-15-16 cm, avpass at neste p er fra retten. Strikk A.2 over A.1. Når A.2 er strikket 1 gang i høyden er det 10 m på p. Strikk A.3 1 gang i høyden. Strikk A.4 over A.3. Kastene strikkes vridd inn i mønster. Når A.4 er strikket 1 gang i høyden er det 22 m på p. Strikk A.1 til arb måler 48-50-52 cm. Strikk 1 rille. Fell av. Sy oppleggs- og avfellingskanten sammen. ---------------------------------------------------------- HALS: Arb strikkes rundt på rundp. Legg opp 72-84 m på rundp 8 med Snow. Strikk A.5 (= 12 m) totalt 6-7 ganger i bredden. Når arb måler 4 cm strikkes A.6 over A.5. HUSK PÅ STRIKKEFASTHETEN! Når arb måler 20-22 cm, avpass etter en hel rapport av A.6, strikkes A.5 over A.6. Fell av når arb måler 24-26 cm. |
|||||||||||||||||||||||||
Diagramforklaring |
|||||||||||||||||||||||||
|
|||||||||||||||||||||||||
 |
|||||||||||||||||||||||||
 |
|||||||||||||||||||||||||
 |
|||||||||||||||||||||||||
Har du fullført dette mønsteret?Tagg bildene dine med #dropspattern eller send dem til #dropsfan-galleriet. Trenger du hjelp med denne oppskriften?Du finner 19 instruksjonsvideoer, kommentarer/spørsmål og mer i oppskriften på www.garnstudio.com © 1982-2026 DROPS Design A/S. Alle rettigheter er reservert. Dette dokumentet med sine underdokumenter har copyright. Les mer om hva du er tillatt å gjøre med våre oppskrifter nederst i alle våre oppskrifter på vår nettside. |
|||||||||||||||||||||||||


Med over 40 år i strikke- og heklebransjen, tilbyr DROPS Design en av de mest omfattende samlingene av gratis oppskrifter på internett - oversatt til 17 språk. Per i dag har vi 324 kataloger og 12290 oppskrifter på Norsk.
Vi jobber hardt for å tilby det beste innen strikking og hekling, inspirasjon og gode råd, men også kvalitetsgarn til fantastiske priser! Vil du bruke våre oppskrifter til annet enn personlig bruk? Du kan lese om hvilke regler som gjelder i teksten Copyright nederst på siden i alle våre oppskrifter. God fornøyelse!
Kommenter oppskrift DROPS Extra 0-1234
Vi vil gjerne høre din mening om denne modellen!
Hvis du ønsker å stille et spørsmål, husk å velge riktig kategori i menyen under - det vil sørge for at du får svar raskere. Obligatoriske felt er markert med *.