
Categorie popolari
State cercando un filato?


Commenti / Domande (145)
![]() Csőke Imola ha scritto:
Csőke Imola ha scritto:
Most tartok 27 cm-nél és fogyasztanom kellene. Az A.1 diagramm azon soránál tartok, hogy 1 erp 2 lsz, 1 erp, 2 lsz, stb. Hogy kell fogyasztani ebben az esetben, hiszen nincsen két erp egymás mellett?
24.02.2025 - 11:08
![]() Majbrit ha scritto:
Majbrit ha scritto:
Kan ikke bruge jeres opskrifter da de med diagram. Søger at der laves opskrifter der bliver beskrevet trin for trin/række for række istedet. Denne opskrift har jeg givet op på.
23.09.2022 - 00:00
![]() Maurer ha scritto:
Maurer ha scritto:
Bei mir wellt sich die letzte Reihe am Volantrand. Maschenprobe war gut. Ich habe den ganzen Volantrand schon mit einer kleineren Nadel gehäkelt, immer noch wellig. Auch habe ich die Picots mit festen Maschen gearbeitet - auch wellig. Können Sie mir bitte helfen? Was mache ich falsch? Vielen Dank.
01.06.2022 - 10:49DROPS Design ha risposto:
Liebe Frau Maurer, bei der 5. Runde, beachten Sie, daß Sie 8 Lm nur in jede 2. Lm häkeln, dh, es ist abwechslungsweise *1 LmBogen mit 8 Lm, 1 LmBogen mit nur 1 Lm* und dazwischen immer 1 M in jedem LmBogen. Dann wird Sie die 4. Runde auch etwas wellen, aber es sollte auch nicht zu wellig sein. Vielleicht können Sie auch mal Ihr DROPS Laden zeigen (auch ein Foto per mail senden), so kann man Ihnen am besten weiterhelfen. Viel Spaß beim häkeln!
01.06.2022 - 13:33
![]() Barbora ha scritto:
Barbora ha scritto:
Hi, I don 't understand the begining of the Pattern. I made 113ch, than 1cs in 2nd, than one more sc. but than I don't know 🤦♀️ what mean next 3-1-4ch? thanks
23.06.2021 - 16:05DROPS Design ha risposto:
Dear Barbora, it means you have now to work 1 sc in each of the next 3 chains in the first size, in the next chain in the 2nd size and in the next 4 chains in the last size. Each number refers to the size. Since the fundation chain is most often quite tight, you cast on more stitches and then you will skip chains evenly on very first row. Happy crocheting!
23.06.2021 - 16:10
![]() Roswitha Rudolph ha scritto:
Roswitha Rudolph ha scritto:
Betreff: bolero CAROLINE Siehe schreiben beim volant häkeln 3 luftmaschen UM die vorhergehende luftmasche herum einstechen , das verstehe ich nicht, ist auch nicht logisch für mich
24.04.2020 - 08:37DROPS Design ha risposto:
Liebe Frau Rudolph, es wird bei der 3. Runde 1 fM um den nächsten Lm-bogen - dieses Video zeigt (mit einem anderen Diagram), wie man in oder um die Maschen häkelt. Viel Spaß beim häkeln!
24.04.2020 - 09:39
![]() Tone Frank Stubberud ha scritto:
Tone Frank Stubberud ha scritto:
Jeg har nå printet ut denne oppskriften, men diagram A1 og diagram A2 er ikke med i oppskriften. Blir ingen bolero uten diagrammene, håper de blir lagt inn på oppskriften.
26.03.2020 - 13:25DROPS Design ha risposto:
Hej Diagrammen finns längst ner på oppskriften så de ska komma med på utskriften. Kan det vara någon inställning på din printer som gör att de inte kommer med? Jag får med de när jag provar här.. Mvh DROPS Design
26.03.2020 - 14:02
![]() Linda ha scritto:
Linda ha scritto:
I have been crocheting for 65 years so I hope that you will consider my suggestion. I am working on this pattern now and find it very easy to use, but I wonder why you do not begin the project with foundation single crochet, rather than including extra chains which you then skip in the following row of single crochet. The obvious purpose is to avoid having the chain too tight, but foundation single crochet has much more stretch than a chain, and gives a nicer-looking result.
30.01.2020 - 08:13
![]() Donna Louk ha scritto:
Donna Louk ha scritto:
In first row does skip ch1 mean skip 1 ch or ch 1 and skip 1 ch?
13.05.2019 - 03:17DROPS Design ha risposto:
Dear Mrs Louk, you will skip 1 chain and crochet 1 dc in each of the next 5 chains (= 5 double crochets worked over 6 chains between stars). Read more here. Happy crocheting!
13.05.2019 - 10:28Mari ha scritto:
Hi, I'm confused as to how to start the other SECOND SIDE of the vest. The instructions don't seem to tell me to do anything different. Do I crochet it exactly the same? If I do, won't one half be in reverse stitch? Please help out.
03.08.2018 - 08:00DROPS Design ha risposto:
Dear Mari, 2nd side starts with 1 row with dc (UK-terminology)/sc (US-terminology), then work as first side, ie repeat A.1 and finish with A.2. Happy crocheting!
03.08.2018 - 08:26Natasja ha scritto:
Hi there. Im wondering if im wrong, but the pattern says to crochet tr. so i do, but i think i just realized that is not tr that i should crochet, but dc ? I can read this pattern in different languages, and in danish it says that i need to crochet this in dc ? And now im confused, should this be crochet in tr. or dc ? Cause i just crochet 33 cm in tr.
28.11.2017 - 23:04DROPS Design ha risposto:
Dear Natasja, US and UK crochet terminology are different, make sure you are selecting the correct language you are used to. Read more here. Happy crocheting!
29.11.2017 - 09:17
|
|||||||||||||
Caroline#carolinebolero |
|||||||||||||
 |
 |
||||||||||||
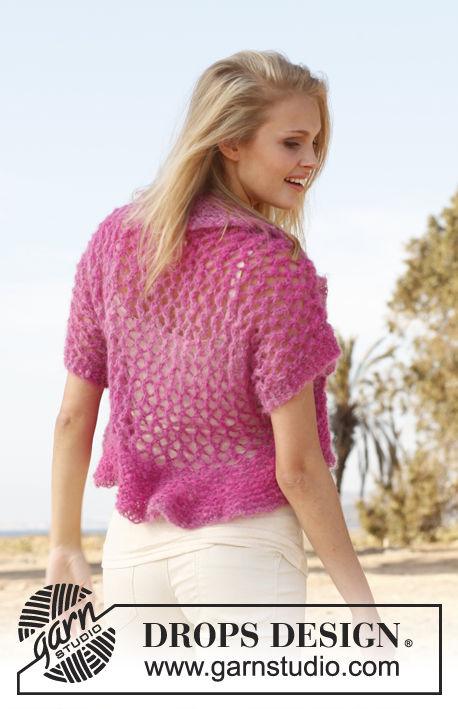
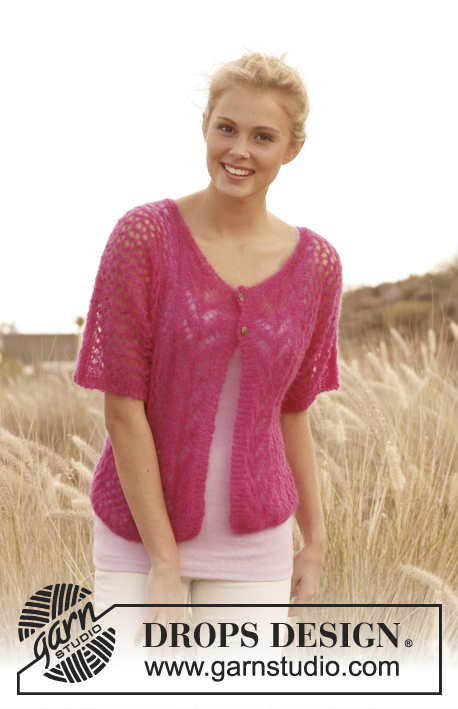
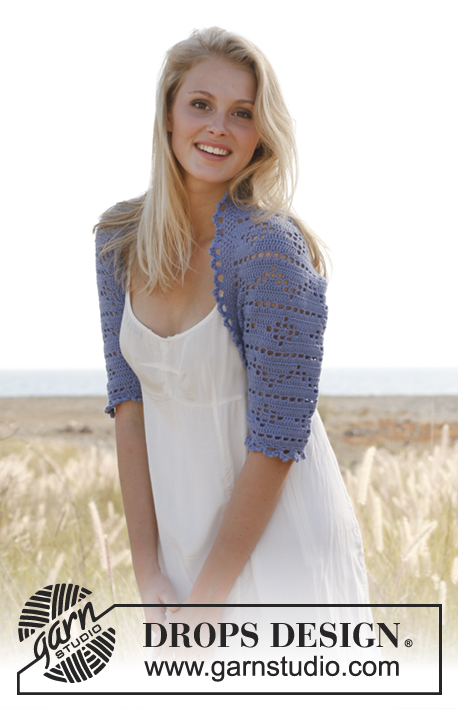
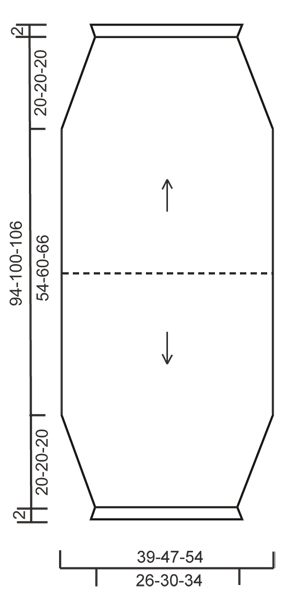
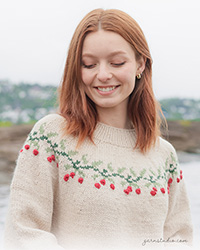
Bolero DROPS all’uncinetto con motivo a pizzo in "BabyAlpaca Silk". Taglie: dalla S alla XXXL
DROPS 147-4 |
|||||||||||||
|
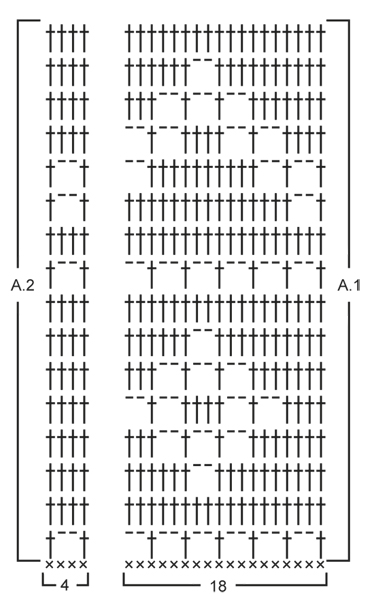
INFORMAZIONI PER IL LAVORO: Sostituire la 1° m.a. su ogni riga con 3 cat. MOTIVO: Vedere i diagrammi A.1 e A.2 - NOTA: la 1° riga a m.b. non è nella ripetizione e non viene ripetuta verso l’alto. SUGGERIMENTO PER LE DIMINUZIONI: Lavorare 2 m.a. insieme come segue: lavorare 1 m.a. nella 1° m., ma aspettare con l’ultimo passaggio, lavorare 1 m.a. nella m. successiva ma sull’ultimo passaggio, far passare il filo attraverso tutte e 3 gli occhielli sull’uncinetto. -------------------------------------------------------- BOLERO: Lavorato dal centro dietro. Per primo lavorare un lato e giù fino all’inizio della manica, poi lavorare l’altro lato e giù fino all’altra manica. Quindi cucire i margini delle maniche e lavorare 1 balza attorno a tutta l’apertura. PRIMO LATO: Lavorare 113-135-156 cat. con Baby Alpaca Silk con l’uncinetto n° 3 mm. Girare e lavorare 1 m.b. nella seconda cat. dall’uncinetto, continuare con 1 m.b. in ognuna delle 3-1-4 cat. successive, * saltare 1 cat., 1 m.b. in ognuna delle 5 cat. successive *, ripetere *-* per tutta la riga = 94-112-130 m.b. (la 1° cat. sulla riga NON viene contata come una m.b.). Continuare con il diagramma A.1 sulle prime 90-108-126 m.b. e il diagramma A.2 sulle ultime 4 m.b. – LEGGERE IL SUGGERIMENTO PER IL LAVORO! Ripetere il motivo fino alla fine del lavoro. Allo stesso tempo quando il lavoro misura 27-30-33 cm, inserire 1 segnapunti a lato (indica fino a dove cucire le maniche in seguito). Sulla riga successiva diminuire 1 m.a a ogni lato lavorando insieme la seconda e la terza m.a. e le penultime 2 m.a. – LEGGERE IL SUGGERIMENTO PER LE DIMINUZIONI! Ripetere le diminuzioni su ogni riga per un totale di 16-20-24 volte = 62-72-82 m. rimaste - NOTA: Quando diminuite lavorate solo a m.a. sulle m. che non rientrano nel motivo. Continuare con il motivo fino a quando il lavoro misura circa 47-50-53 cm in totale – finire dopo una riga con solo m.a., tagliare il filo. SECONDO LATO: Lavorare 1 m.b in ognuna delle 94-112-130 m.b. lavorate sulla prima riga sul primo lato (cioè centro dietro). Poi lavorare il motivo come sul primo lato. Assicurarsi di finire sulla stessa riga del diagramma sulla parte inferiore della manica su entrambi i lati. CONFEZIONE: Piegare il bolero a metà e cucirlo dalla parte inferiore di ogni manica su fino a dove è stato inserito il segnapunti a ogni lato – cucire margine a margine per evitare una cucitura spessa. BALZA ATTORNO ALL’APERTURA: Lavorare attorno a tutte l’apertura come segue (iniziare al centro dietro): GIRO 1: 1 m.bss. nella 1° m., * 3 cat., 1 m.b. nella m.a. successiva *, ripetere *-* per tutto il giro e finire con 3 cat. e 1 m.bss. nella m.bss. dall’inizio del giro - NOTA: Aggiustarlo in modo che sia stato lavorato un numero pari di occhielli di cat. altrimenti il 5° giro non combacerà. GIRO 2: Lavorare 1 m.bss. e 1 m.b. nel 1° occhiello di cat., * 3 cat., 1 m.b. nell’occhiello di cat. successivo *, ripetere *-* per tutto il giro, finire con 1 m.bss. nella 1° m.b. dall’inizio del giro. GIRI 3 e 4: Lavorare come il secondo giro. GIRO 5: Lavorare 1 m.bss. e 1 m.b. nel 1° occhiello di cat., * 8 cat., 1 m.b. nell’occhiello di cat. successivo, 1 cat., 1 m.b. nell’occhiello di cat. successivo *, ripetere *-* per tutto il giro, finire con 1 m.bss. nella 1° m.b. dall’inizio del giro. GIRO 6: 1 cat., 1 m.b. nel 1° occhiello di cat. grande, [* 4 cat., 1 m.a. nella 1° cat. fatta (= 1 picot), 1 m.b. nello stesso occhiello di cat. *, ripetere *-* altre 2 volte (cioè in modo che ci siano 3 picot nell’occhiello di cat. grande), 1 m.b. nell’occhiello di cat. piccolo (quello con solo 1 cat. tra gli occhielli di cat. grandi), 1 m.b. nell’occhiello di cat. grande successivo], ripetere [-] per tutto il giro, invece dell’ultima m.b., lavorare 1 m.bss. nella 1° m.b. sul giro. Tagliare e affrancare il filo. BALZA SULLA PARTE INFERIORE DELLA MANICA: Lavorare un bordo più corto sulla parte inferiore della manica, lavorare solo il 1°, il 5° e il 6° giro della balza attorno all’apertura – NOTA: sul 1° giro saltare 1 m.a. tra ogni occhiello di cat. |
|||||||||||||
Spiegazioni del diagramma |
|||||||||||||
|
|||||||||||||
 |
|||||||||||||
 |
|||||||||||||
Avete terminato questo modello?Allora taggate le vostre foto con #dropspattern #carolinebolero o inviatele alla #dropsfan gallery. Avete bisogno di aiuto con questo modello?Troverete 7 video tutorial, una sezione per i commenti/domande e molto altro guardando il modello su www.garnstudio.com © 1982-2025 DROPS Design A/S. Ci riserviamo tutti i diritti. Questo documento, compreso tutte le sue sotto-sezioni, è protetto dalle leggi sul copyright. Potete leggere quello che potete fare con i nostri modelli alla fine di ogni modello sul nostro sito. |
|||||||||||||


Con oltre 40 anni di esperienza nel design di modelli di maglia e uncinetto, DROPS Design offre la più estesa collezione di modelli gratuiti su internet - tradotti in 17 lingue. Ad oggi vi possiamo fornire 319 cataloghi e 12042 modelli - 9305 dei quali sono tradotti in Italiano.
Ci stiamo impegnando molto per darvi il meglio che vi possiamo offrire in termini di maglia e uncinetto, ispirazioni e consigli così come filati di grande qualità ad un prezzo incredibile! Volete utilizzare i nostri modelli per qualcosa d'altro oltre al vostro uso personale? Potete leggere tutto ciò che è consentito nel testo sul Copyright in basso su tutte le pagine dei nostri modelli. Buon lavoro!
Lasciare un commento sul modello DROPS 147-4
Noi saremmo felici di ricevere i tuoi commenti e opinioni su questo modello!
Se vuoi fare una domanda, fai per favore attenzione a selezionare la categoria corretta nella casella qui sotto per velocizzare il processo di risposta. I campi richiesti sono indicati da *.