
Categorie popolari
State cercando un filato?


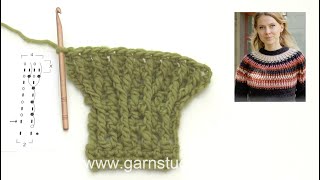
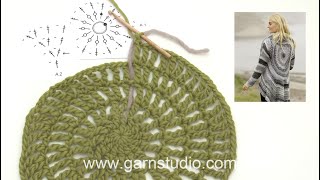
Come lavorare la spalla in DROPS 171-35

Dovete leggere il modello per essere in grado di seguire questo video in maniera corretta.
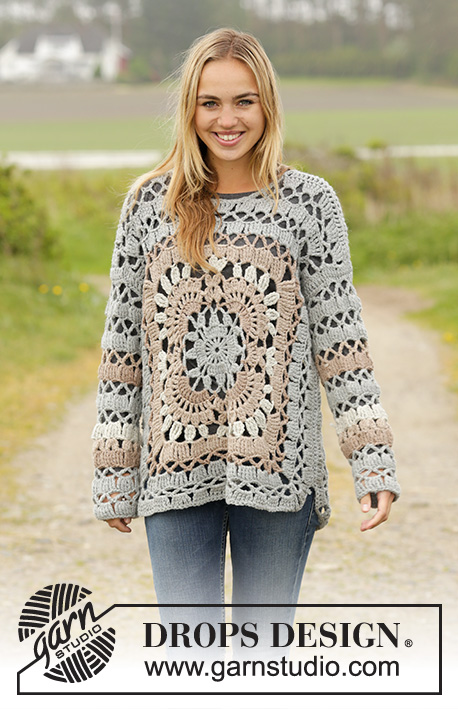
Potete vedere il modello cliccando sulla foto sotto.
Modelli che utilizzano questa tecnica
Video #1047, riportato in: Tutorial dei modelli, Women, Video tutorials di modelli all'uncinetto, Maglioni & Cardigans / Modelli a uncinetto
I nostri video non hanno il sonoro. Siamo un'azienda multinazionale e i nostri video vengonp visti da persone che parlano linguaggi diversi e molti non capiscono l'inglese. Per cui, dal momento che non abbiamo un linguaggio comune da utilizzare, riportiamo invece delle istruzioni scritte che accompagnano il video, e inoltre non ci sono suoni che disturbano la visione.
Potete modificare la velocità del video cliccando sull'icona sulla barra di riproduzione.
Lasciate un commento o una domanda per questo video
Il tuo indirizzo mail non verrà pubblicato. I campi richiesti sono indicati da *.
Continua a guardare


Potrebbe piacervi anche....


Con oltre 40 anni di esperienza nel design di modelli di maglia e uncinetto, DROPS Design offre la più estesa collezione di modelli gratuiti su internet - tradotti in 17 lingue. Ad oggi vi possiamo fornire 325 cataloghi e 12298 modelli - 9569 dei quali sono tradotti in Italiano.
Ci stiamo impegnando molto per darvi il meglio che vi possiamo offrire in termini di maglia e uncinetto, ispirazioni e consigli così come filati di grande qualità ad un prezzo incredibile! Volete utilizzare i nostri modelli per qualcosa d'altro oltre al vostro uso personale? Potete leggere tutto ciò che è consentito nel testo sul Copyright in basso su tutte le pagine dei nostri modelli. Buon lavoro!
Thank you for answering my first query, however I’m still not clear about a few things. Is there a video for chart A9 I don’t know where this fits? Can I just work rows along the top neck for the back, not the bottom part as you suggested , and then not crochet all around the square? Do I have to work a complete round after if I just work the top of the back? Is there a video for the sleeves? Thank you
15.07.2022 - 13:57DROPS Design :
Dear Linda, you work A.9 in the sleeves only, working it once over the A.5 repetitions and then continuing repeating A.5 over A.9. There is no video for working the sleeves at the moment. If you add rows with A.5 in the top neck for the back, over the square, instead of in the lower part, the square will be moved downwards and not centered and you will need to recenter the front as well. You have to work around the whole square, to have the appropriate width and length. Happy crocheting!
20.07.2022 - 17:00I do not understand how to finish the back of this design there is no picture or instructions, do I do two rows repeated to match the length of the front ? Also how do I make the garment longer , thank you
15.07.2022 - 09:43DROPS Design :
Dear Linda, for the back, work straight, without decreases for the neck, so you work over all stitches and don't work A.7 or A.8. Unfortunately, to lengthen this garment, you need to modify the pattern. You need to work A.5 back and forth in the lower part of the sweater. When you have the desired length, start working a complete round around all 4 sides of the square. Happy crocheting!
15.07.2022 - 12:22Muy lindo modelo; lo hice y queda hermoso. Muchísimas gracias por los patrones y explicaciones :D
12.07.2021 - 08:05Good morning, thanks for the detailed explanations. I have already performed the 2 central squares of the front and back. I have to add shoulders and sleeves. I saw that the videos should be 6 but I can not find the 6. I miss the part that I do not understand well how to do, the one related to the sleeves. Could you add the video related to the sleeves? Thanks in advance
30.11.2018 - 11:37My question is I'm doing the L/XL and I do not understand the text directions. When do I go around side 2, 3 and 4 after I make the the neck line or during the neckline process? I need clarification. Do I start on the wrong side at the end of the side 1 row then go around ? Please help I'm so lost and want to get through this part I've come so far.
02.10.2017 - 06:59DROPS Design :
Dear Mrs Davidson, you work along the end of side 1 from WS (the middle 9 dtr = neckline) and work back and forth from end of side 1 along side 4, 3, 2 and finish with beg of side 1. (leaving the middle 9 dtr unworked), and continue like this back and forth from shoulders/neckline. Happy crocheting!
02.10.2017 - 13:06Thank you so much for that part of the video. I tried many times with the written instructions, and I can say that I was wrong. Now, I will start again. Would you have a video for the sleeves? Thanks again for your great work.
04.10.2016 - 23:46DROPS Design :
Dear Lynn, on the sleeves you are working A.5 (see this video) and A.9 ie on 1st round in A.9 work: *1 ch, skip next 2 sts, 3 tr tog, 3 ch, 3 tr tog in next st, 1 ch, skip 2 sts*, repeat from *-*. On round 2, work *1 dtr around 1 ch, 3 dtr around 3-ch-space, 1 dtr around next ch*, repeat from *-* (you will have 2 dtr around the 2-ch-space). Happy crocheting!
05.10.2016 - 09:21