


Komentáře / Otázky (25)
![]() Reding Florence napsala:
Reding Florence napsala:
Si tout le pull est tricoté avec 2 fils comme indiqué au début des explications, pourquoi faut-il seulement 50 g de Drops Kid silk (soit 400m de fil) alors qu'il y a 150g de Drops Fabel (soit plus de 600m de fil) pour la taille S ? Merci
02.05.2025 - 20:06Odpověď DROPS Design :
Bonjour Mme Reding, je transfère votre demande à nos stylistes, pensez éventuellement à prévoir une pelote Kid-Silk en plus pour éviter d'en manquer. Bon tricot!
05.05.2025 - 07:15
![]() Vangie Walker napsala:
Vangie Walker napsala:
Hi - When binding off for the armholes it states I should have 72 stitches left when done binding off - however I started off with 96 stitches before the bind off and by binding off the 4 stitches 1 time, 2 stitches 1 time and then 1 stitch 6 times leaves me with 84 stitches instead of 72?
05.10.2024 - 22:31Odpověď DROPS Design :
Dear Vangie, you bind off on each side, so you should have double the bind off stitches: 4 stitches once at the beginning of the row from the right side and the wrong side. Then 2 stitches once at the beginning of the row from the right side and the wrong side. Finally 1 stitch 6 times on each side (so 12 times in total). That is: 4x2 + 2x2 + 1x12 = 24 stitches bound off. So 96-24 = 72 stitches. Happy knitting!
06.10.2024 - 14:04
![]() Vangie Walker napsala:
Vangie Walker napsala:
When binding off for armholes do I bind off at the beginning and end of each row or just the beginning of the row?
28.09.2024 - 21:48Odpověď DROPS Design :
Dear Vangie, you bind off at the beginning of each row, including rows from the wrong side, so that you shape the armholes in the same way on both sides. Happy knitting!
29.09.2024 - 21:01
![]() Donna Esterline napsala:
Donna Esterline napsala:
Making the small size and on front panel it says to work until piece measures 8", however the diagram on the last page shows 10". Including the 4" of rib how many inches should it be in a size small? Thank you
24.09.2024 - 02:31Odpověď DROPS Design :
Dear mrs Esterline, note that the front piece will be shorter than the back piece, the 4 cm (not 4") at the bottom of the chart are for back piece only - armholes on back piece will be made after 9½" from cast-on edge. Happy knitting!
24.09.2024 - 09:22
![]() Regina Rieger napsala:
Regina Rieger napsala:
Ich bin sehr zierlich und würde das Modell gerne in xxs / xs arbeiten. Die Schulterbreite sollte bei ca 36 cm liegen, der Bund bei 40 cm. Wie kann ich die Maschenzahl reduzieren oder soll ich einfach nur (deutlich) dünnere Nadeln verwenden?
16.04.2024 - 23:12Odpověď DROPS Design :
Liebe Frau Rieger, hier finden Sie alle unsere Anleitungen für Westen und Pullunder für XS, vielleicht finden Sie ein passendes Modell. Viel Spaß beim Stricken!
17.04.2024 - 08:31
![]() Sabina napsala:
Sabina napsala:
Det vil være rart, hvis man kunne se hvad størrelse modellerne har på, så man har et udgangspunkt. Kan dette ses et sted? :)
03.01.2024 - 11:59Odpověď DROPS Design :
Hei Sabina. Modellene er som regel str. S. Men det beste er å se på målskisse og se på målene der. mvh DROPS Design
08.01.2024 - 14:37
![]() Cassandra napsala:
Cassandra napsala:
Hej, Jeg er nået til at skulle lukke af til ærmegab på forstykket. Dog forstår jeg ikke hvordan jeg skal lukke 3 masker af på en gang, og bagefter 2 masker på en gang. Ud over det, skal jeg så strikke ret indtil jeg kommer til de sidste 6 masker også lukke af der (dog omvendt), eller skal jeg strikke pinden ud også lukke af næste gang på vrang? Ville bare tro, at ærmerne så ikke bliver overfor hinanden :D På forhånd tak for hjælpen :D
27.05.2023 - 15:43Odpověď DROPS Design :
Hei Cassandra Du feller av fra retten i den ene siden og fra vrangen i den andre siden. I f.eks str. S har du 74 masker. Du feller først av 3 masker fra retten i den ene siden, strikk pinnen ut, snu, fell 3 nye masker i den andre siden (fra vrangen). Strikk pinnnen ut, snu og nå felles det 2 masker, strikk pinnen ut, snu og felle 2 masker fra vrangen, strikk pinnen ut, snu, fell 1 maske, strikk pinnen ut, snu, fell 1 maske, strikk pinnen ut = 62 masker. mvh DROPS Design
30.05.2023 - 09:31
![]() Helena napsala:
Helena napsala:
Hej! Det ser ud til der mangler tekst forklaringen til rygstykket, efter delen om ærmegab står der: "Strik videre til arbejdet måler 44-46-48-50-52-54 cm (der er ca 4 cm tilbage til færdigt mål)." Burde det være 10 cm mere end det var for forstykket? Så der er ca 20-20-22-22-24-24 cm tilbage? På forhånd tak. Mvh, Helena
18.09.2022 - 12:27Odpověď DROPS Design :
Hei Helena. Bakstykket er 4 cm lengre enn forstykket. Disse 4 cm strikkes i begynnelsen (vrangborden = 14 cm). På forstykket felles det til hals ca 10-14 cm før ferdig mål, men på bakstykket felles det til hals når det er ca 4 cm igjen. mvh DROPS Design
19.09.2022 - 13:44
![]() Carol Ferguson napsala:
Carol Ferguson napsala:
Where do I find number of stitches to cast on, etc
05.06.2022 - 17:36Odpověď DROPS Design :
Dear Carol, as seen in the FRONT: Cast on 89 (for size S) -97 (for size M) -103 (for size L) -111 (for size XL) -121 (for size XXL)-131 (for size XXXL) stitches. Our patterns are written for several sizes at once, so you need to select the number depending on the size you are working. Check out the following lesson to help you better understand our patterns: https://www.garnstudio.com/lesson.php?id=79&cid=19 . Happy knitting!
05.06.2022 - 20:54
![]() Anna napsala:
Anna napsala:
Le diminuzioni per gli Scalfi vanno fatte tutti i ferri, o solo sul diritto del lavoro? e quindi un ferro si e uno no. Grazie
05.04.2022 - 14:18Odpověď DROPS Design :
Buonasera Anna, le diminuzioni per gli scalfi si lavorano su tutti i ferri. Buon lavoro!
05.04.2022 - 19:12
|
|
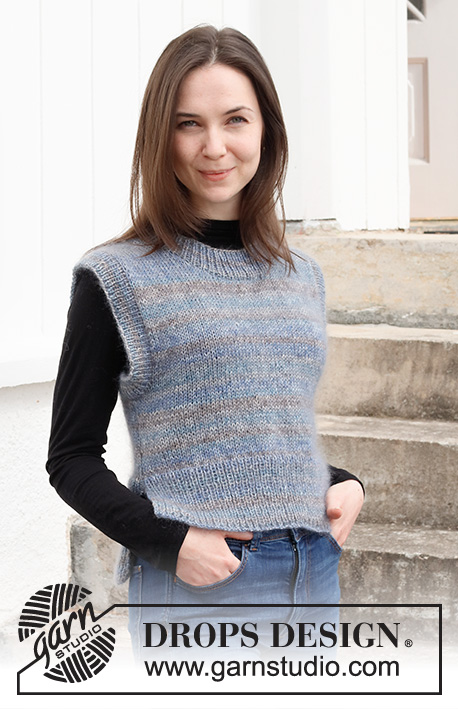
River Reflections#riverreflectionsvest |
|
 |
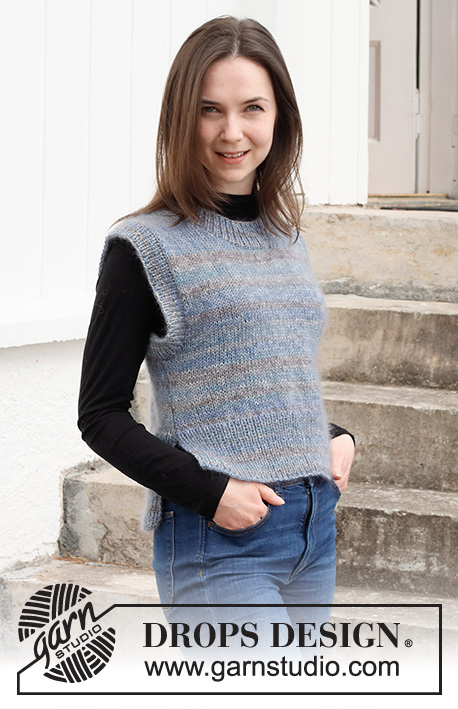 |
Vesta pletená lícovým žerzejem s 1 vláknem příze DROPS Fabel a 1 vláknem příze Kid-Silk. Velikost: S - XXXL.
DROPS 216-33 |
|
|
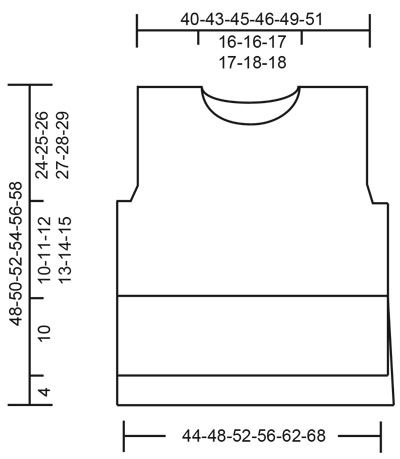
------------------------------------------------------- VYSVĚTLIVKY K NÁVODU: ------------------------------------------------------- VROUBKOVÝ VZOR: Pleteme stále hladce, lícové i rubové řady. TIP – UJÍMÁNÍ: Abychom vypočítali, v jakých rozestupech máme ujímat, vydělíme celkový počet ok v řadě (např. 89 ok) počtem ok, která potřebujeme ujmout (např. 15) = 5,9. Podle tohoto příkladu spleteme každé zhruba 5. a 6. oko. ------------------------------------------------------- PRÁCE ZAČÍNÁ ZDE: ------------------------------------------------------- VESTA - JAK BUDEME POSTUPOVAT: Přední a zadní díl pleteme odděleně v řadách zdola nahoru. Zadní díl je o 4 cm delší než přední díl. Nakonec dopleteme na kruhové jehlici nebo ponožkových jehlicích lemy průramků a průkrčníku. PŘEDNÍ DÍL: Na kruhovou jehlici č. 4 nahodíme 1 vláknem příze Fabel a 1 vláknem příze Kid-Silk (= dvojitou přízí) 89-97-103-111-121-131 ok a upleteme 1 lícovou řadu hladce. Potom pleteme pružný vzor takto: 1 krajové oko VROUBKOVÝM VZOREM – viz popis výše, pružný vzor (1 oko hladce, 1 oko obrace) až po poslední 1 oko, poslední 1 krajové oko upleteme vroubkovým vzorem. V tomto rozvržení pleteme lem do výše asi 10 cm. Převedeme práci na jehlici č. 5. Nyní pleteme lícovým žerzejem, v první řadě rovnoměrně ujmeme 15 ok - viz TIP – UJÍMÁNÍ výše = 74-82-88-96-106-116 ok. V tomto rozvržení pleteme do výšky 20-21-22-23-24-25 cm od od počáteční, nahozené řady. V následující řadě uzavřeme na každé straně oka pro průramky: uzavřeme 3-3-3-4-4-4 oka 1x, 2 oka 1x, a 1 oko 1-3-4-6-9-12x = 62-66-70-72-76-80 ok. Pleteme až do výše 34-36-36-38-38-40 cm (do konce nám zbývá asi 10-10-12-12-14-14 cm). V následující lícové řadě uzavřeme oka pro průkrčník takto: Upleteme 25-27-28-29-30-32 ok, uzavřeme následujících 12-12-14-14-16-16 ok (= průkrčník), a upleteme posledních 25-27-28-29-30-32 ok. Každou náramenici dokončíme odděleně; přízi nestříháme - pleteme pravou náramenici, pokračujeme rubovou stranou. PRAVÁ NÁRAMENICE PŘEDNÍ DÍL: = 25-27-28-29-30-32 ok. Začínáme rubovou stranou, pleteme lícovým žerzejem. Na začátku každé lícové řady uzavíráme u průkrčníku takto: 2 oka 2x, a 1 oko 4x = 17-19-20-21-22-24 ok. Pleteme až do celk. výšky 44-46-48-50-52-54 cm od počáteční, nahozené řady. Potom práci uzavřeme a přízi zapošijeme. LEVÁ NÁRAMENICE PŘEDNÍ DÍL: = 25-27-28-29-30-32 ok. Začínáme lícovou řadou, pleteme lícovým žerzejem. Na začátku každé rubové řady uzavíráme u průkrčníku takto: 2 oka 2x, a 1 oko 4x = 17-19-20-21-22-24 ok. Pleteme až do celk. výšky 44-46-48-50-52-54 cm od počáteční, nahozené řady - délku upravíme podle pravé náramenice. Potom práci uzavřeme a přízi zapošijeme. ZADNÍ DÍL: Na kruhovou jehlici č. 4 nahodíme 1 vláknem příze Fabel a 1 vláknem příze Kid-Silk (= dvojitou přízí) 89-97-103-111-121-131 ok a upleteme 1 lícovou řadu hladce. Potom pleteme pružný vzor takto: 1 krajové oko vroubkovým vzorem, pružný vzor (1 oko hladce, 1 oko obrace) až po poslední 1 oko, poslední 1 krajové oko upleteme vroubkovým vzorem. V tomto rozvržení pleteme spodní lem do výše asi 14 cm. Převedeme práci na jehlici č. 5. Nyní pleteme lícovým žerzejem, v první řadě rovnoměrně ujmeme 15 ok - viz TIP – UJÍMÁNÍ výše = 74-82-88-96-106-116 ok. Takto pleteme až do výše 24-25-26-27-28-29 cm od nahozeného okraje. V následující řadě uzavřeme na každé straně oka pro průramky: uzavřeme 3-3-3-4-4-4 oka 1x, 2 oka 1x, a 1 oko 1-3-4-6-9-12x = 62-66-70-72-76-80 ok. Pleteme až do výše 44-46-48-50-52-54 cm (do konce nám zbývají asi 4 cm). V další lícové řadě uzavřeme oka pro průkrčník takto: Upleteme prvních 18-20-21-22-23-25 ok, uzavřeme následujících 26-26-28-28-30-30 ok (= průkrčník), a upleteme posledních 18-20-21-22-23-25 ok. Každou náramenici dokončíme odděleně; přízi nestříháme - pleteme levou náramenici, pokračujeme rubovou stranou. LEVÁ NÁRAMENICE ZADNÍ DÍL: = 18-20-21-22-23-25 ok. Začínáme rubovou řadou, pleteme lícovým žerzejem. Na začátku lícové řady uzavřeme 1 oko = 17-19-20-21-22-24 ok. Pleteme až do celk. výšky asi 48-50-52-54-56-58 cm od počáteční, nahozené řady - délku upravíme podle předních náramenic. Potom práci uzavřeme a přízi zapošijeme. PRAVÁ NÁRAMENICE ZADNÍ DÍL: = 18-20-21-22-23-25 ok. Začínáme lícovou řadou, pleteme lícovým žerzejem. Na začátku další rubové řady uzavřeme 1 oko = 17-19-20-21-22-24 ok. Pleteme až do celk. výšky asi 48-50-52-54-56-58 cm od počáteční, nahozené řady - délku upravíme podle předních náramenic. Potom práci uzavřeme a přízi zapošijeme. DOKONČENÍ: Sešijeme náramenice. Sešijeme postranní švy, začínáme u průramků a postupujeme až k pružnému lemu - odtud začíná postranní rozparek - zadní díl je delší než přední díl. LEM PRŮKRČNÍKU: Začínáme na lícové straně u jednoho ramenního švu. Kruhovou jehlicí nebo ponožkovými jehlicemi č. 4 nabereme 1 vláknem příze Fabel a 1 vláknem příze Kid-Silk (= dvojitou přízí) po celém obvodu průkrčníku asi 80 - 100 ok (počet ok musí být dělitelný 2). Pleteme pružným vzorem v kruhových řadách (1 oko hladce, 1 oko obrace) až do výše 5 cm. Pak všechna oka dle vzoru uzavřeme. LEM PRŮRAMKU: Začínáme na lícové straně ve spodní části jednoho průramku. Kruhovou jehlicí nebo ponožkovými jehlicemi č. 4 nabereme 1 vláknem příze Fabel a 1 vláknem příze Kid-Silk (= dvojitou přízí) kolem průramku 110 - 134 ok (počet ok musí být dělitelný 2). Pak pleteme pružným vzorem (1 oko hladce, 1 oko obrace) do výše 4 cm. Nakonec všechna oka dle vzoru uzavřeme. Stejným způsobem upleteme lem kolem druhého průramku. |
|
|
|
Dokončili jste tento model?Pak označte své fotky tagem #dropspattern #riverreflectionsvest nebo je pošlete do galerie #dropsfan. Potřebujete s tímto návodem poradit?Otevřete-li si návod na stránce garnstudio.com, najdete tam 15 výukových video-ukázek, Komentáře/Dotazy a další užitečné informace. © 1982-2025 DROPS Design A/S. Vyhrazujeme si veškerá práva. Tento dokument, včetně všech jeho dílčích částí, podléhá autorským právům. Podrobnější komentář k možnostem užití našich návodů najdete dole pod každým návodem na našich stránkách. |
|


V oblasti pletené a háčkované módy působí DROPS Design více než 40 let. Díky tomu vám můžeme nabídnout jednu z nejrozsáhlejších kolekcí modelů s bezplatnými návody dostupnými na internetu - navíc v 17 jazycích. K dnešnímu dni máme na 314 katalogů a 11822 návodů celkem - z nich je už 7048 dostupných v [češtině].
Přidejte komentář k návodu DROPS 216-33
Rádi bychom věděli, co si o tomto modelu myslíte!
Pokud se chcete na něco zeptat, dbejte prosím na to, abyste ve formuláři níže vybrali správnou kategorii - díky tomu se dříve dozvíte, co potřebujete vědět. Povinná pole jsou označena *.