
Popular categories
Looking for a yarn?


|
|
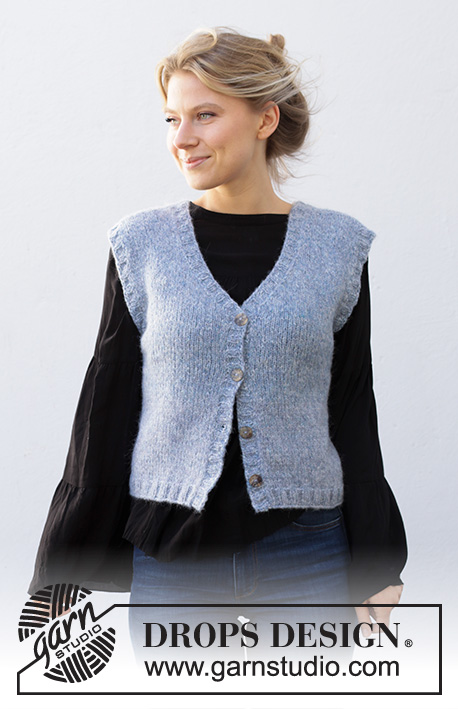
River Reflections |
|
 |
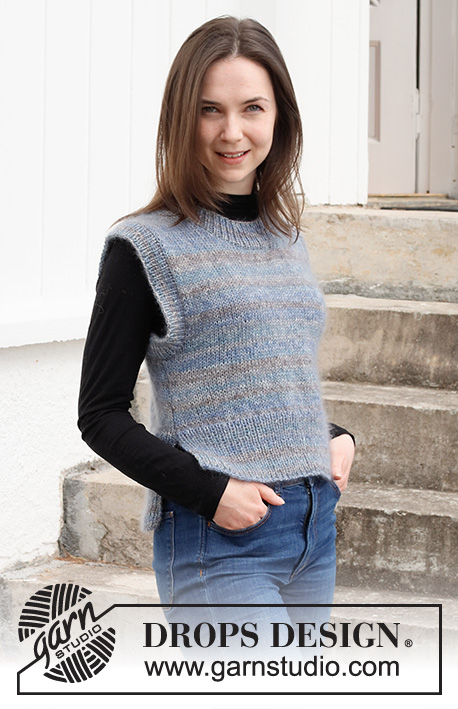 |
Knitted vest / slipover in 1 strand DROPS Fabel and 1 strand Kid-Silk. Piece is knitted in stocking stitch with edges in rib. Size: S - XXXL
DROPS 216-33 |
|
|
------------------------------------------------------- EXPLANATION FOR THE PATTERN: ------------------------------------------------------- GARTER STITCH (back and forth): Knit all rows. DECREASE TIP (evenly): To calculate how to decrease evenly, use the total number of stitches on row (e.g. 89 stitches) and divide stitches by number of decreases to be done (e.g. 15) = 5.9. In this example work approx. every 5th and 6th stitch together. ------------------------------------------------------- START THE PIECE HERE: ------------------------------------------------------- VEST - SHORT OVERVIEW OF THE PIECE: Work front pieces and back piece separately back and forth, bottom up. Back piece is 4 cm longer than front piece. Work edges around the armholes and neck in the round on circular needle or double pointed needles. FRONT PIECE: Cast on 89-97-103-111-121-131 stitches on needle size 4 mm with 1 strand Fabel and 1 strand Kid-Silk (= 2 strands). Knit 1 row from right side. Work rib as follows from next row: 1 edge stitch in GARTER STITCH – read explanation above, knit 1 and purl 1 until 1 stitch remains on needle, 1 edge stitch in garter stitch. Work until rib measures approx. 10 cm in all sizes. Switch to needle size 5 mm. Now work in stocking stitch and on first row decrease 15 stitches evenly in all sizes - read DECREASE TIP in explanation above = 74-82-88-96-106-116 stitches. REMEMBER THE KNITTING TENSION! Work until piece measures 20-21-22-23-24-25 cm from cast-on edge. On next row cast off for armholes in each side as follows: Cast off 3-3-3-4-4-4 stitches 1 time, 2 stitches 1 time, and 1 stitch 1-3-4-6-9-12 times = 62-66-70-72-76-80 stitches. Work until piece measures 34-36-36-38-38-40 cm (approx. 10-10-12-12-14-14 cm until finished measurements). On next row from right side cast off for neck as follows: Work 25-27-28-29-30-32 stitches, cast off the next 12-12-14-14-16-16 stitches for neck, and work the last 25-27-28-29-30-32 stitches. Work shoulder separately, do not cut the strand - work right shoulder from the wrong side from here. RIGHT SHOULDER FRONT PIECE: = 25-27-28-29-30-32 stitches. Work stocking stitch, begin from wrong side, and cast off stitches for neck at the beginning of rows from right side as follows: Cast off 2 stitches 2 times, and cast off 1 stitch 4 times = 17-19-20-21-22-24 stitches. Work until piece measures total 44-46-48-50-52-54 cm in total from cast-on edge. Cast off and fasten the yarn. LEFT SHOULDER FRONT PIECE: = 25-27-28-29-30-32 stitches. Work stocking stitch, begin from right side, and cast off for neck at the beginning of rows from wrong side as follows: Cast off 2 stitches 2 times, and cast off 1 stitch 4 times = 17-19-20-21-22-24 stitches. Work until piece measures total 44-46-48-50-52-54 cm in total from cast-on edge, adjust according to left shoulder. Cast off and fasten the yarn. BACK PIECE: Cast on 89-97-103-111-121-131 stitches on needle size 4 mm with 1 strand Fabel and 1 strand Kid-Silk (= 2 strands). Knit 1 row from right side. Work rib as follows from next row: 1 edge stitch in garter stitch, knit 1 and purl 1 until 1 stitch remains, 1 edge stitch in garter stitch. Work until rib measures approx. 14 cm in all sizes. Switch to needle size 5 mm. Now work in stocking stitch and on first row decrease 15 stitches evenly in all sizes - read DECREASE TIP in explanation above = 74-82-88-96-106-116 stitches. Work until piece measures 24-25-26-27-28-29 cm from cast-on edge. On next row cast off for armholes in each side as follows: Cast off 3-3-3-4-4-4 stitches 1 time, 2 stitches 1 time, and cast off 1 stitch 1-3-4-6-9-12 times = 62-66-70-72-76-80 stitches. Work until piece measures 44-46-48-50-52-54 cm (approx. 4 cm remain until finished measurements). On next row from right side cast off for neck as follows: Work the first 18-20-21-22-23-25 stitches, cast off the next 26-26-28-28-30-30 stitches for neck, and work the last 18-20-21-22-23-25 stitches. Work shoulder separately, do not cut the strand - work left shoulder from the wrong side from here. LEFT SHOULDER BACK PIECE: = 18-20-21-22-23-25 stitches. Work in stocking stitch, begin from wrong side and cast off 1 stitch at the beginning of next row from the right side = 17-19-20-21-22-24 stitches. Work until piece measures approx. 48-50-52-54-56-58 cm in total from cast-on edge, adjust according to front pieces: Cast off and fasten the yarn. RIGHT SHOULDER BACK PIECE: = 18-20-21-22-23-25 stitches. Work in stocking stitch, begin from right side and cast off 1 stitch at the beginning of next row from wrong side = 17-19-20-21-22-24 stitches. Work until piece measures approx. 48-50-52-54-56-58 cm in total from cast-on edge, adjust according to front pieces: Cast off and fasten the yarn. ASSEMBLY: Sew shoulder seams edge to edge. Sew side seams, begin at armhole and sew down until 1 cm of rib - from here there is a vent, and back piece is longer than front piece. NECK EDGE: Begin from right side at one shoulder seam with 1 strand Fabel and 1 strand Kid-Silk. Use circular needle or double pointed needles size 4 mm and pick up approx. 80 to 100 stitches inside 1 stitch around the entire opening (number of stitch must be divisible by 2). Work rib in the round (knit 1/purl 1) in the round until rib measures 5 cm. Cast off stitches with knit over knit and purl over purl. EDGE AROUND ARMHOLES: Begin from right side where armholes was cast off with 1 strand Fabel and 1 strand Kid-Silk. Use circular needle or double pointed needles size 4 mm and pick up approx. 110 to 134 stitches around the entire armhole (number of stitches must be divisible by 2). Work rib in round with knit 1 and purl 1 until rib measures 4 cm. Cast off stitches with knit over knit and purl over purl. Work an edge around the other armhole the same way. |
|

|
|
|
Have you made this or any other of our designs? Tag your pictures in social media with #dropsdesign so we can see them! Do you need help with this pattern?You'll find tutorial videos, a Comments/Questions area and more by visiting the pattern on garnstudio.com. © 1982-2024 DROPS Design A/S. We reserve all rights. This document, including all its sub-sections, has copyrights. Read more about what you can do with our patterns at the bottom of each pattern on our site. |
|


With over 40 years in knitting and crochet design, DROPS Design offers one of the most extensive collections of free patterns on the internet - translated to 17 languages. As of today we count 304 catalogues and 11422 patterns - 11422 of which are translated into English (UK/cm).
We work hard to bring you the best knitting and crochet have to offer, inspiration and advice as well as great quality yarns at incredible prices! Would you like to use our patterns for other than personal use? You can read what you are allowed to do in the Copyright text at the bottom of all our patterns. Happy crafting!
Comments / Questions (21)
Ich bin sehr zierlich und würde das Modell gerne in xxs / xs arbeiten. Die Schulterbreite sollte bei ca 36 cm liegen, der Bund bei 40 cm. Wie kann ich die Maschenzahl reduzieren oder soll ich einfach nur (deutlich) dünnere Nadeln verwenden?
16.04.2024 - 23:12DROPS Design answered:
Liebe Frau Rieger, hier finden Sie alle unsere Anleitungen für Westen und Pullunder für XS, vielleicht finden Sie ein passendes Modell. Viel Spaß beim Stricken!
17.04.2024 - 08:31Det vil være rart, hvis man kunne se hvad størrelse modellerne har på, så man har et udgangspunkt. Kan dette ses et sted? :)
03.01.2024 - 11:59DROPS Design answered:
Hei Sabina. Modellene er som regel str. S. Men det beste er å se på målskisse og se på målene der. mvh DROPS Design
08.01.2024 - 14:37Hej, Jeg er nået til at skulle lukke af til ærmegab på forstykket. Dog forstår jeg ikke hvordan jeg skal lukke 3 masker af på en gang, og bagefter 2 masker på en gang. Ud over det, skal jeg så strikke ret indtil jeg kommer til de sidste 6 masker også lukke af der (dog omvendt), eller skal jeg strikke pinden ud også lukke af næste gang på vrang? Ville bare tro, at ærmerne så ikke bliver overfor hinanden :D På forhånd tak for hjælpen :D
27.05.2023 - 15:43DROPS Design answered:
Hei Cassandra Du feller av fra retten i den ene siden og fra vrangen i den andre siden. I f.eks str. S har du 74 masker. Du feller først av 3 masker fra retten i den ene siden, strikk pinnen ut, snu, fell 3 nye masker i den andre siden (fra vrangen). Strikk pinnnen ut, snu og nå felles det 2 masker, strikk pinnen ut, snu og felle 2 masker fra vrangen, strikk pinnen ut, snu, fell 1 maske, strikk pinnen ut, snu, fell 1 maske, strikk pinnen ut = 62 masker. mvh DROPS Design
30.05.2023 - 09:31Hej! Det ser ud til der mangler tekst forklaringen til rygstykket, efter delen om ærmegab står der: "Strik videre til arbejdet måler 44-46-48-50-52-54 cm (der er ca 4 cm tilbage til færdigt mål)." Burde det være 10 cm mere end det var for forstykket? Så der er ca 20-20-22-22-24-24 cm tilbage? På forhånd tak. Mvh, Helena
18.09.2022 - 12:27DROPS Design answered:
Hei Helena. Bakstykket er 4 cm lengre enn forstykket. Disse 4 cm strikkes i begynnelsen (vrangborden = 14 cm). På forstykket felles det til hals ca 10-14 cm før ferdig mål, men på bakstykket felles det til hals når det er ca 4 cm igjen. mvh DROPS Design
19.09.2022 - 13:44Where do I find number of stitches to cast on, etc
05.06.2022 - 17:36DROPS Design answered:
Dear Carol, as seen in the FRONT: Cast on 89 (for size S) -97 (for size M) -103 (for size L) -111 (for size XL) -121 (for size XXL)-131 (for size XXXL) stitches. Our patterns are written for several sizes at once, so you need to select the number depending on the size you are working. Check out the following lesson to help you better understand our patterns: https://www.garnstudio.com/lesson.php?id=79&cid=19 . Happy knitting!
05.06.2022 - 20:54Le diminuzioni per gli Scalfi vanno fatte tutti i ferri, o solo sul diritto del lavoro? e quindi un ferro si e uno no. Grazie
05.04.2022 - 14:18DROPS Design answered:
Buonasera Anna, le diminuzioni per gli scalfi si lavorano su tutti i ferri. Buon lavoro!
05.04.2022 - 19:12Le diminuzioni per gli Scalfi vanno fatte tutti i ferri o solo sul diritto del lavoro? e quindi un ferro si e uno no
03.04.2022 - 22:49DROPS Design answered:
Buonasera Anna, le diminuzioni per gli scalfi si lavorano su tutti i ferri. Buon lavoro!
05.04.2022 - 19:12Buonasera, mia nipote vorrebbe che le realizzassi questo modello color blu reale 108, a quale colore kid-silk potrei abbinarlo? Grazie Gabriella
06.01.2022 - 16:10DROPS Design answered:
Buongiorno Gabriella, potrebbe utilizzare il colore kid-silk n° 39 blu tempesta oppure n° 08 blu ghiaccio; in ogni caso può chiedere al suo rivenditore delle foto degli abbinamenti per poter decidere meglio. Buon lavoro!
08.01.2022 - 13:17Hermoso modelo!,,
17.06.2021 - 21:33Det står i oppskrift at første pinne på bråtet skal strikkes rett? Er det noken grunn til dette, eller kan ein strikke de den med en rett og en vrang slik som resten?
01.05.2021 - 09:33DROPS Design answered:
Hei Monika, Vi foreslår en pinne rett for å lage en smal kant, men du kan gjerne begynne med vrangbord med en gang hvis du vil. God fornøyelse!
03.05.2021 - 07:50