
Popular categories
Looking for a yarn?


|
|
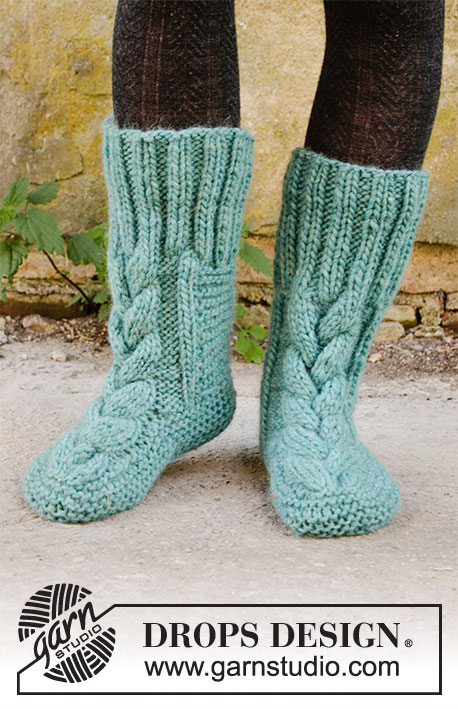
Beyond Boots |
|
|
|
|
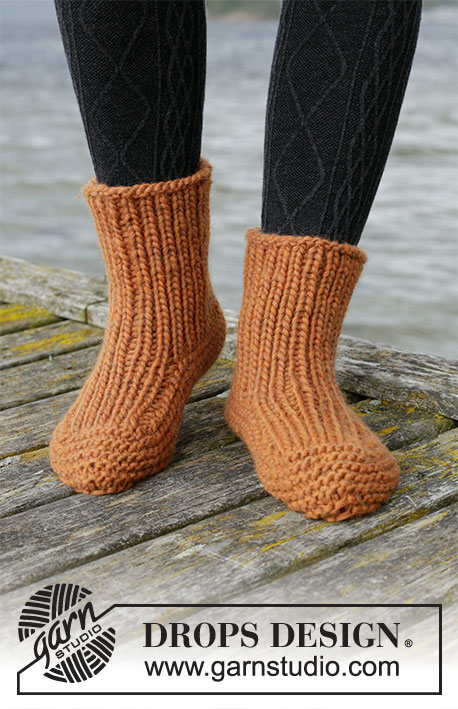
Knitted slippers in DROPS Snow. The piece is worked top down with garter stitch and Fisherman`s rib. Sizes 35-42 = 5-10.
DROPS 203-27 |
|
|
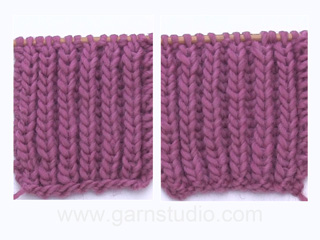
------------------------------------------------------- EXPLANATIONS FOR THE PATTERN: ------------------------------------------------------- RIDGE/GARTER STITCH (worked back and forth): Knit all rows. 1 ridge in height = Knit 2 rows. FISHERMAN`S RIB (back and forth): ROW 1 (= wrong side): Knit all stitches ROW 2 (= right side): * Purl 1, knit 1 in stitch under the next stitch *, work from *-* og finish with purl 1. ROW 3 (= wrong side): * Knit 1 in stitch under the next stitch, purl 1 *, work from *-* and finish with knit 1 in stitch under the next stitch. Repeat row 2 and 3. ------------------------------------------------------- START THE PIECE HERE: ------------------------------------------------------- SLIPPERS – SHORT OVERVIEW OF THE PIECE: The piece is worked back and forth with circular needle, top down. The slipper is sewn together to finish. RIGHT SLIPPER: LEG: Cast on 39-41-43 stitches with circular needle size 6 mm = US 10 and Snow. Knit 3 rows. Then work as follows: 3 stitches in GARTER STITCH – read description above, work FISHERMAN`S RIB – read description above, until there are 3 stitches left and finally 3 stitches in garter stitch. Continue with Fisherman`s rib and 3 stitches in garter stitch on each side (= bands) until the piece measures 12 cm = 4¾". REMEMBER THE KNITTING GAUGE! On the next row from the right side bind off the 3 stitches in garter stitch, knit the next 5-4-5 stitches, work Fisherman`s rib over the next 9-11-11 stitches as before and garter stitch over the last 22-23-24 stitches. Continue like this until the piece measures 4 cm = 1½" from where the 3 stitches were bind off – adjust so the last row is from the wrong side. Cut the strand. UPPER: Start from the right side (= on the side where the 3 stitches were bind off), place the first 5-4-5 stitches on a strand, keep the next 9-11-11 stitches on the needle and place the last 22-23-24 stitches on a thread. Now work Fisherman`s rib over the 9-11-11 stitches as follows: Start from the right side and cast on 1 new stitch, work Fisherman`s rib over the 9-11-11 stitches as before and cast on 1 new stitch at the end of the row (make a loop which is placed twisted on the needle) = 11-13-13 stitches. Continue with 1 edge stitch in garter stitch on each side of the 9-11-11 stitches in Fisherman`s rib until the upper measures approx. 7-8½-10 cm = 2¾"-3¼"-4". On the next row from the wrong side decrease the edge stitches by working them together with the stitch beside them = 9-11-11 stitches. Place all the stitches on a thread. Cut the strand. FOOT: Start from the right side (= on the side where the 3 stitches were bind off), place the first 5-4-5 stitches from the thread back on the needle and knit these stitches, knit up 12-14-16 stitches inside the 1 edge stitch on the upper. Place the 9-11-11 stitches from the upper back on the needle and knit them. Knit up 12-14-16 stitches inside the 1 edge stitch along the other side of the upper. Place the 22-23-24 stitches from the last thread back on the needle and knit them. There are now 60-66-72 stitches on the needle. THE PIECE IS NOW MEASURED FROM HERE. Knit 1 row from the wrong side. Insert 1 marker in the 22nd-24th-27th stitch (mid front) and 1 marker in the 52nd-57th-63rd stitch (mid back). Work garter stitch. When the piece measures approx. 2 cm = ¾" from where the piece was put together, decrease front and back as follows: Knit 2 together on each side of both stitches with markers (= 4 stitches decreased). Continue with garter stitch and at the same time decrease like this every row from the right side until the piece measures approx. 5-5-6 cm = 2"-2"-2⅜" from where the piece was put together. Bind off with knit from the right side. ASSEMBLY: Fold the slipper so the 3 bind-off stitches (band) are over the band on the other side of the slipper. The bind-off edge is together and the long-sides meet. Sew in the outermost loop of the outermost ridge from the bind-off edge and up along the side of the slipper as far as the bands. Cut and fasten the strand. Then sew the bind-off edge together, sewing in the outermost loop of the outermost stitch so the seam is flat. Cut and fasten the strand. Place 3 buttons evenly spaced on the outermost band and sew them on, through both layers. LEFT SLIPPER: LEG: Cast on 39-41-43 stitches with circular needle size 6 mm = US 10 and Snow. Knit 3 rows. Then work as follows: 3 stitches in GARTER STITCH – read description above, work FISHERMAN`S RIB – read description above, until there are 3 stitches left and 3 stitches in garter stitch. Continue with Fisherman`s rib and 3 stitches in garter stitch on each side (= bands) until the piece measures 12 cm = 4¾". On the next row from the wrong side bind off the 3 stitches in garter stitch, knit the next 5-4-5 stitches, work Fisherman`s rib over the next 9-11-11 stitches as before and knit over the last 22-23-24 stitches. Continue like this until the piece measures 4 cm = 1½" from where the 3 stitches were bind off – adjust so the last row is from the wrong side. Cut the strand. UPPER: Start from the right side (= on the opposite side from where the 3 stitches were bind off), place the first 22-23-24 stitches on a strand, keep the next 9-11-11 stitches on the needle and place the last 5-4-5 stitches on a thread. Now work Fisherman`s rib over the 9-11-11 stitches as follows: Start from the right side and cast on 1 new stitch, work Fisherman`s rib over the 9-11-11 stitches as before and cast on 1 new stitch at the end of the row (make a loop which is placed twisted on the needle) = 11-13-13 stitches. Continue with 1 edge stitch in garter stitch on each side of the 9-11-11 stitches in Fisherman`s rib until the upper measures approx. 7-8½-10 cm = 2¾"-3¼"-4". On the next row from the wrong side decrease the edge stitches by working them together with the stitch beside them = 9-11-11 stitches. Place these stitches on a thread. Cut the strand. FOOT: Start from the right side (= on the opposite side from where the 3 stitches were bind off), place the first 22-23-24 stitches from the thread back on the needle and knit these stitches, knit up 12-14-16 stitches inside the 1 edge stitch on the upper. Place the 9-11-11 stitches from the upper back on the needle and knit them. Knit up 12-14-16 stitches inside the 1 edge stitch along the other side of the upper. Place the 5-4-5 stitches from the last thread back on the needle and knit them. There are now 60-66-72 stitches on the needle. THE PIECE IS NOW MEASURED FROM HERE. Knit 1 row from the wrong side. Insert 1 marker in the 9th-10th-10th stitch (mid back) and 1 marker in the 39th-43rd-46th stitch (mid front). Work garter stitch. When the piece measures approx. 2 cm = ¾" from where the piece was put together, decrease front and back as follows: Knit 2 together on each side of both stitches with markers (= 4 stitches decreased). Continue with garter stitch and at the same time decrease like this every row from the right side until the piece measures approx. 5-5-6 cm = 2"-2"-2⅜" from where the piece was put together. Bind off with knit from the right side ASSEMBLY: The slipper is assembled in the same way as the right slipper. |
|
|
Have you made this or any other of our designs? Tag your pictures in social media with #dropsdesign so we can see them! Do you need help with this pattern?You'll find tutorial videos, a Comments/Questions area and more by visiting the pattern on garnstudio.com. © 1982-2024 DROPS Design A/S. We reserve all rights. This document, including all its sub-sections, has copyrights. Read more about what you can do with our patterns at the bottom of each pattern on our site. |


With over 40 years in knitting and crochet design, DROPS Design offers one of the most extensive collections of free patterns on the internet - translated to 17 languages. As of today we count 304 catalogs and 11422 patterns - 11417 of which are translated into English (US/in).
We work hard to bring you the best knitting and crochet have to offer, inspiration and advice as well as great quality yarns at incredible prices! Would you like to use our patterns for other than personal use? You can read what you are allowed to do in the Copyright text at the bottom of all our patterns. Happy crafting!
Comments / Questions (19)
Is this a chunky or double knit yarn?
08.02.2021 - 12:01DROPS Design answered:
Dear Debra, this pattern is written so you can knit it from the DROPS yarn-group E, or two thread from the group C held together. You can read/see more about the yarn groups here. Happy Knitting!
08.02.2021 - 12:08Is this worked in the round and if not then why the circular needle?
26.11.2020 - 17:02DROPS Design answered:
Dear Heather, no, it's not worked in the round. We use a circular needle due to the high number of stitches of the piece, so that we can work more comfortably. Happy knitting!
26.11.2020 - 22:59Is this worked in the round and if not why the circular needle?
26.11.2020 - 17:01DROPS Design answered:
Dear Heather, see answer above.
26.11.2020 - 22:59Non riesco a capire la spiegazione del FISHERMAN`S RIB. C'è scritto di ripetere il FERRO 2 ma il FERRO 1 non si ripete? Inoltre nei tutorial le maglie avviate sono sempre in numero pari, mentre nel modello si avvia un numero di maglie dispari. Posso avere dei chiarimenti?
20.11.2020 - 22:41DROPS Design answered:
Buongiorno Anna, va ripetuto solo il ferro 2 come indicato. A questo link può trovare una panoramica sulla lavorazione delle coste inglesi. Buon lavoro!
21.11.2020 - 08:34Whats it mean to cug the strand and put stitched on a strsnd would appreciate a video to show if you have it
24.09.2020 - 03:28DROPS Design answered:
Dear Beverly, at the end of leg section, you cut the yarn - the next row won't start from here anymore. Work now upper part: slipe the first 4 or 5 sts (see size on a thread - see video), keep the next 9/11 sts on the needle and slip the remaining 22-23-24 sts on a thread - now work over the 9/11 sts on the needle for the middle part on top of foot. Happy knitting!
24.09.2020 - 09:45Ingenting som er retter her... Se mitt tidligere spm.
11.12.2019 - 00:19DROPS Design answered:
Hei Anita! Vi beklager at det tok litt tid, den korrekte garnmengden er: 200-250-250 g. Lykke til!
11.12.2019 - 08:36Hei her er det tre størrelser, men oppgitt garn til 4. Hva er riktig garnmengde til de størrelsene som er oppgitt?
03.12.2019 - 12:19DROPS Design answered:
Hej Anita, Tak for info. Vi skal få lagt rigtig garnforbrug ud.
03.12.2019 - 15:30Herlige vintersokker. Hvor er opskriften på de kabelstrikkede strømper. Eller er det strømpebukser?
04.07.2019 - 00:52Fit für den Winter
06.06.2019 - 10:22