
Popular categories
Looking for a yarn?


|
|
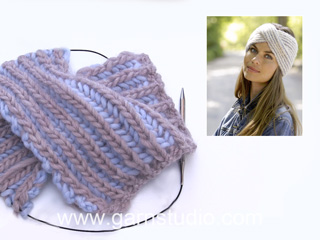
Lissie |
|
 |
 |
Knitted head band in DROPS Air. Piece is knitted in English rib in two colors and cable mid front.
DROPS 192-44 |
|
|
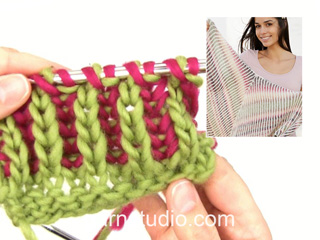
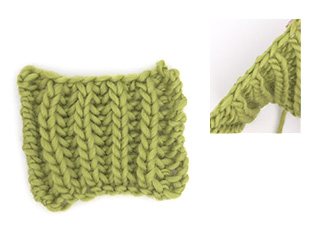
---------------------------------------------------------- EXPLANATION FOR THE PATTERN: ---------------------------------------------------------- GARTER STITCH (back and forth): 1 ridge = knit 2 rows. ENGLISH RIB IN 2 COLORS: ROW 1 (= wrong side): Knitted with fog. Work 1 stitch in garter stitch, * 1 yarn over, slip 1 stitch purlwise, knit 1 *, work from *-* until 2 stitches remain, 1 yarn over, slip 1 stitch purlwise and work 1 stitch in garter stitch. Turn piece. ROW 2 (= right side): Knitted with wheat. Slip 1st stitch with fog purlwise: * Knit yarn over and slipped stitch together, 1 yarn over, slip 1 stitch purlwise *, repeat from *-* until 2 stitches remain, knit yarn over and slipped stitch together, slip last stitch purlwise. Push stitches to the other side of circular needle and work from the same side one more time. ROW 3 (= right side): Knitted with fog. Work 1 stitch in garter stitch, * 1 yarn over, slip 1 stitch purlwise, purl yarn over and slipped stitch together *, work from *-* until 2 stitches remain, 1 yarn over, slip 1 stitch purlwise and work 1 stitch in garter stitch. Turn piece. ROW 4 (= wrong side): Knitted with wheat. Slip 1st stitch purlwise: * Purl yarn over and slipped stitch together, 1 yarn over, slip 1 stitch purlwise *, repeat from *-* until 2 stitches remain, purl yarn over and slipped stitch together, slip last stitch purlwise. Push stitches to the other side of circular needle and work from the same side one more time. ROW 5 (= wrong side): Knitted with fog. Work 1 stitch in garter stitch, * 1 yarn over, slip 1 stitch purlwise, knit yarn over and slipped stitch together *, work from *-* until 2 stitches remain, 1 yarn over, slip 1 stitch purlwise and work 1 stitch in garter stitch. Turn piece. Repeat 2nd-5th row. ---------------------------------------------------------- START THE PIECE HERE: ---------------------------------------------------------- HEAD BAND - SHORT OVERVIEW OF THE PIECE: Work piece back and forth on circular needle. HEAD BAND: Cast on 40 stitches on circular needle size 6 mm = US 10 with wheat. Work as follows from right side: Work 1 stitch in GARTER STITCH – read explanation above, * knit 2 stitches together, purl 1 *, work from *-* until 3 stitches remain, knit 2 stitches together and finish with 1 stitch in garter stitch = 27 stitches. Cut the yarn. Then work ENGLISH RIB WITH 2 COLORS - read explanation above. REMEMBER THE KNITTING GAUGE! When piece measures 24 cm = 9½", adjust so that next row is worked with fog from right side, slip the first 13 stitches on cable needle behind piece (yarn overs are not counted as stitches), purl next stitch (= knit 1) together with next purl stitch and yarn over (= 1 stitch decreased), work 12 stitches in English rib, cast on 1 stitch with wheat, knit English rib over all 12 stitches on cable needle (1st stitch is purled, and has no yarn over) and finish by knitting yarn over and knit stitch together = 27 stitches. Cut the yarn (in wheat) and continue with English rib (stitch that was cast on is purled, and hos no yarn over) and stitches in garter stitch as before until piece measures 49 cm = 19¼". Bind off with wheat with knit over knit and purl over purl. ASSEMBLY: Sew cast-on edge together with bind-off edge in outer loops of edge stitches. |
|
|
Have you made this or any other of our designs? Tag your pictures in social media with #dropsdesign so we can see them! Do you need help with this pattern?You'll find tutorial videos, a Comments/Questions area and more by visiting the pattern on garnstudio.com. © 1982-2024 DROPS Design A/S. We reserve all rights. This document, including all its sub-sections, has copyrights. Read more about what you can do with our patterns at the bottom of each pattern on our site. |
|


With over 40 years in knitting and crochet design, DROPS Design offers one of the most extensive collections of free patterns on the internet - translated to 17 languages. As of today we count 304 catalogs and 11422 patterns - 11417 of which are translated into English (US/in).
We work hard to bring you the best knitting and crochet have to offer, inspiration and advice as well as great quality yarns at incredible prices! Would you like to use our patterns for other than personal use? You can read what you are allowed to do in the Copyright text at the bottom of all our patterns. Happy crafting!
Comments / Questions (8)
Leider fehlen die Videos zur Anleitung IN der Anleitung. Erst durch die Übersetzung der Kommentare bin ich fündig geworden und habe erst verstanden was in der Anleitung gemeint ist
01.03.2024 - 23:30Efter de 24 cm, skal de 2x13 masker strikkes færdig hver for sig
16.02.2021 - 20:18DROPS Design answered:
Hej Pia, se videoerne nederst i opskriften, de viser hvordan man gør :)
18.02.2021 - 09:07Peux t on remplacer les aguilles circulaire par des droites merci pour la réponse bonne journée
13.02.2021 - 11:05DROPS Design answered:
Bonjour Mme Orbin, dans ce cas précis, on utilise des aiguilles circulaires car on va tricoter successivement 2 rangs sur l'endroit et 2 rangs sur l'envers comme le montre la vidéo - si vous avez des aiguilles doubles pointes suffisamment longue, vous pourrez les utiliser, mais avec des aiguilles, vous devrez repasser vos mailles sur l'aiguille gauche pour pouvoir tricoter vos 2 rangs sur l'endroit, puis 2 rangs sur l'envers. La vidéo illustre le rôle de l'aiguille circulaire dans les côtes anglaises bicolores. Bon tricot!
15.02.2021 - 07:29Hallo, liebes Drops Team!\r\n\r\nEine (vielleicht) dumme Frage: warum werden am Anfang 40 Maschen angeschlagen und gleich in der ersten Reihe auf 27 reduziert? Wo ist der Sinn?\r\nDanke vielmals im voraus!
03.12.2020 - 14:38Que signifie en. Robillard?merci pour les beaux patrons.
01.12.2020 - 18:25DROPS Design answered:
Bonjour Mme Ducharme, je ne suis pas sûre de bien comprendre votre question, le mot "Robillard" ne se trouvant pas dans les explications. Si toutefois vous pensiez "brouillard", ceci correspond à la couleur DROPS Air utilisée dans ce modèle - avec la couleur blé. Bon tricot!
02.12.2020 - 07:27Hei. Jeg vil gjerne strikke i Mohair. Er det mulig med denne oppskriften?
26.11.2020 - 15:01DROPS Design answered:
Hei Ann Helen, Ja, hvis du bruker garnkalkulatoren finner du ut hvor mye av det nye garnet du trenger. Da må du også strikke en prøvelapp for å finne riktige strikkefasthet og hvilke pinner du trenger. God fornøyelse!
30.11.2020 - 10:23Kan man gjenta pinne 1 og 2 om man strikker med kun en farge?
29.08.2019 - 07:40DROPS Design answered:
Hej Tone, Ja det går fint :)
06.09.2019 - 12:15Hoe breed wordt de band met27 steken? Vast bedankt.
09.12.2018 - 10:45DROPS Design answered:
Dag Gerda,
Bij een stekenverhouding van 13 steken = 10 cm, zou de band ongeveer 20 cm worden met 27 steken.
09.12.2018 - 16:17