
Popular categories
Looking for a yarn?


|
|||||||||||||||||||||||||||||||
Empress |
|||||||||||||||||||||||||||||||
 |
 |
||||||||||||||||||||||||||||||
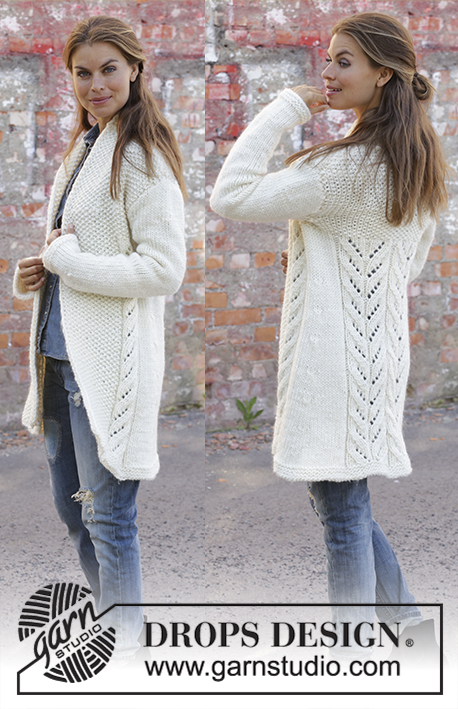
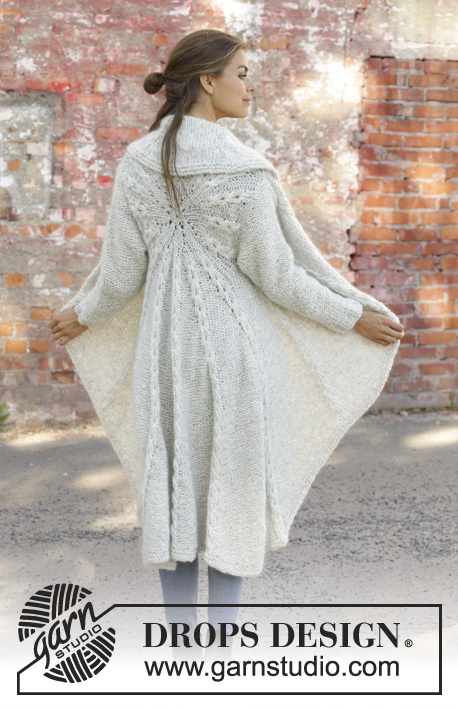
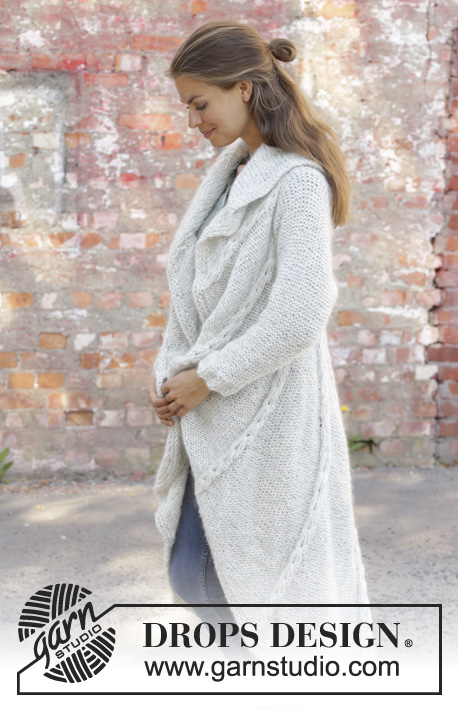
Knitted long circle jacket in 1 strand DROPS Air and 1 strand DROPS Brushed Alpaca Silk. The piece is worked in the round in a circle with texture. Sizes S - XXXL.
DROPS 194-17 |
|||||||||||||||||||||||||||||||
|
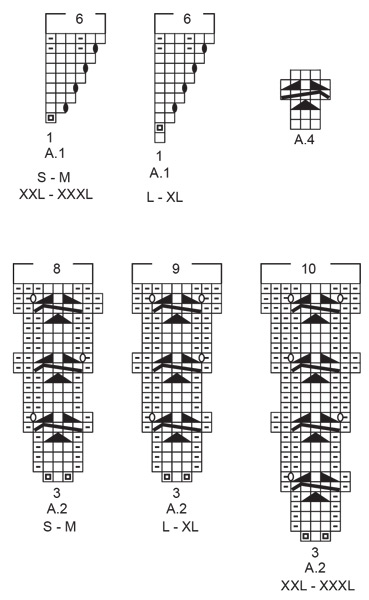
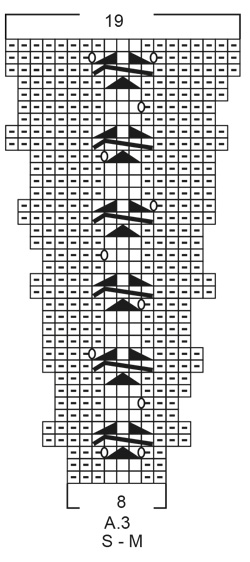
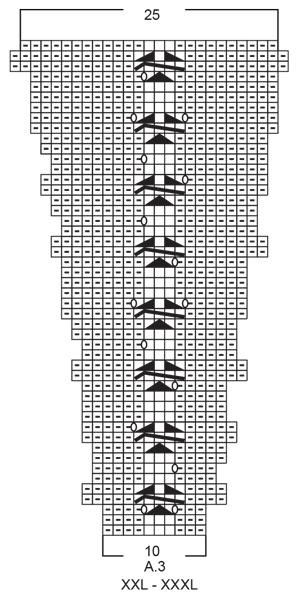
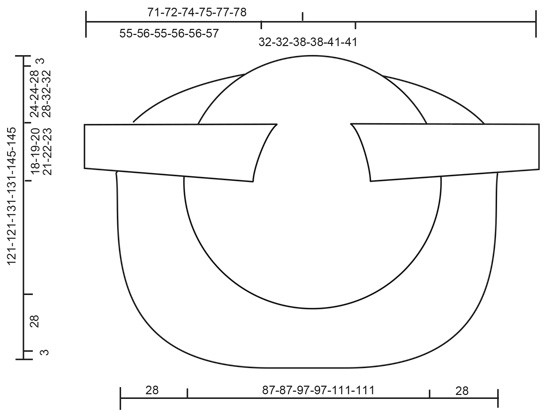
------------------------------------------------------- EXPLANATIONS FOR THE PATTERN: ------------------------------------------------------- RIDGE/GARTER STITCH (worked in the round): 1 ridge = 2 rounds. Knit 1 round and purl 1 round. RIDGE/GARTER STITCH (worked back and forth): 1 ridge = knit 2 rows. PATTERN: See diagrams A.1 to A.4. Choose diagram for your size. The diagrams show all the rows in the pattern seen from the right side! DECREASE TIP (for sleeves): All decreases are made from the side in purl! Decrease 1 stitch by purling 2 stitches together ------------------------------------------------------- START THE PIECE HERE: ------------------------------------------------------- CIRCLE JACKET - SHORT OVERVIEW OF THE PIECE: The piece is worked in the round in a circle from the middle of the back outwards. Change to circular needle(s) when necessary. Then work back and forth with short rows for the front pieces and down the back. The sleeves are worked top down in stockinette stitch with the wrong side out. Because of the weight of the yarn, the garment will stretch somewhat after use. CIRCLE JACKET: CIRCLE: Cast on 8 stitches with double pointed needles size 8 mm = US 11 and 1 strand Air and 1 strand Brushed Alpaca Silk (= 2 strands). Divide the stitches between 4 needles so that there are 2 stitches on each. Insert a marker thread at the beginning of the round. Allow the marker thread to follow your work onwards. Work pattern in the round according to A.1 – choose diagram for your size, a total of 8 times on the round. REMEMBER THE KNITTING GAUGE! When A.1 is finished, there are 48 stitches on the round. Now work pattern as follows: Work A.2 – choose diagram for your size, a total of 16 times on the round. After the next-to-last round in A.2 there are 128-128-144-144-160-160 stitches on the round. The last round in A.2 is worked as follows: Work the first 39-39-45-45-49-49 stitches (there is now 1-1-0-0-1-1 stitch left in the last repeat of A.2 worked), insert a new marker thread here (follows your work onwards and is later used when you work short rows from the front pieces and down the body on the back piece), bind off the next 20-21-22-23-24-25 stitches (= armhole), work the next 49-47-55-53-63-61 stitches, bind off the last 20-21-22-23-24-25 stitches (= armhole). The piece measures approx. 39-39-41-41-47-47 cm = 15¼"-15¼"-16⅛"-16⅛"-18½"-18½" in diameter. The next round is worked as follows: Work A.3 – choose diagram for your size (= 8-8-9-9-10-10 stitches on the first round in the diagram) a total of 16 times on the round and at the same time cast on 20-21-22-23-24-25 new stitches on the needle where the stitches were bind off for the armholes = 128-128-144-144-160-160 stitches. Continue in the round with A.3 until the whole diagram has been completed in height. There are now 304-304-352-352-400-400 stitches on the round. The piece measures approx. 87-87-97-97-111-111 cm = 34¼"-34¼"-38¼"-38¼"-43¾"-43¾" in diameter. Cut the strand. Place the first 94-94-110-110-124-124 stitches on the round (= stitches between the 2 marker threads) on a thread. FRONT PIECES AND DOWN THE BODY: There are now 210-210-242-242-276-276 stitches for the front pieces and down the body on the back piece. Start from the right side after the second marker thread and work short rows back and forth for the front pieces and down the body on the back piece as follows: ROW 1 (right side): Purl over purl and work A.4 (= 3 stitches) over each cable until there are 3 stitches left before the next marker thread (i.e. start of round), turn. ROW 2 (wrong side): Work back until there are 3 stitches left before the marker thread, turn. ROW 3: Purl over purl and work A.4 over each of the cables until there are 6 stitches left before the marker thread, AT THE SAME TIME increase 1 purled stitch after each cable/A.4, turn. ROW 4: Work back until there are 6 stitches left before the marker thread, turn. Continue back and forth like this by working 3 fewer stitches than the previous row and increase 1 stitch after each cable/A.4 every 4th row until you have worked 7 repeats of A.4 in height (= 42 rows). The piece measures approx. 72-72-77-77-84-84 cm = 28⅜"-28⅜"-30⅜"-30⅜"-33"-33" from the middle of the circle and down mid back. The last row is worked from the wrong side. Do not cut the strand. Insert a marker thread in the middle cable/A.4 mid back of jacket. Continue back and forth with pattern as before over the bottom of the left front piece as follows: ROW 1 (right side): Work until there are 4 stitches left before the cable/A.4 with the marker thread mid back, turn. ROW 2 (wrong side): Work until there are 3 more stitches left before the marker thread than the previous row (start of round), AT THE SAME TIME increase 1 purled stitch after each cable/A.4, turn. ROW 3 (right side): Work until there are 4 more stitches than last time left before the cable/A.4 with the marker thread mid back, turn. ROW 4 (wrong side): Work until there are 3 more stitches before the marker thread than the previous row, turn. Continue back and forth with pattern and increase after each cable/A.4 every 4th row until you have worked 3 repeats of A.4 in height (= 18 rows). Cut the strand. Start from the right side and after A.4/mid back and work short rows back and forth over the bottom of the right front piece in the same way, but reversed, i.e. each row from the wrong side is turned when there are 4 more stitches before the cable/A.4 with the marker thread mid back than the previous time and on each row from the right side is turned when there are 3 more stitches left than the previous time. EDGE: Place all stitches on the circle back on circular needle and work 2 RIDGES – read description above, around the whole circle. Bind off, but to avoid the bind-off edge being tight you can make 1 yarn over after approx. each 5th stitch - the yarn overs are bind off as normal stitches. SLEEVE: The sleeve is worked in stockinette stitch with the wrong side out (reversed stockinette stitch). Cast on 11-11-12-12-14-14 stitches with circular needle size 8 mm = US 11 and 1 strand Air and 1 strand Brushed Alpaca Silk (= 2 strands). Work stockinette stitch back and forth, AT THE SAME TIME cast on new stitches at the end of each row in each side as follows: Cast on 2 stitches 2 times, 1 stitch 3-4-5-6-6-7 times, 2 stitches 1 time and 4 stitches 1 time = 37-39-42-44-46-48 stitches. THE PIECE IS NOW MEASURED FROM HERE. Continue back and forth with stockinette stitch and 1 edge stitch in GARTER STITCH – read description above, in each side. When the piece measures 4 cm decrease 1 stitch inside the 1 edge stitch in garter stitch in each side – read DECREASE TIP. Decrease like this every 7-6-6-5-5-4 cm = 2¾"-2⅜"-2⅜"-2"-2"-1½" a total of 6-7-7-8-8-9 times = 25-25-28-28-30-30 stitches. When the piece measures 42-42-40-40-39-39 cm = 16½"-16½"-15¾"-15¾"-15¼"-15¼" increase 7-7-4-9-7-7 stitches evenly on row = 32-32-32-37-37-37 stitches. Change to circular needle size 7 mm = US 10,75. Work rib, starting from the side with purl (reversed stockinette stitch/the wrong side out) as follows: 1 edge stitch in garter stitch (knit 2, purl 3) until there is 1 stitch left, 1 edge stitch in garter stitch. When the rib measures 5 cm = 2" bind off with knit over knit and purl over purl. The sleeve measures approx. 55-56-55-56-56-57 cm = 21⅝"-22"-21⅝"-22"-22"-22½" from the sleeve cap down. Work the other sleeve in the same way. ASSEMBLY: Sew sleeves to body inside the bind-off/cast-on edge. Sew sleeve seams. Make sure that the seam is not tight. |
|||||||||||||||||||||||||||||||
Diagram explanations |
|||||||||||||||||||||||||||||||
|
|||||||||||||||||||||||||||||||
|
|||||||||||||||||||||||||||||||
|
|||||||||||||||||||||||||||||||

|
|||||||||||||||||||||||||||||||
|
|||||||||||||||||||||||||||||||
|
|||||||||||||||||||||||||||||||
|
Have you made this or any other of our designs? Tag your pictures in social media with #dropsdesign so we can see them! Do you need help with this pattern?You'll find tutorial videos, a Comments/Questions area and more by visiting the pattern on garnstudio.com. © 1982-2024 DROPS Design A/S. We reserve all rights. This document, including all its sub-sections, has copyrights. Read more about what you can do with our patterns at the bottom of each pattern on our site. |
|||||||||||||||||||||||||||||||


With over 40 years in knitting and crochet design, DROPS Design offers one of the most extensive collections of free patterns on the internet - translated to 17 languages. As of today we count 304 catalogs and 11422 patterns - 11417 of which are translated into English (US/in).
We work hard to bring you the best knitting and crochet have to offer, inspiration and advice as well as great quality yarns at incredible prices! Would you like to use our patterns for other than personal use? You can read what you are allowed to do in the Copyright text at the bottom of all our patterns. Happy crafting!
Comments / Questions (174)
Hi, Kan het zijn dat er een foutje zit in het patroon A2 voor de XXXL? Van naald 23 naar naald 24 komt er slechts 1 steek bij terwijl hetzelfde patroon van naald 17 naar naald 18 er 2 steken bijkomen. Ik zie niet waar ik het fout zie, tenzij het patroon het fout stelt. bedankt om na te kijken Ilse
07.02.2024 - 08:49DROPS Design answered:
Dag Ilse,
Dag Ilse, waarschijnlijk heb je gelijk een moet er 1 omslag minder gemaakt worden in de een na laatste naald van A.2, dus de eerste omslag zou je dan niet moeten maken. Ik zal het doorgeven aan de ontwerpafdeling om na te kijken.
07.02.2024 - 19:06Thank you so much for this pattern I knitted it in red Aran with a couple of changes, I added a flower to the back centre circle, and I used the sleeves stocking stitch out. I would add a picture but not sure where I can do that, but very happy with the end result
26.01.2024 - 15:10What do I do with the 124 stitches I’ve put on a thread please?
20.01.2024 - 19:54DROPS Design answered:
Hi Barbara D., these sts you use again when working the Edge - these stitches on a thread are at the top of the sweater, behind the neck. Happy knitting!
21.01.2024 - 11:11Maat moet je berekenen met een vergelijkbaar kledingstuk in je bezit. Ik heb geen vergelijkbaar kledingstuk. Graag een echte matentabel. S komt overeen met werkelijke borstomtrek van x cm, etc. Dat maakt het voor iedereen duidelijker. Nu kan ik moeilijk een maat kiezen.
06.01.2024 - 11:17DROPS Design answered:
Dag Ingrid,
De maten komen redelijk goed overeen met de confectiematen zoals je kledingstukken in de winkel koopt, dus als je normaal bijvoorbeeld altijd een shirt in maat M koopt, zou je dat nu ook aan kunnen houden.
07.01.2024 - 14:00Hej, jag har sett att det beror på löplängd, så jag behöver inte svar på min tidigare fråga men har en ny. Om jag byter garn till garngrupp E står att jag ska använda stickor 9 i stället för stickor 8 till det garnet. Vilket ska jag använda?
03.01.2024 - 17:58DROPS Design answered:
Hej Helen, det som er vigtigt er at du har 11 masker på 10 cm for at få målene som står i mönsteret :)
09.01.2024 - 14:50Hej, Jag är lite fundersam på garnåtgången. Varför går det åt mindre av alpacka silk än av drops air? Jag kan inte se någonstans att man bara ska använda det ena garnet?
03.01.2024 - 17:15DROPS Design answered:
Hei Helen. Når du strikker med disse 2 trådene bruker man like mange meter, men DROPS Air nøste er på 50 gram og har en løpelengde på 150 meter, mens et DROPS Brushed Alpaca Silk nøste er på 25 gram og har en løpelengde på 140 meter. Altså du trenger 2 nøster / 100 gram DROPS Air for å ha ca like mange løpemeter som 1 nøste / 25 gram DROPS Brushed Alpaca Silk. mvh DROPS Design
08.01.2024 - 14:44Hello, I have two questions about FRONT PIECES AND DOWN THE BODY: - "increase 1 stitch after each cable/A.4 every 4th row": This is every 4th row after the increase in ROW 3 (ROW 3, ROW 7, ROW 11,...) or in each row 4 of the A.4 diagram? - If I increase always after the A.4 diagram in the right side, the jacket will be asymetric. Should the increases be done at different sides of A.4 like in diagram A.3?
21.12.2023 - 21:13DROPS Design answered:
Dear Pablo, increase on every 4th row as explained under ROW 3, this means, in this section: row 3, row 7, row 11, etc. Happy knitting!
22.12.2023 - 08:40Hallo Liebes Team es geht mir um die Maschenprobe. Mache ich diese mit Beiden Garnen zusammen, oder mit jedem Garn einzeln? Bei einem anderen Modell mit 2 Garnen steht "1 Faden von Fabel + 1 Faden Flora (=2 Fäden)" Hier steht "mit 1 Faden von jeder Garnqualität" Ich danke für eine rasche Antwort, denn ich würde schon gerne beginnen. Lg Manu
27.11.2023 - 17:10DROPS Design answered:
Liebe Manu, diese Jacke wird mit 2 Fäden von der Garngruppe C gestrickt: Air und Brushed Alpaca Silk, gerne können Sie mit Fabel und Flora stricken aber am besten mit insgesamt 4 Fäden der Garngruppe A und nicht nur 2, sonnst können Sie die Maschenprobe nicht erreichen. Viel Spaß beim stricken!
28.11.2023 - 08:32Ich habe den unteren Rücken gestrickt und den Markierungsfaden an der hinteren Rückenmitte angebracht. Laut Anleitung soll ich den Faden nicht abschneiden. Aber ich soll doch eine Hinreihe über den unteren Teil des linken Vorderteils stricken, da ist der Faden doch an der falschen Stelle. Soll ich eine Rückreihe bis zum Anfang des linken Vorderteils stricken oder soll ich den Faden abschneiden?
06.11.2023 - 15:50DROPS Design answered:
Liebe Sabine, die letzte Reihe von Vorderteile und unterer Rücken ist eine Rückreihe; das linke Vorderteil beginnt dann mit einer Hinreihe nach unten bis die Markierung in der Mitte vom Rückenteil (also 4 Maschen vor dieser Markierung), und bei den Rückreihen stricken Sie 3 Maschen weniger, so stricken Sie diese verkürzten Reihen weiter, dann wird der Faden abgeschnitten und das rechte Vorderteil genauso gestrickt. Viel Spaß beim stricken!
07.11.2023 - 08:00Det står att omtaget skall vara 4,5 cm Är det hela omtaget el bara på en sida??? Om det bara är på en sida så blir hela omtaget 9 cm
10.10.2023 - 20:54DROPS Design answered:
Hej Susanna, jeg forstår ikke hvad det er som skal være 4,5 cm. Hvor er du i opskriften og hvilken størrelse strikker du?
17.10.2023 - 13:26