
Popular categories
Looking for a yarn?


|
||||
Sea Air |
||||
 |
 |
|||
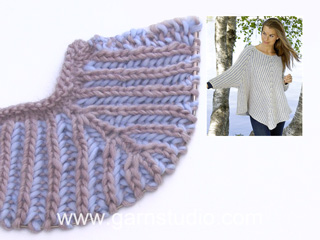
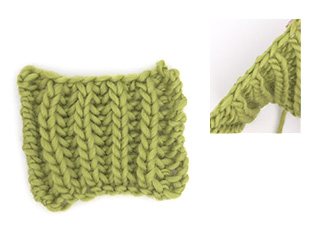
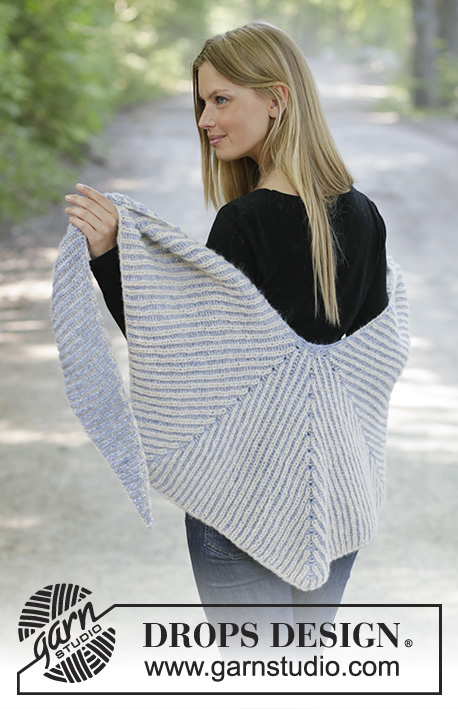
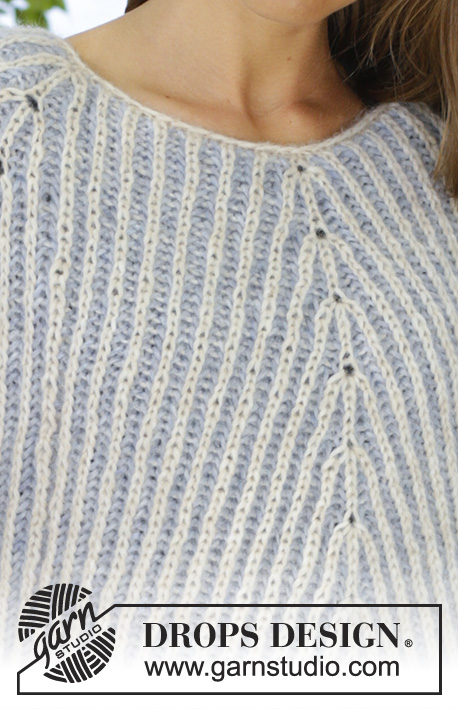
Knitted poncho sweater with raglan in DROPS Air. The piece is worked top down with English rib in two colors. Sizes S - XXXL.
DROPS 194-13 |
||||
|
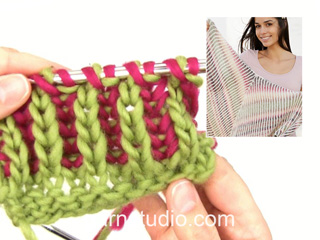
------------------------------------------------------- EXPLANATIONS FOR THE PATTERN: ------------------------------------------------------- ENGLISH RIB IN TWO COLORS (in the round): ROUND 1: Worked with color wheat. Work * 1 yarn over, slip 1 stitch as if to purl, knit 1*, work from *-*. ROUND 2: Worked with color fog. * Purl the yarn over and the slipped stitch together, 1 yarn over, slip 1 stitch as if to purl *, work from *-* (be careful; the last yarn over does not look like a yarn over, but the wheat strand is at the front of the piece, lay the strand over so that it becomes a yarn over) - read KNITTING TIP. ROUND 3: Worked with color wheat. Work * 1 yarn over, slip 1 stitch as if to purl, knit together the yarn over and the slipped stitch *, work from *-* (be careful; the last yarn over does not look like a yarn over, but the fog strand is at the front of the piece, lay the strand over so that it becomes a yarn over). Repeat rounds 2 and 3. KNITTING TIP: If you are in doubt as to which color to use on the next round, you can always see which color the previous round was worked with by the color of the yarn overs. INCREASE TIP-1 (evenly spaced): To work out how to increase evenly, count the total number of stitches on the needle (e.g. 68 stitches) and divide by the number of increases to be made (e.g. 4) = 17. In this example, increase by making 1 yarn over after each 17th stitch. On the next round knit the yarn overs twisted to avoid holes. INCREASE TIP-2: All increases are made on 1 round with wheat. Increase 4 stitches as follows: Work 5 stitches in the stitch and the yarn over as follows: * Knit the yarn over and stitch together, but wait with slipping the stitch and yarn over off the needle, make 1 yarn over the right needle *, work from *-* a total of 2 times and knit together the stitch and yarn over 1 more time = 5 stitches (= 4 stitches increased). On the next round work the increased stitches into the English rib. NOTE: work each increased stitch individually (do not work yarn over and stitch together). DECREASE TIP (for sleeves): All decreases are made on 1 round of wheat. Decrease as follows: Work until there are 3 stitches left before the marker thread (without the yarn overs, the yarn overs between the stitches are also slipped), slip the next 3 stitches to right needle as if to knit together: Slip 1 knit stitch + 1 purl stitch + 1 knit stitch (= stitch with marker) = 3 stitches without the yarn overs. Then knit together: 1 purl stitch and 1 knit stitch (= 2 stitches). Now pass the 3 slipped stitches over the stitches that was knitted together (= 4 stitches decreased – not counting the yarn overs). ------------------------------------------------------- START THE PIECE HERE: ------------------------------------------------------- PONCHO SWEATER - SHORT OVERVIEW OF THE PIECE: The piece is worked in the round with circular needle, top down. First work the yoke, where you increase stitches for sleeves and body. Then divide the piece; the body is continued in the round with circular needle and the sleeves are worked in the round with short circular needle/double pointed needles. YOKE: The round starts in the transition between 1 sleeve and the back piece. Cast on 68-72-76-80-84-88 stitches with circular needle size 6 mm / US 10 and wheat. Knit 1 round. Knit 1 round and increase 4-0-4-0-4-0 stitches evenly on round – read INCREASE TIP-1. Knit 1 round. Change to circular needle size 7 mm / US 10.75. Then work ENGLISH RIB IN 2 COLORS (in the round) – read description above. Insert 6 markers in the piece as follows (all the markers are inserted in a knitted stitch of wheat): Back piece: Work 13-13-15-15-17-17 stitches, work 1 stitch and insert marker 1 in this stitch (= mid back), work 13-13-15-15-17-17 stitches. Right sleeve: Work 1 stitch and insert marker 2 in this stitch, work 7 stitches, work 1 stitch and insert marker 3 in this stitch. Front piece: Work 13-13-15-15-17-17 stitches, work 1 stitch and insert marker 4 in this stitch (= mid front), work 13-13-15-15-17-17 stitches. Left sleeve: Work 1 stitch and insert marker 5 in this stitch, work 7 stitches, work 1 stitch and insert marker 6 in this stitch. Work 1 round with fog (= 2nd round of English rib). On the next round (= 3rd round of English rib) increase 4 stitches in each stitch with a marker (= knitted stitch of wheat) – read INCREASE TIP-2 above. REMEMBER THE GAUGE! Repeat this increase every 6th round of wheat (i.e. every 12th round) to finished length. When the piece measures 31-33-34-36-38-40 cm / 12⅛"-13"-13⅜"-14⅛"-14⅞"-15 ¾" from the cast-on edge (you have now increased approx. 8-9-9-10-10-11 times) there are approx. 91-99-103-111-115-123 stitches on the front/back pieces (i.e. the stitches between markers 3 and 5 = front piece and the stitches between markers 6 and 2 = back piece) and approx. 41-45-45-49-49-53 stitches on each sleeve (including the stitches with the markers) = a total of 264-288-296-320-328-352 stitches. Cut the strand and displace the start of the round to the stitch with marker 2 (stitch with marker 2 = first stitch on next round). Now divide the piece for body and sleeves as follows: Right sleeve: Place the stitches between markers 2 and 3 (including the stitches with these markers) on a thread for sleeve (= approx. 41-45-45-49-49-53 stitches) and cast on 7 stitches under the sleeve. Front piece: Work English rib as before as far as the stitch marker 5 (= approx. 91-99-103-111-115-123 stitches). Left sleeve: Place the stitches between markers 5 and 6 (including the stitches with these markers) on a thread for sleeve (= approx. 41-45-45-49-49-53 stitches and cast on 7 stitches under the sleeve. Back piece: Work English rib as before to end of round (= approx. 91-99-103-111-115-123 stitches). BODY: = approx. 196-212-220-236-244-260 stitches. Continue in the round with English rib and increase 4 stitches in the stitches with marker 1 and marker 4 (= mid front/back) every 6th round with wheat as before (i.e. every 12th round). In other words, increase 8 stitches each 6th round with wheat. Continue like this until the piece measures 24-24-25-25-25-25 cm / 9⅜"-9⅜"-9 ¾"-9 ¾"-9 ¾"-9 ¾" from where the body was divided from the sleeves = approx. 244-260-268-284-292-308 stitches (after 6 increases on the body). Adjust so that the next round is a round with wheat. Bind off with knit over knit and purl over purl; the yarn overs are bind off as normal stitches with knit. This is to avoid the bind-off edge being tight. SLEEVE: Place the stitches from the thread on the one side of the piece on short circular needle size 7 mm / US 10.75 (= approx. 41-45-45-49-49-53 stitches) and knit up 1 stitch in each of the 7 stitches cast on under the sleeve = approx. 48-52-52-56-56-60 stitches. Insert 1 marker in the knitted stitch mid under sleeve. Continue in the round with English rib. Change to double pointed needles when necessary. When the sleeve measures 2 cm / ¾" from where it was divided from the body, decrease 4 stitches in the stitch with the marker (= knitted stitch) – read DECREASE TIP. Decrease like this every 4½-3½-4½-3-3½-2½ cm a total of 5-6-5-6-5-6 times = 28-28-32-32-36-36 stitches. Continue in the round with English rib until the sleeve measures 25-24-23-21-19-18 cm / 9 ¾"-9⅜"-9"-8 ¼"-7⅜"-7" from where it was divided from the body; adjust so that the next round will be worked with wheat. Change to double pointed needles size 6 mm / US 10. Knit 1 round with wheat, the yarn overs are knitted together with the purled stitches. Then bind off with knit; make sure the bind-off edge is not tight. You can bind off with a size larger needle if this is a problem. Work the other sleeve in the same way. |
||||
Diagram explanations |
||||
|
||||

|
||||
|
Have you made this or any other of our designs? Tag your pictures in social media with #dropsdesign so we can see them! Do you need help with this pattern?You'll find tutorial videos, a Comments/Questions area and more by visiting the pattern on garnstudio.com. © 1982-2024 DROPS Design A/S. We reserve all rights. This document, including all its sub-sections, has copyrights. Read more about what you can do with our patterns at the bottom of each pattern on our site. |
||||


With over 40 years in knitting and crochet design, DROPS Design offers one of the most extensive collections of free patterns on the internet - translated to 17 languages. As of today we count 304 catalogs and 11422 patterns - 11417 of which are translated into English (US/in).
We work hard to bring you the best knitting and crochet have to offer, inspiration and advice as well as great quality yarns at incredible prices! Would you like to use our patterns for other than personal use? You can read what you are allowed to do in the Copyright text at the bottom of all our patterns. Happy crafting!
Comments / Questions (24)
Hei! Blir kastene i 1 omgang av Patent i 2 farger sett på som økninger i neste runder og skal de strikkes normalt da? Hvis de er økninger så har man altfor mange masker når man skal sette de 6 markene for å dele arbeidet. Veldig usikker på om jeg forstår riktig...
09.09.2018 - 05:53DROPS Design answered:
Hei Kinga. På omgang 2 strikkes kastene sammen med den masken som ble tatt løst av, de er derfor ikke økninger. Her er en video av hvordan å strikke patent med 2 farger. God fornøyelse.
10.09.2018 - 11:32Daneel wrote:
Lovely pattern
30.08.2018 - 16:19Hei. Når jeg har økt 4 m i en maske, blir det 5 m totalt. Når jeg fortsetter på pinnen sier mønsteret at jeg skal lage 1 kast, 1 m løs av, og 2 sammen. På neste omgang får jeg da 1 m for mye når jeg skal strikke disse m inn i patenten. Hva gjør jeg feil?
22.08.2018 - 16:04DROPS Design answered:
Hej Anne, se her hvordan du gør: öka i patent God fornøjelse!
27.08.2018 - 15:57Hej! Jag får inte till att sticka in de 4 ökade maskorna i patentmönstret...vill få lite klarhet i detta om någon kan...
20.08.2018 - 08:11DROPS Design answered:
Hej Bodil, se vår video hur du gör: öka i patent Lycka till :)
27.08.2018 - 15:55Sarah Bishop wrote:
I am really struggling with the tension. On round 3 of Fisherman’s Rib, the stitches are really tight when you knit the slipped stitch with the stitch together. Also the increase is very very tight making 5 stitches. On the next round it doesn’t seem to work making the 5 new stitches part of the Fisherman s Rib. Do you have photos or a video to show how this works?
17.08.2018 - 00:53DROPS Design answered:
Dear Mrs Bishop, try to not tighten too much the yarn when increasing - on next row continue fisherman's rib over these 5 sts, slip 1 st as if to P with a YO as before and P the next st (instead of P tog the st with YO). Happy knitting!
17.08.2018 - 11:01Liebes Team, Ich habe die Übersetzung der neuen Kollektion täglich verfolgt. Es gab ein Tuch in der gleichen Farb-, Wollauswahl und Muster wie dieser Pullover. Das habe ich aber bis jetzt auch noch nicht gefunden, wie einige andere auch. Werden diese später übersetzt?
16.08.2018 - 10:32DROPS Design answered:
Liebe Birgit, alle Modellen der neuen Kollektion werden nach und nach in den nächsten Wochen/Monaten hochgeladen. Bleiben Sie daran!
16.08.2018 - 12:02Hei, igjen! Nå fikk jeg det til! Lykke🌸 Hilsen Linda
14.08.2018 - 07:13Hei! Jeg får ikke til å strikke økningene inn i patentmønstret. Jeg øker med fire masker, men klarer ikke å få det til å passe inn i eksisterende mønster. Kan dere hjelpe meg? Hilsen Linda
14.08.2018 - 07:07Ich würde den Pullover gern einfarbig stricken, ist dabei irgendetwas zu beachten? Benötige ich dann für Gr. XL 500 g Drops Air oder weniger?
06.08.2018 - 12:09DROPS Design answered:
Liebe Gisela, da dieser Pullover mit 2 Farben gestrickt wurde, können wir leider nicht die Garnmenge mit nur einer Farbe geben, es kann sein. Viel Spaß beim stricken!
06.08.2018 - 16:24Den würde ich mir gleich stricken...tolles Teil !!!!!
27.07.2018 - 16:53