
Popular categories
Looking for a yarn?


|
||||||||||||||||||||||||||||
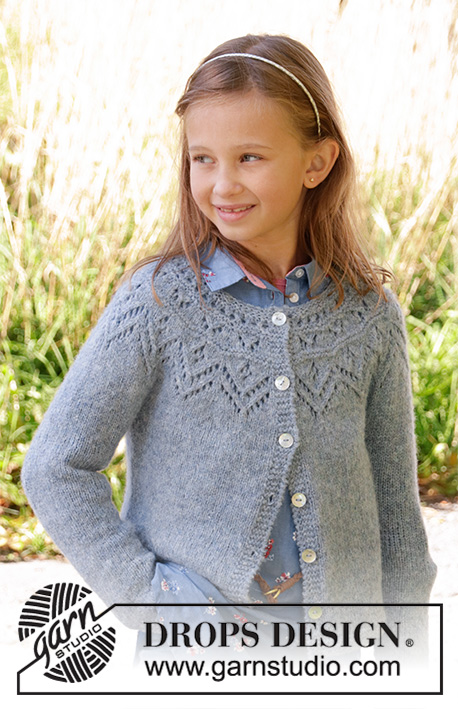
Agnes Cardi |
||||||||||||||||||||||||||||
 |
 |
|||||||||||||||||||||||||||
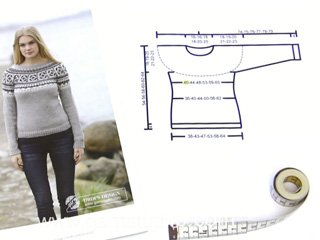
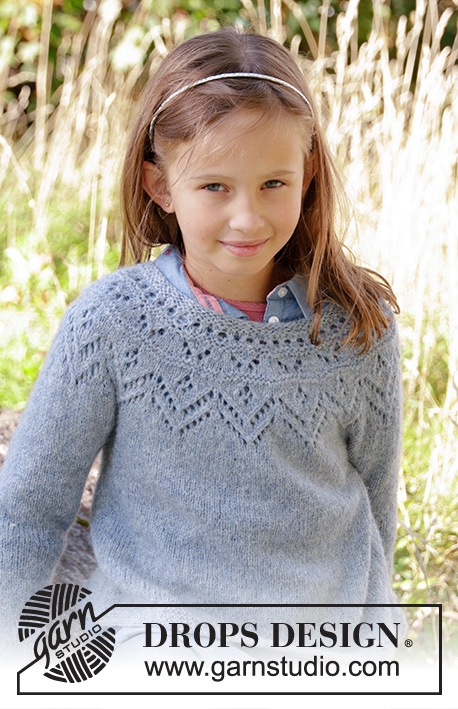
Knitted vest with round yoke in DROPS Sky. The piece is worked top down with lace pattern. Sizes S - XXXL.
DROPS 197-14 |
||||||||||||||||||||||||||||
|
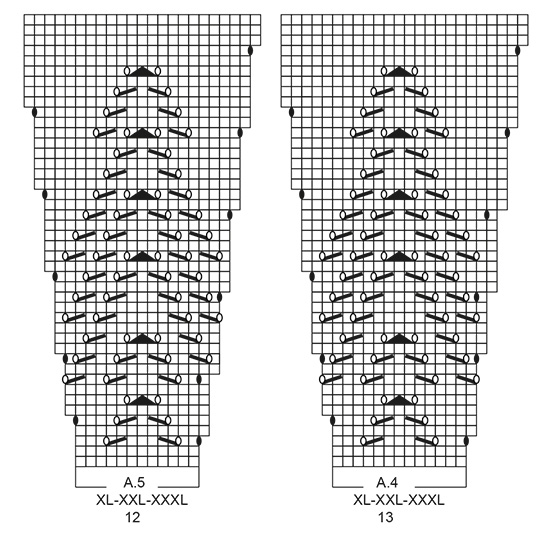
------------------------------------------------------- EXPLANATIONS FOR THE PATTERN: ------------------------------------------------------- RIDGE/GARTER STITCH (worked back and forth): 1 ridge = Knit 2 rows. RIDGE/GARTER STITCH (worked in the round): 1 ridge = 2 rounds. Knit 1 round and purl 1 round. PATTERN: See diagrams A.1 to A.5. Choose diagram for your size. The diagrams show all the rows in the pattern seen from the right side. ELEVATION (for back of neck): The elevation is worked in garter stitch. Insert 1 marker thread after 63-66-69-72-75-78 stitches (= approx. mid back). Start from the right side and knit as far as 7-8-8-9-9-10 stitches past the marker thread, turn, tighten the strand and knit 14-16-16-18-18-20 stitches back. Turn, tighten the strand and knit 21-24-24-27-27-30 stitches, turn, tighten the strand and knit 28-32-32-36-36-40 stitches back. Turn, tighten the strand and knit 35-40-40-45-45-50 stitches, turn, tighten the strand and knit 42-48-48-54-54-60 stitches back. Turn, tighten the strand and knit 49-56-56-63-63-70 stitches back, turn, tighten the strand and knit to end of row. INCREASE TIP-1 (evenly spaced): To work out how to increase evenly, count the total number of stitches on the needle (e.g. 102 stitches) minus the bands (= a total of 10 stitches = 92 stitches) and divide these stitches by the number of increases to be made (e.g. 25) = 3.68. In this example, increase by making 1 yarn over after approx. each 4th stitch. On the next row, work the yarn overs twisted to avoid holes. INCREASE TIP-2 (for sides of body): All increases are made from the right side. Work until there are 2 stitches left before the marker thread, 1 yarn over, knit 4 stitches (the marker thread sits in the middle of these stitches) 1 yarn over. On the next row work the yarn overs twisted to avoid holes. Then work the new stitches in stockinette stitch. BUTTONHOLES: Work buttonholes on the right band (when the garment is worn). Work from the right side when there are 3 stitches left on the row as follows: Make 1 yarn over, knit the next 2 stitches together and knit the last stitch. On the next row, knit the yarn over to leave a hole. The first buttonhole is worked when the piece measures approx. 1½-2 cm. The second buttonhole is worked when the piece measures 7 cm / 2¾". Then work the next 4-4-5-5-6-6 buttonholes with 8½-8½-7½-7½-7-7 cm between each one. ------------------------------------------------------- START THE PIECE HERE: ------------------------------------------------------- VEST - SHORT OVERVIEW OF THE PIECE: The piece is worked back and forth, top down with circular needle as far as the armholes. Then the body and sleeves are finished separately. The body is continued back and forth. The sleeves are worked in the round with double pointed needles. YOKE: Cast on 102-106-110-118-122-128 stitches (including 5 band stitches in each side of the piece) with circular needle size 3.5 mm / US 4 and Sky. Work 2 RIDGES – read description above. Knit 1 round from the right side and increase 25-27-29-27-29-29 stitches evenly on row – read INCREASE TIP-1 = 127-133-139-145-151-157 stitches. Knit 1 row from the wrong side. Change to circular needle size 4 mm / US 6. For a better fit, you can now work an elevation in the back of the neck so that the yoke is slightly higher at the back. This elevation can be left out; the neck will then be the same front and back – read ELEVATION. Work BUTTONHOLE on right band – read description above. Then work pattern as follows from the right side: Work 5 band stitches in garter stitch, A.1 (= 8 stitches), A.2 (= 6 stitches) over the next 102-108-114-120-126-132 stitches (= 17-18-19-20-21-22 times in width), A.3 (= 7 stitches) and finish with 5 band stitches in garter stitch. On each row with a star (= increase-row) increase as follows: REMEMBER THE GAUGE! INCREASE 1: Increase 24-24-24-24-30-30 stitches evenly on row = 151-157-163-169-181-187 stitches. A.2 is then repeated 21-22-23-24-26-27 times in width. INCREASE 2: Increase 18-18-24-24-24-30 stitches evenly on row = 169-175-187-193-205-217 stitches. A.2 is then repeated 24-25-27-28-30-32 times in width. INCREASE 3: Increase 12-18-18-24-24-24 stitches evenly on row = 181-193-205-217-229-241 stitches. A.2 is then repeated 26-28-30-32-34-36 times in width. When A.1 to A.3 have been worked 1 time in height, the piece measures approx. 8 cm / 3⅛" from the cast-on edge. Then work as follows from the right side: Work 5 band stitches in garter stitch, 1 stitch stockinette stitch, A.4 (= 13 stitches), work A.5 (= 12 stitches) over the next 156-168-180-192-204-216 stitches (= 13-14-15-16-17-18 times in width), 1 stitch stockinette stitch and finish with 5 band stitches in garter stitch. When A.4 and A.5 have been worked 1 time in height there are 307-343-365-404-427-450 stitches on the needle. The piece measures approx. 21-22-22-24-24-24 cm / 8 ¼"-8⅝"-8⅝"-9⅜"-9⅜"-9⅜". Continue back and forth in stockinette stitch until the piece measures 21-23-24-26-28-29 cm / 8 ¼"-9"-9⅜"-10 ¼"-11"-11⅜". Now divide the piece for body and sleeves as follows: Work 5 band stitches in garter stitch, stockinette stitch over the next 42-47-50-57-62-66 stitches, place the next 64-72-78-82-84-88 stitches on a thread for sleeve edge and cast on 8-8-10-10-12-12 stitches under the sleeve, work stockinette stitch over the next 85-95-99-116-125-132 stitches, place the next 64-72-78-82-84-88 stitches on a thread for sleeve edge and cast on 8-8-10-10-12-12 stitches under the sleeve, work 42-47-50-57-62-66 stitches stockinette stitch and finish with 5 band stitches in garter stitch = 195-215-229-260-283-298 stitches. BODY: Insert 1 marker thread in the middle of the 8-8-10-10-12-12 stitches under each sleeve. Work stockinette stitch with 5 band stitches in garter stitch in each side. When the piece measures 2 cm / ¾" from where the body was divided from the sleeves, increase 1 stitch on each side of both marker threads – read INCREASE TIP-2. Increase like this every 3½-4½-4-6-5-3½ cm a total of 6-5-6-4-5-7 times = 219-235-253-276-303-326 stitches. Continue with stockinette stitch until the piece measures 30-30-31-31-31-32 cm / 11 ¾"-11 ¾"-12⅛"-12⅛"-12⅛"-12 ½" from where the body was divided from the sleeves. Change to circular needle size 3.5 mm / US 4 and work garter stitch until the piece measures 32-32-33-33-33-34 cm / 12 ½"-12 ½"-13"-13"-13"-13⅜" from where the body was divided from the sleeves. Bind off with knit. The piece measures approx. 56-58-60-62-64-66 cm / 22"-22¾"-23⅝"-24⅜"-25¼"-26" from the shoulder down. SLEEVE EDGE: Place the 64-72-78-82-84-88 stitches from the thread on the one side of the piece on double pointed needles size 3.5 mm / US 4 and knit up 1 stitch in each of the 8-8-10-10-12-12 stitches under the sleeve = 72-80-88-92-96-100 stitches. Work 3 RIDGES in the round – read description above. Then bind off with knit. The sleeve edge measures approx. 2 cm / ¾". Work the other sleeve edge in the same way. ASSEMBLY: Sew the buttons onto the left band. |
||||||||||||||||||||||||||||
Diagram explanations |
||||||||||||||||||||||||||||
|
||||||||||||||||||||||||||||

|
||||||||||||||||||||||||||||

|
||||||||||||||||||||||||||||
|
||||||||||||||||||||||||||||

|
||||||||||||||||||||||||||||
|
Have you made this or any other of our designs? Tag your pictures in social media with #dropsdesign so we can see them! Do you need help with this pattern?You'll find tutorial videos, a Comments/Questions area and more by visiting the pattern on garnstudio.com. © 1982-2024 DROPS Design A/S. We reserve all rights. This document, including all its sub-sections, has copyrights. Read more about what you can do with our patterns at the bottom of each pattern on our site. |
||||||||||||||||||||||||||||


With over 40 years in knitting and crochet design, DROPS Design offers one of the most extensive collections of free patterns on the internet - translated to 17 languages. As of today we count 304 catalogs and 11422 patterns - 11417 of which are translated into English (US/in).
We work hard to bring you the best knitting and crochet have to offer, inspiration and advice as well as great quality yarns at incredible prices! Would you like to use our patterns for other than personal use? You can read what you are allowed to do in the Copyright text at the bottom of all our patterns. Happy crafting!
Comments / Questions (14)
After A4 and A5 have been completed do I measure from mid front or from the shoulder to separate the body for sleeves?
09.06.2023 - 14:26DROPS Design answered:
Dear Mrs Carvalho, measure from cast on edge towards mid front/front band stitches. Happy knitting!
12.06.2023 - 08:07Guten Tag, ich stricke Grösse L und habe nach der 1. Zunahme 163 M auf der Nadel. Wenn ich A.2 weiter stricke habe ich zuviele Maschen übrig. Wie geht es beim Diagramm genau weiter?
13.05.2023 - 07:55DROPS Design answered:
Liebe Ew, so stricken Sie die 163 Maschen: 5 Blenden-Maschen krausrechts, A.1 (= 8 Maschen), A.2 (= 6 Maschen) insgesamt 23 Mal, A.3 (7 Maschen) und 5 Blenden-Maschen krausrechts. Viel Spaß beim stricken!
15.05.2023 - 08:00Jeg kan kun finde denne opskrift med korte ærmer i damestørrelse. Har tidligere strikket børnestørrelse med korte ærmer og er blevet bedt om at strikke den igen i en større børnestørrelse, men kan kun finde opskriften til børn med lande ærmer i drops
23.10.2022 - 13:48DROPS Design answered:
Hej Stina, vi har den kun med lange ærmer til børn: DROPS Children 34-9 men da den er strikket oppefra og ned, så stopper du bare når du ikke vil have ærmerne længere :)
25.10.2022 - 13:42Je pense qu'il y a une erreur au 1er rang de A4 et A5 dans le dernier A5 ne faudrait-il pas faire l'augmentation après le motif dans les 3 mailles jersey de manière à avoir la symétrie des 2 côtés 5 mailles au début et à la fin car si on suit la grille on se retrouve avec 5 mailles au début du rang et 4 mailles à la fin ?
29.05.2022 - 19:24DROPS Design answered:
Bonjour Mme Aquilina, les diagrammes sont justes ainsi, les augmentations faites alternativement au début/à la fin du diagramme permettent d'ajuster le nombre de mailles pour que le motif ajouré soit centré - vous tricotez 1 x A.4, répétez A.5 et terminez par 1 m jersey (entre les mailles de bordure des devants). Bon tricot!
30.05.2022 - 08:24Hvor kan jeg læse brystmål mm så jeg kan afgøre om jeg skal strikke en størrelse M eller L?
15.07.2021 - 20:55DROPS Design answered:
Hej Edith. Du finner alla mål i cm längst ner på opskriften på måleskitsen. Mvh DROPS Design
16.07.2021 - 09:47Jag undrar om det finns ett fel i förhöjningen. Om jag följer beskrivningen hamnar jag efter alla 7 vändningar tillbaka till varvets början och inte till varvets slut. Det måste fattas något i beskrivningen eller annars är det en vändning för mycket i beskrivningen.
08.05.2021 - 21:34Anleitung 197-4. Nach 3. Zunahme 181 Maschen, habe ich jetzt auch auf der Nadel. Dann geht's weiter mitA4/A5, da sind es aber nur 156M + je 5 Blendenmaschen +je 1 Kraus rechts. Stricke ich die Reihe,so wie angegeben, bleiben Maschen übrig......oder lese ich es falsch? Habe die Reihe schon 3×aufgetrennt. Danke schonmal im Vorraus.
18.05.2019 - 14:48DROPS Design answered:
Liebe Strickliesel, so stricken Sie die 181 Maschen: 5 Blenden-Maschen, 1 Masche glatt rechts, A.4 (= 13 Maschen), A.5 (= 12 Maschen) x 13 Mal (= über die nächsten 156 Maschen), 1 Masche glatt rechts und enden mit 5 Blenden-Maschen = 5 + 1 + 13 + 12x13 + 1 + 5= 181 Maschen. Diagram lesen Sie von unten nach oben (hier lesen Sie mehr über Diagramme). Viel Spaß beim stricken!
20.05.2019 - 10:16Morag wrote:
The Norwegian comment on July 12 translates as Named after my lovely daughter. Is this the designer? It is turning out to be a lovely design too.
25.09.2018 - 19:03Morag wrote:
Thank you
25.09.2018 - 18:50Morag wrote:
I am making size large. After the words “remember the knitting tension”I should have 163 stitches (153+10) I am then to work a pattern of 6 stitches. 153 does not divide evenly into 6. What am I to do with the extra stitches?
22.09.2018 - 06:22DROPS Design answered:
Dear Morag, after you have increased 24 sts you will now repeat A.2 a total of 4 more times like this: K5, A.1, repeat A.2 over the next 138 sts, A.3, K5 = 5+8+138+7+5= 163 sts. On next increase, you will increase 24 sts again = you will repeat A.2 a total of 4 more times and so on. Happy knitting!
24.09.2018 - 08:07