DROPS Cloud
DROPS Cloud
72% alpaka, 21% polyamid, 7% vlna
Výroba ukončena
najít náhradu

Passing Storm

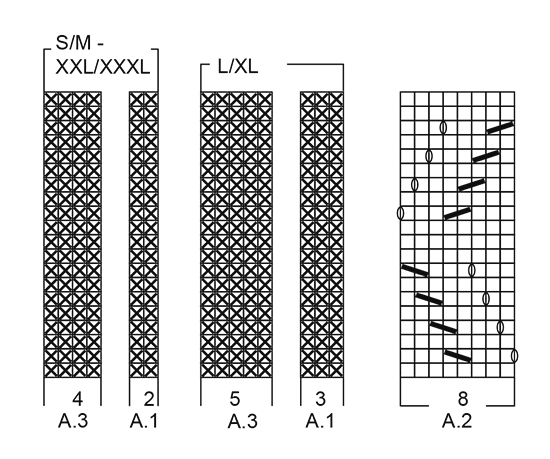
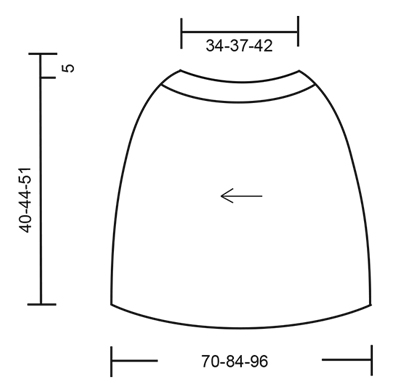
DROPS pončo a čelenka s ažurovým vzorem pletené kolmo, napříč z příze ”Cloud”. Velikost: S - XXXL.

DROPS 173-34
DROPS design: model č. co-047
Skupina přízí: E nebo C + C
----------------------------------------------------------
PONČO:
Velikost: S/M - L/XL - XXL/ XXXL

Materiál: DROPS CLOUD firmy Garnstudio
200-250-300 g, barva č. 04, šedá

DROPS KRUHOVÁ JEHLICE (80 cm) č. 8 – nebo velikosti potřebné k upletení zkušebního vzorku o rozměrech 11 ok x 15 řad ažurovým vzorem = 10 x 10 cm.
----------------------------------------------------------
ČELENKA:
Velikost: S/M - M/L - L/XL
Obvod hlavy: 54/56 - 56/58 - 58/60 cm

Materiál: DROPS CLOUD firmy Garnstudio
50 g pro všechny velikosti, barva č. 04, šedá

DROPS JEHLICE č. 8 – nebo velikosti potřebné k upletení zkušebního vzorku o rozměrech 11 ok x 15 řad ažurovým vzorem = 10 x 10 cm.

-------------------------------------------------------

Náhradní příze – Podívejte se, jak změnit přízi
Skupina přízí A až F – Neměňte návod, změňte přízi
Spotřeba příze při použití náhradní příze – Využijte náš převodník

-------------------------------------------------------

DROPS Cloud
DROPS Cloud
72% alpaka, 21% polyamid, 7% vlna
Výroba ukončena
najít náhradu

DROPS Super Sale

SAVE 30% on 6 cotton favourites!
Platí do 12.04.2024

Návod

VROUBKOVÝ VZOR:
Pleteme stále hladce, lícové i rubové řady. 1 vroubek = 2 řady hladce.

VZOR:
Viz schémata A.1 až A.3 – zvolte si schéma pro požadovanou velikost. Zobrazeny jsou všechny řady vzoru nahlížené z lícové strany.

ZKRÁCENÉ ŘADY:
1. řada začíná u dolního okraje.
1.-2. ŘADA: dopleteme k 1. značce, práci otočíme a upleteme zpáteční řadu.
3.-4. ŘADA: upleteme 2 řady nad všemi oky.
5.-6. ŘADA: dopleteme ke 2. značce, práci otočíme a upleteme zpáteční řadu.
7.-8. ŘADA: upleteme 2 řady nad všemi oky.
9.-10. ŘADA: dopleteme ke 3. značce, práci otočíme a upleteme zpáteční řadu.
11.-12. ŘADA: upleteme 2 řady nad všemi oky.
13.-14. ŘADA: dopleteme ke 3. značce, práci otočíme a upleteme zpáteční řadu.
15.-16. ŘADA: upleteme 2 řady nad všemi oky.
VELIKOST L/XL- XXL/XXXL (17.-18. ŘADA): dopleteme ke 2. značce, práci otočíme a upleteme zpáteční řadu.
1. až 16.-18.-18. řadu stále opakujeme.
----------------------------------------------------------

PONČO:
Pleteme v řadách na kruhové jehlici – pohodlně se na ni vejdou všechna oka. Pleteme kolmo, napříč a nakonec sešijeme.

Na kruhovou jehlici č.8 VOLNĚ nahodíme přízí Cloud 44-48-56 ok a upleteme 1 řadu hladce. V následující řadě rozmístíme do pleteniny 3 značky, takto - začínáme od dolního okraje (oka nepleteme): 1. značku vložíme za 16.-18.-28. oko, 2. značku vložíme za dalších 12-13-12 ok, 3. značku za následujících 10-11-10 ok, za poslední značkou zbývá 6 ok.
Následující rubovou řadu pleteme takto: 2 oka vroubkovým vzorem – viz výše, vzor A.1 (zvolte si schéma pro požadovanou velikost), *vzor A.2, vzor A.3*, *-* opakujeme ještě 1-1-2x, vzor A.2, vzor A.1, končíme 6 oky vroubkovým vzorem (= průkrčník); SOUČASNĚ po upletení 2 řad vzoru začneme plést ZKRÁCENÉ ŘADY – viz výše. V tomto rozvržení pokračujeme.
Pleteme do výše asi 68-74-84 cm podél průkrčníku a asi 139-167-191 cm podél dolního okraje – končíme dopletením jedné celé nebo poloviny sekvence vzoru A.2 (na výšku) (= 10. nebo poslední řadou vzoru), pak všechna oka VOLNĚ uzavřeme.

DOKONČENÍ:
Pončo sešijeme, šev vedeme vnější částí krajových ok, aby byl plochý a nenápadný.
----------------------------------------------------------

ČELENKA:
Na jehlice č.8 nahodíme přízí Cloud 12 ok a upleteme 1 vroubek vroubkovým vzorem – viz výše. Pleteme takto – začínáme lícovou řadou: 2 oka vroubkovým vzorem, vzor A.2 (začínáme 2. řadou ze schématu), končíme 2 oky vroubkovým vzorem. Takto pokračujeme až do výše 48-50-52 cm. Pak upleteme 1 vroubek a poté všechna oka uzavřeme.

DOKONČENÍ:
Čelenku sešijeme, šev vedeme vnější částí krajových ok, aby byl plochý a nenápadný.

Schéma

symbols = lícový žerzej (líc hladce, rub obrace)
symbols = rubový žerzej (líc obrace, rub hladce)
symbols = 2 oka spleteme hladce
symbols = 1 oko sejmeme hladce, 1 upleteme hladce a sejmuté přes ně přetáhneme
symbols = 1x nahodíme mezi 2 oky
symbols = směr pletení
diagram
diagram
Chcete se na něco zeptat? Projděte si seznam nejčastějších otázek (FAQ).

Knitting tension is what determines the final measurements of your work, and is usually measured per 10 x 10 cm. It is provided like so: number of stitches in width x number of rows in height - eg: 19 stitches x 26 rows = 10 x 10 cm.

The knitting tension is very individual; some people knit/crochet loosely while others work tightly. You adjust the knitting tension with the needle size, which is why the suggested needle size is only meant as a guide! You need to adjust this (up or down) to ensure that YOUR knitting tension matches the knitting tension provided in the pattern. If you work with a different knitting tension than provided you will have a different yarn consumption, and your work will have different measurements than what the pattern suggests.

The knitting tension also determines which yarns can replace each other. As long as you achieve the same knitting tension you can replace one yarn with another.

See DROPS lesson: How to measure your tension/gauge

See DROPS video: How to make a gauge tension swatch

The required amount of yarn is provided in grams, eg: 450 g. To calculate how many balls you’ll need you first need to know how many grams are in 1 ball (25g, 50g or 100g). This information is available if you click on the individual yarn quality on our pages. Divide the amount required with the amount of each ball. For example, if each ball is 50g (the most common amount), the calculation will be as follows: 450 / 50 = 9 balls.

The important thing when changing from one yarn to another is that the knitting/crochet tension remains the same. This is so that the measurements of the finished piece will be the same as on the sketch provided. It is easier to achieve the same knitting tension using yarns from the same yarn group. It is also possible to work with multiple strands of a thinner yarn to achieve the knitting tension of a thicker one. Please try our yarn converter. We recommend you to always work a test swatch.

Please NOTE: when changing yarn the garment might have a different look and feel to the garment in the photo, due to individual properties and qualities of each yarn.

See DROPS lesson: Can I use a different yarn than the one mentioned in the pattern?

All our yarns are categorised into yarn groups (from A to F) according to thickness and knitting tension – group A contains the thinnest yarns and group F the thickest. This makes it easier for you to find alternative yarns to our patterns, should you wish to switch yarn. All yarns within the same group have a similar knitting tension and can easily replace each other. However, different yarn qualities have different structures and properties which will give the finished work a unique look and feel.

Click here for an overview of the yarns in each yarn group

At the top of all our patterns you’ll find a link to our yarn calculator, which is a helpful tool should you wish to use a different yarn than suggested. By filling in the yarn quality you wish to replace, the amount (in your size) and number of strands, the calculator will present good alternative yarns with the same knitting tension. Additionally it will tell you how much you’ll require in the new qualities and whether you’ll need to work with multiple strands. Most skeins are 50g (some are 25g or 100g).

If the pattern is worked with multiple colours, every colour will have to be calculated separately. Similarly, if the pattern is worked with several strands of different yarns (for example 1 strand Alpaca and 1 strand Kid-Silk) you will have to find alternatives for each, individually.

Click here to see our yarn calculator

Since different yarns have different qualities and textures we have chosen to keep the original yarn in our patterns. However, you can easily find options among our available qualities by using our yarn calculator, or simply pick a yarn from the same yarn group.

It is possible that some retailers still have discontinued yarns in stock, or that someone has a few skeins at home that they would like to find patterns for.

The yarn calculator will provide both alternative yarn as well as required amount in the new quality.

If you think it's hard to decide what size to make, it can be a good idea to measure a garment you own already and like the size of. Then you can pick the size by comparing those measures with the ones available in the pattern's size chart.

You'll find the size chart at the bottom of the pattern.

See DROPS lesson: How to read size chart

The needle size provided in the pattern serves only as a guide, the important thing is to follow the knitting tension. And since knitting tension is very individual, you will have to adjust the needle size to ensure that YOUR tension is the same as in the pattern – maybe you’ll have to adjust 1, or even 2 needle sizes, up or down to achieve the correct tension. For this, we recommend that you work test swatches.

Should you work with a different knitting tension than the one provided, the measurements of the finished garment might deviate from the measurement sketch.

See DROPS lesson: How to measure your tension/gauge

See DROPS video: How to make a tension/gauge swatch

Working a garment top-down provides more flexibility and room for personal adjustment. For example it is easier to try the garment on while working, as well as making adjustments to length of yoke and shoulder caps.

The instructions are carefully explaining every step, in the correct order. Diagrams are adjusted to the knitting direction and are worked as usual.

The diagram depicts all rows/rounds, and every stitch seen from the right side. It is read from bottom to top, from right to left. 1 square = 1 stitch.

When working back and forth, every other row is worked from the right side and every other row is worked from the wrong side. When working from the wrong side, the diagram will have to be worked reversed: from left to right, knit stitches are purled, purl stitches are knit etc.

When working in the round every round is worked from the right side and the diagram are worked from right to left on all rounds.

See DROPS lesson: How to read knitting diagrams

The diagram depicts all rows/rounds, and every stitch seen from the right side. It is worked from bottom to top, from right to left.

When working back and forth every other row is worked from the right side: from right to left and every other row is worked from the wrong side: from left to right.

When working in the round, every row in the diagram are worked from the right side, from right to left.

When working a circular diagram you start in the middle and work your way outwards, counter clockwise, row by row.

The rows usually start with a given number of chain stitches (equivalent to the height of the following stitch), this will either be depicted in the diagram or explained in the pattern.

See DROPS lesson: How to read crochet diagrams

Instructions for working several diagrams after each other on the same row/round, will often be written like so: “work A.1, A.2, A.3 a total of 0-0-2-3-4 times". This means you work A.1 once, then A.2 is worked once, and A.3 is repeated (in width) the number of times provided for your size – in this case like so: S = 0 times, M = 0 times, L=2 times, XL= 3 times and XXL = 4 times.

The diagrams are worked as usual: begin with the first row in A.1, then work the first row in A.2 etc.

See DROPS lesson: How to read knitting diagrams

See DROPS lesson: How to read crochet diagrams

The total width of the garment (from wrist-to-wrist) will be larger in the larger sizes, despite the actual sleeves being shorter. The larger sizes have longer sleeve caps and wider shoulders, so there will be a good fit in all sizes.

The measurement sketch/schematic drawing provides information regarding the full length of the garment. If it’s a jumper or a jacket the length is measured from the highest point on the shoulder closest to the neckline, and straight down to the bottom of the garment. It is NOT measured from the tip of shoulder. Similarly, the length of yoke is measured from the highest point on the shoulder and down to where yoke is split into body and sleeves.

On a jacket measures are never taken along bands, unless specifically stated. Always measure inside band stitches when measuring the length.

See DROPS lesson: How to read a schematic drawing

Diagrams are often repeated on the round or in height. 1 repeat is the diagram the way it appears in the pattern. If it says to work 5 repeats of A.1 in the round, then you work A.1 a total of 5 times after/next to each other in the round. If it says to work 2 repeats of A.1 vertically/in height you work the entire diagram once, then begin again at the start and work the entire diagram one more time.

Chain stitches are slightly narrower than other stitches and to avoid working the cast-on edge too tight, we simply chain more stitches to begin with. The stitch count will be adjusted on the following row to fit the pattern and measurement sketch.

The rib edge is more elastic and will contract slightly compared to, for example, stocking stitch. By increasing before the rib edge, you avoid a visible difference in width between the rib edge and the rest of the body.

It’s very easy to cast off too tightly, and by making yarn overs while casting off (and simultaneously casting these off) you avoid a too tight cast off edge.

See DROPS video: How to bind off with yarn overs (yo)

To achieve an even increase (or decrease) you can increase on, for example: every 3rd and 4th row alternately, like so: work 2 rows and increase on the 3rd row, work 3 rows and increase on the 4th. Repeat this until the increase is complete.

See DROPS lesson: Increase or decrease 1 st on every 3rd and 4th row alternately

Should you prefer to work in the round instead of back and forth, you may of course adjust the pattern. You’ll need to add steeks mid-front (usually 5 stitches), and follow the instructions. When you would normally turn and work from the wrong side, simply work across the steek and continue in the round. At the end you’ll cut the piece open, pick up stitches to work bands, and cover the cut edges.

See DROPS video: How to knit steeks and cut open

Should you prefer to work back and forth instead of in the round, you may of course adjust the pattern so you work the pieces separately and then assemble them at the end. Divide the stitches for the body in 2, add 1 edge stitch in each side (for sewing) and work the front and back pieces separately.

See DROPS lesson: Can I adapt a pattern for circular needles into straight needles?

Pattern repeats can vary slightly in the different sizes, in order to get the correct proportions. If you’re not working the exact same size as the garment in the photo, yours might deviate slightly. This has been carefully developed and adjusted so that the complete impression of the garment is the same in all sizes.

Make sure to follow instructions and diagrams for your size!

If you have found a pattern you like which is available in women’s size it’s not very difficult to convert it to men’s size. The biggest difference will be the length of sleeves and body. Start working on the women size that you think would fit across the chest. The additional length will be worked right before you cast off for the armhole/sleeve cap. If the pattern is worked top-down you can add the length right after the armhole or before the first decrease on sleeve.

Regarding additional yarn amount, this will depend on how much length you add, but it is better with a skein too many than too few.

All yarns will have excess fibres (from production) that might come off as lint or shedding. Brushed yarns (ie hairier yarns) have more of these loose, excess fibres, causing more shedding.

Shedding also depends on what is worn under or over the garment, and whether this pulls at the yarn fibres. It’s therefore not possible to guarantee that there will be no shedding

Below are some tips on how to get the best result when working with hairier yarns:

1. When the garment is finished (before you wash it) shake it vigorously so the looser hairs come off. NOTE: do NOT use a lint roller, brush or any method that pulls at the yarn.

2. Place the garment in a plastic bag and put it in your freezer - the temperature will cause the fibres to become less attached to each other, and excess fibres will come off easier.

3. Leave in the freezer for a few hours before taking it out and shaking it again.

4. Wash the garment according to the instructions on the yarn label.

Pilling is a natural process that happens to even the most exclusive of fibers. It's a natural sign of wear and tear that is hard to avoid, and that is most visible in high friction areas of your garment like a sweater's arms and cuffs.

You can make your garment look as new by removing the pilling, using a fabric comb or a pill/lint remover.

Pořád se nemůžete dobrat odpovědi, kterou hledáte? Pak posuňte stránku dolů a napište nám svůj dotaz, naši specialisté se vám pokusí poradit. Obvykle to zvládneme během 5 až 10 pracovních dnů..
Mezitím si můžete pročíst otázky a odpovědi, které k tomuto modelu položili ostatní, nebo navštívit skupinu DROPS Workshop na Facebooku, kde vám může poradit některá spřízněná duše!

Mohly by se vám líbit...

Přidejte komentář k návodu DROPS 173-34

Rádi bychom věděli, co si o tomto modelu myslíte!

Pokud se chcete na něco zeptat, dbejte prosím na to, abyste ve formuláři níže vybrali správnou kategorii - díky tomu se dříve dozvíte, co potřebujete vědět. Povinná pole jsou označena *.

Komentáře / Otázky (26)

country flag Mette Laszkiewicz wrote:

Do you count the 6 neck garter stiches and the 2 bottom garder stiches into your work? That is do you ever do short rows over the garter stiches ?

11.09.2022 - 19:23

DROPS Design answered:

Dear Mrs Laszkiewicz, when inserting the markers you should count all stitches - then when working short rows, just turn where you inserted the markers. Happy knitting!

12.09.2022 - 11:18

country flag Vella wrote:

Bonjour Je ne suis pas sûre de bien avoir placé les 3 marqueurs. Sur les 2 premiers rgs raccourcis on doit tricoter jusqu'au 1er marqueur soit 16 mailles pour moi y compris les 6 mailles d'encolure. Est-ce exact ? À quoi correspondent les 6 mailles après le 3ème marqueur ? Merci

14.01.2022 - 16:11

DROPS Design answered:

Bonjour Mme Vella, les marqueurs sont placés sur l'endroit, autrement dit le 1er marqueur se trouve à 16 mailles (1ère taille) du bas, et le dernier à 6 mailles du haut (côté encolure). Vous allez tricoter davantage de rangs sur le bas du poncho: en commençant sur l'endroit, tricotez 16 mailles, tournez et tricotez ces 16 mailles sur l'envers, tricotez 2 rangs sur toutes les mailles, etc.. Bon tricot!

14.01.2022 - 16:53

country flag Vella Chantal wrote:

Bonjour, Quand faut-il commencer le 1er rang raccourci ? au 3ème rang du travail depuis le montage ou au 4è rang ? Si je comprends bien : Le 1er rang du travail = les 44 m endroit. Le 2ème rang du travail = 1er rang des diagrammes sur les 44 m Et après on commence les rangs raccourcis (le 3ème rg) mais alors pourquoi faut il 2 rangs de diagrammes ? Merci

10.01.2022 - 18:39

DROPS Design answered:

Bonjour Mme Vellal, tricotez d'abord 2 rangs des différents points (point mousse, A.1, A.2, A.3) sur toutes les mailles et commencez les rangs raccourcis au rang suivant. La séquence des rangs raccourcis se termine toujours par 2 rangs sur toutes les mailles, on va donc commencer ainsi. Bon tricot!

11.01.2022 - 08:47

country flag Vella Chantal wrote:

Bonjour, Quand on fait les rangs raccourcis et qu'on retourne le travail pour le rang suivant, faut-il emballer la maille voisine avant de tourner ou faut-il ne rien faire pour laisser le jour se faire au moment où on tourne le travail ? Merci

11.11.2021 - 20:17

DROPS Design answered:

Bonjour Mme Vella, c'est une question de choix, la maille n'a pas été emballée dans le modèle où c'est la technique de base des rangs raccourcis qui a été utilisée, mais libre à vous de les emballer si vous préférez. Bon tricot!

12.11.2021 - 07:40

country flag Monica wrote:

Buongiorno... Volevo gentilmente chiedere, quando dice " allo stesso tempo, dopo aver lavorato due ferri del motivo, lavorare a ferri accorciati". I due ferri del motivo sono i primi ferri del diagramma A.2? Grazie mille e buona giornata. 😊

24.03.2021 - 05:46

DROPS Design answered:

Buonasera Monica, per "due ferri" si fa riferimento alla lavorazione dei motivi come stabilito. Buon lavoro!

24.03.2021 - 20:05

country flag Rosa wrote:

Me encanta este patrón, y llevo varios dias intentando hacerlo y no soy capaz. No entiendo el patrón. Por favor como y de q manera se introducen las vueltas cortas? A que se refieten con la expresion "orilla inferior" cuando se comienzan las vueltas cortas , cual es el primer marcador? Perdonen q me extienda tanto , pero es q de verdad q esta complicado. Gracias por su atención.

13.03.2020 - 21:18

DROPS Design answered:

Hola Rosa. Bajo el patrón tienes la selección de vídeos que te puede ayudar a elaborar la prenda. También puedes consultar con las tiendas de Drops más cercanas por teléfono o email para obtener ayuda especializada.

15.03.2020 - 22:01

country flag Martine wrote:

Le schéma A2 à 20 rang, mais l'on doit faire de 1 à 18... Comment peut on faire le dessin au complet si on arrête à 18 ( je fais le L/XL)

01.03.2020 - 17:25

DROPS Design answered:

Bonjour Martine, les rangs raccourcis se tricotent indépendamment des rangs du point ajouré, autrement dit, tricotez A.2 sur les mailles concernées, au rang suivant concerné par le motif, chaque A.2 ne va pas "augmenter" en même temps, notez bien à quel rang vous en êtes de chaque A.2 pour bien répéter les motifs en hauteur sur le bon nombre de rangs. Bon tricot!

02.03.2020 - 10:47

country flag Daguenet wrote:

Bonjour , je suis les instructions du modèle , j'ai placé mes marqueurs , je fais mes 2 rangs qui corresponds au point mousse et je commence le diagramme qui se termine par les 6 m points mousse après il y a écrit EN MËME TEMPS quand 2 rangs points fantaisie ont été tricotés ,tricoter rangs raccourcis . cela veut dire de faire le diagramme et le rangs raccourcis en même temps ? comment on peux suivre 2 choses ? et quelle est se points fantaisie ? merci

04.01.2020 - 16:09

DROPS Design answered:

Bonjour Mme Daguenet, les rangs raccourcis vont vous permettre d'obtenir la forme souhaitée = plus de rangs en bas (bas du poncho) et moins de rangs (côté encolure); les différents diagrammes vont être ainsi tricotés à un rythme différent en fonction des rangs raccourcis, mais ils doivent être tricotés comme dans le diagramme (chaque A.2 doit faire 20 rangs en hauteur, même si vous ne le tricotez pas à chaque fois). Bon tricot!

06.01.2020 - 07:54

country flag Christine wrote:

Aber dann ist man doch in den verkürzten Reihen weiter als beim Rest, oder habe ich da einen Denkfehler?

02.01.2019 - 15:46

DROPS Design answered:

Liebe Christine, also ja, Sie stricken Diagram weiter über die gestrickten Maschen aber die unterschiedlichen A.2 in der Breite werden einen unterschiedlichen Anzahl in der Höhe wiederholt (= mehr am Anfang der Reihen, wo man mehr Reihen strickt = untereren Rand als oben am Hals). Viel Spaß beim stricken!

02.01.2019 - 15:52

country flag Christine wrote:

Hallo, wie verhält es sich mit dem Muster in den verkürzten Reihen? Das verschiebt sich,oder ? Bitte um Hilfe !!!

02.01.2019 - 14:29

DROPS Design answered:

Liebe Christine, das Muster stricken Sie über die gestrickten Maschen in den verkürzten Reihen, dh einfach das Muster weiterstricken, wenn Sie die Maschen in A.2 stricken. Viel Spaß beim stricken!

02.01.2019 - 15:05