DROPS Muskat
DROPS Muskat
100% Cotton
from 2.80 $ /50g
Get the yarn to make this pattern from 25.20$.

The yarn cost is calculated from the pattern’s smallest size and the yarn’s cheapest product type. Looking for an even better price? You might find it on the DROPS Deals!

DROPS SS24

Summer Leaves Top

Knitted DROPS top with leaf pattern, ridges, round yoke and short sleeves, worked top down in ”Muskat”. Size S-XXXL.

DROPS 170-27
DROPS design: Pattern no r-692
Yarn group B
----------------------------------------------------------
Size: S - M - L - XL - XXL - XXXL
Materials: DROPS MUSKAT from Garnstudio
450-500-550-600-650-700 g color no 18, white

DROPS CIRCULAR NEEDLE (60 or 80 cm / 24'' or 32'') SIZE 4 mm/US 6 - or size needed to get 21 sts x 28 rows in stockinette st = 4'' x 4'' (10 x 10 cm).
DROPS DOUBLE POINTED NEEDLES AND CIRCULAR NEEDLE (60 or 80 cm / 24'' or 32'') SIZE 3.5 mm/US 4 - or size needed to get 21 sts x 35 rows pattern (A.2) = 4'' x 4'' (10 x 10 cm).
DROPS MOTHER-OF-PEARL BUTTON ARCHED (white), NO 522: 4 pieces for all sizes

-------------------------------------------------------

Alternative Yarn – See how to change yarns here
Yarn Groups A to F – Use the same pattern and change the yarn here
Yarn usage using an alternative yarn – Use our yarn converter here

-------------------------------------------------------

DROPS Muskat
DROPS Muskat
100% Cotton
from 2.80 $ /50g
Get the yarn to make this pattern from 25.20$.

The yarn cost is calculated from the pattern’s smallest size and the yarn’s cheapest product type. Looking for an even better price? You might find it on the DROPS Deals!

Pattern instructions

NOTE: This pattern is written in American English. All measurements in charts are in cm. For conversion from inches to cm - click here. There are different terms for crocheting in American and British English. If this pattern includes crochet, click for "crochet terms" here. For this pattern in British English, please click here.
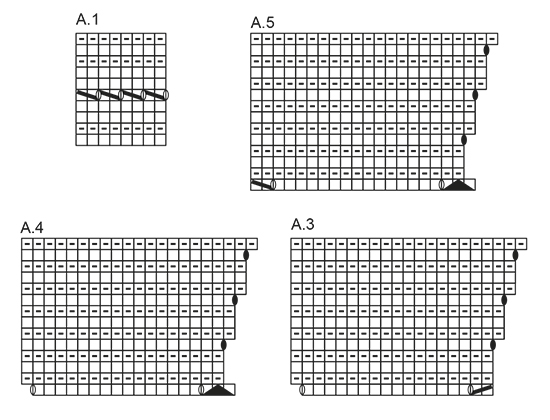
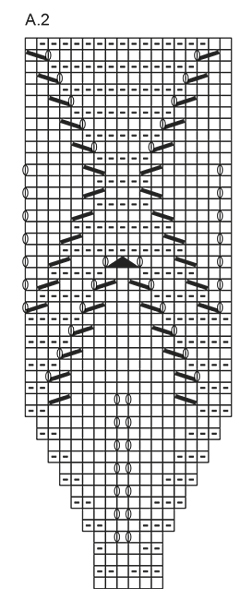
GARTER ST (back and forth):
K all rows. 1 ridge = K2 rows.

GARTER ST (worked in the round):
1 ridge = 2 rounds. * K 1 round and P 1 round *, repeat from *-*.

PATTERN:
See diagrams A.1 to A.5. The diagrams show all rows in pattern seen from RS.

BUTTONHOLES:
Dec for buttonhole on band at the end of row seen from RS. Work until 4 sts remain. Make 1 YO, K the next 2 sts tog, work the last 2 sts on row.
Dec for buttonholes when piece measures (from cast-on edge and along the band):
SIZE S: 2, 8, 14 and 19 cm
SIZE M: 2, 8, 14 and 20 cm
SIZE L: 2, 8, 14 and 21 cm
SIZE XL: 2, 8, 15 and 22 cm
SIZE XXL: 2, 9, 16 and 23 cm
SIZE XXXL: 2, 9, 16 and 24 cm
----------------------------------------------------------

TOP:
The piece is worked top down. Yoke is worked back and forth on circular needle with button band on the back, then work the body in the round.

YOKE:
Cast on 89-95-101-113-125-131 sts on circular needle size 3.5 mm / US 4 with Muskat. Bind off for BUTTON HOLES mid back - see explanation above. Work 5 sts in GARTER ST - see explanation above (= band), A.1 until 5 sts remain, 5 sts in garter st (= band). When A.1 has been worked 1 time vertically, continue as follows: 5 sts in garter st, A.2 (= 6 sts), repeat A.2 13-14-15-17-19-20 times in total, finish with first st in A.2 (so that pattern is the same in each side), finish with 5 sts in garter st. REMEMBER THE KNITTING GAUGE When A.2 has been worked 1 time vertically, there are 245-263-281-317-353-371 sts on needle. Then work as follows: 5 sts in garter st, A.3 (= 17 sts), repeat A.4 11-12-13-15-17-18 times, A.5 (= 20 sts) and 5 sts in garter st. When A.3-A.5 have been worked 1 time vertically, there are 284-305-326-368-410-431 sts on needle. Continue in garter st until piece measures 20-21-22-23-24-25 cm / 8''-8¼''-8¾''-9''-9½''-9¾'', on last row from WS adjust no of sts to 283-307-331-365-397-429. Continue to work as follows (from RS): bind off the first 5 sts, work the first 39-43-47-53-59-65 sts (= half back piece), slip the next 61-65-69-74-78-82 sts on a stitch holder (= sleeve), cast on 6 new sts under sleeve, work the next 78-86-94-106-118-130 sts (= front piece), slip the next 61-65-69-74-78-82 sts on a stitch holder (= sleeve), cast on 6 new sts under sleeve, work the remaining 39-43-47-53-59-65 sts (= half back piece).

BODY:
There are now 168-184-200-224-248-272 sts for body. Insert a marker in each side of body where new sts were cast on under sleeve (= 3 new sts on each side of marker). NOW MEASURE THE PIECE FROM HERE. Switch to circular needle size 4 mm / US 6. Continue with stockinette st, now work in the round. When piece measures 4 cm / 1½'', inc 1 st on each side of each marker (= 4 sts inc). Repeat inc every 5-5-5-6-6-6 cm / 2''-2''-2''-2 3/8''-2 3/8''-2 3/8'' 5 more times = 192-208-224-248-272-296 sts. Continue in stockinette st until piece measures 34-35-36-37-38-39 cm / 13 3/8''-13¾''-14¼''-14½''-15''-15¼'', switch to circular needle size 3.5 mm / US 4 and work 3 ridges in GARTER ST - see explanation above. Bind off. The whole piece measures approx. 58-60-62-64-66-68 cm / 22¾''-23 5/8''-24 3/8''-25¼''-26''-26¾''.

SLEEVE EDGE:
Slip sts from stitch holder back on double pointed needles size 3.5 mm / US 4 (= 61-65-69-74-78-82 sts). Pick up 1 st in each of the 6 sts cast on under sleeve = 67-71-75-80-84-88 sts. Work 2 ridges in GARTER ST – see explanation above, then bind off.

ASSEMBLY:
Place band without buttonholes under band with buttonholes and fasten the bottom band. Sew on buttons.

This pattern has been corrected.

Updated online: 19.10.2016
Correction: text diagram-symbol no 6 & 7

Diagram

All measurements in charts are in cm.

symbols = K from RS, P from WS
symbols = P from RS, K from WS
symbols = slip 1 st as if to K, K 1, psso
symbols = K 2 tog
symbols = slip 1 st as if to K, K 2 tog, psso
symbols = 1 YO between 2 sts, on next row K/P YO (= to make holes)
symbols = 1 YO between 2 sts, on next row K/P YO twisted (= to avoid holes)
diagram
diagram
diagram

Each of our patterns has specific tutorial videos to help you.

Do you have a question? See a list of frequently asked questions (FAQ)

Knitting tension is what determines the final measurements of your work, and is usually measured per 10 x 10 cm. It is provided like so: number of stitches in width x number of rows in height - eg: 19 stitches x 26 rows = 10 x 10 cm.

The knitting tension is very individual; some people knit/crochet loosely while others work tightly. You adjust the knitting tension with the needle size, which is why the suggested needle size only serve as a guide! You need to adjust this (up or down) to ensure that YOUR knitting tension matches the knitting tension provided in the pattern. If you work with a different knitting tension than provided you will have a different yarn consumption, and your work will have different measurements than what the pattern suggests.

The knitting tension also determines which yarns can replace each other. As long as you achieve the same knitting tension you can replace one yarn with another.

See DROPS lesson: How to measure your tension/gauge

See DROPS video: How to make a gauge tension swatch

The required amount of yarn is provided in grams, eg: 450 g. To calculate how many balls you’ll need you first need to know how many grams are in 1 ball (25g, 50g or 100g). This information is available if you click on the individual yarn quality on our pages. Divide the amount required with the amount of each ball. For example, if each ball is 50g (the most common amount), the calculation will be as follows: 450 / 50 = 9 balls.

The important thing when changing from one yarn to another is that the knitting/crochet tension remains the same. This is so that the measurements of the finished piece will be the same as on the sketch provided. It is easier to achieve the same knitting tension using yarns from the same yarn group. It is also possible to work with multiple strands of a thinner yarn to achieve the knitting tension of a thicker one. Please try our yarn converter. We recommend you to always work a test swatch.

Please NOTE: when changing yarn the garment might have a different look and feel to the garment in the photo, due to individual properties and qualities of each yarn.

See DROPS lesson: Can I use a different yarn than the one mentioned in the pattern?

All our yarns are categorised into yarn groups (from A to F) according to thickness and knitting tension – group A contains the thinnest yarns and group F the thickest. This makes it easier for you to find alternative yarns to our patterns, should you wish to switch yarn. All yarns within the same group have a similar knitting tension and can easily replace each other. However, different yarn qualities have different structures and properties which will give the finished work a unique look and feel.

Click here for an overview of the yarns in each yarn group

At the top of all our patterns you’ll find a link to our yarn converter, which is a helpful tool should you wish to use a different yarn than suggested. By filling in the yarn quality you wish to replace, the amount (in your size) and number of strands, the converter will present good alternative yarns with the same knitting tension. Additionally it will tell you how much you’ll require in the new qualities and whether you’ll need to work with multiple strands. Most skeins are 50g (some are 25g or 100g).

If the pattern is worked with multiple colours, every colour will have to be converted separately. Similarly, if the pattern is worked with several strands of different yarns (for example 1 strand Alpaca and 1 strand Kid-Silk) you will have to find alternatives for each, individually.

Click here to see our yarn converter

Since different yarns have different qualities and textures we have chosen to keep the original yarn in our patterns. However, you can easily find options among our available qualities by using our yarn converter, or simply pick a yarn from the same yarn group.

It is possible that some retailers still have discontinued yarns in stock, or that someone has a few skeins at home that they would like to find patterns for.

The yarn converter will provide both alternative yarn as well as required amount in the new quality.

If you think it's hard to decide what size to make, it can be a good idea to measure a garment you own already and like the size of. Then you can pick the size by comparing those measures with the ones available in the pattern's size chart.

You'll find the size chart at the bottom of the pattern.

See DROPS lesson: How to read size chart

The needle size provided in the pattern serves only as a guide, the important thing is to follow the knitting tension. And since knitting tension is very individual, you will have to adjust the needle size to ensure that YOUR tension is the same as in the pattern – maybe you’ll have to adjust 1, or even 2 needle sizes, up or down to achieve the correct tension. For this, we recommend that you work test swatches.

Should you work with a different knitting tension than the one provided, the measurements of the finished garment might deviate from the measurement sketch.

See DROPS lesson: How to measure your tension/gauge

See DROPS video: How to make a gauge tension swatch

Working a garment top-down provides more flexibility and room for personal adjustment. For example it is easier to try the garment on while working, as well as making adjustments to length of yoke and shoulder caps.

The instructions are carefully explaining every step, in the correct order. Diagrams are adjusted to the knitting direction and are worked as usual.

The diagram depicts all rows/rounds, and every stitch seen from the right side. It is read from bottom to top, from right to left. 1 square = 1 stitch.

When working back and forth, every other row is worked from the right side and every other row is worked from the wrong side. When working from the wrong side, the diagram will have to be worked reversed: from left to right, knit stitches are purled, purl stitches are knit etc.

When working in the round every round is worked from the right side and the diagram are worked from right to left on all rounds.

See DROPS lesson: How to read knitting diagrams

The diagram depicts all rows/rounds, and every stitch seen from the right side. It is worked from bottom to top, from right to left.

When working back and forth every other row is worked from the right side: from right to left and every other row is worked from the wrong side: from left to right.

When working in the round, every row in the diagram are worked from the right side, from right to left.

When working a circular diagram you start in the middle and work your way outwards, counter clockwise, row by row.

The rows usually start with a given number of chain stitches (equivalent to the height of the following stitch), this will either be depicted in the diagram or explained in the pattern.

See DROPS lesson: How to read crochet diagrams

Instructions for working several diagrams after each other on the same row/round, will often be written like so: “work A.1, A.2, A.3 a total of 0-0-2-3-4 times". This means you work A.1 once, then A.2 is worked once, and A.3 is repeated (in width) the number of times provided for your size – in this case like so: S = 0 times, M = 0 times, L=2 times, XL= 3 times and XXL = 4 times.

The diagrams are worked as usual: begin with the first row in A.1, then work the first row in A.2 etc.

See DROPS lesson: How to read knitting diagrams

See DROPS lesson: How to read crochet diagrams

The total width of the garment (from wrist-to-wrist) will be larger in the larger sizes, despite the actual sleeves being shorter. The larger sizes have longer sleeve caps and wider shoulders, so there will be a good fit in all sizes.

The measurement sketch/schematic drawing provides information regarding the full length of the garment. If it’s a jumper or a jacket the length is measured from the highest point on the shoulder (usually closest to the neckline), and straight down to the bottom of the garment. It is NOT measured from the tip of shoulder. Similarly, the length of yoke is measured from the highest point on the shoulder and down to where yoke is split into body and sleeves.

See DROPS lesson: How to read a schematic drawing

Diagrams are often repeated on the round or in height. 1 repeat is the diagram the way it appears in the pattern. If it says to work 5 repeats of A.1 in the round, then you work A.1 a total of 5 times after/next to each other in the round. If it says to work 2 repeats of A.1 vertically/in height you work the entire diagram once, then begin again at the start and work the entire diagram one more time.

Chain stitches are slightly narrower than other stitches and to avoid working the cast-on edge too tight, we simply chain more stitches to begin with. The stitch count will be adjusted on the following row to fit the pattern and measurement sketch.

The rib edge is more elastic and will contract slightly compared to, for example, stocking stitch. By increasing before the rib edge, you avoid a visible difference in width between the rib edge and the rest of the body.

It’s very easy to cast off too tightly, and by making yarn overs while casting off (and simultaneously casting these off) you avoid a too tight cast off edge.

See DROPS video: How to bind off with yarn overs (yo)

To achieve an even increase (or decrease) you can increase on, for example: every 3rd and 4th row alternately, like so: work 2 rows and increase on the 3rd row, work 3 rows and increase on the 4th. Repeat this until the increase is complete.

See DROPS lesson: Increase or decrease 1 st on every 3rd and 4th row alternately

Should you prefer to work in the round instead of back and forth, you may of course adjust the pattern. You’ll need to add steeks mid-front (usually 5 stitches), and follow the instructions. When you would normally turn and work from the wrong side, simply work across the steek and continue in the round. At the end you’ll cut the piece open, pick up stitches to work bands, and cover the cut edges.

See DROPS video: How to knit steeks and cut open

Should you prefer to work back and forth instead of in the round, you may of course adjust the pattern so you work the pieces separately and then assemble them at the end. Divide the stitches for the body in 2, add 1 edge stitch in each side (for sewing) and work the front and back pieces separately.

See DROPS lesson: Can I adapt a pattern for circular needles into straight needles?

Pattern repeats can vary slightly in the different sizes, in order to get the correct proportions. If you’re not working the exact same size as the garment in the photo, yours might deviate slightly. This has been carefully developed and adjusted so that the complete impression of the garment is the same in all sizes.

Make sure to follow instructions and diagrams for your size!

If you have found a pattern you like which is available in women’s size it’s not very difficult to convert it to men’s size. The biggest difference will be the length of sleeves and body. Start working on the women size that you think would fit across the chest. The additional length will be worked right before you cast off for the armhole/sleeve cap. If the pattern is worked top-down you can add the length right after the armhole or before the first decrease on sleeve.

Regarding additional yarn amount, this will depend on how much length you add, but it is better with a skein too many than too few.

All yarns will have excess fibres (from production) that might come off as lint or shedding. Brushed yarns (ie hairier yarns) have more of these loose, excess fibres, causing more shedding.

Shedding also depends on what is worn under or over the garment, and whether this pulls at the yarn fibres. It’s therefore not possible to guarantee that there will be no shedding

Below are some tips on how to get the best result when working with hairier yarns:

1. When the garment is finished (before you wash it) shake it vigorously so the looser hairs come off. NOTE: do NOT use a lint roller, brush or any method that pulls at the yarn.

2. Place the garment in a plastic bag and put it in your freezer - the temperature will cause the fibres to become less attached to each other, and excess fibres will come off easier.

3. Leave in the freezer for a few hours before taking it out and shaking it again.

4. Wash the garment according to the instructions on the yarn label.

Pilling is a natural process that happens to even the most exclusive of fibers. It's a natural sign of wear and tear that is hard to avoid, and that is most visible in high friction areas of your garment like a sweater's arms and cuffs.

You can make your garment look as new by removing the pilling, using a fabric comb or a pill/lint remover.

Still can't find the answer you need? Then scroll down and leave your question so one of our experts can try to help you. This will be done normally within 5 to 10 working days.
In the meantime, you can read the questions and answers that others have left to this pattern or join the DROPS Workshop on Facebook to get help from fellow knitters/crocheters!

You might also like...

Summer Leaves Top

collectionsakiri, Austria

Summer Leaves Top

Paulien, Netherlands

Post a comment to pattern DROPS 170-27

We would love to hear what you have to say about this pattern!

If you want to leave a question, please make sure you select the correct category in the form below, to speed up the answering process. Required fields are marked *.

Comments / Questions (67)

country flag Connie Bakkemose Jessen wrote:

Tak for svaret 😉 Jeg forstår stadig ikke. Jeg strikker i str. L, men det burde vel ikke ændre så meget. Jeg har strikket rap. 3-4 efter hinanden og skal igang med rap.5 nu! Spørgsmål er så i rap. 5 er der 20 masker til start der kommer så omslag og masker der skal strikkes sammen, så der er 19 masker tilbage, men i rap 3&4 er der til slut 21 masker i hver rap. Skulle jeg ha strikket 3-5 efter hinanden? Eller skal 5 strikkes ovenpå 3&4 ? Mvh Connie

13.07.2021 - 17:41

DROPS Design answered:

Hej Connie, ja det stemmer du strikker rapporterne efter hinanden i bredden (ikke ovenpå hinanden) A3 A4 (11 gange) A5 og så retstrik i hver side :)

14.07.2021 - 10:47

country flag Connie Bakkemose Jessen wrote:

Jeg skriver endnu engang - håber snart på svar til mit spørgsmål! Jeg kan ikke få mønster til at passe, når jeg skal fortsætte fra A4 til A5. I A4 er der til slut i rap. 21 masker, nå man så skal til rap. 5 er masketallet 20, når man trækker indtagning og omslag med, får jeg det til 19 masker! er det rigtigt? Jeg kan ikke komme videre - så håber på snarlig svar. mvh Connie

12.07.2021 - 14:06

DROPS Design answered:

Hej Connie, jo hvis du strikker mindste størrelse har du 245 masker. Du strikker nu næste pind således: 5 masker retstrik, A.3 (=17m), A.4=18 masker x 11=198m, A.5 (=20m) og 5 masker retstrik = ialt 245 masker. God fornøjelse!

13.07.2021 - 13:29

country flag Connie Bakkemose Jessen wrote:

Hej! Jeg har nu efter at gennemlæse spørgsmål på på A3 og A4 fundet ud af at de strikkes efter hinanden - meget svært at finde ud af. Nu er jeg nået til A5 og kan ikke få det til at passe ind med de foregående A3 og A4 Pu ha håber på hurtig svar 😉

06.07.2021 - 16:59

country flag Anne Daugaard wrote:

Skal man skifte til pinde nr 4 efter A1 på bærestykket, eller hvor skal man bruge pind 4???

20.06.2021 - 15:43

DROPS Design answered:

Hei Anne. Bærestykket strikkes med pinne 3,5 mm, mens når RYG & FORSTK skal strikkes byttes det til rundpinne 4,0 mm. Man strikker gjerne hullmønster løsere enn glattstrikk, slik at det blir jevnere/penere ved å bytte når man skal kun strikke glattstrikk. mvh DROPS design

21.06.2021 - 13:13

country flag Graziella wrote:

Buonasera, sono arrivata alla fine degli schemi e sono già a 20 cm circa. Sull’ultimo ferro degli schemi che è a rovescio aggiusto il numero di maglie. Sul ferro successivo divido le maniche dal corpo. Poi passo ai ferri circolari ma a questo punto mi trovo a lavorare il ferro a rovescio... devo fare un ferro a rovescio dopo la divisione delle maniche e poi passare ai circolari? Fino ad ora ho lavorato avanti e indietro con i ferri normali lunghi. Grazie

10.04.2021 - 22:59

DROPS Design answered:

Buongiorno Graziella, quando passa ai ferri circolari deve fare in modo di avere il diritto del lavoro verso l'esterno: da questo punto in poi non ci sarà più un dirittoe un rovescio del lavoro, ma si lavorerà sempre sul diritto del lavoro. Buon lavoro!

11.04.2021 - 11:52

country flag Graziella wrote:

Grazie mille!

06.04.2021 - 08:19

country flag Graziella wrote:

Buonasera, mi trovo in difficoltà con lo schema A1. Sono arrivata al 5 ferro e devo partire, dopo le 5 maglie a legaccio, con un gettato, poi una maglia passata, 1 maglia a dritto e accavallate la maglia non lavorata. Quando arrivo alla fine del ferro mi trovo 6 maglie e non le 5 che devo fare a legaccio. Cosa ho sbagliato? Grazie mille per l’aiuto!

05.04.2021 - 21:30

DROPS Design answered:

Buonasera Graziella, sul 5° ferro può lavorare a diritto la maglia che precede le ultime 5 maglie. Buon lavoro!

05.04.2021 - 23:43

country flag Tina wrote:

Er det korrekt at første pind på diagram A2 er på vrangsiden? Når jeg kommer til pind 17 og skal tage ind - også fra vrangsiden. Synes jeg ikke indtagningen bliver pæn, da det er ret maske indtagning fra vrangsiden. Er jeg startet forkert? Mvh Tina

17.03.2021 - 22:25

DROPS Design answered:

Hej Tina, det er lettere hvis første pind i diagrammet strikkes fra retsiden, for da vil mønsterpindene blive strikket fra retsiden. God fornøjelse!

18.03.2021 - 10:17

country flag Hoarau Paule wrote:

Désolée ,il me faut plus d explications. Sur le n 2 la feuille reste ouverte. Le numéro 3 commence avec 2 m ensemble 1 jeté 15 m end 1 jeté Faut il les répéter sur tout les autres.au 5 rang 1 jete 18 m faut il les répéter sur les autres jusqu’à la fin. Et ainsi jusqu’au diagramme 5 Si je pouvais vous avoir au téléphone pour mieux comprendre Infiniment merci

03.09.2020 - 22:10

DROPS Design answered:

Bonjour Mme Hoarau, effectivement les feuilles ne sont pas terminées dans A.2, mais au premier rang des diagrammes suivantes = A.3 à A.5, vous allez "fermer" chacune des feuilles, la diminution au début de A.3/A.4/A.5 (et à la fin de A.5) doit correspondre à chaque fois à la pointe de chaque feuille, placez bien vos marqueurs pour délimiter chaque diagramme. N'hésitez pas à contacter votre magasin DROPS par téléphone, ils sauront vous aider également; Bon tricot!

04.09.2020 - 08:08

country flag Hoarau Paule wrote:

Bonjour Je Réalisé le modèle 170-27 Nombre de mailles 113. J arrive à la fin du n 1 avec 317 mailles. A la fin du numéro 3. Avec 388 m J excute le premier rang du numéro 4 je me retrouve avec le même nombre de mailles 388 Comment me retrouver à la fin du numéro 5 avec 368 mailles J ai défait le tricot en 3 fois Je ne comprend toujours Pas Je suis prête à tout abandonner.. Venez à mon aide s il vous plaît. Merci

03.09.2020 - 13:59

DROPS Design answered:

Bonjour Mme Hoarau, tricotez-vous bien les diagrammes comme indiqué? Vous devez tricoter les 317 m ainsi: 5 m point mousse, 1 x A.3 (= 17 m), répétez 15 x A.4 (= 18 m), 1 x A.5 (= 20 m) et 5 m point mousse soit:5+17+ 15x18 + 20 +5= 317 m et au dernier rang des diagrammes, vous avez: 21 m dans A.3, 21 m dans chaque A.4 et 23 m dans A.5 soit: 5 m + 21 + 15x21+22+5=368 m. Mettez bien un marqueur entre chaque diagramme pour pouvoir bien vérifier le nombre de mailles à chaque fois. Bon tricot!

03.09.2020 - 15:47