
Popular categories
Looking for a yarn?


|
|||||||||||||||||||
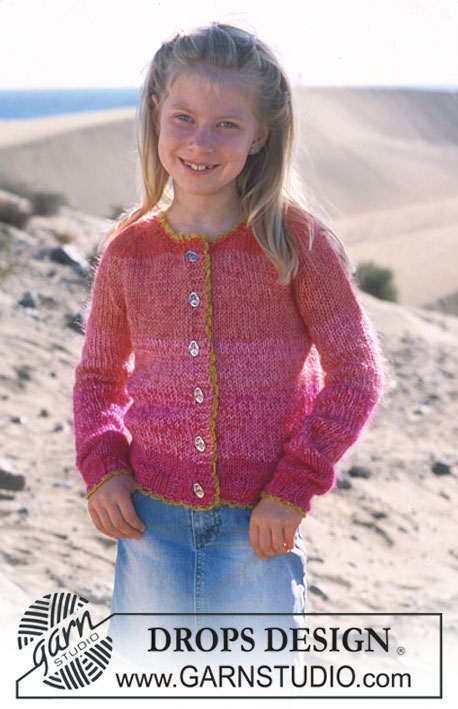
Little Sophie |
|||||||||||||||||||
|
|
|||||||||||||||||||
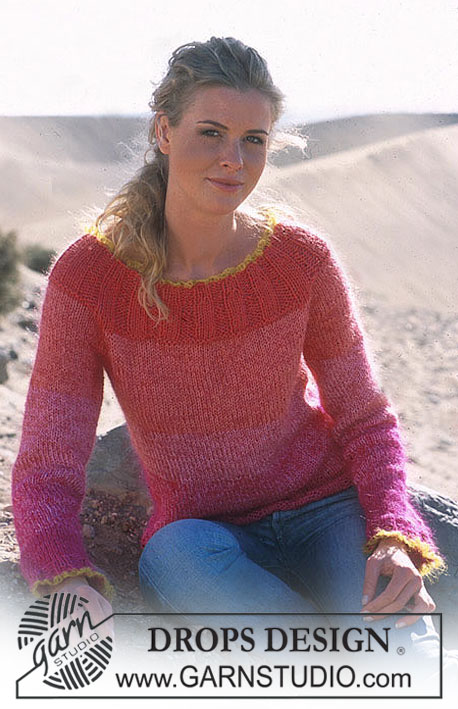
DROPS Girl’s Crocheted Poncho in Paris with blossom in Safran
DROPS 89-6 |
|||||||||||||||||||
|
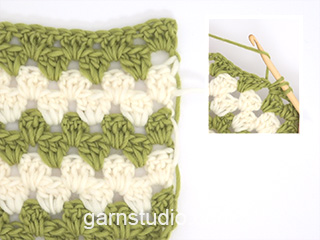
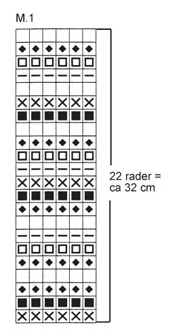
PONCHO: Crochet gauge: 4 dc-groups in width and 7 rows in height = approx. 10 x 10 cm. Stripe Pattern: See chart. 1 row of the chart = 1 crochet row. Crochet info (for points at center front and center back: increased dc-group = 3 dc, ch 1, 3 dc in the same ch-loop. Crochet tips: When changing colors, crochet over the ends of the last color and the new color to fasten them. Poncho: The poncho is crocheted from the neck down. Ch 88-98-108 with hot pink (the chain should measure approx. 54-57-61 cm) and join into a ring with 1 sl st. 1st row: 1 sc in each ch and finish with 1 sl st in 1st sc at start of row = 88-98-108 sc. Follow crochet instructions below in stripes on chart, starting at bottom of chart. 2nd row: The start of the row will be one side (shoulder). Ch 3 (= 1 dc), 1 dc in each of the next 2 sc, ch 1, skip over 2 sc, * 1 dc in each of the next 3 sc, ch 1, skip over 2 sc *, repeat * - * a total of 3-3-4 times (= 4-4-5 dc-groups), 3 dc in the next sc, ch 1 (= center front point), 3 dc in the next sc, ch 1, skip over 2 sc, * 1 dc in each of the next 3 sc, ch 1, skip over 2 sc *, repeat * - * a total of 8-9-10 times, 3 dc in the next sc, ch 1 (= center back point), 3 dc in the next sc, ch 1, skip over 2 sc, * 1 dc in each of the next 3 sc, ch 1, skip over 2 sc *, repeat * - * a total of 4-5-5 times and finish with 1 sl st in ch 3 at start of row = 8-9-10 dc-groups between each point. Then 1 sl st in each of the first 2 dc and the first ch-loop. 3rd row: Ch 3, 2 dc in same ch-loop, ch 1, * 3 dc in the next ch-loop, ch 1 *, repeat * - * a total of 3-3-4 times, crochet an increased dc-group (see instructions above) in ch-loop at center front point, ch 1, * 3 dc in the next ch-loop, ch 1 *, repeat * - * a total of 9-10-11 times, crochet an increased dc-group in ch-loop at center back point, ch 1, * 3 dc in the next ch-loop, ch 1 *, repeat * - * a total of 5-6-6 times and finish with 1 sl st in ch 3 at start of row = 9-10-11 dc-groups between each point. Then 1 sl st in each of the first 2 dc and the first ch-loop. From 4th row to finished measurements: Continue in the same manner as 3rd row – there will be 1 dc-group more between each point after every row. When the piece measures approx. 32-37-44 cm from neck along shoulder (= approx. 22-26-31 rows) – or to desired length – cut yarn and fasten. The piece measures approx. 44-52-62 cm from neck down at center front. BLOSSOM: Materials: SAFRAN Small amount nr 02, pink DROPS 3 mm [US C] crochet hook, or size needed to obtain correct gauge. Crocheted blossom: Ch 4 with Safran and join into a ring with 1 sl st. 1st row: 6 sc in ring, finish with 1 sl st in 1st sc. 2nd row: 1 sc in first sc, * ch 3, 1 sc in the next sc *, repeat * - * a total of 5 times and finish with ch 3 and 1 sl st in first sc at start of row = 6 ch-loops. Ch 1, turn piece and crochet from back side. 3rd row: Crochet as follows in each ch-loop: 1 sc, ch 1, 3 dc, ch 1, 1 sc, finish with 1 sl st in 1st sc at start of row. 4th row: * 1 sc in sc from 2nd row (crochet on back side of petal around sts from previous row, pull yarn tight), ch 4 *, repeat * - * a total of 6 times and finish with 1 sl st in 1st sc at start of row. 5th row: Ch 1, crochet as follows in each ch-loop: 1 sc, ch 1, 5 dc, ch 1, 1 sc, finish with 1 sl st in 1st sc at start of row. 6th row: * 1 sc in sc from 4th row (crochet on back side of the 2 petals around sts from previous row, pull yarn tight), ch 5 *, repeat * - * a total of 6 times and finish with 1 sl st in 1st sc at start of row. 7th row: Ch 1, crochet as follows in each ch-loop: 1 sc, ch 1, 1 dc, 5 tc, 1 dc, ch 1, 1 sc, finish with 1 sl st in 1st sc at start of row. Cut yarn and fasten – sew a small safety pin to back. |
|||||||||||||||||||
Diagram explanations |
|||||||||||||||||||
|
|||||||||||||||||||
|
|||||||||||||||||||
|
Have you made this or any other of our designs? Tag your pictures in social media with #dropsdesign so we can see them! Do you need help with this pattern?You'll find tutorial videos, a Comments/Questions area and more by visiting the pattern on garnstudio.com. © 1982-2024 DROPS Design A/S. We reserve all rights. This document, including all its sub-sections, has copyrights. Read more about what you can do with our patterns at the bottom of each pattern on our site. |
|||||||||||||||||||


With over 40 years in knitting and crochet design, DROPS Design offers one of the most extensive collections of free patterns on the internet - translated to 17 languages. As of today we count 304 catalogs and 11422 patterns - 11417 of which are translated into English (US/in).
We work hard to bring you the best knitting and crochet have to offer, inspiration and advice as well as great quality yarns at incredible prices! Would you like to use our patterns for other than personal use? You can read what you are allowed to do in the Copyright text at the bottom of all our patterns. Happy crafting!
Comments / Questions (63)
Bonsoir merci tout d'abord de votre réponse mais meme pas sautant les maille comme l'indique le rang 2 il me reste des ms je le recommence a chaque fois et a chaque il me reste des mailles
01.12.2017 - 23:24DROPS Design answered:
Bonjour Mme Hardy, le rang 2 se crochète bien sur 98 ms: 3 ml, 2B, 1 ml, sauter 2 B (= 3B /4 ms), puis (3B, 1 ml, sauter 2 B) x 3 (= 9B/15 ms), 3B, 1 ml, 3B, 1 ml, sauter 2 ms (= 6B, 4 ms), (3B, 1 ml, sauter 2B) x 9 (= 27B, 45 ms), 3B, 1 ml, 3B, 1 ml, sauter 2 ms (= 6B, 4 ms), (3B, 1 ml, sauter 2B) x 5 (= 15B / 25 ms). Bon crochet!
04.12.2017 - 09:10Bonjour voila j'ai un problème quand j'arrive au rang 2 il me reste des maille non faite en bride comment cela se fait il je le fait en 98 ml c'est pour une fille de 8_10 ans et je n'arrive pas a lire le diagramme merci de votre réponse
01.12.2017 - 11:37DROPS Design answered:
Bonjour Mme Hardy, N'oubliez pas de bien sauter les ms indiquées quand vous crochetez les groupes de brides de *-* (= 1 B dans chacune des 3 ms suivantes, 1 ml, sautez 2 ms) pour avoir le bon nombre de brides. Bon crochet!
01.12.2017 - 14:16Hello, I could not find a video of DROPS Girl’s Crocheted Poncho in Paris with blossom in Safran. When I clicked on Videos, I did not see it.
25.10.2017 - 20:28DROPS Design answered:
Dear Mrs Shifflett, there is no specific video to this pattern, you will find under tab "Videos" all techniques used in this pattern. Happy crocheting!
26.10.2017 - 10:12Hi. I love your pattern. I would love to make this for adults for Christmas. How many starting chains do I need for adult sizes? I need a Small, a M, and an XL, please.
18.09.2017 - 20:16DROPS Design answered:
Dear Heather, you will find here all our crocheted ponchos in adult size including similar ponchos, ie this one for example. Happy crocheting!
19.09.2017 - 08:46Aan het einde van de 2e en 3e toer staat 'haak dan 1 hv in iedere van de eerste 2 stk en de eerste l-lus' Doe ik dit alleen in de eerste stk- groep? Of ook helemaal rond? Dus een hele toer hv op de stokjes groepen? Voor ik aan de volgende toer begin.
24.08.2017 - 15:16DROPS Design answered:
Hallo Jolanda, De halve vasten haak je alleen in de 2 stk en de eerste l-lus, en niet helemaal rond (helemaal rond zou weer een nieuwe toer betekenen)>
28.08.2017 - 12:31Jeg kan ikke få maskeantallet til at passe, mener kun der skal slås 84 m op (til den lille str) 4 stangmaskegrupper af 5 m x 4 = 80 m + 4 m til udtagning for og bag = 84 m, jeg synes ikke jeg overser noget, og sidder efter første forsøg med 4 m i overskud?
09.08.2017 - 12:24DROPS Design answered:
Hej, du skal have 8 st-grupper (8x5) mellem hver spids og så bruger du 2 i hver spids = 84. God fornøjelse!
18.08.2017 - 10:33I am unable to understand how to increase int Little Sophie poncho pattern by Drops Design, despite watching the video (which has no audio) or by reading the directions to increase (i.e. Do 1 extra dc and 1 extra chain at each end of the doc. Please send clearer directions. Thank you, Nancy
15.07.2017 - 19:13DROPS Design answered:
Dear Mrs Strathdee, you will inc by working 1 inc dc-group in the ch-space (tip mid front and tip mid back), ie work 3 dc, 1 ch, 3 dc in the ch-space at tip mid front and at tip mid back. Happy crocheting!
17.07.2017 - 09:01What do you mean by crochet an increase dc? Like...add another set of three dc?
09.01.2017 - 23:24DROPS Design answered:
Dear Brooke, in the tips you will crochet as you did in the tip on row 1, but now crochet in the dc on previous round (not in the sc), ie: 3 dc in the next dc, ch 1 (= center point), 3 dc in the next dc. Happy crocheting!
10.01.2017 - 09:43Bonjour, Je pense qu'il y a une erreur sur la première couleur de fil indiquée. Le modèle indique que pour la taille 8/10 ans il faut 150 g de la couleur 27 - Kaki. Or, la couleur 27 correspond à la couleur Pêche. Quelle couleur est la bonne ? Merci par avance pour votre aide. Béatrice
05.10.2016 - 17:03DROPS Design answered:
Bonjour Béatrice, les numéros des couleurs étaient corrects, pas leur nom, mais elles ont été renommées comme elles le devaient, merci. Bon crochet!
06.10.2016 - 08:54Ik kom er niet uit met de 4de toer van de bloem , en kan de video niet vinden
01.02.2016 - 17:04DROPS Design answered:
Hoi Franca. Je keert het bloemetje en haakt van de achterkant en maakt eerst 1 v in de v van toer 2. Dan maak je 5 l en 1 v in de volgende v van toer 2. Je krijgt dus 6 "l-ketttingen" op de achterkant van het bloemetje, die je dan bladen in haakt op toer 5. Hetzelfde herhaalt zich in toer 6. Je krijgt een bloem met 3 lagen blaadjes.
11.02.2016 - 15:22